Collecting information using tools like Google Analytics is a critical action for increasing organic traffic, achieving higher conversions, and optimizing your leading digital marketing strategy to establish stronger connections with users on your website.
However, putting it into practice is easier said than done. Google Analytics and other analytics tools certainly assist in the process, but it seems to be more efficient to use tags.
Those tags are the central component of Google Tag Manager, a free tool provided by Google for tag management.
In short, tags are pieces of code embedded in the website, such as JavaScript or HTML, to “extract” or receive specific information from your site.
In this guide, we’ll start by showing how to open a Google Tag Manager account, how to install the tag manager script on WordPress sites (and in general), how to create new tags, and we’ll even explain how to add Google Analytics tracking code and Facebook pixel.
But before that, let’s explain and elaborate on what Google Tag Manager is and how it works…
So what is Google Tag Manager exactly?
Google Tag Manager (or GTM for short) is a tag management system that allows you to create and manage tags through an interface, eliminating the need to write code every time you want to add a tag to your site.
To use this tool, you need to embed the Tag Manager code on all your site pages, a step that eliminates the need to manually create tags and hopefully makes your marketing process more efficient and precise.
Here are some examples of what you can do with Google Tag Manager:
- Customizations and changes to the information sent to Google Analytics.
- For instance, tracking events on your site, like the number of downloads of a specific PDF.
- Sending information to Analytics about the number of clicks on outbound links or specific buttons on your site.
- Setting up more complex tracking, such as tracking products in your E-Commerce store.
Despite this, you’ll still want to test and try Google Tag Manager for yourself before deciding if it’s the right tool for you.
Maybe your site already has another tag management system? Maybe you don’t feel the need for such a level of management since adding new tags is not a common task on your site or within your organization?
Advantages of using Google Tag Manager
Firstly, it allows site developers or the IT department to focus on broader tasks by removing the need to add each tag or relevant code on their own.
Secondly, since GTM (in most cases) adds the tag code itself, it reduces the likelihood of human errors when adding those tags manually in the site’s code.
Another benefit is that Google Tag Manager gives the marketing department full control over the tags they create and monitor, which likely improves the efficiency of their work.
Here are some additional advantages of using Google’s tag manager:
- Using it doesn’t require coding knowledge (though it definitely requires technical knowledge and a basic understanding of the web).
- In some cases, it helps your site load faster (depending on the number of tags you use).
- It works with non-Google products as well.
- Flexibility for changes and experiments. You can test changes in Preview Mode before publishing them on your site.
- All third-party code snippets will be in one place.
Is Google Tag Manager an easy and simple tool to use?
In Google’s words: “GTM makes tag management simple and easy by enabling marketers and site administrators to deploy and manage all tags in one place.” Is that really the case in practice?
No. I completely disagree with this claim. Google Tag Manager does indeed require technical knowledge to understand how to define tags, triggers, and variables. For example, if you want to track form submissions, you need a basic understanding of HTML.
If you want to set up event tracking in Google Analytics, you need to understand what events are, how Google Analytics works, what data you can track with events, what a Google Analytics report looks like, and how to name categories, actions, and labels in GTM.
Therefore, technical knowledge and understanding are required, and there is a learning curve you need to go through to use this tool.
But once you overcome this curve, you’ll find that Google’s tag manager is a very versatile tool that allows a lot of manipulation with the data you want to track and the scripts you want to add to your site with its help.
As we mentioned, the use of GTM is not clear to many marketers, and most of them use it more extensively in many cases. And even though the idea is to empower them to perform technical actions themselves, most of them don’t understand the implications of adding code and tags to the site, which can affect the page structure and its performance.
How does Google Tag Manager work?
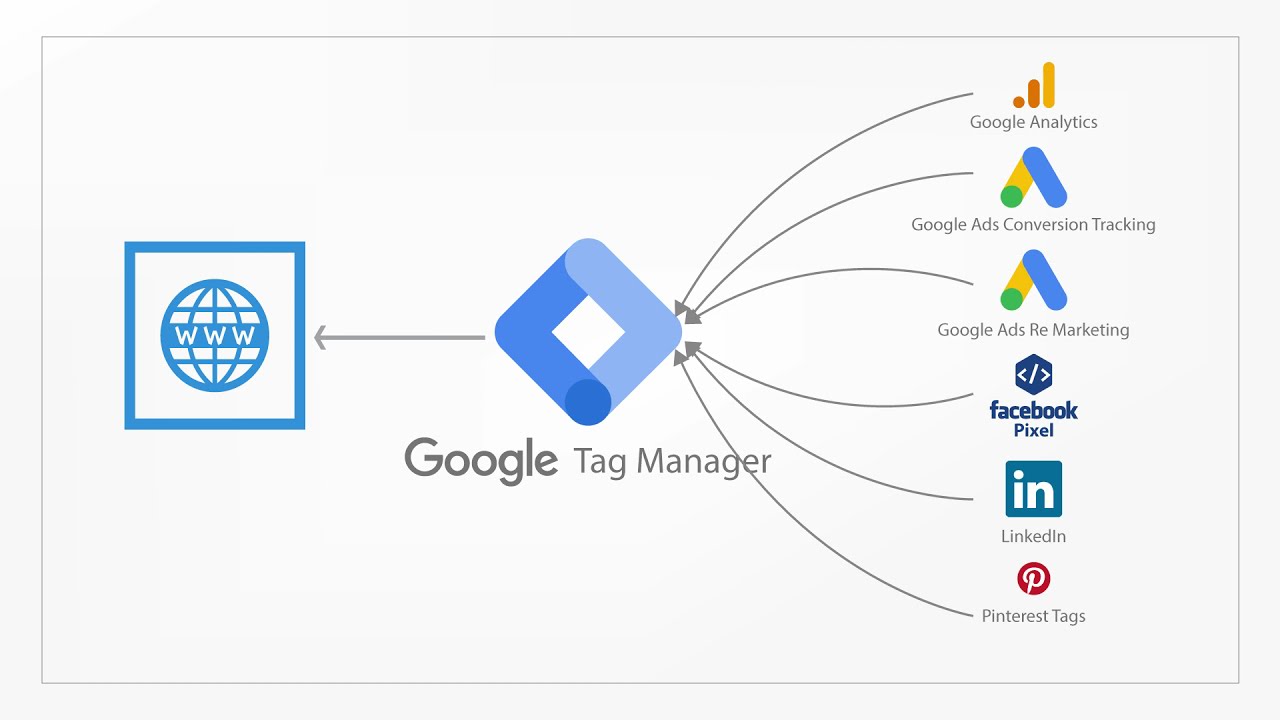
In the following image, you’ll find a generic example of how Google Tag Manager works. The tag manager shares information between your site and external tools like Facebook, Google Ads, LinkedIn, or Google Analytics.

There are three main components to Google Tag Manager:
Here’s a brief overview of the three main components of GTM: Tags, Variables & Triggers:
- Tags – As we’ve discussed, these are, for example, pieces of code in JavaScript or HTML that “extract” or receive specific information from your site.
- Triggers – Indicate when, where, and how to “fire” (activate) those tags.
- Variables – Additional information that GTM may need to make the tag and trigger you defined work.
1. Tags
So, as mentioned, tags are pieces of code that you embed in your site, like JavaScript or HTML, to “extract” or receive specific information from your site.
For marketers, essential and typical information might include the time users spend on a specific page, tracking form submissions, understanding how users arrived at the site, which links they clicked on, and even which products they removed from their shopping cart.
Each tag tracks something different. For instance, you might want to create a tag just to know how many users filled out the contact form on your site. This tag could send more precise information to Google Analytics, Google Ads, or any third-party tool.
Here are some examples of common tags that exist in Google Tag Manager:
- Google Analytics Universal Tracking Tag or GA4 Tracking Tag.
- Google Ads Remarketing Code.
- Google Ads Conversions Tracking Code.
- Heatmap Tracking Codes like Hotjar, CrazyEgg, and similar.
- Facebook Pixel or LinkedIn Pixel.
- Additional scripts that can be added using HTML.
2. Triggers
Triggers are how you activate the tags you create. They tell Google Tag Manager when, where, and how to perform the actions you want. Here are some examples of common triggers in GTM:
- Pageviews
- Link clicks
- Form submissions
- Scroll depth
- Custom events
3. Variables
Variables are additional pieces of information that Google Tag Manager might require in order for a specific tag or trigger to function. Here are a few examples of different variables:
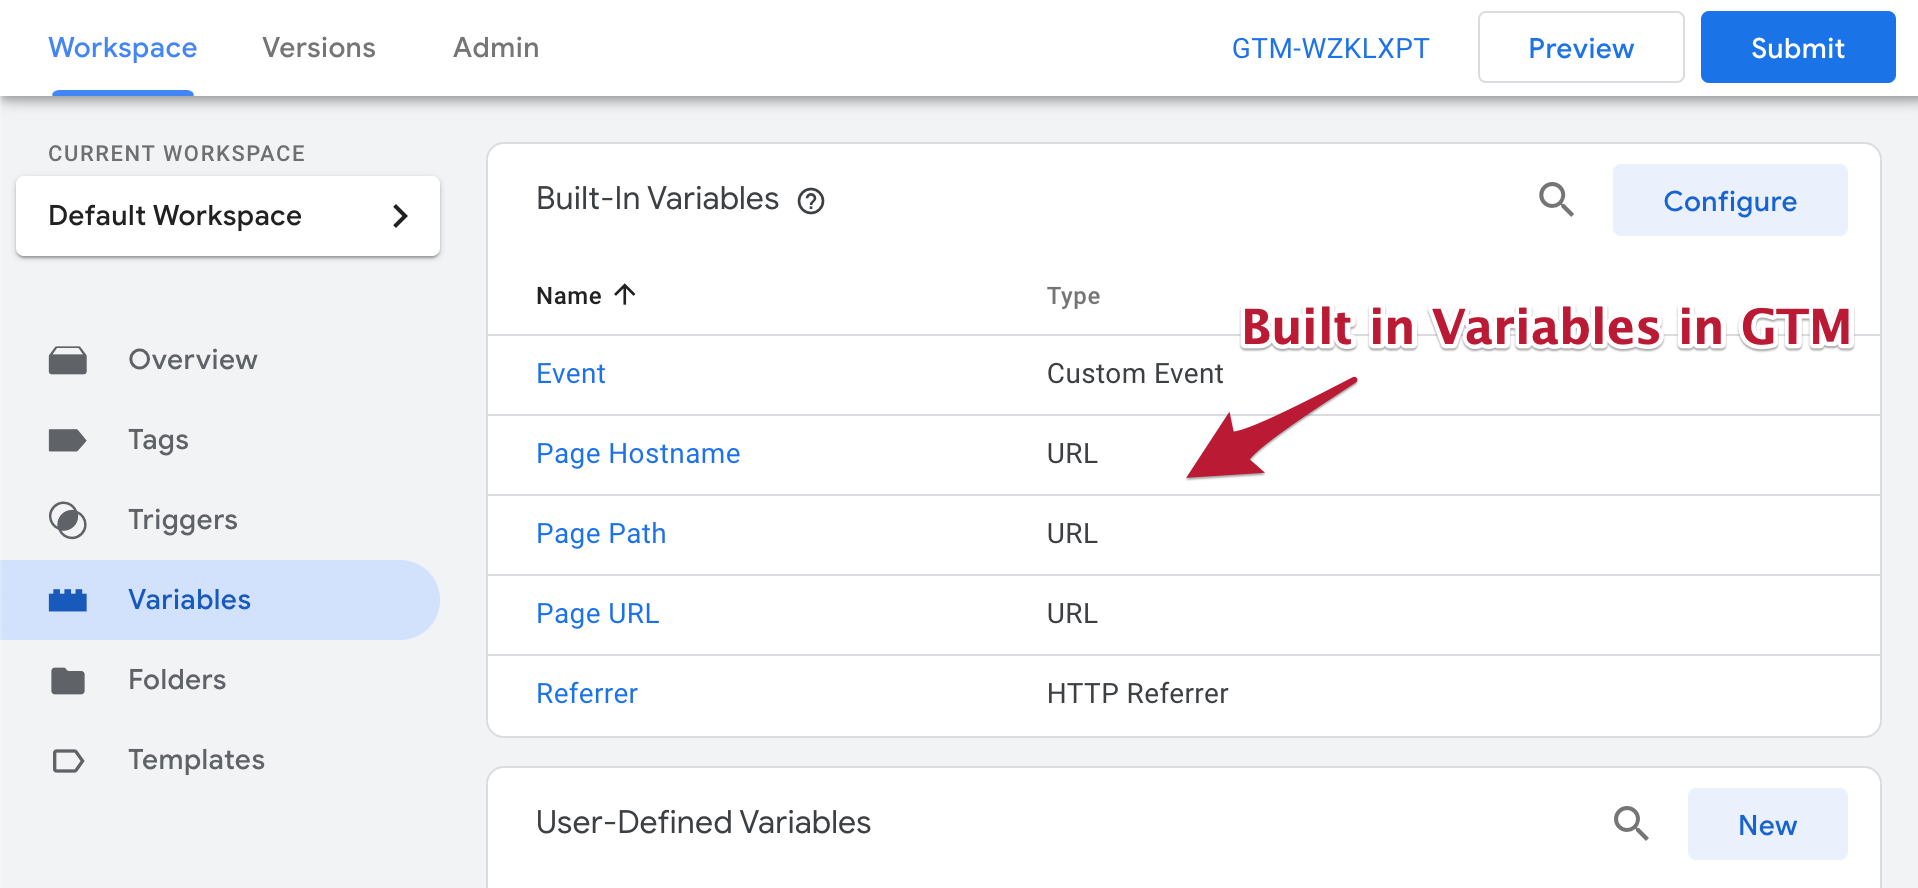
Okay, enough talk. Let’s see how to actually use Google Tag Manager when the first step is creating an account.
Creating an Account in Google Tag Manager
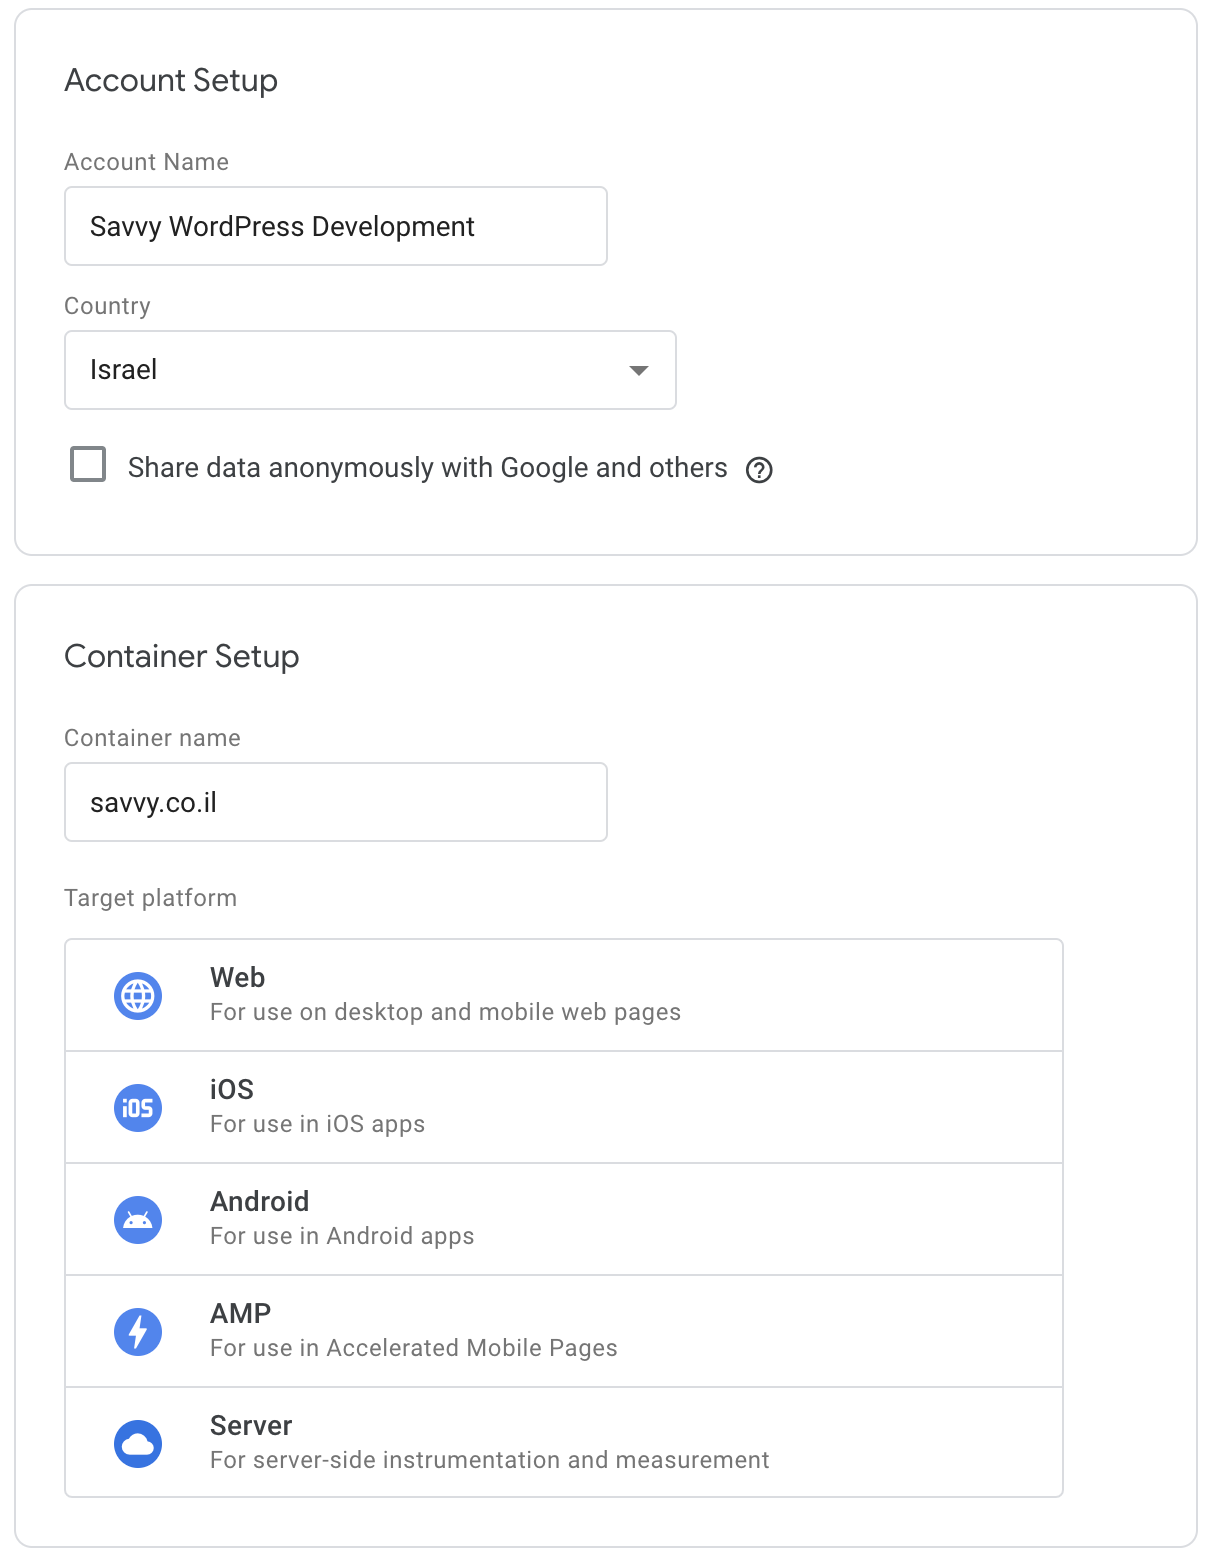
Creating a free account is a two-step process. First, go to Google Tag Manager and sign in using your email. On the screen that appears, click on Create Account.
At this stage, you’ll be asked to enter your company’s name, the country you’re in, your website’s URL, and where you intend to use the tag manager (website, iOS app, Android app, etc.).
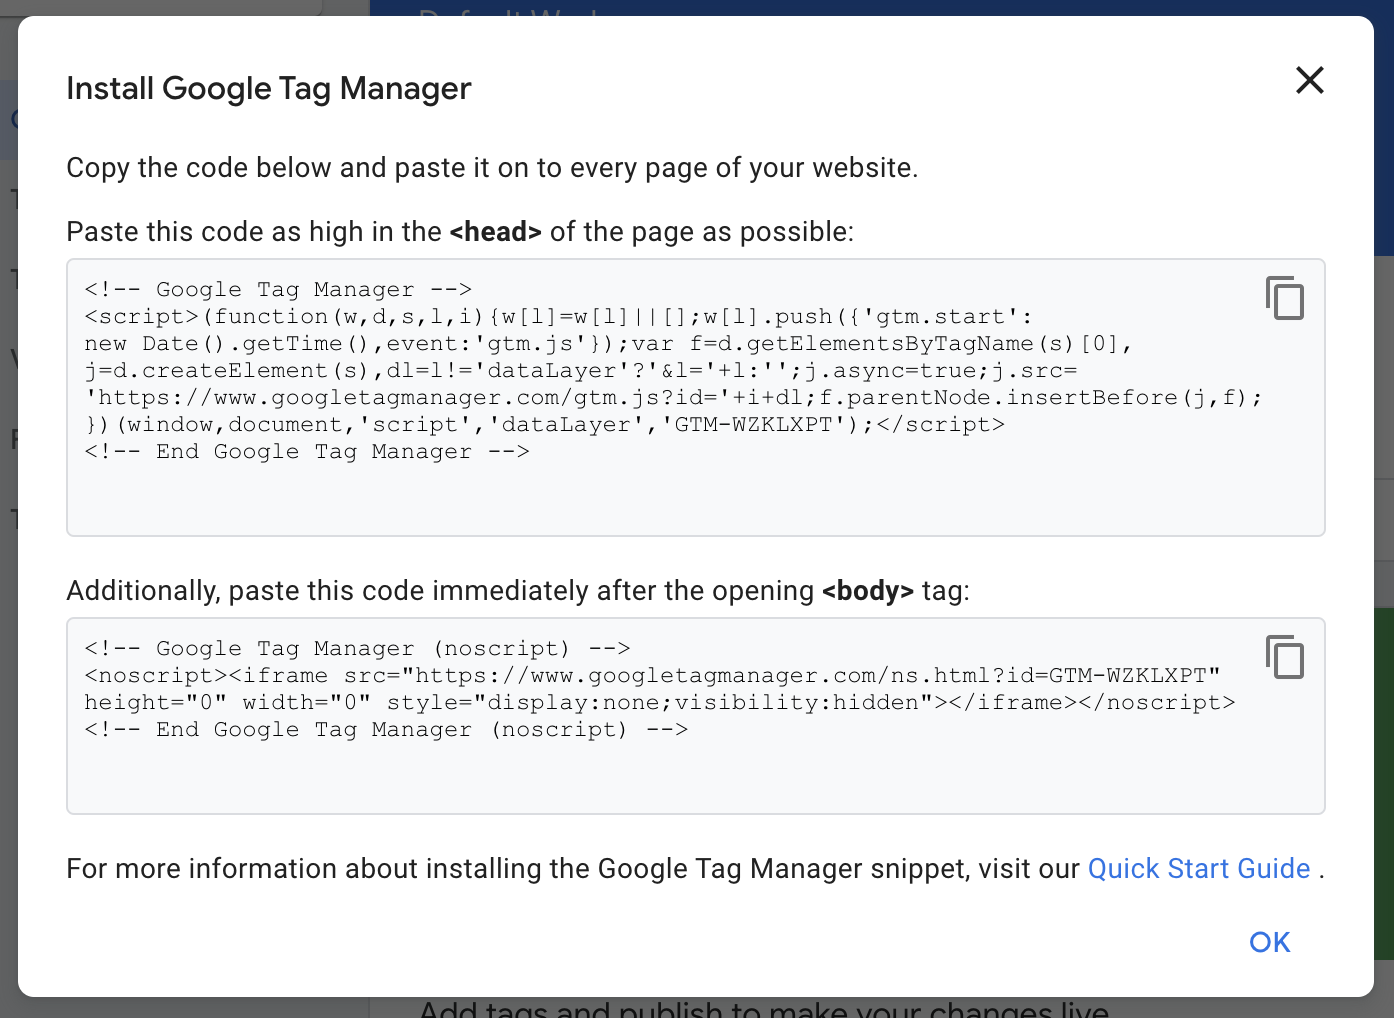
Accept the terms of use, and then you’ll be directed to the Tag Manager interface, where a window with the code you need to embed in your site will appear.
Installing Google Tag Manager Code on Your Website
This is the second step. You need to embed the top code snippet shown in the window into the <head> of your website.
If you’re using WordPress, simply add this code to your template’s functions.php file (use a child theme if you’re using one). Note that you’re removing the opening PHP tag (the first line):
<?php
// Add Google Tag Manager snippet to WordPress <head> Tag
function add_gtm_tag() {
    ?>
    <!--ADD Your Script Here-->
    <?php
}
add_action('wp_head', 'add_gtm_tag');
Now, copy and paste the top script provided by GTM into line number 5.
Adding the second script is a bit more complex. I won’t describe how to do it in this post, but you can refer to the original post for detailed instructions or consult a developer.
This script is only relevant to browsers with JavaScript disabled, and it’s likely that almost all users on your site have JavaScript enabled.
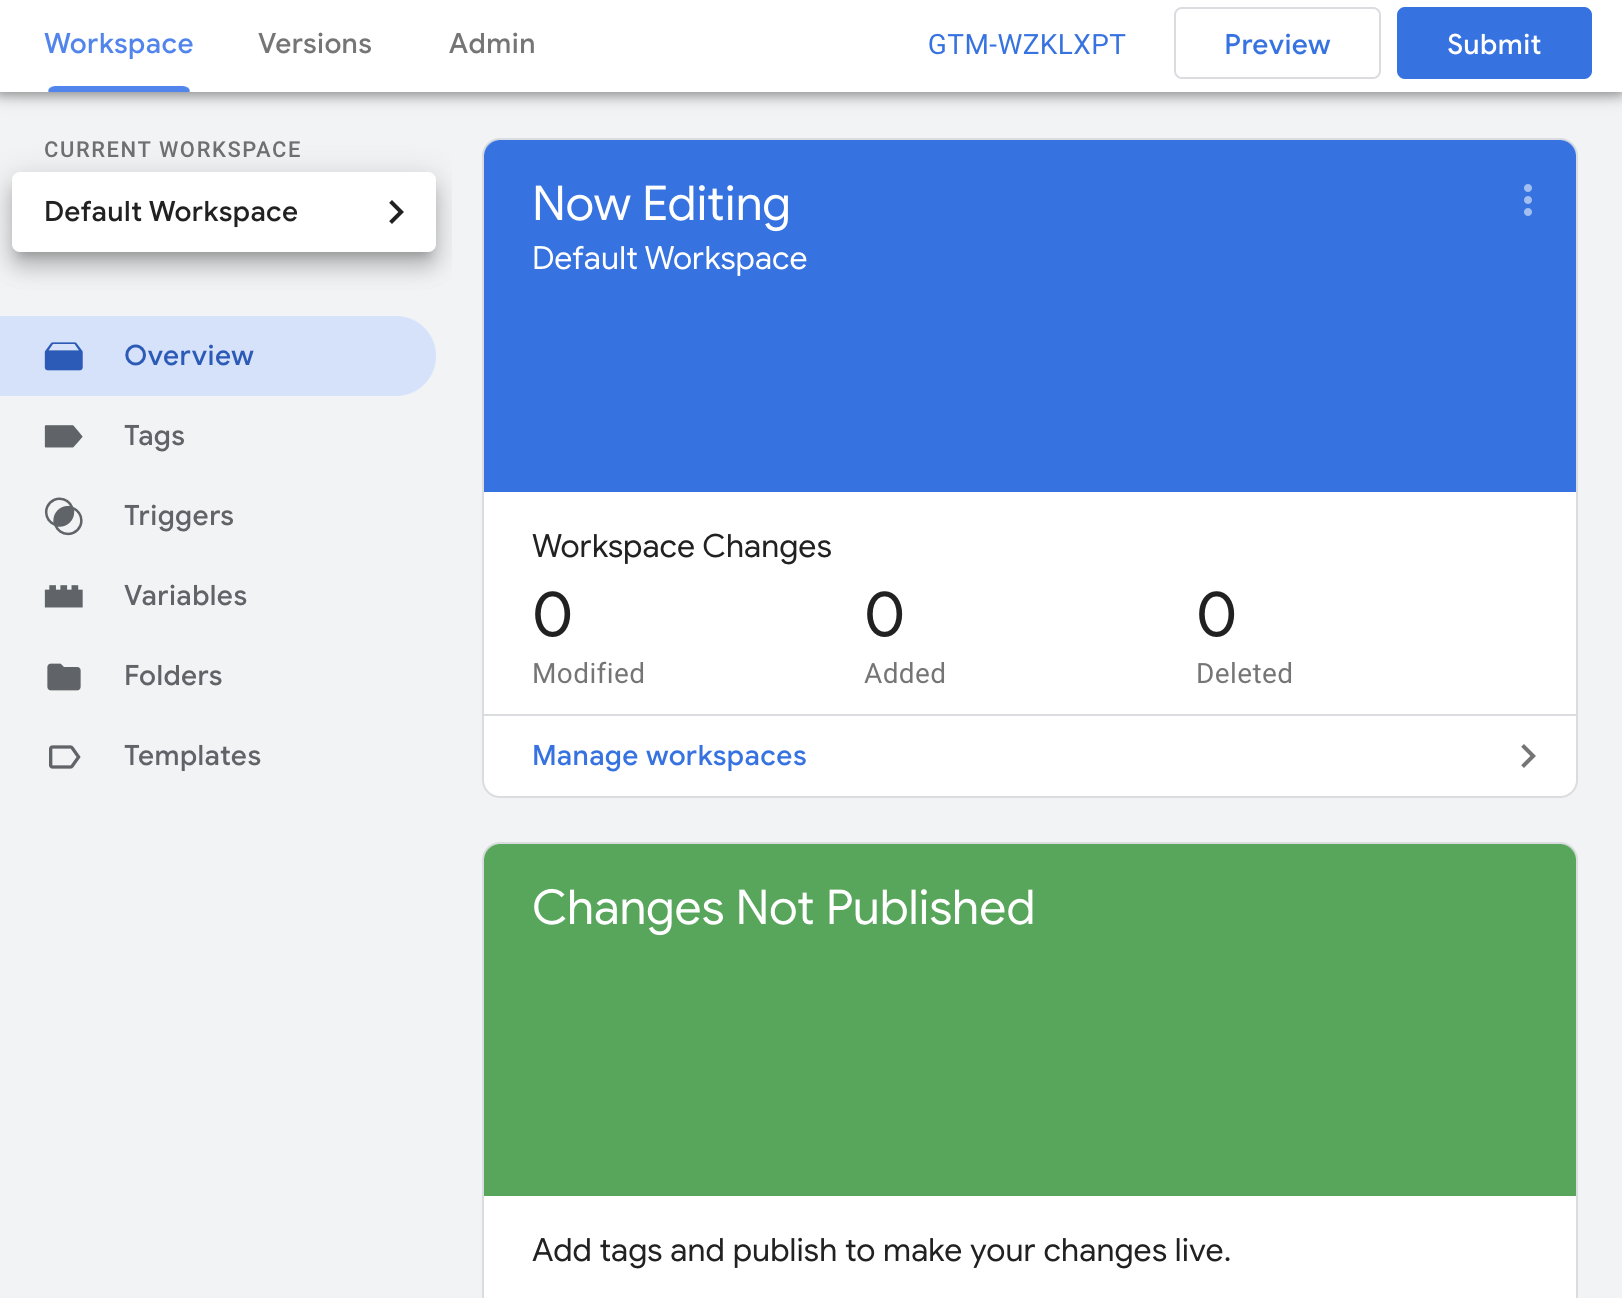
In any case, after adding the code to your site, go back to the Google Tag Manager interface and you’ll see the following window:
Creating a New Tag in Google Tag Manager – Adding Google Analytics Tracking Code
After opening an account in Google Tag Manager and adding the code to your site, the first thing you’ll want to do is create a new tag. Note that you can create an unlimited number of tags, allowing you to get more detailed reports on user behavior on your site.
Before we continue, make sure to give accurate names and organize your tags properly. Google recommends using the following naming structure: Tag Type – App Name – Details.
For example, you could name a specific tag: AdWords conversions – Website – 2022-02 campaign. Another example could be: Google Analytics – CTA – Contact Us page.
The second example describes the performance of the Call to Action (CTA) button on the contact page. If, for instance, you were naming the tag CTA Button, you would find it difficult to manage if you have multiple CTA buttons, so choosing appropriate names is important.
Now that we understand the importance of names, let’s see how to add the Google Analytics tracking code to Google Tag Manager…
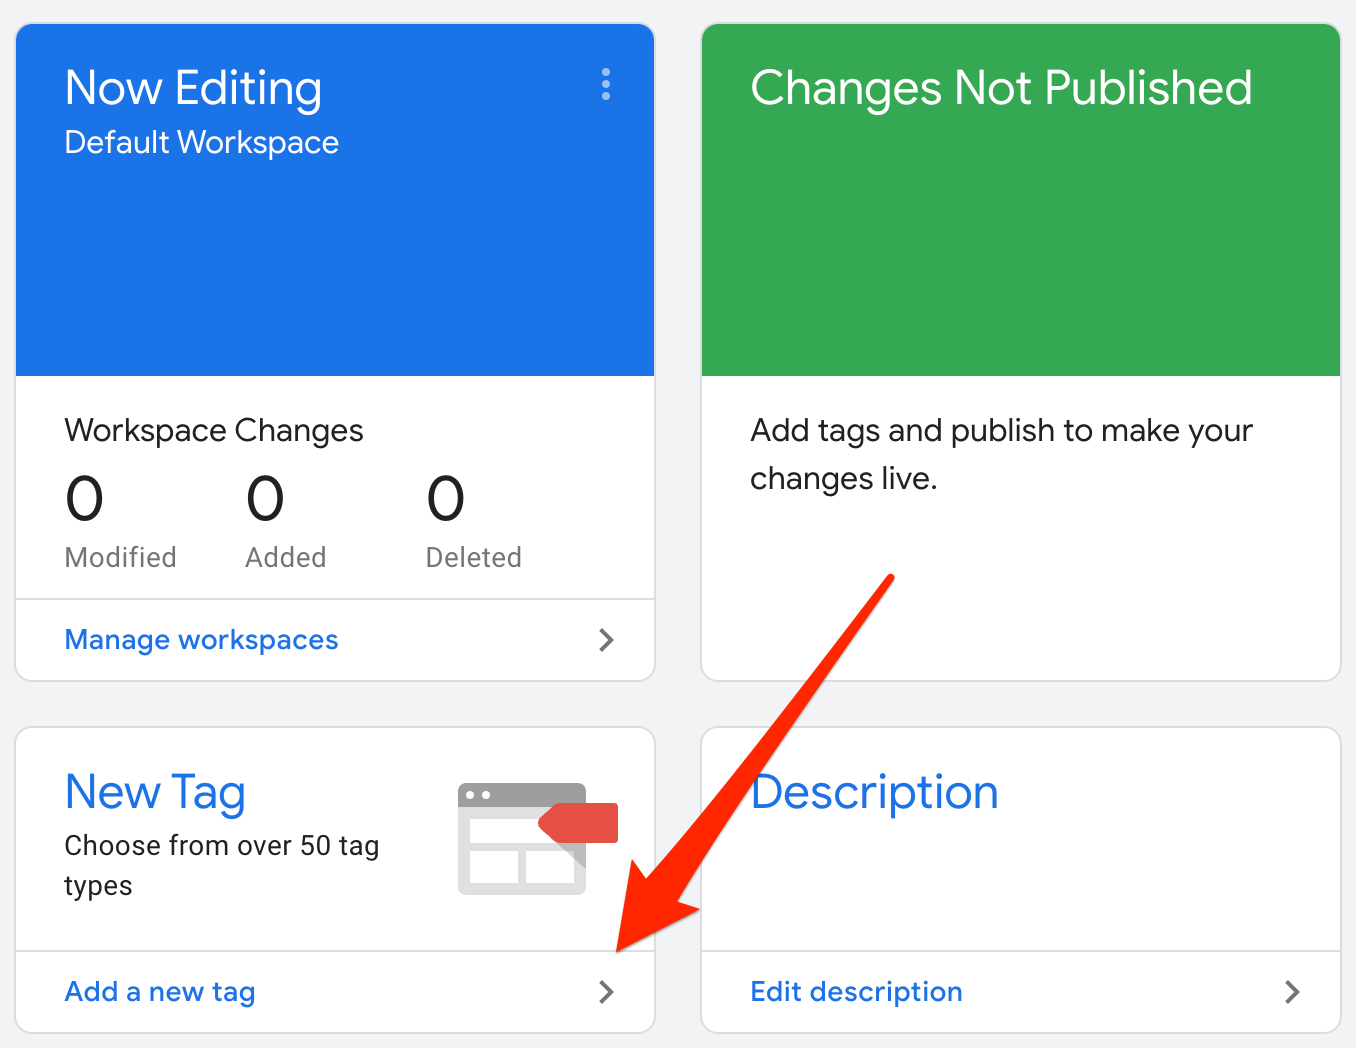
1. Creating a Tag in the Google Tag Manager Interface
In the Google Tag Manager interface, click the “New Tag” button as shown in the image below:
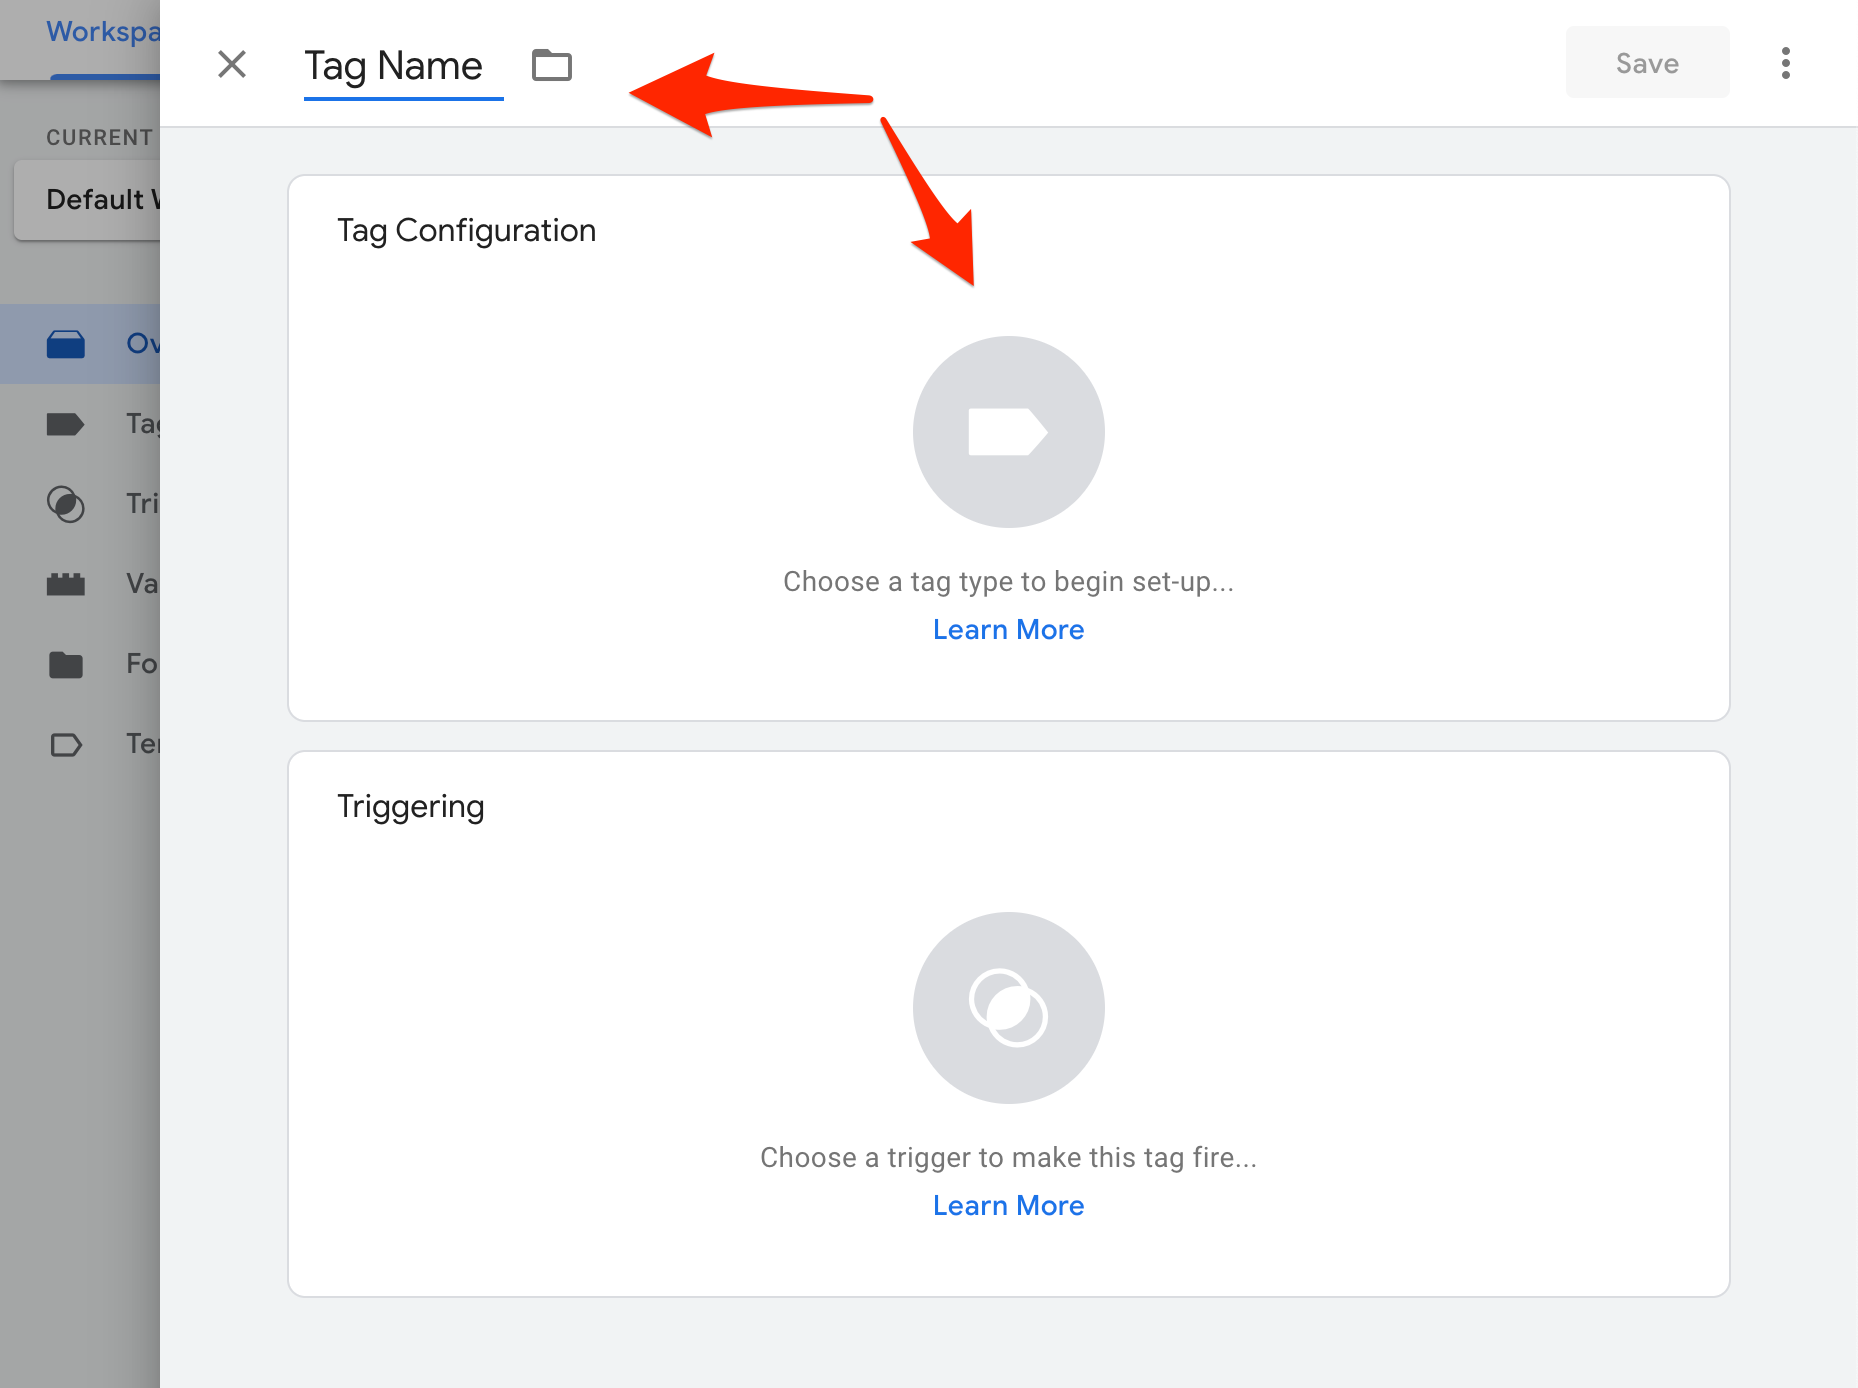
2. Configure the New Tag
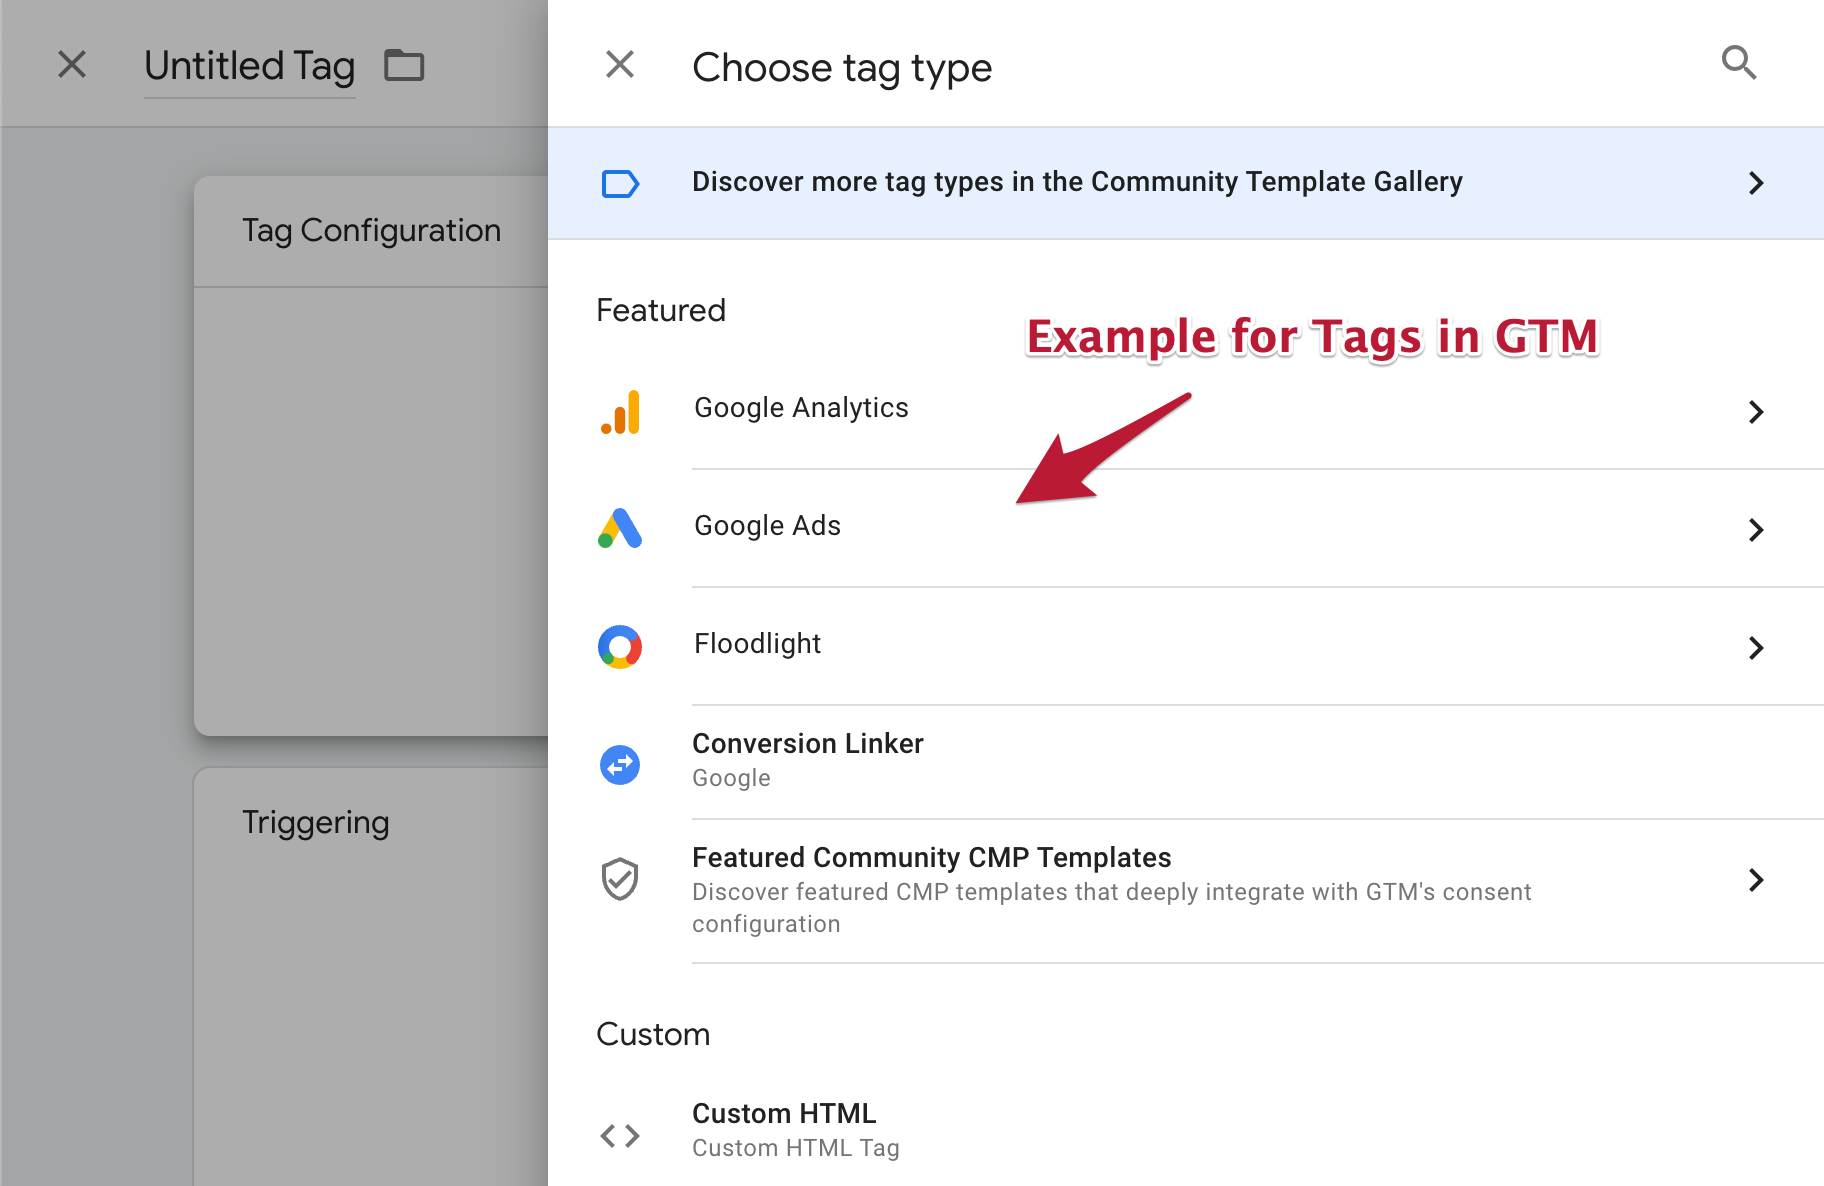
Give a name to the new tag at the top according to the conventions mentioned earlier. Then, click on the top box called “Tag Configuration” to choose the type of tag you want to add:
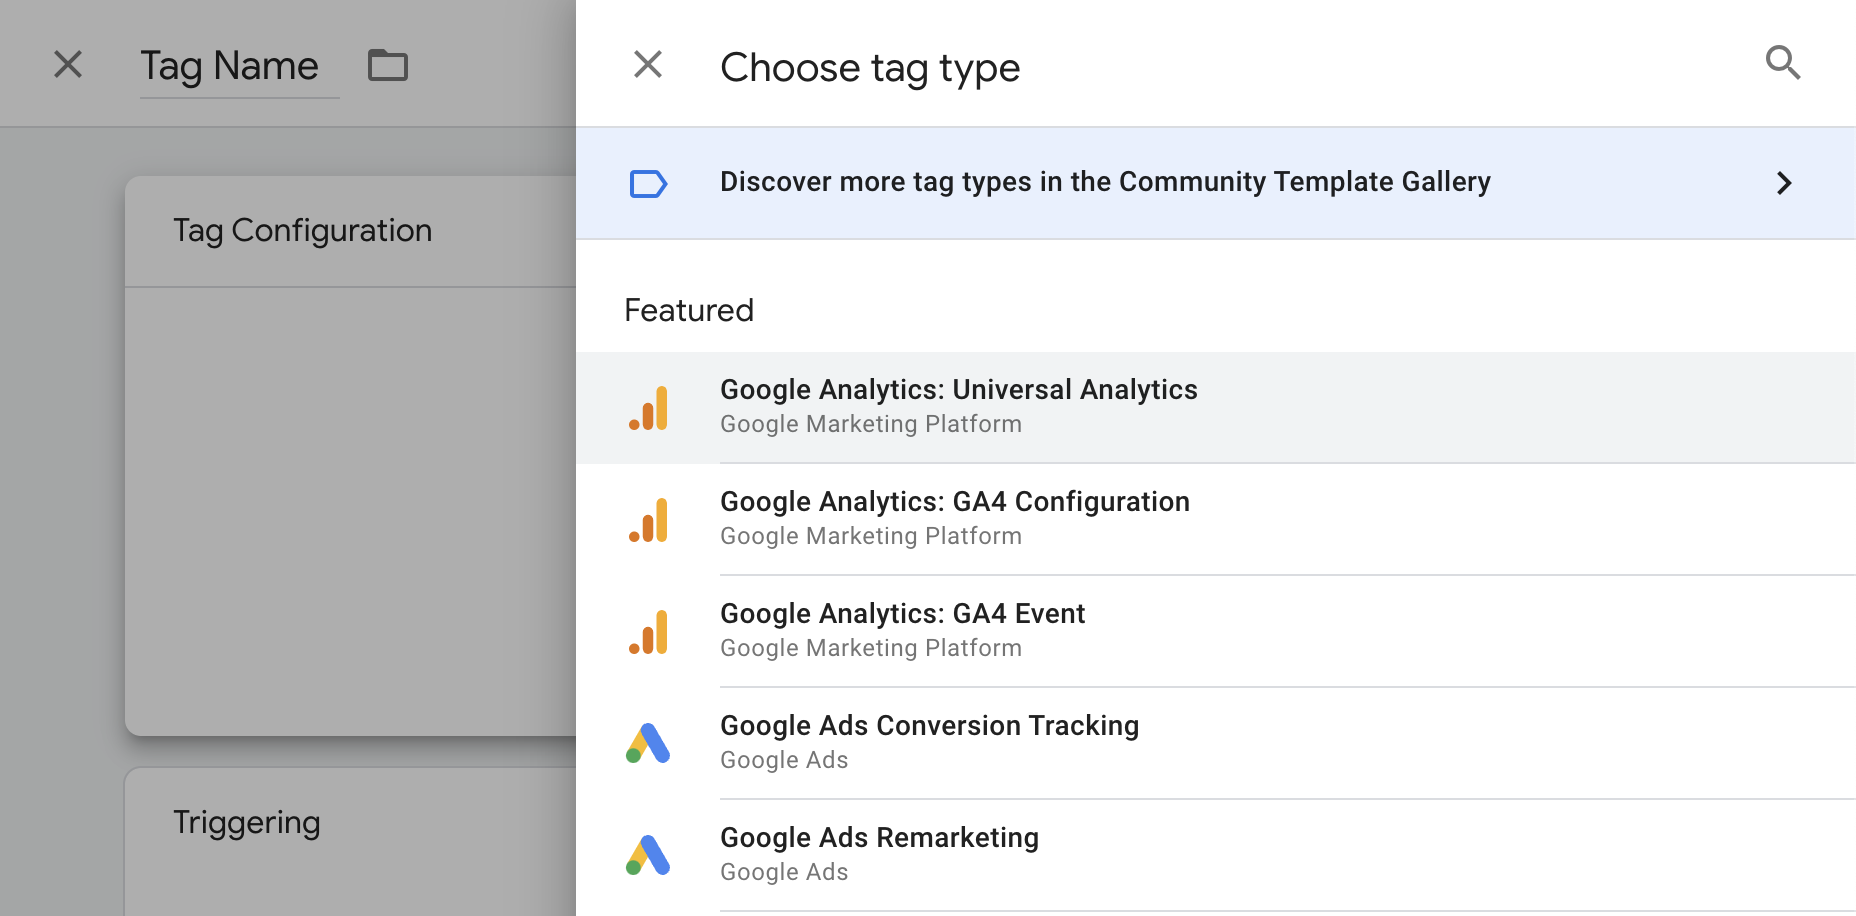
3. Choose the Tag Type
There are many types of tags in Google Tag Manager, not all of which are shown here. In our case, we will choose the “Google Analytics: Universal Analytics” tag. This means we will create a tag that sends specific information to the Google Analytics account linked to our site.
Note that there’s an option to choose Google Analytics 4, which is slightly different from what we’re showing here.
4. Link the Tag to Google Analytics
Now select the Track Type. In our case, we chose “Pageview,” but you can choose many other types.
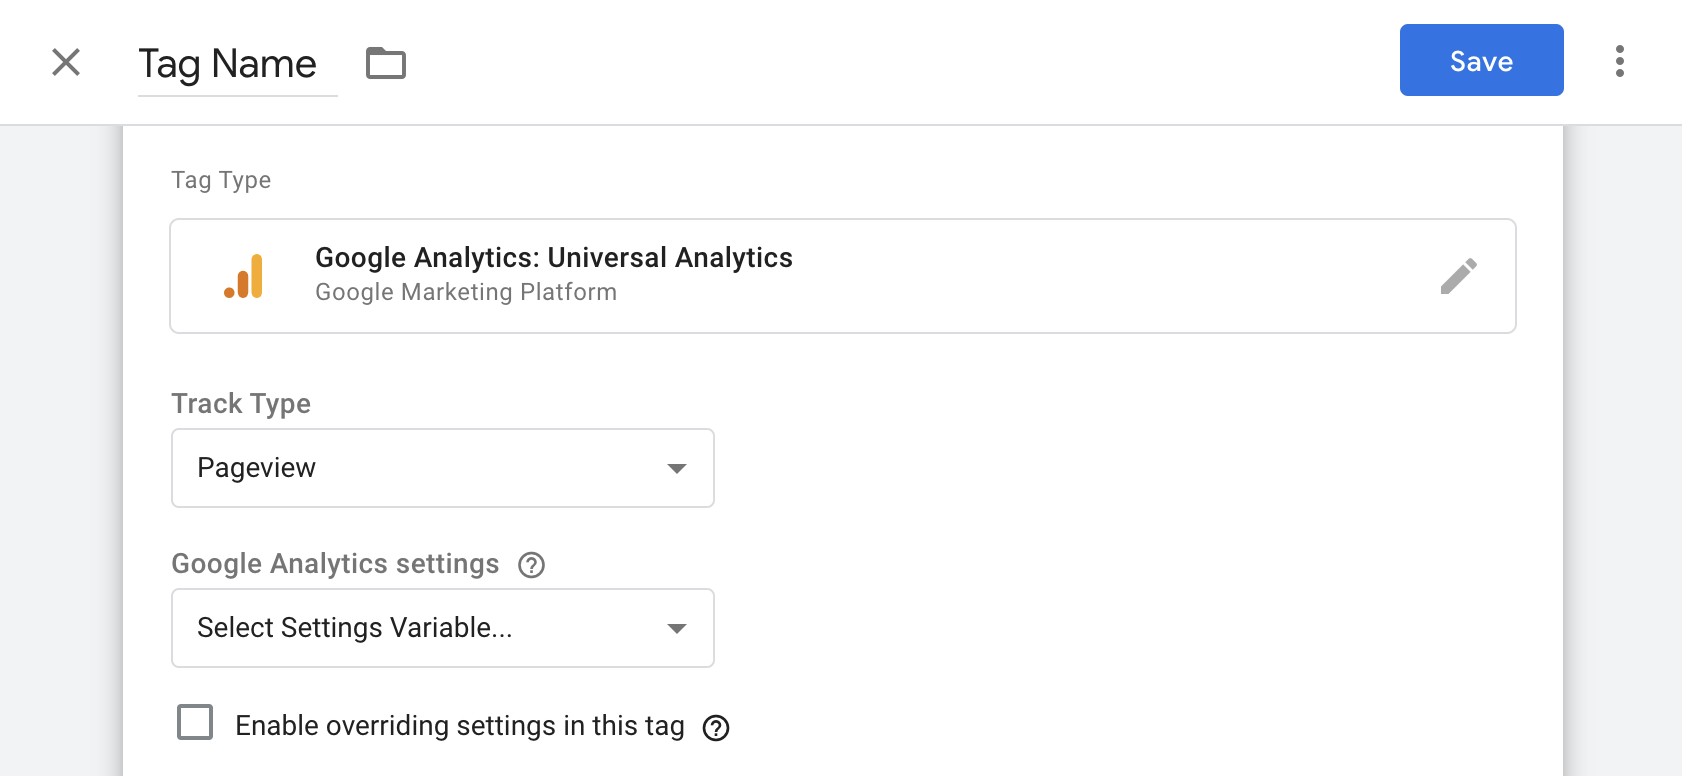
If you want the tag to send information to Google Analytics, you need to set the ID of the Analytics account embedded in your site or app. To do this, click on “Select Settings Variable” and then on “New Variable.”
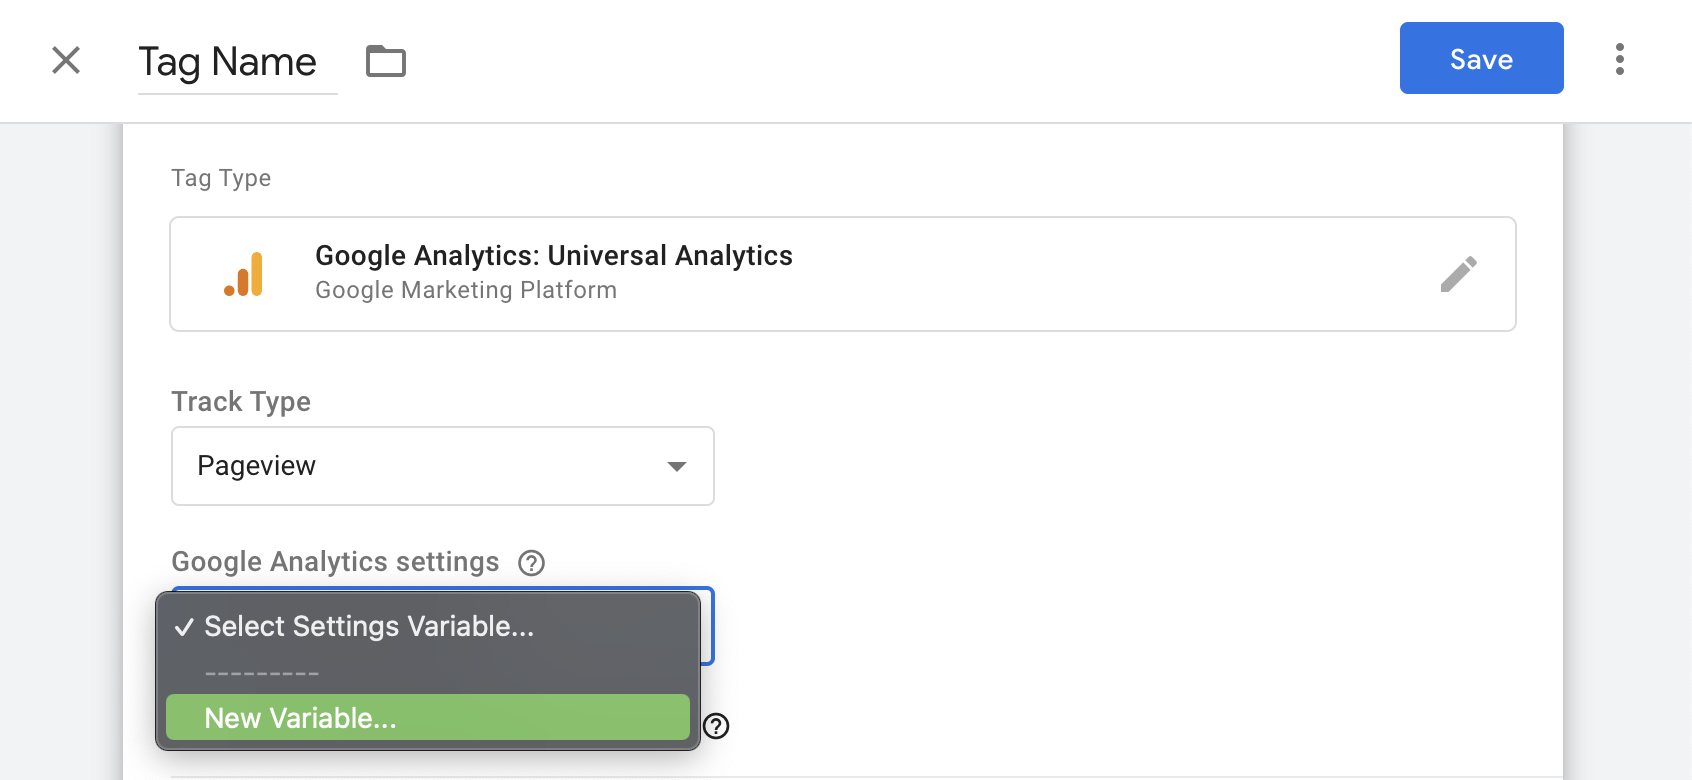
Now give a name to the new variable in the upper part of the screen. I suggest you use “UA Tracking Code” as this variable will be useful when adding new Google Analytics tags in the tag manager.
Then, add the Analytics tracking ID under “Tracking ID” and save the variable by clicking the blue “Save” button.
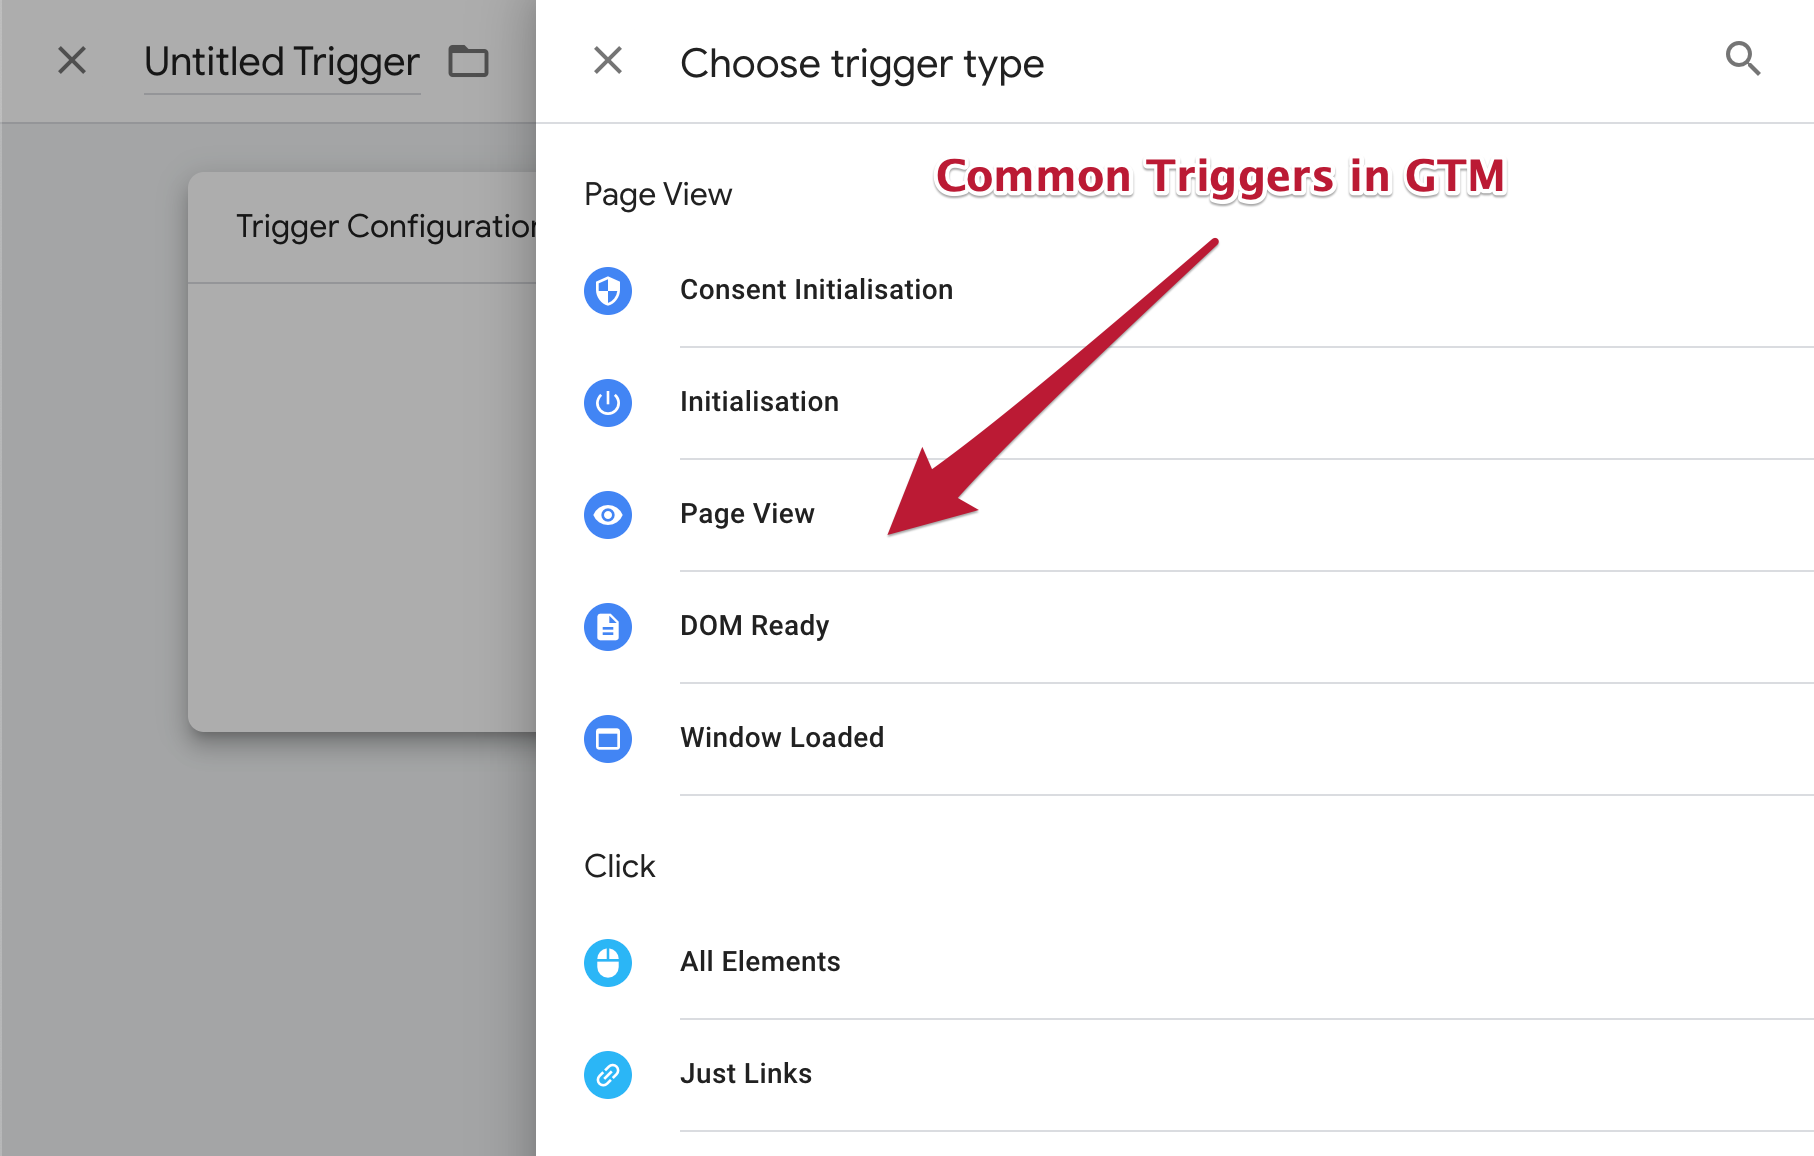
5. Choose the Trigger that Defines When the Tag Activates
Now you need to choose the trigger that determines when you want the tag you created to send information to Analytics. If you didn’t see the option to create a trigger when saving the changes, simply click on the box labeled “Triggering,” which looks like this:
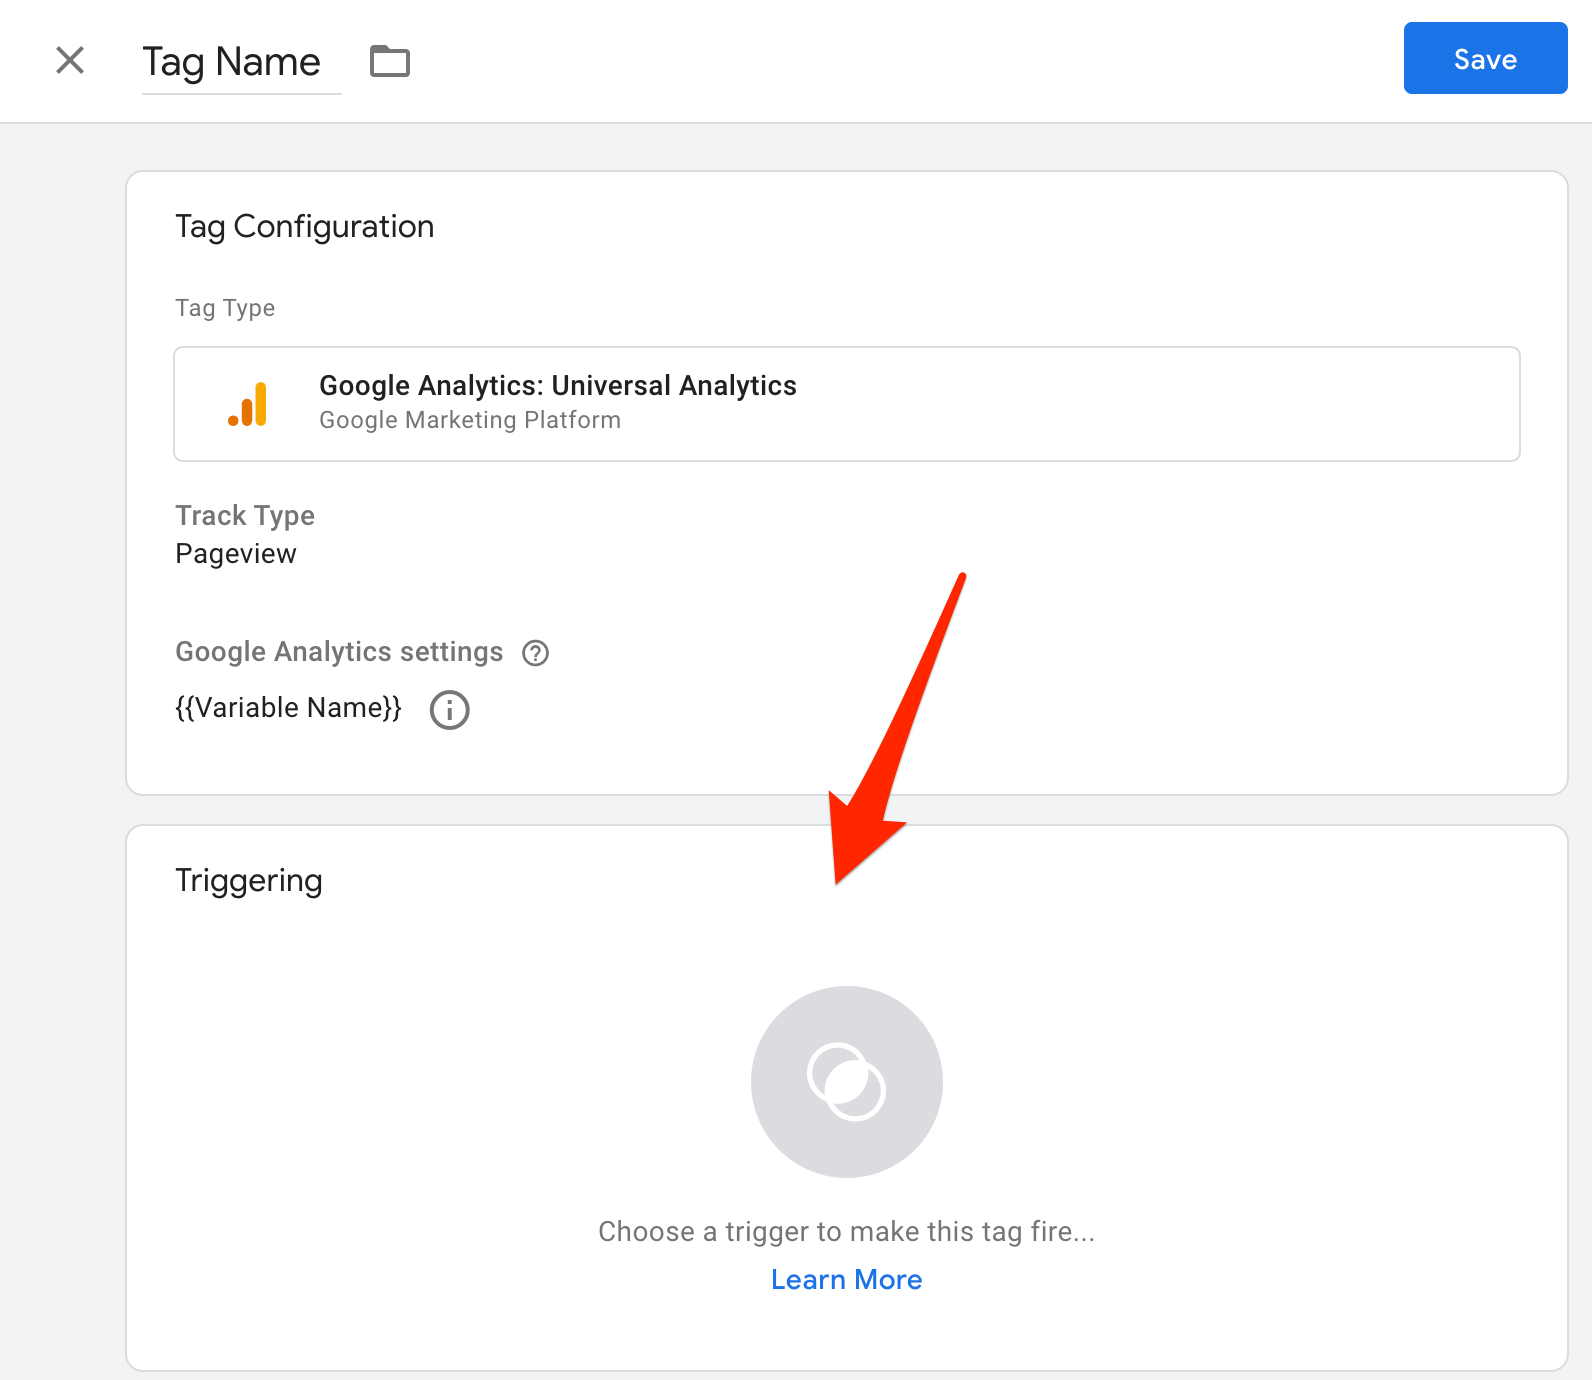
In our case, we selected “All Pages” to get the information in Analytics every time a visitor views a page on your site. Of course, you can choose other options.
6. Save the Tag
When you’re done and satisfied with the settings of the new tag and the trigger you’ve set for it, save the tag by clicking the blue button:
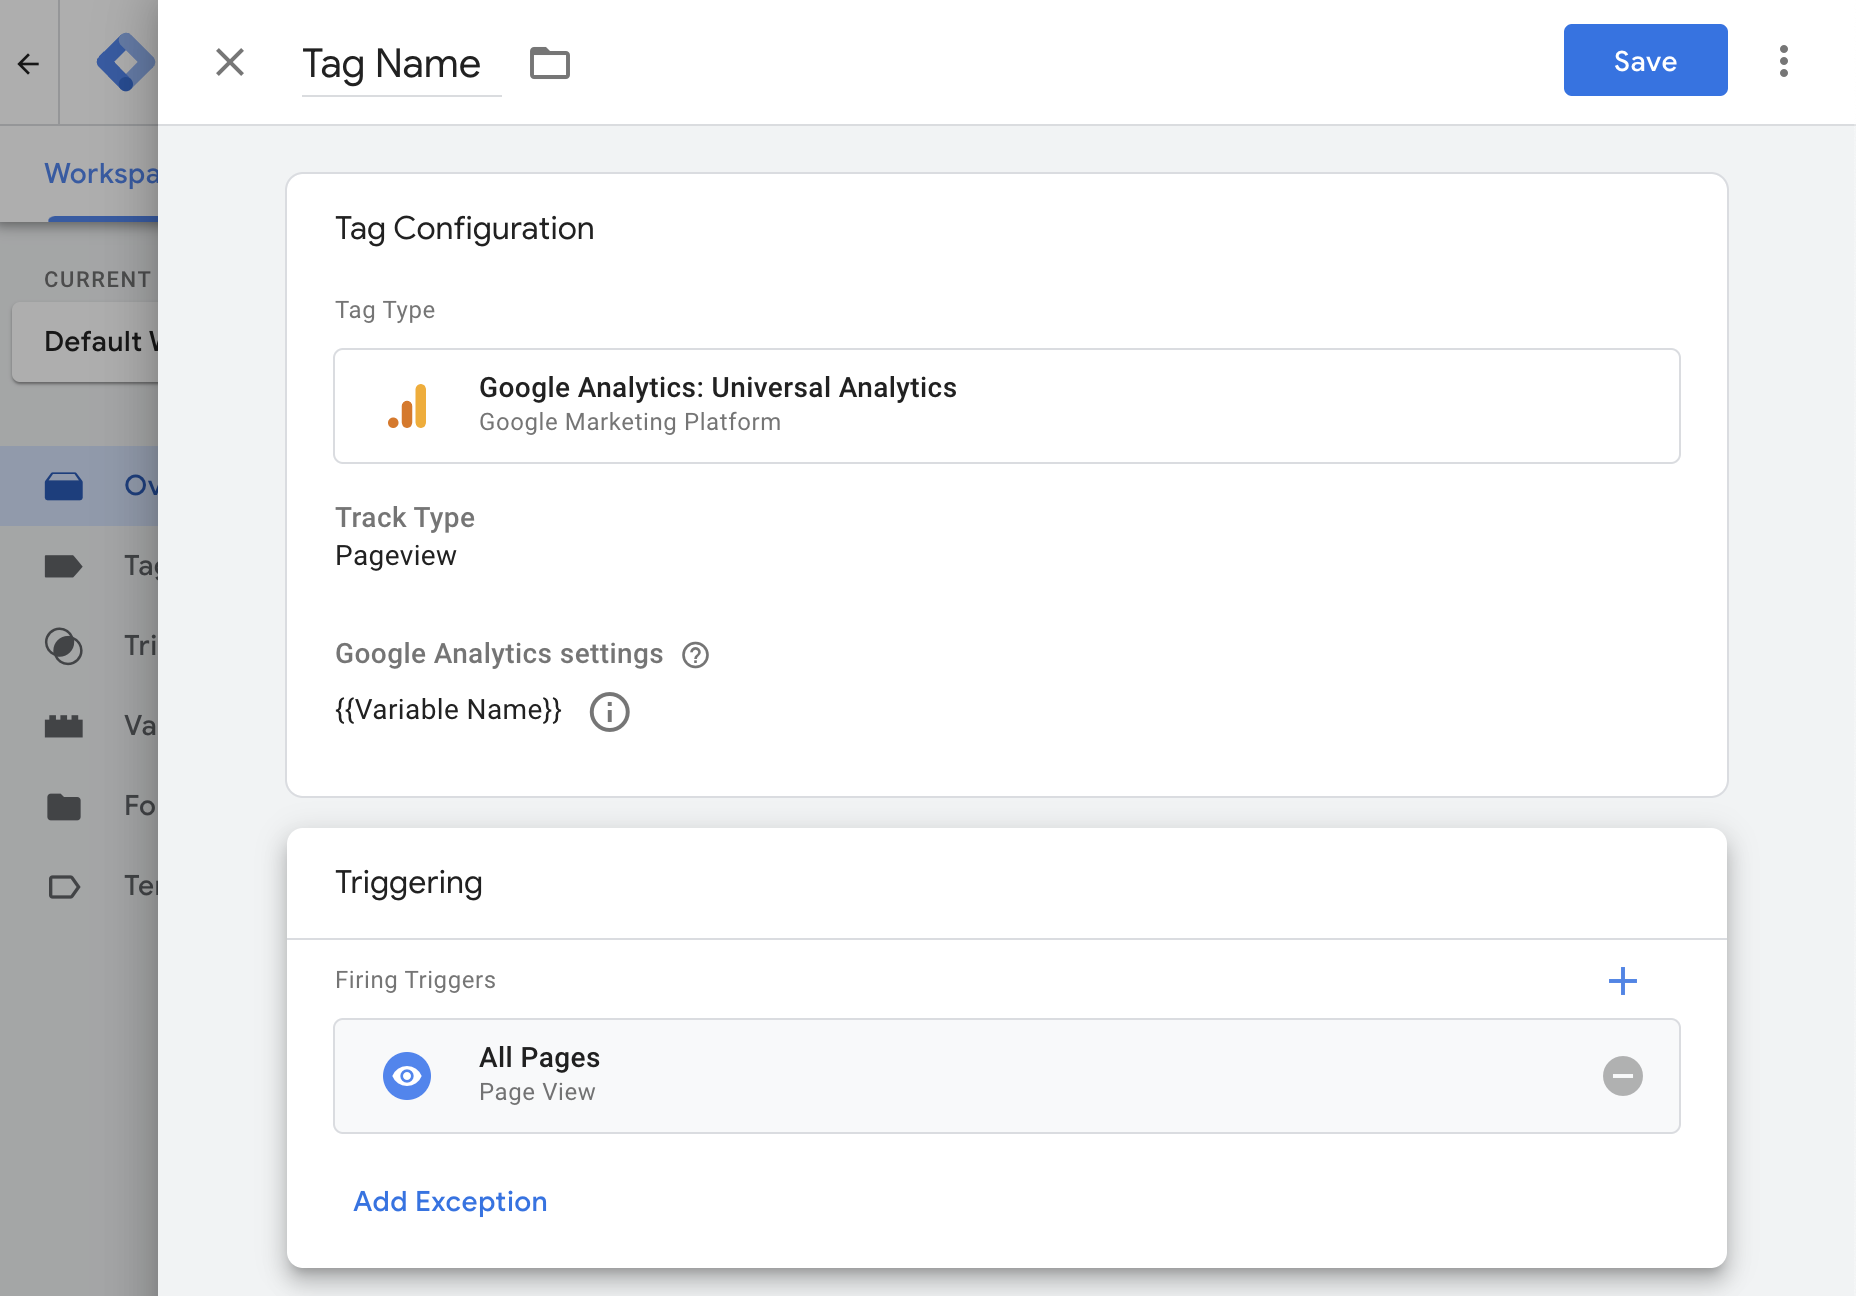
Saving the tag will create a variable containing your Analytics ID, so you can use this variable again whenever you want to add Google Analytics tags in the tag manager.
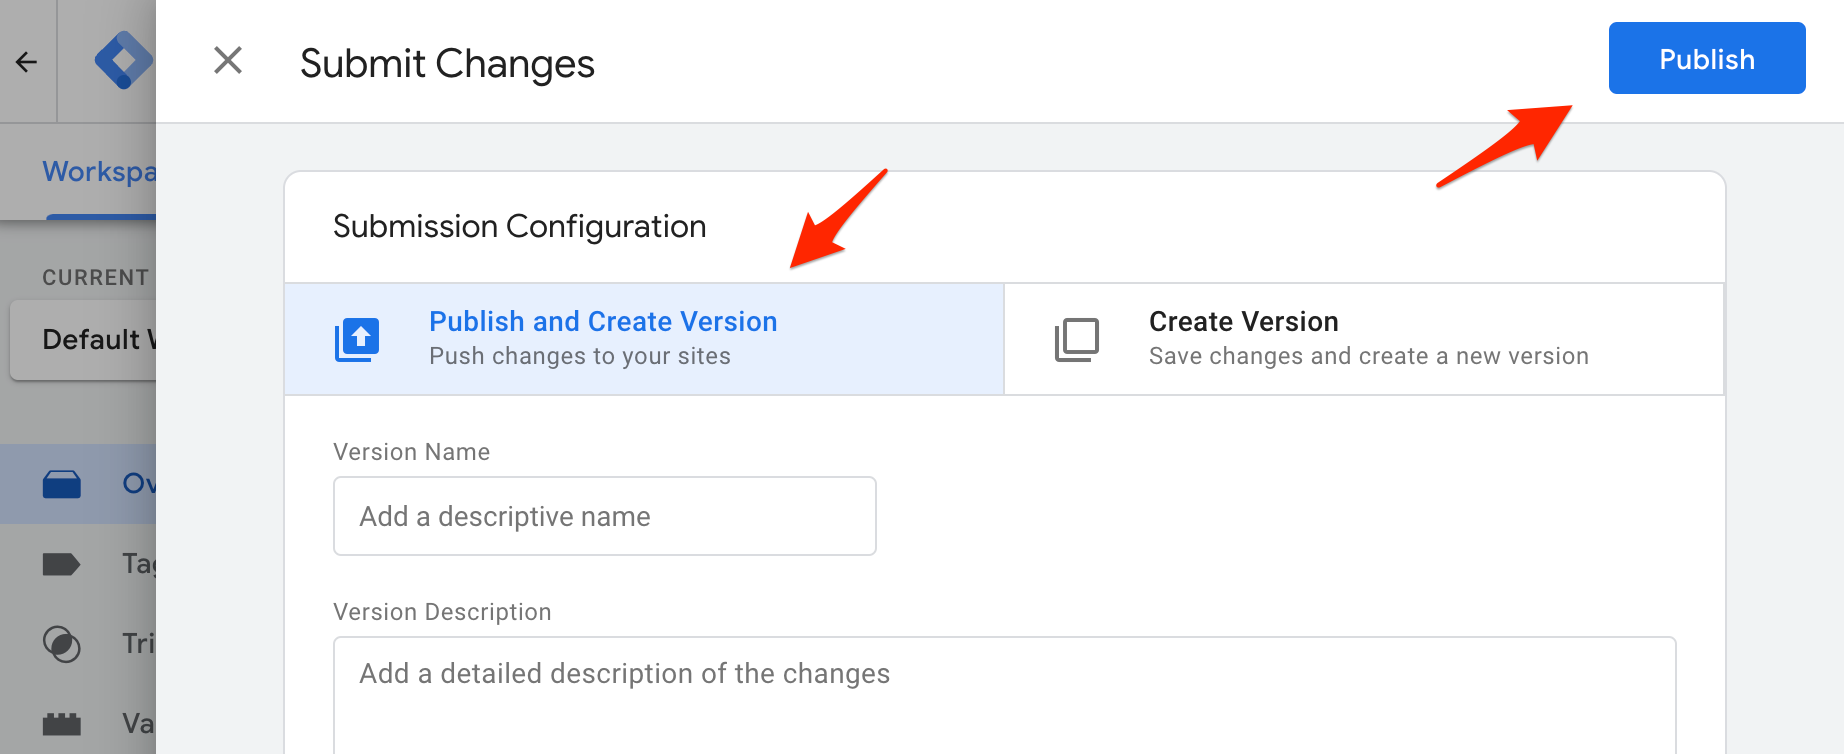
7. Publish the New Tag
Clicking the “Submit” button will take you to the “Submissions Configuration” window. You have two options: “Publish and Create Version” and “Create Version.”
Since we’re ready to publish the tag on all the site’s pages, we chose the option “Publish and Create Version” and then clicked on the “Publish” button located in the upper right corner of the screen.
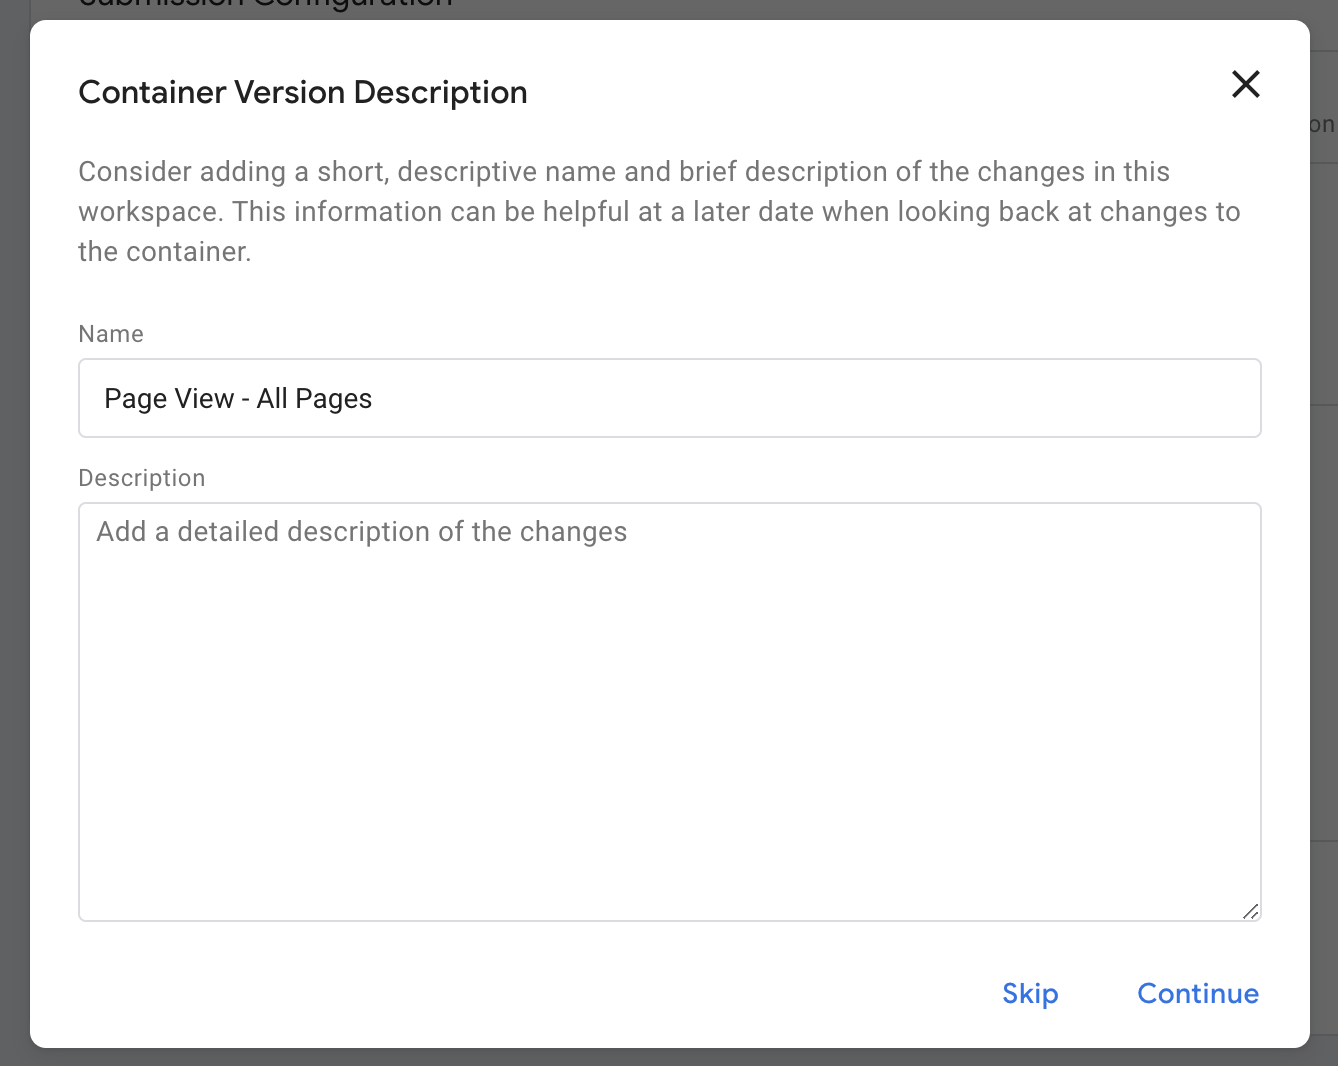
8. Add Names and Descriptions to Your Tags and Keep Them Organized
Finally, you’ll see a screen called “Container Version Description.” In order to keep your tags organized, add a name and description to understand the purpose of the tag and the information you’re trying to collect using it.
Voila! You’ve successfully published your first tag 🙂 Now let’s see an example of how to add the Facebook pixel to Google Tag Manager…
Adding Facebook Pixel to Google Tag Manager
The official Facebook documentation recommends using a Custom HTML tag to add the Facebook pixel to Google Tag Manager. Let’s see how to do that.
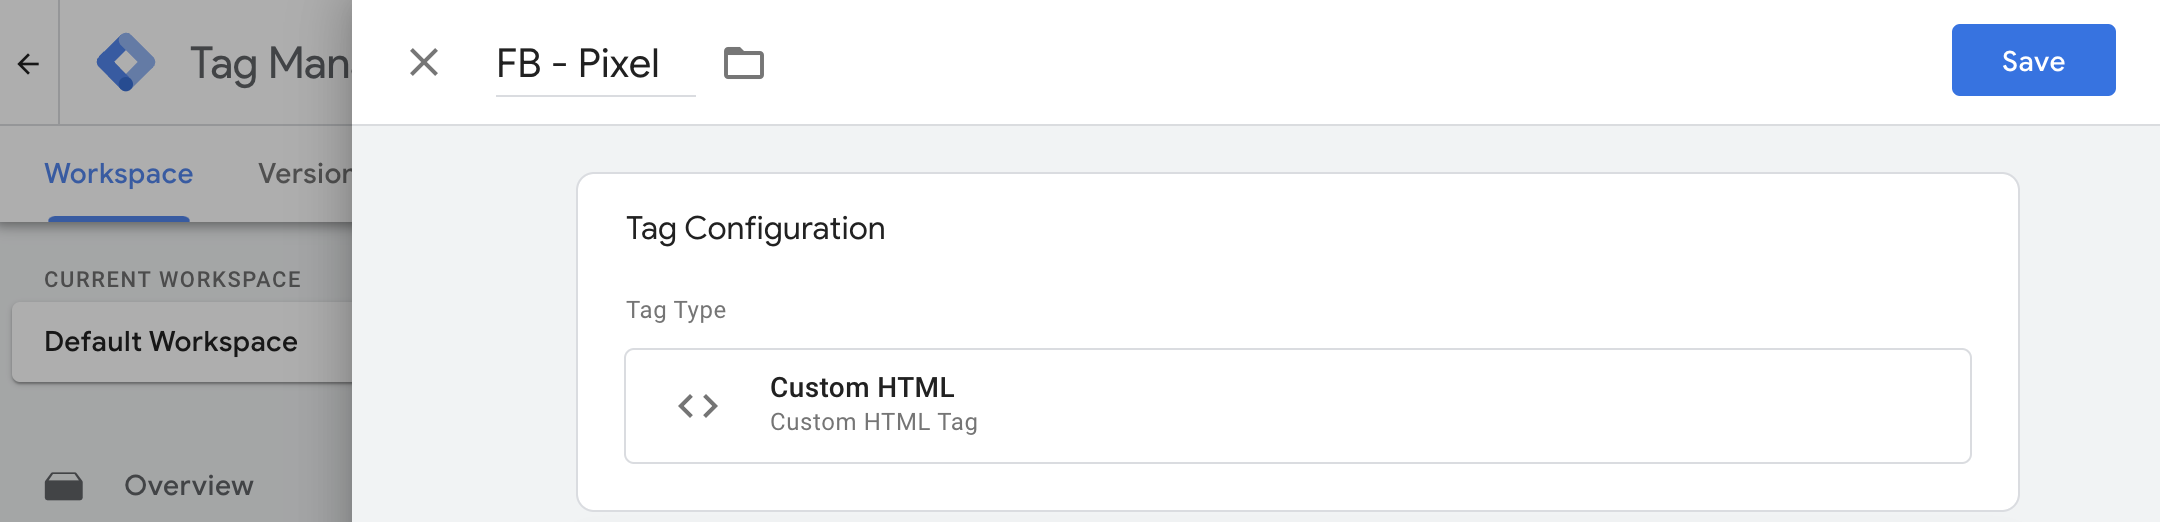
- Add a new tag and name it “FB – Pixel.”
- Under “Tag Configuration,” select the tag type “Custom HTML.”
%22%20transform%3D%22translate(4.2%204.2)%20scale(8.4375)%22%20fill-opacity%3D%22.5%22%3E%3Cellipse%20fill%3D%22%237d7d7d%22%20cx%3D%2211%22%20cy%3D%2240%22%20rx%3D%2231%22%20ry%3D%22193%22%2F%3E%3Cellipse%20fill%3D%22%23fff%22%20rx%3D%221%22%20ry%3D%221%22%20transform%3D%22matrix(42.02622%20-61.23503%2085.94427%2058.98442%20167.7%2057)%22%2F%3E%3Cellipse%20fill%3D%22%23d0d0d0%22%20rx%3D%221%22%20ry%3D%221%22%20transform%3D%22matrix(3.8751%2096.48141%20-28.35619%201.1389%2043.3%2024.1)%22%2F%3E%3Cellipse%20fill%3D%22%23fff%22%20cx%3D%22151%22%20cy%3D%2231%22%20rx%3D%2280%22%20ry%3D%2280%22%2F%3E%3C%2Fg%3E%3C%2Fsvg%3E)
- Paste the pixel you received from Facebook into the HTML box that appears. You can find the Facebook pixel in the Facebook Event Manager. (For more information, click here).
%22%20transform%3D%22translate(4.2%204.2)%20scale(8.40625)%22%20fill-opacity%3D%22.5%22%3E%3Cellipse%20fill%3D%22%237e7e7e%22%20cx%3D%2214%22%20cy%3D%2288%22%20rx%3D%2230%22%20ry%3D%22205%22%2F%3E%3Cellipse%20fill%3D%22%23fff%22%20rx%3D%221%22%20ry%3D%221%22%20transform%3D%22rotate(-18%20393.8%20-491.7)%20scale(86.00229%20179.6075)%22%2F%3E%3Cellipse%20fill%3D%22%23d1d1d1%22%20rx%3D%221%22%20ry%3D%221%22%20transform%3D%22matrix(30.34163%20.16489%20-.68006%20125.14144%2047.3%2094)%22%2F%3E%3Cellipse%20fill%3D%22%238d8d8d%22%20rx%3D%221%22%20ry%3D%221%22%20transform%3D%22rotate(.8%20-6256.4%20130.8)%20scale(15.58411%20112.34257)%22%2F%3E%3C%2Fg%3E%3C%2Fsvg%3E)
- Add a new trigger and select “All Pages.”
%22%20transform%3D%22matrix(8.25%200%200%208.25%204.1%204.1)%22%20fill-opacity%3D%22.5%22%3E%3Cellipse%20fill%3D%22%23828282%22%20rx%3D%221%22%20ry%3D%221%22%20transform%3D%22matrix(-30.20762%201.77481%20-6.1708%20-105.0284%2014.2%2024.8)%22%2F%3E%3Cellipse%20fill%3D%22%23fff%22%20cx%3D%22202%22%20rx%3D%22127%22%20ry%3D%22127%22%2F%3E%3Cellipse%20fill%3D%22%23cfcfcf%22%20rx%3D%221%22%20ry%3D%221%22%20transform%3D%22matrix(10.44651%2065.52088%20-29.6875%204.73331%2049.8%2031.5)%22%2F%3E%3Cellipse%20fill%3D%22%23fff%22%20cx%3D%22185%22%20cy%3D%2233%22%20rx%3D%22105%22%20ry%3D%22105%22%2F%3E%3C%2Fg%3E%3C%2Fsvg%3E)
- Save the changes with the blue “Save” button.
- Click the main “Submit” button to publish the changes.
Now it’s your turn. What do you think about Google Tag Manager?
Google Tag Manager can definitely make your life easier if you’re willing to invest some time (not a little) in understanding how it works. Just make sure you’re really using the data you’re setting up in GTM; otherwise, what’s the point?
There’s much more to learn about GTM, and in this guide, we’ve only scratched the surface of what this tool can do. Stay tuned for more posts and guides on Google Tag Manager.
In the meantime, we’re curious to hear about your experiences with Google Tag Manager. Is it simple or complex to work with? How do you use this tool in your digital marketing process?