The Meta Pixel (formerly Facebook Pixel) is a tracking snippet that connects your WordPress site to Meta’s advertising platform. It lets you measure ad performance, build custom audiences, and retarget visitors across Facebook and Instagram.
In this post, you will learn what the Meta Pixel does, how to add it to your WordPress site (manually or with a plugin), and how to verify it is working. We will also cover the Conversions API – Meta’s server-side tracking layer that has become essential alongside the Pixel.
The Meta Pixel was previously called the Facebook Pixel. You may also see it referred to as a remarketing or retargeting pixel. All three names describe the same tool.
What is Meta Pixel and Why Do You Need It?
Meta Pixel is an analytics tool from Meta that helps you measure ad campaign effectiveness and optimize based on user actions.
Have you ever visited a website and then seen ads for that site on Facebook or Instagram? That is retargeting in action, powered by the Meta Pixel.
The Pixel does not add visible content to your site. It places a small piece of JavaScript that drops a cookie in your visitors’ browsers. This cookie lets Meta recognize users when they log into Facebook or Instagram and show them your ads.
Adding the Meta Pixel to your site allows you to:
- Track conversions from Facebook and Instagram ads (e.g., purchases, sign-ups, leads).
- Create custom audiences for ad targeting, including people who visited specific pages on your site.
- Optimize ad delivery by focusing on users most likely to complete a desired action.
- Build lookalike audiences based on your existing visitors and customers.
If you are not running Facebook or Instagram ads (and have no plans to), you do not need the Meta Pixel on your site.
If you promote your WordPress site on Facebook or Instagram, adding the Meta Pixel is highly recommended. It gives you detailed insights into user behavior and campaign performance that help you spend your ad budget more effectively.
Meta Pixel and the Conversions API
Browser-based tracking has become less reliable in recent years. Apple’s iOS 14.5 update introduced App Tracking Transparency, ad blockers strip cookies, and browsers increasingly restrict third-party tracking.
To address this, Meta introduced the Conversions API (CAPI) – a server-side tracking method that sends conversion events directly from your server to Meta, bypassing the browser entirely.
Meta recommends running the Pixel and Conversions API together for the most accurate tracking. The Pixel handles browser-side events, while CAPI captures events that ad blockers or cookie restrictions might miss. When using both, Meta automatically deduplicates events so nothing is counted twice.
For most WordPress users, the easiest way to set up both the Pixel and the Conversions API is through a plugin like PixelYourSite (covered below). Manual CAPI implementation requires server-side code and is typically handled by developers or through Google Tag Manager server-side containers.
Creating a New Meta Pixel
To create a Meta Pixel, follow these steps in the Meta Events Manager:
Step 1 – Open Events Manager
Log into your Facebook account and navigate to the Meta Events Manager:
- Go to business.facebook.com and log in with your Facebook credentials.
- In the left-hand menu, find Events Manager under Data Sources. If it is not visible, click “More Tools” to expand the options.
- You can also access Events Manager directly by clicking here.
Step 2 – Create and Install the Pixel
In Events Manager, go to the Data Sources section and click Connect Data Source. Choose Web as the data source and select Meta Pixel.
Once your Pixel is created, you will see installation options. Choose “Manually add Pixel code to website” and copy the code snippet for the next steps.
Adding Meta Pixel to WordPress Without a Plugin
To manually add the Meta Pixel code, paste the tracking snippet directly before the closing </head> tag in your theme’s header.php file.
You can do this via FTP or through the WordPress dashboard:
- Go to Appearance > Theme File Editor.
- Locate the
header.phpfile and paste the code before the closing</head>tag.
Before editing theme files, back up your site. If your theme updates, manual code changes in
header.phpwill be overwritten – use a child theme or a plugin to avoid this.
This method only installs the browser-side Pixel. It does not include Conversions API support. If you need both (recommended), use a plugin instead.
Adding Meta Pixel Using a Plugin
If you prefer not to edit code, a plugin is the simplest approach. PixelYourSite is the most popular option and supports both the Meta Pixel and the Conversions API:
- Go to Plugins > Add New in your WordPress dashboard and search for “PixelYourSite”.
- Install and activate the plugin.
- Go to the plugin’s settings, paste your Meta Pixel ID, and save.
- To enable the Conversions API, generate an access token in Meta Events Manager and paste it into the plugin’s CAPI settings.
The free version covers basic Pixel tracking. The Pro version adds WooCommerce integration, automatic event tracking (add to cart, purchase, lead), and full Conversions API support.
That’s it! Next, let’s verify that the Pixel is working properly.
How to Check If Your Meta Pixel Is Working
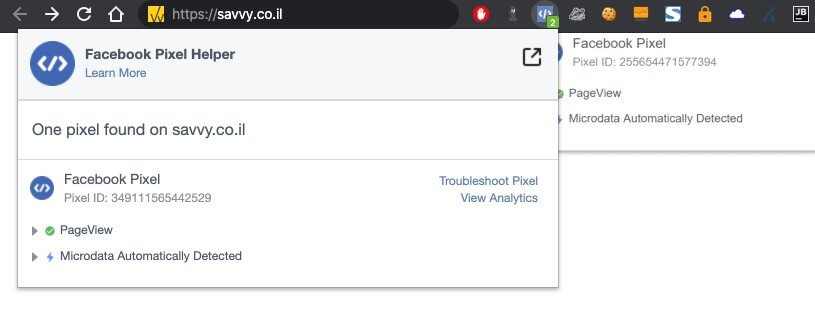
To verify the Pixel is active, use the Meta Pixel Helper browser extension for Chrome.
After installing it, visit your site and click the Pixel Helper icon in the toolbar. If the Pixel is correctly installed, you will see a green checkmark and the events it detected (e.g., PageView).
Checking If Meta Pixel Is Working
If the icon shows errors, double-check that you pasted the full Pixel code and that it appears before the closing </head> tag.
FAQs
Common questions about the Meta Pixel:
Summary
If you promote your WordPress site on Facebook or Instagram, the Meta Pixel is essential for tracking conversions, building audiences, and optimizing ad spend. For the best results, pair it with the Conversions API to capture events that browser-side tracking might miss.
You can install the Pixel manually in your theme’s header.php or use a plugin like PixelYourSite for an easier setup that also supports CAPI. After installation, verify everything works using the Meta Pixel Helper Chrome extension.