Recently, I migrated my blog to the HTTPS protocol, and I want to share with you the process and some things I learned along the way. I also noticed that there isn’t a comprehensive guide explaining the steps to properly migrate a WordPress site to HTTPS. I will do my best to explain how to do it correctly to maintain your site’s ranking on Google and other search engines.
What Is HTTPS?
HTTPS (Hyper Text Transfer Protocol Secure) is a mechanism that enables secure communication between the browser and the server. Implementing HTTPS is an important step in protecting your data by encrypting it so that no one can intercept the communication between the browser and the server as plain text.
This encryption includes data such as your online banking account, credit card information you leave on a website, and even login details for your WordPress dashboard. All this information will be encrypted and transmitted securely from the browser to the server.
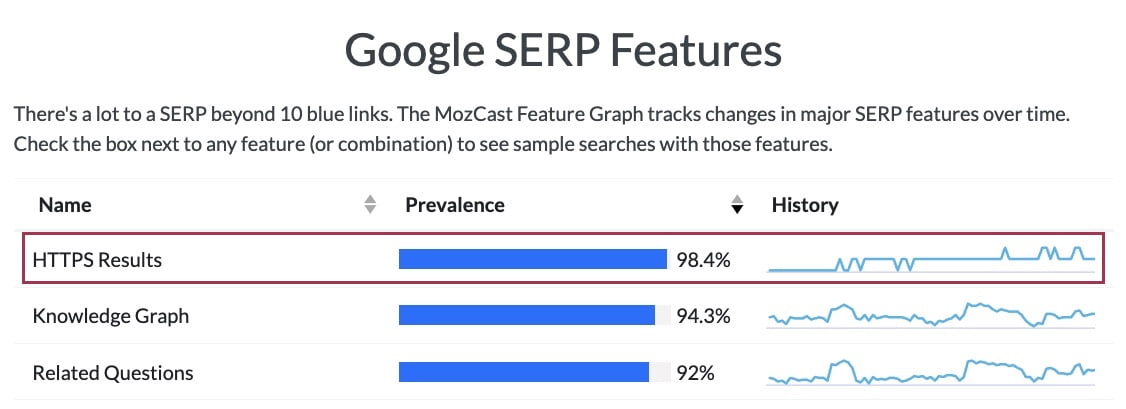
As of June 2021, MozCast reports that 98.4% of Google search results display websites with SSL certificates (i.e., using HTTPS). This is a significant increase in recent years, indicating that many websites are migrating to HTTPS.
Why Should HTTPS Concern You?
There are several reasons why WordPress website owners should consider HTTPS and why you should start the migration process if you haven’t already. Let’s go over some of the key reasons:
A. Site Security
Security is, of course, the most significant reason. By migrating to HTTPS, your site will use SSL/TLS encrypted communication. This means that data will no longer be transmitted as plain text that can be easily intercepted by hackers.
If you run digital stores or WooCommerce shops that process credit card information, it’s crucial to use HTTPS. While it might not be a legal requirement, it’s your responsibility (and that of credit card companies) to keep your customers’ information confidential and secure.
Moreover, HTTPS is essential for the login pages of your WordPress site, especially for WordPress sites with multiple authors (multi-author). If you’re not using HTTPS, every time an author logs in, their login credentials are sent to the server as plain text. Therefore, HTTPS and data encryption are mandatory to maintain secure communication between the browser and the server.
B. Google Ranking and SEO
Google officially announced that HTTPS has an impact on a site’s ranking. While the impact is minor, I assume that you’d want to gain this slight advantage over your competitors. Since Google is pushing the issue, it’s safe to assume that in the future, the weight given to HTTPS websites in terms of ranking will increase.
As a side note, I recently read about a guy named Matthew Barby who analyzed millions of URLs and found that more than 33% of websites ranking 1st, 2nd, and 3rd on Google use HTTPS.
C. Trustworthiness
Did you know that about 28% of users look for the green lock icon in the address bar of their browsers? Furthermore, 77% of those users are concerned about the theft of their information online.

Implementing HTTPS allows your business to build trust, known professionally as SSL Trust. Visitors to your site who see that green lock icon immediately gain peace of mind, knowing that their data is secure.
D. Browser Warnings
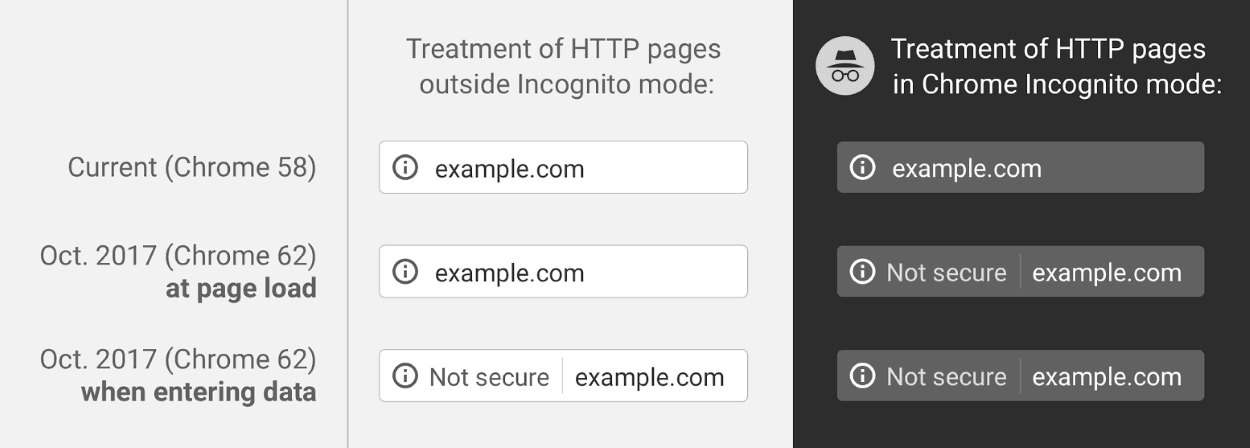
Starting from January 2017, Chrome began displaying a warning when users tried to enter passwords or credit card details on websites that didn’t use HTTPS. As of Chrome 62, Google took this even more seriously and showed a warning next to the form fields on non-HTTPS websites, even without an SSL certificate.
Since Chrome dominates the browser market, with over 55% of internet users using it, this change will directly affect a significant percentage of your site’s visitors. Google simply wants users to be aware that using forms on non-secure sites is not recommended, and they’re making that clear. Firefox has also started marking non-HTTPS sites by displaying a lock icon with a red slash in the address bar.
E. Performance
Another advantage, and not a minor one (especially for speed enthusiasts like me), is the performance improvement of your WordPress site. Migrating your WordPress site to HTTPS allows you to use the HTTP/2 protocol, which is accessible only to HTTPS-enabled sites.
Performance improvements result from various reasons, such as sending multiple signals in one communication channel (Multiplexing), the ability to send and receive a large number of assets simultaneously, including images and JavaScript files, HPACK Compression that allows compressing headers, and ALPN that saves unnecessary round trips.
It’s worth mentioning that some optimizations that we usually perform to improve loading speed of WordPress sites, like file concatenation, using image sprites, and others, are irrelevant when you use HTTP/2 and can even harm your site’s performance. Take a look at the post on Speed and Optimization in the HTTP/2 Era to get more information on this topic.
How to Migrate a WordPress Site to HTTPS
Let’s move on to the interesting and practical part – migrating and the process of transferring a WordPress site to HTTPS. Here are some things you need to ensure before starting the migration:
- The first thing you need to do is purchase an SSL certificate if you don’t already have one. Google recommends an SSL certificate with encryption of 2048 bits or higher. It is recommended to buy an SSL certificate from companies such as Comodo, DigiCert, GeoTrust, or RapidSSL. There are also cheaper options like NameCheap and GoDaddy.
- Make sure that your hosting server and CDN provider (if applicable) support HTTP/2. HTTP/2 support is not mandatory but recommended for better performance, load times, and speed for your WordPress site.
- Allocate enough time for the migration process; it’s not something that can be done in 10 seconds.
- Ensure that all external services (3rd Party Scripts) used on your site and all scripts loaded on your site have HTTPS versions.
- It’s important to note that you will lose all your likes, share counts, and even comments on social networks if you don’t follow the instructions in this guide (especially in part 2 of the guide). This is because social networks treat HTTP and HTTPS addresses as completely different.
- Depending on the size of your site, Google may take some time to crawl the new HTTPS addresses of your site. During this time, you may see fluctuations in your ranking on Google search results.
- Try to perform the migration during the hours when your site has the lowest traffic to avoid affecting the user experience of visitors to your WordPress site.
- Back up your site’s code and database just in case before starting the process.
I highly recommend turning off CDN integration and disabling all caching, minification, and file concatenation plugins before you start. These can complicate the process.
Migrating to HTTPS – Steps to Perform
1. Install Your SSL Certificate
In this guide, I won’t explain how to install an SSL certificate on your server. If you’re using cPanel, you can follow this guide to install a free LetsEncrypt SSL certificate.
You’re welcome to take a look at the post I wrote titled “SSL Certificate and Do You Need It for WordPress Sites?“. You can also see in the post a graph showing the traffic boost Savvy Blog experienced after switching to HTTPS.
2. Verify Your SSL Certificate
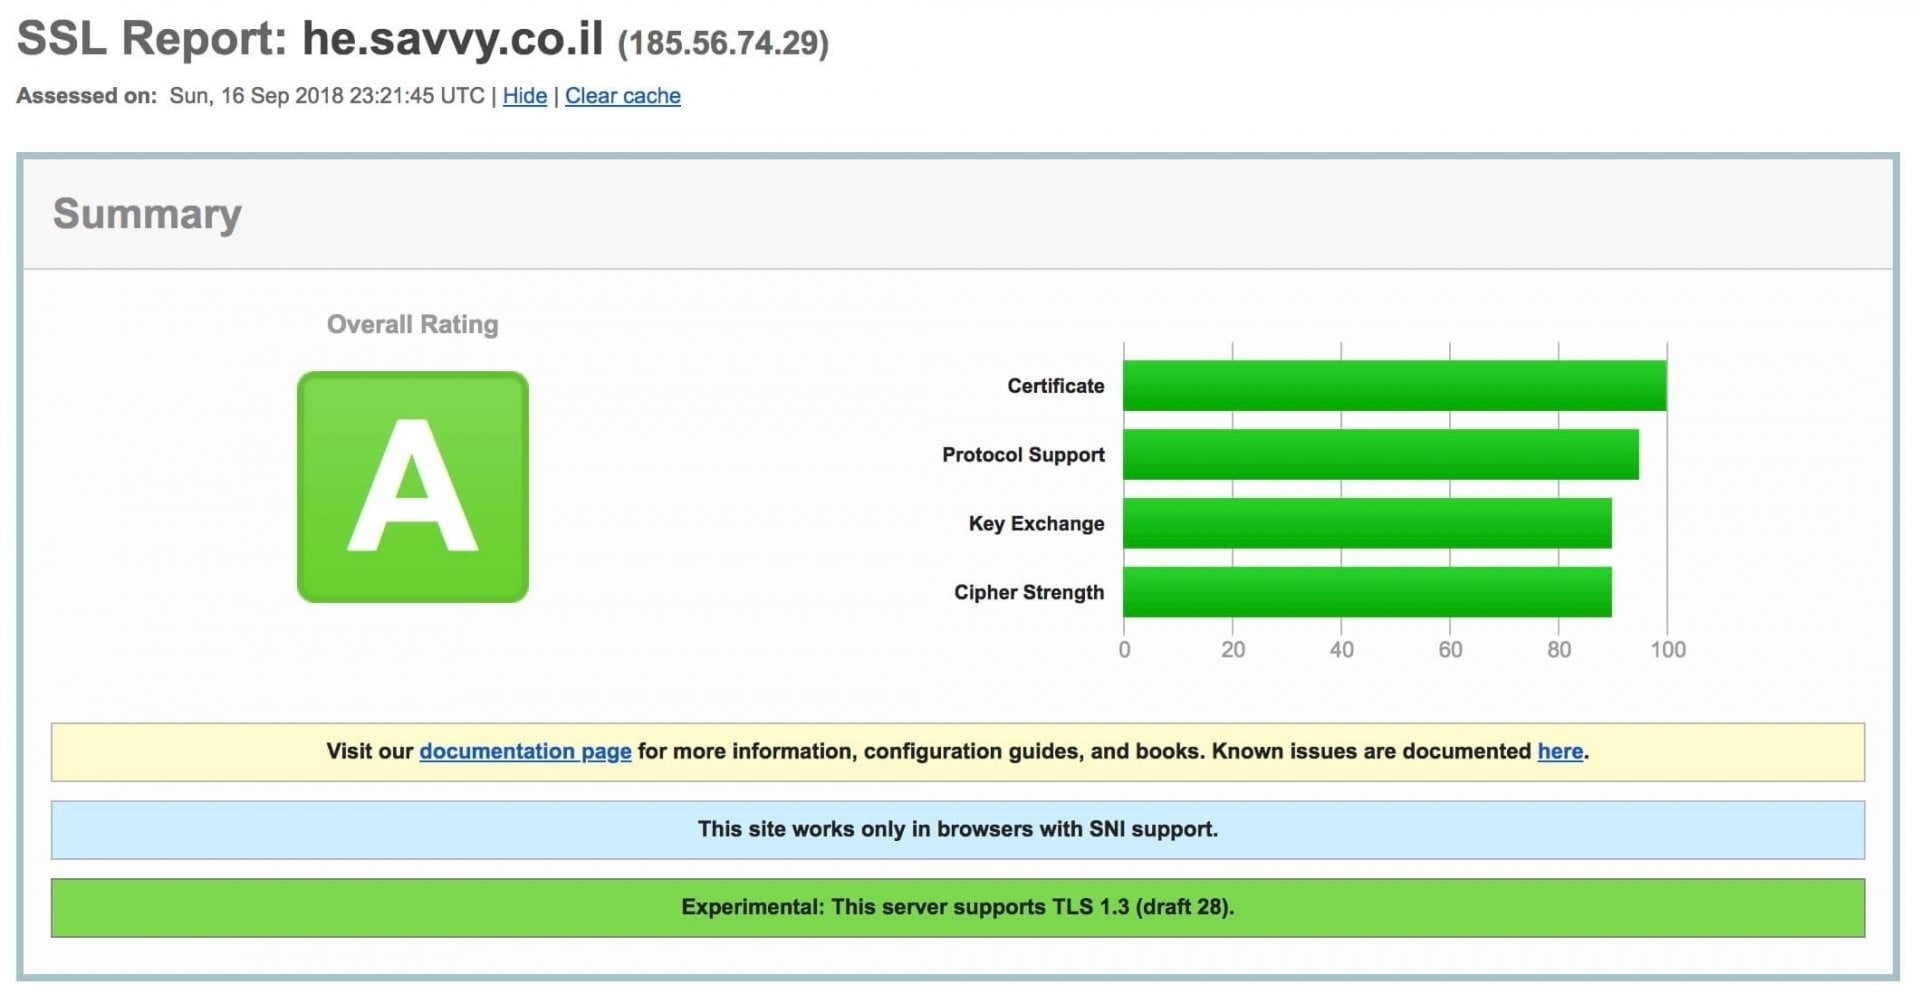
After installing your SSL certificate, before proceeding, you must ensure that you’ve installed it correctly. A quick and simple way to do this is to use the free tool provided by Qualys SSL Labs. If you’ve installed it correctly, you should see an “A” grade in the test results (or possibly “A+”).
3. Implement Permanent Redirection from HTTP to HTTPS
Once you’ve verified the correctness of your SSL certificate, you need to implement a permanent redirection (301 redirect) of all traffic from HTTP to HTTPS. There are several ways to do this, but the recommended way is to do it at the server level.
The method we’ll use for redirection is the correct way to do it both from an SEO perspective, and using a different type of redirection may harm your site’s search engine ranking. It’s important to note that a 301 redirect doesn’t pass 100% of the ranking value, even though Google claims it does (it’s closer to 90%). Nevertheless, this is the correct way to perform redirects.
HTTP to HTTPS Redirection in Apache Server
If your server is running Apache, you can easily redirect traffic from HTTP to HTTPS on your WordPress site by adding the following code to your .htaccess file:
# FORCE SSL
RewriteCond %{HTTPS} off
RewriteRule (.*) https://%{HTTP_HOST}%{REQUEST_URI} [R=301,L]
There are many ways to do this using .htaccess, but this is the method I found to be correct.
HTTP to HTTPS Redirection in Nginx Server
If your server is running Nginx, you can redirect to HTTPS by adding the following code to your Nginx configuration file:
server {
    listen 80;
    server_name domain.com www.domain.com;
    return 301 https://domain.com$request_uri;
}
Note that you need to replace “domain.com” with your own domain.
4. Implement the HSTS Header (Optional)
You don’t have to perform this step – (HSTS (HTTP Strict Transport Security is a secure header that you can add to your server. This header forces the browser to use a secure connection when the site is using HTTPS. This action can prevent Man-in-the-Middle (MitM) attacks and Cookie Hijacking.
You can find more information about this action in a more extensive post I wrote on the topic of Security Headers in WordPress.
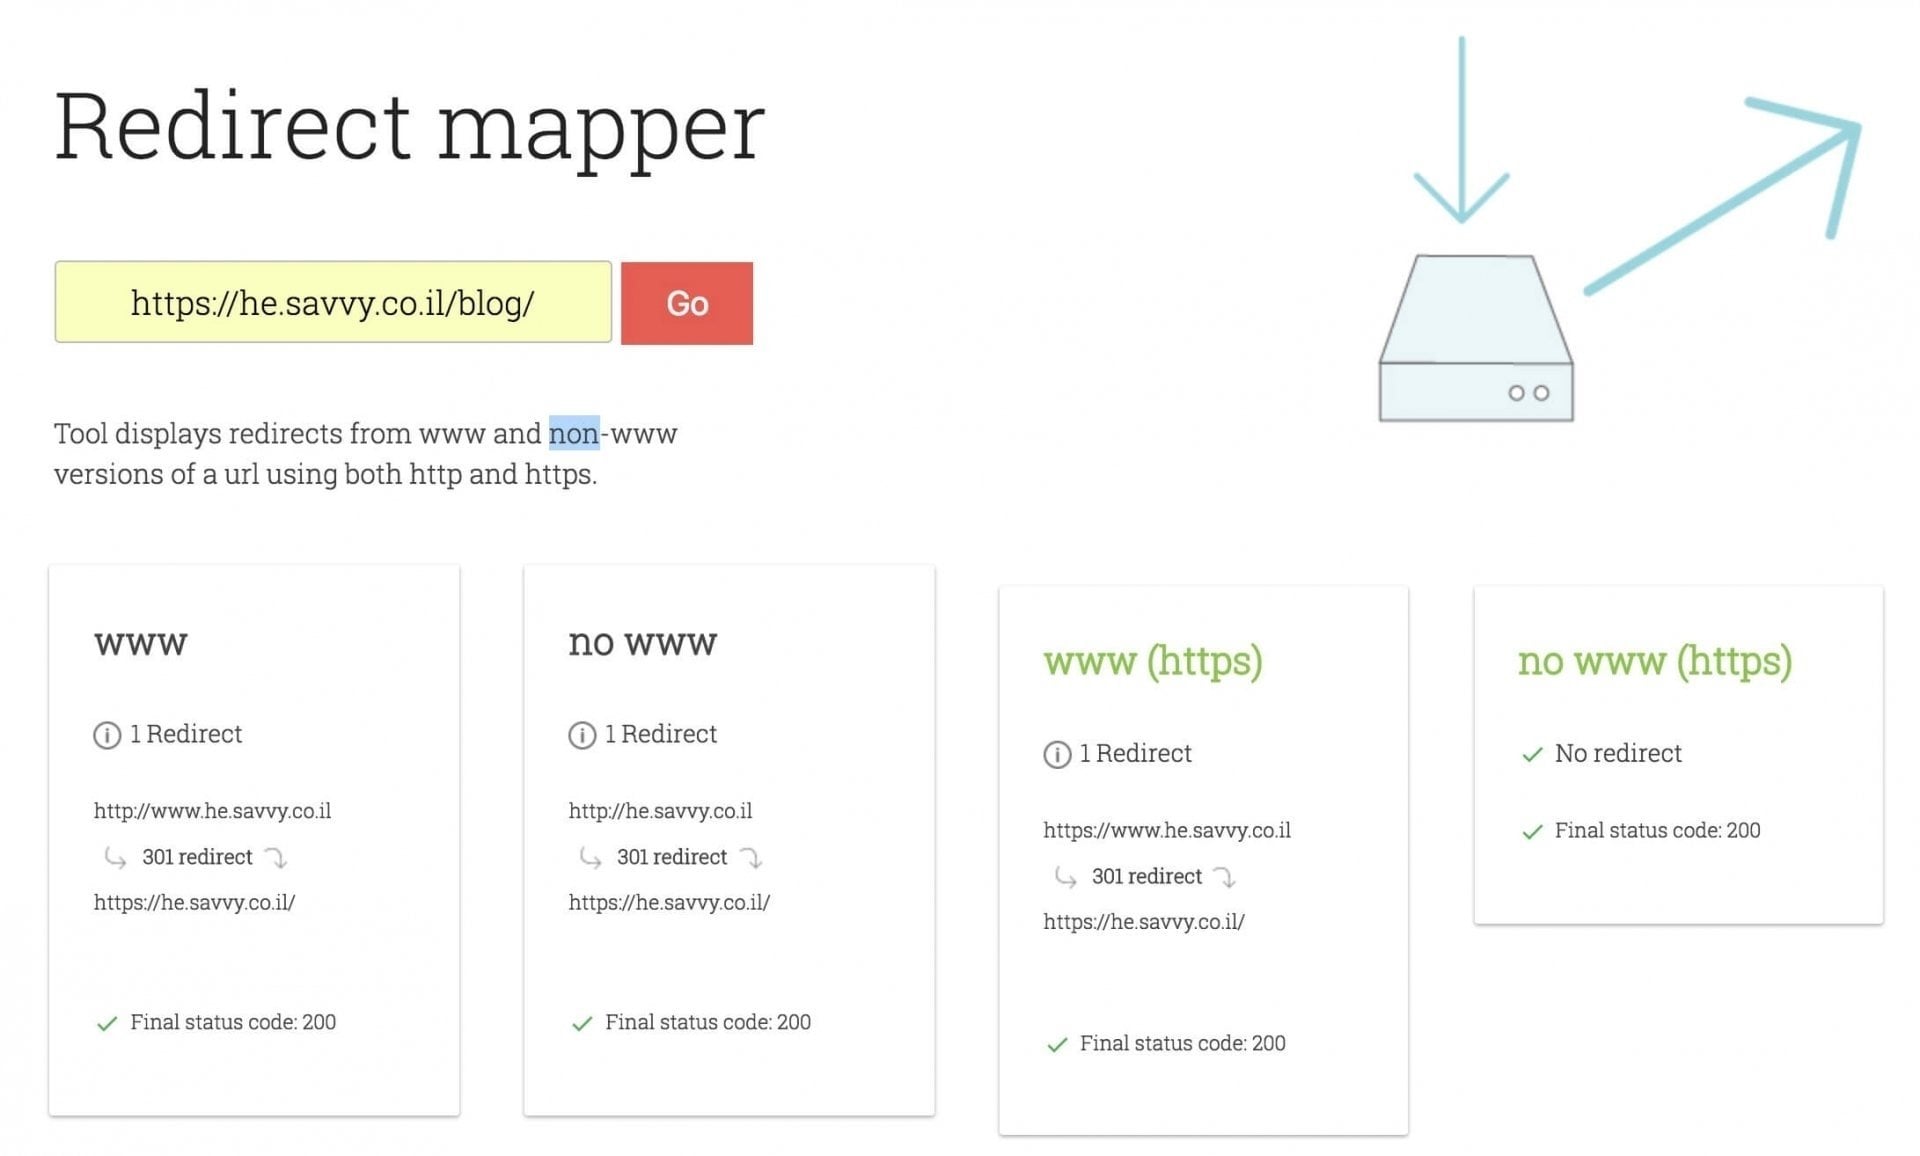
5. Check for Excessive Redirects
After you’ve redirected to HTTPS, it’s essential to verify that there are no unnecessary redirects. This phenomenon is quite common and can impact the speed of your WordPress site.
6. Update All Links in the Database to HTTPS
There are several ways to change links in the database from HTTP to HTTPS. I recommend using the plugin called Better Search Replace to perform this task. The process is straightforward:
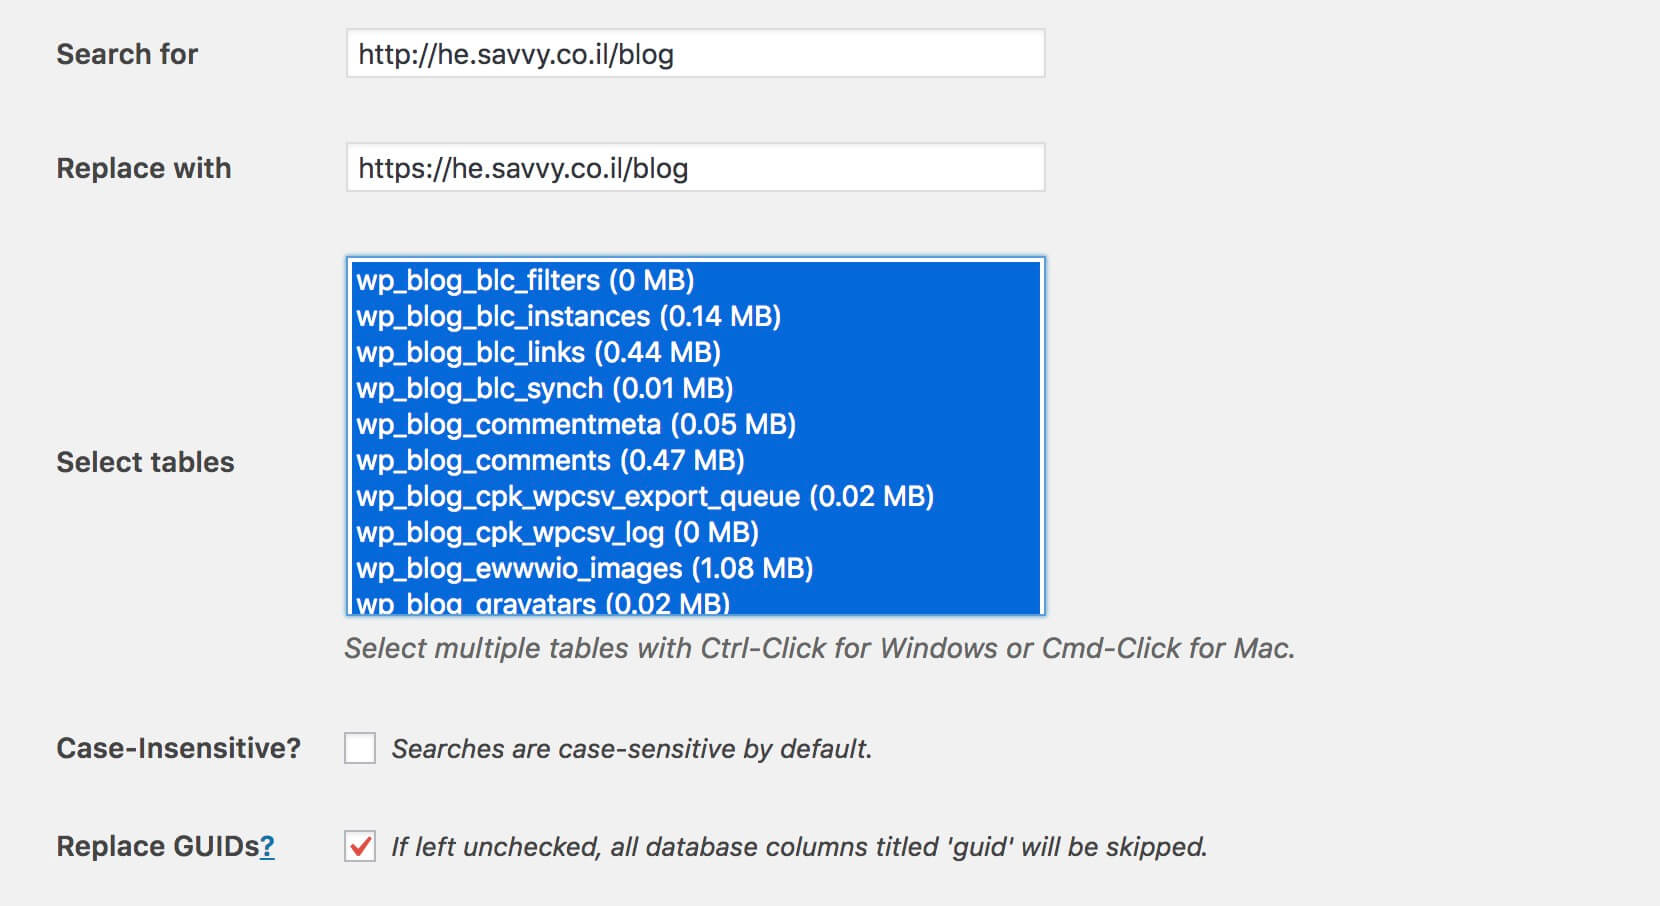
Additionally, if the links to your WordPress site, homepage, or wp-content directory are defined in the wp-config.php file, you should change them accordingly:
define('WP_HOME', 'https://yourdomain.co.il');
define('WP_SITEURL', 'https://yourdomain.co.il');
define('WP_CONTENT_URL', 'https://yourdomain.co.il/wp-content' );
7. Update Links to Scripts and External Libraries
After updating the links in the database, you’ll want to replace all links to scripts and external libraries used in the header, footer, functions.php file, or anywhere else.
These libraries and links could be links to jQuery, Facebook, or any other library. For example, here’s a link to jQuery; simply update the link to HTTPS:
<script src="https://ajax.googleapis.com/ajax/libs/jquery/3.1.0/jquery.min.js"></script>Almost every service provider offers an HTTPS version of the libraries it provides.
8. Perform CDN Migration from HTTP to HTTPS
I can’t explain how to do this because it depends on the CDN service you’re using. However, there are many online guides that explain how to perform this action. Regardless, this is a necessary step you must take.
9. Ensure There Are No Mixed Content Warnings
Now, perform the final check on your WordPress site to ensure you’re not receiving errors related to Mixed Content. These errors appear in Developer Tools when you load assets (scripts, styles, and images) on your site from both HTTP and HTTPS addresses simultaneously.
I assume it’s clear to all of us at this point that when you perform a migration to HTTPS, all assets on the site should load over HTTPS. Here’s an example of a Mixed Content warning:

There’s also an excellent tool called SSL Check that you can use to scan your WordPress site and check if it serves content insecurely. The tool will scan and report on images, scripts, and CSS files that are not served over HTTPS.
Please note that this tool is limited to scanning up to 200 pages for each site.
You can also easily see comments in the Network Panel of Chrome Developer Tools if Mixed Content exists. The Security Panel can also be useful for identifying such issues.
Either way, if these errors exist, you won’t see the coveted green padlock you’ve been waiting for in the browser’s address bar.
Summary
In this guide, we have shown how to transition a WordPress site to HTTPS and perform the migration correctly. Make sure the green padlock appears in your browser’s address bar. Beyond the checks we have performed, go through various pages on your site and ensure that the green padlock is present and expected on all of them.
These actions are just as important and include updating Google Analytics, making updates in Google Search Console, and ensuring that all likes, shares, and comments on Facebook are preserved on your WordPress site. Once you’ve migrated to HTTPS, verify your SSL and other AI readiness signals with the AI Visibility Audit.
Please share your thoughts with us in the comments below, and if you liked the content, don’t forget to share! 🙂