If your hosting runs on a LiteSpeed server, the LiteSpeed Cache plugin is arguably the best caching solution you can install. I’ve been using it across several production sites and the performance gains are real.
The problem? The plugin has a huge number of settings spread across dozens of tabs. It’s easy to miss something or misconfigure an option that breaks your layout.
This guide walks through every section with the settings I recommend for most WordPress sites running on LiteSpeed, based on what’s worked well in practice for improving WordPress performance.
The settings in this guide are recommended defaults, if you’re unsure about anything, feel free to ask in the comments below for personalized help.
Dashboard
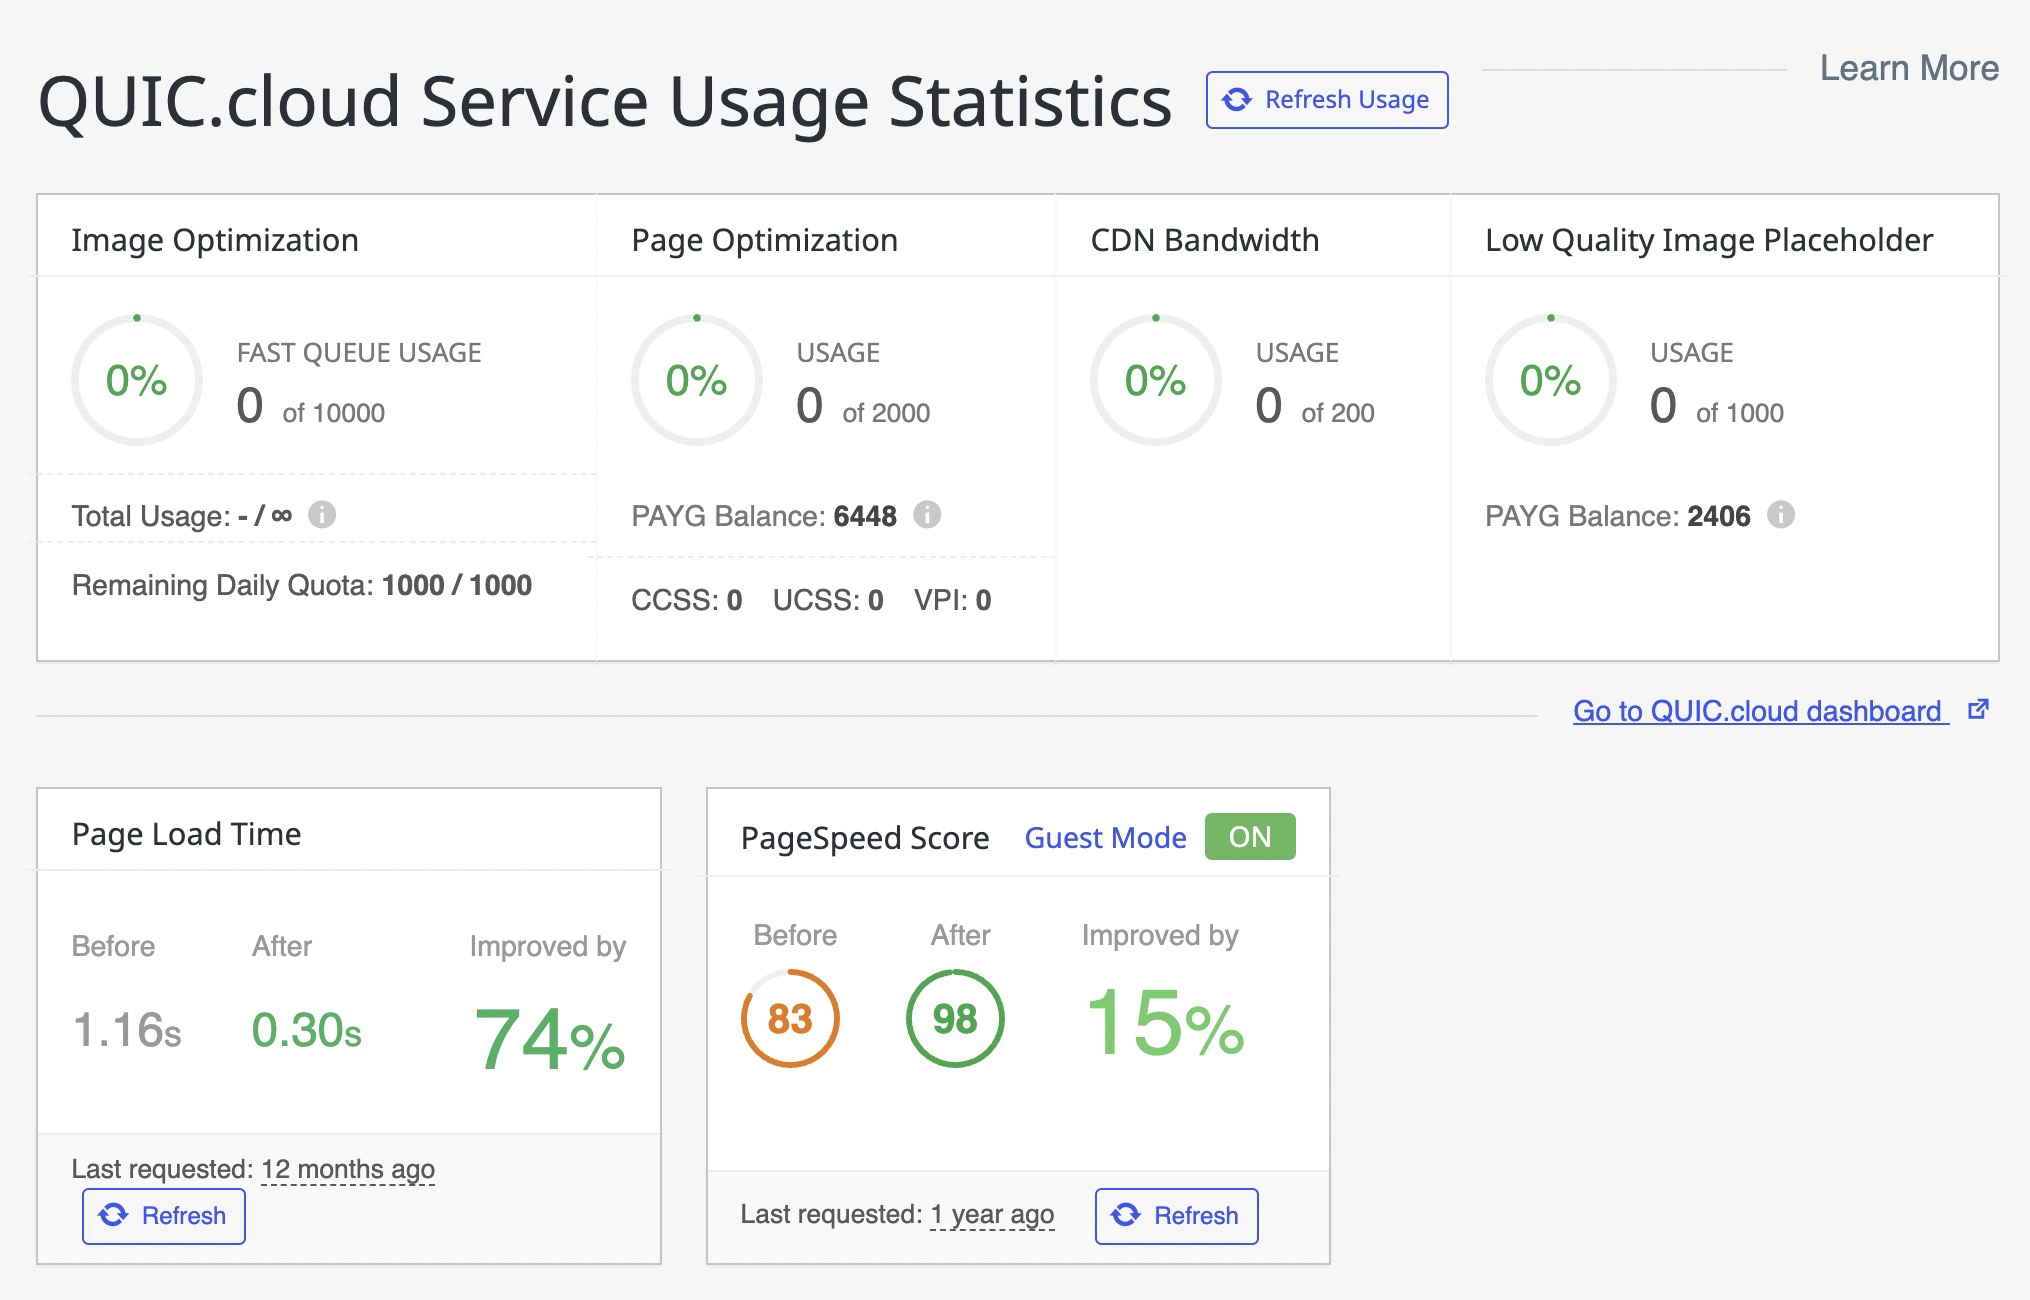
Dashboard – LiteSpeed Settings
The Dashboard offers a quick overview of your site’s performance and its integration with QUIC.cloud services. It summarizes your usage of image optimization, page optimization, CDN bandwidth, and LQIP features, all in one place.
You’ll also see real-time indicators for cache layers, improvements in page speed metrics, and the status of critical services like object caching and crawlers.
This screen is primarily informational and helps you verify that everything is running smoothly. If you notice issues or want to dive deeper, links to relevant sections are just a click away.
The Dashboard helps you stay in control of your optimization strategy by visualizing resource usage, performance gains, and connectivity at a glance.
Presets
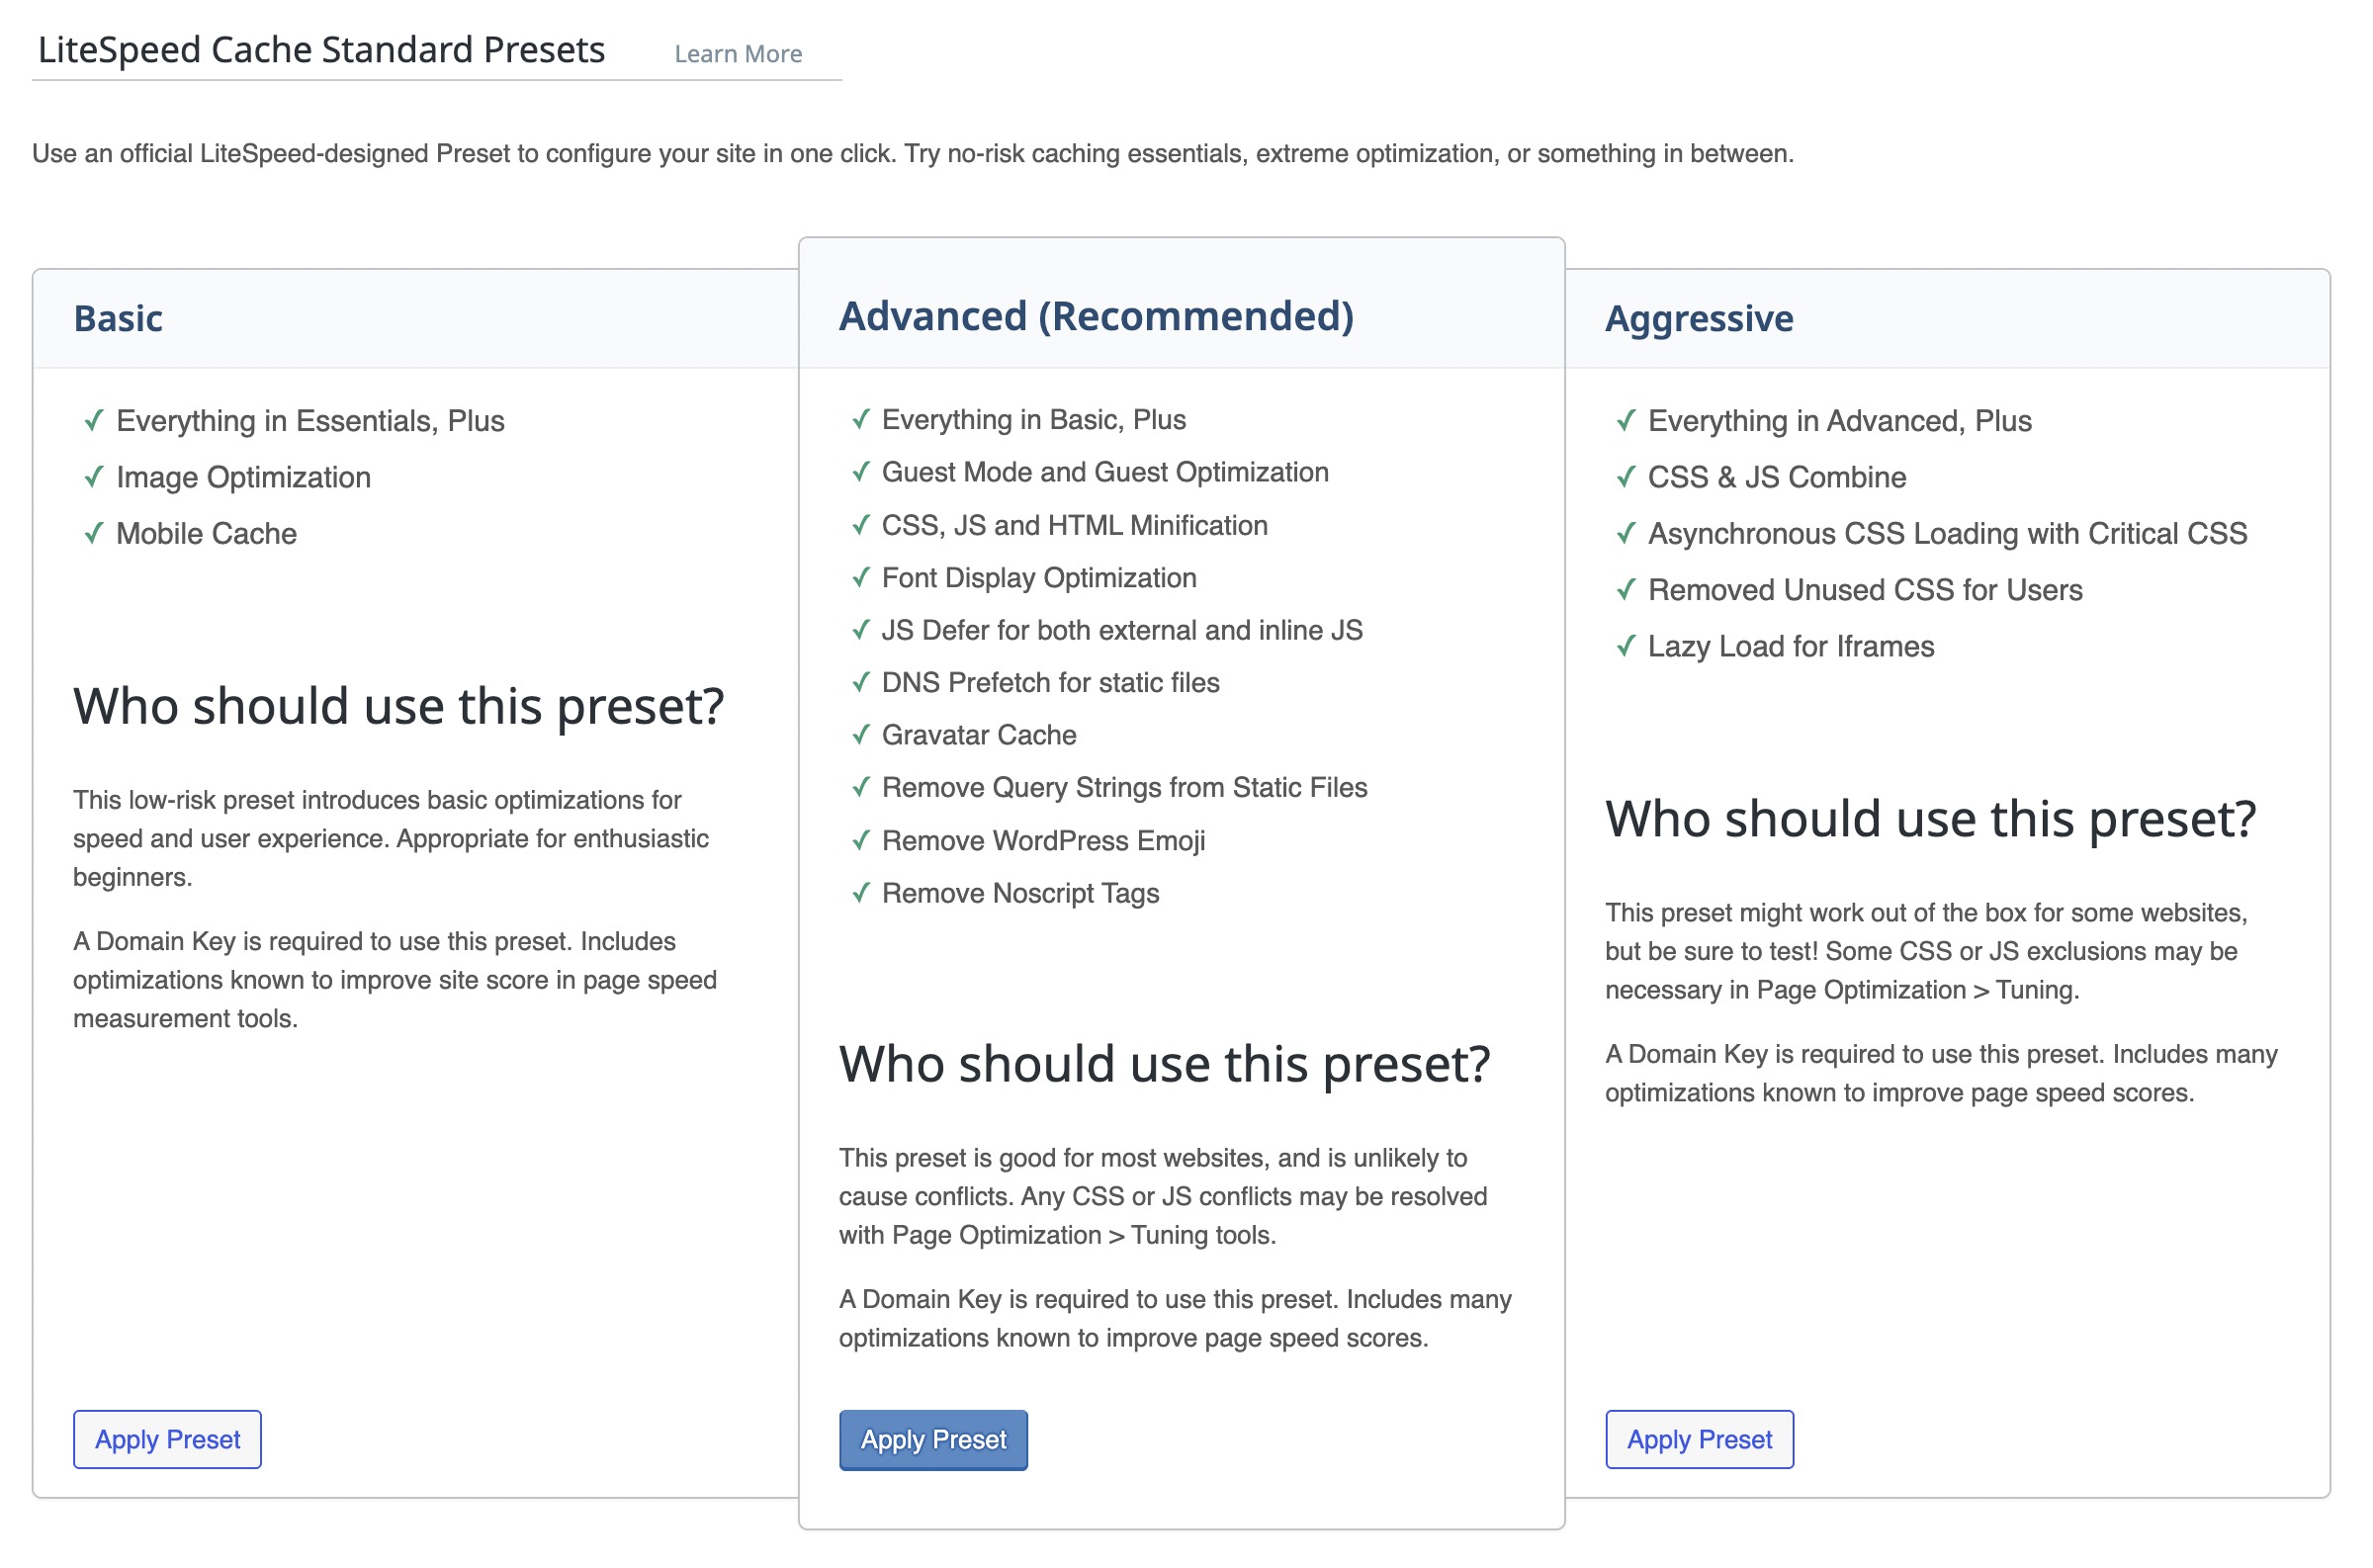
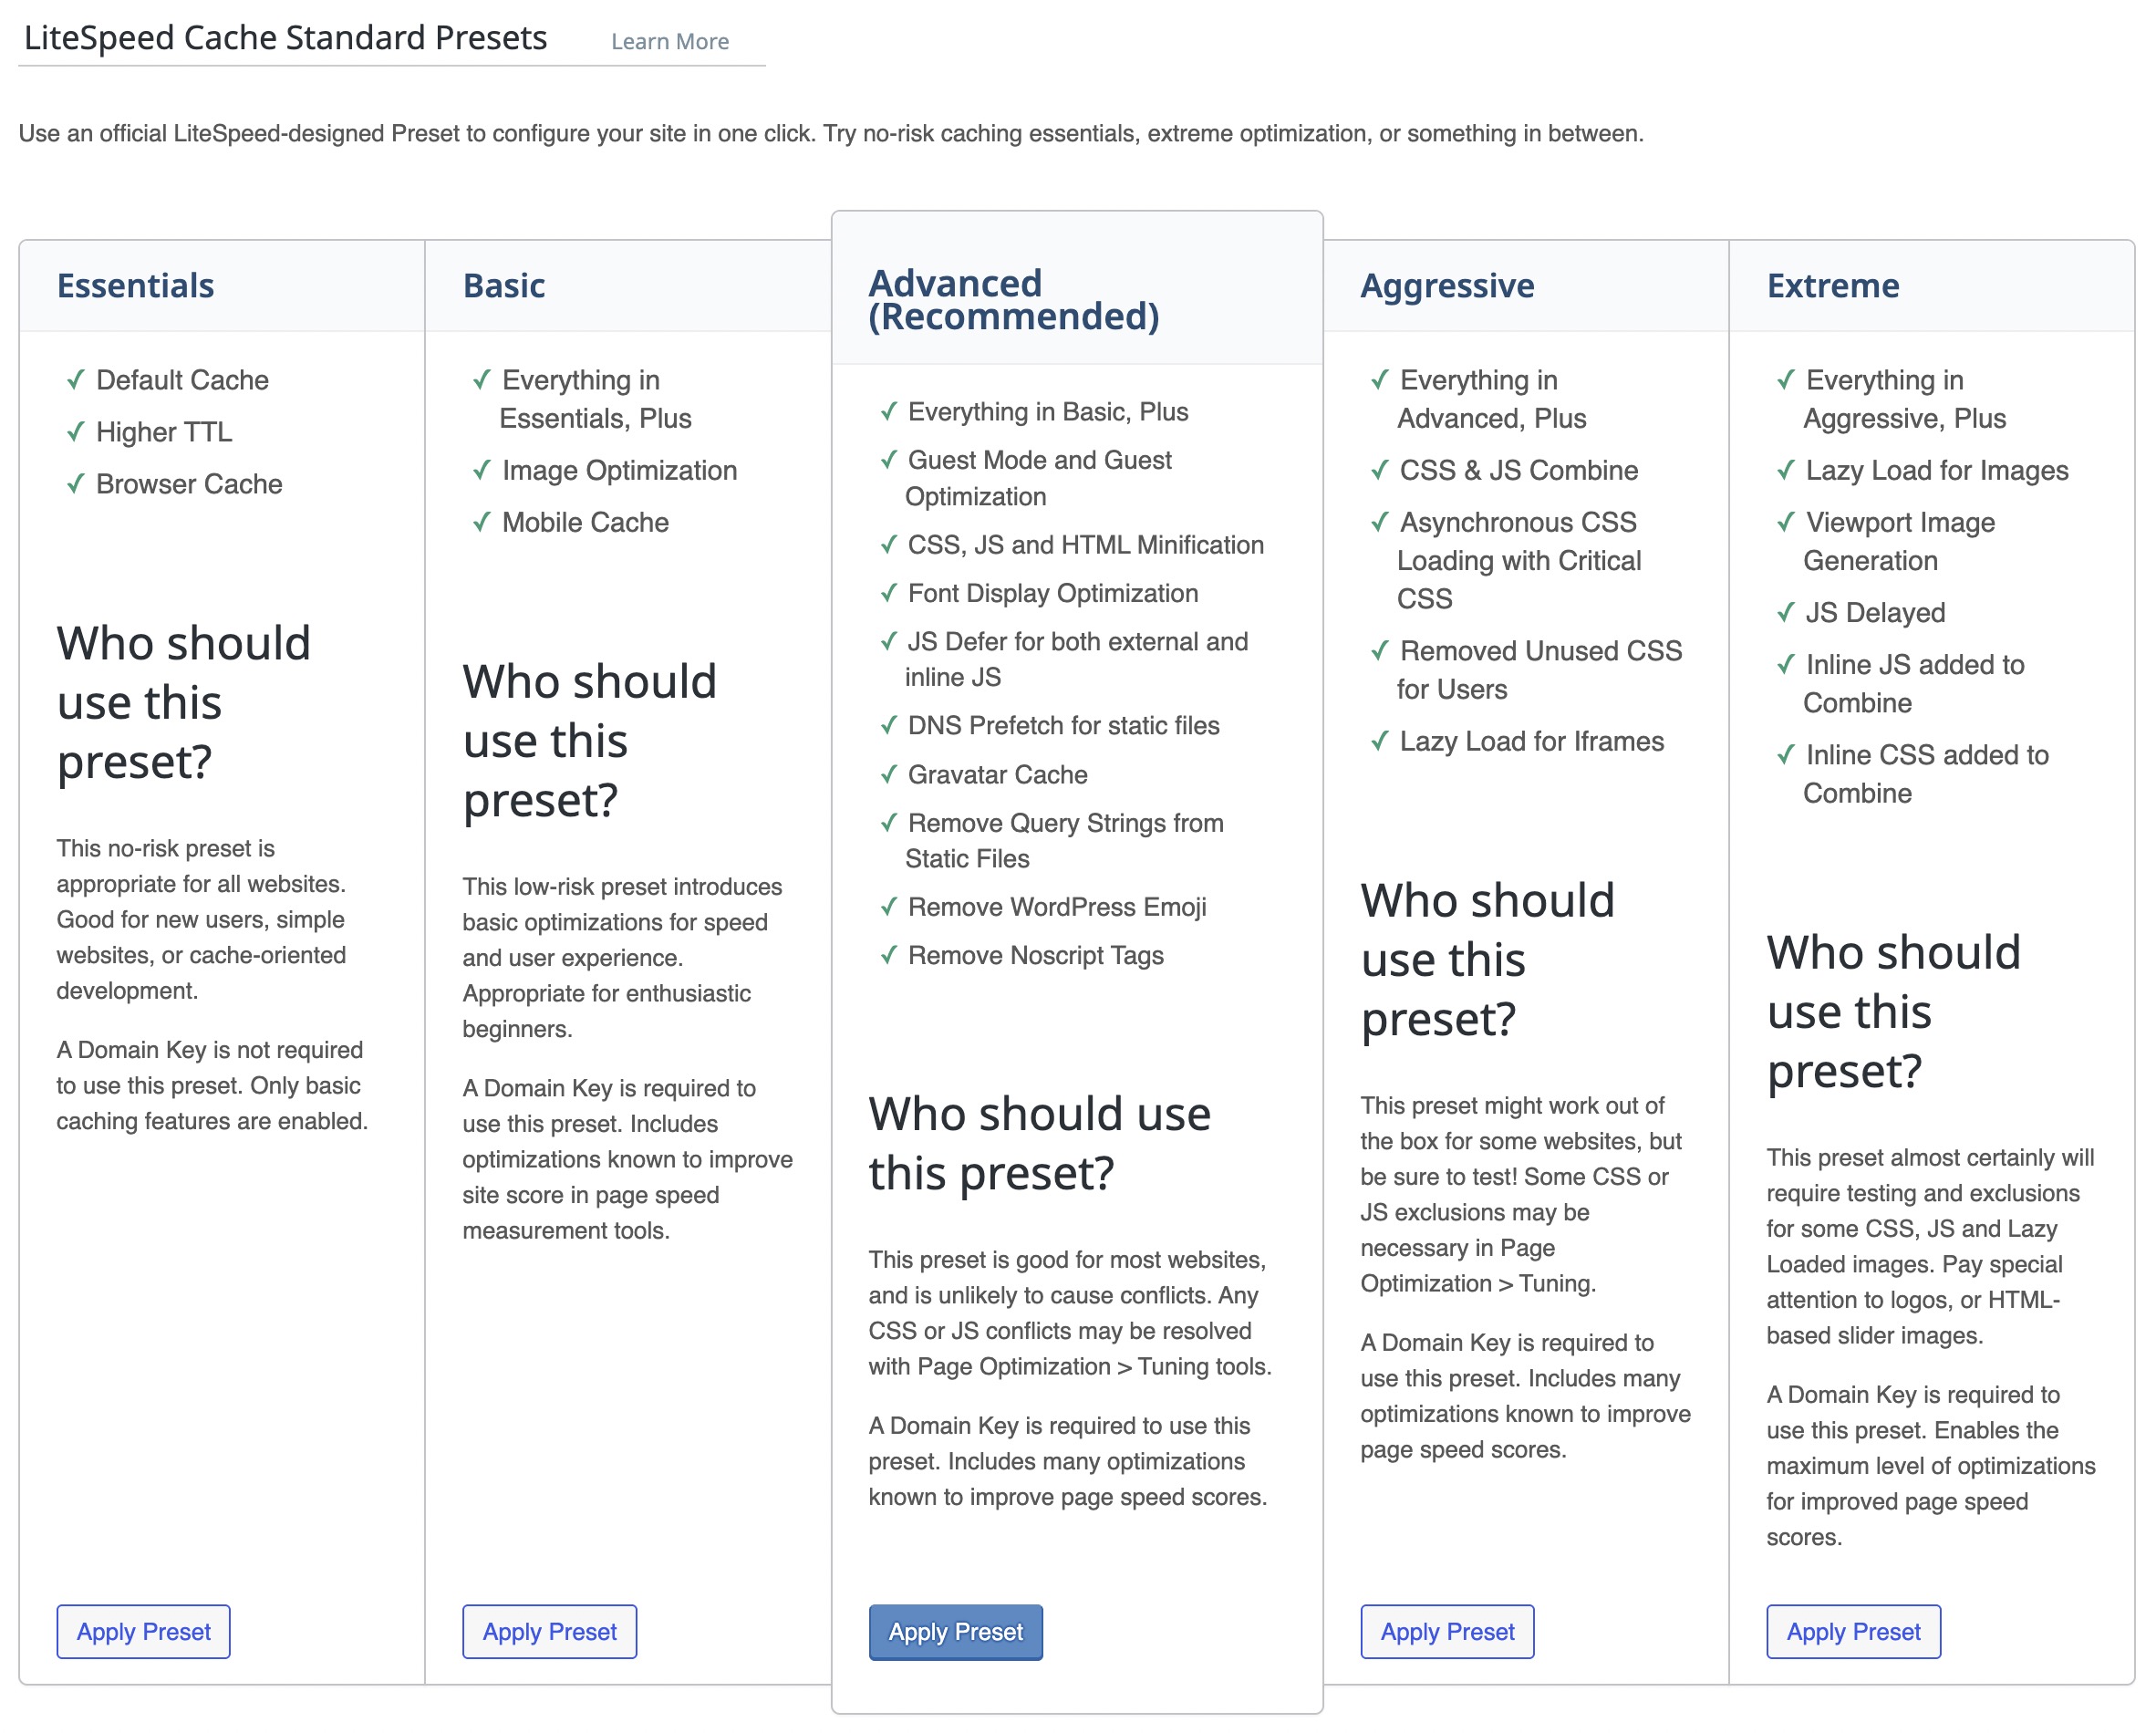
The Presets screen lets you apply a predefined configuration or transfer settings between sites for faster setup.
[1] Standard Presets
Choose a preset based on your site’s needs:
- Standard: Best for most WordPress sites.
- Aggressive / High Performance: Offer more speed but require testing.
Start with “Standard” and fine-tune only if needed.
[2] Import/Export
Easily reuse configurations across sites:
- Import: Upload a saved config file.
- Export: Save your current settings.
General
The General settings control plugin-wide behavior and key performance features like Guest Mode and access to online services. They serve as the global switches that determine how LiteSpeed Cache interacts with your server and frontend optimizations.
[1] Online Services
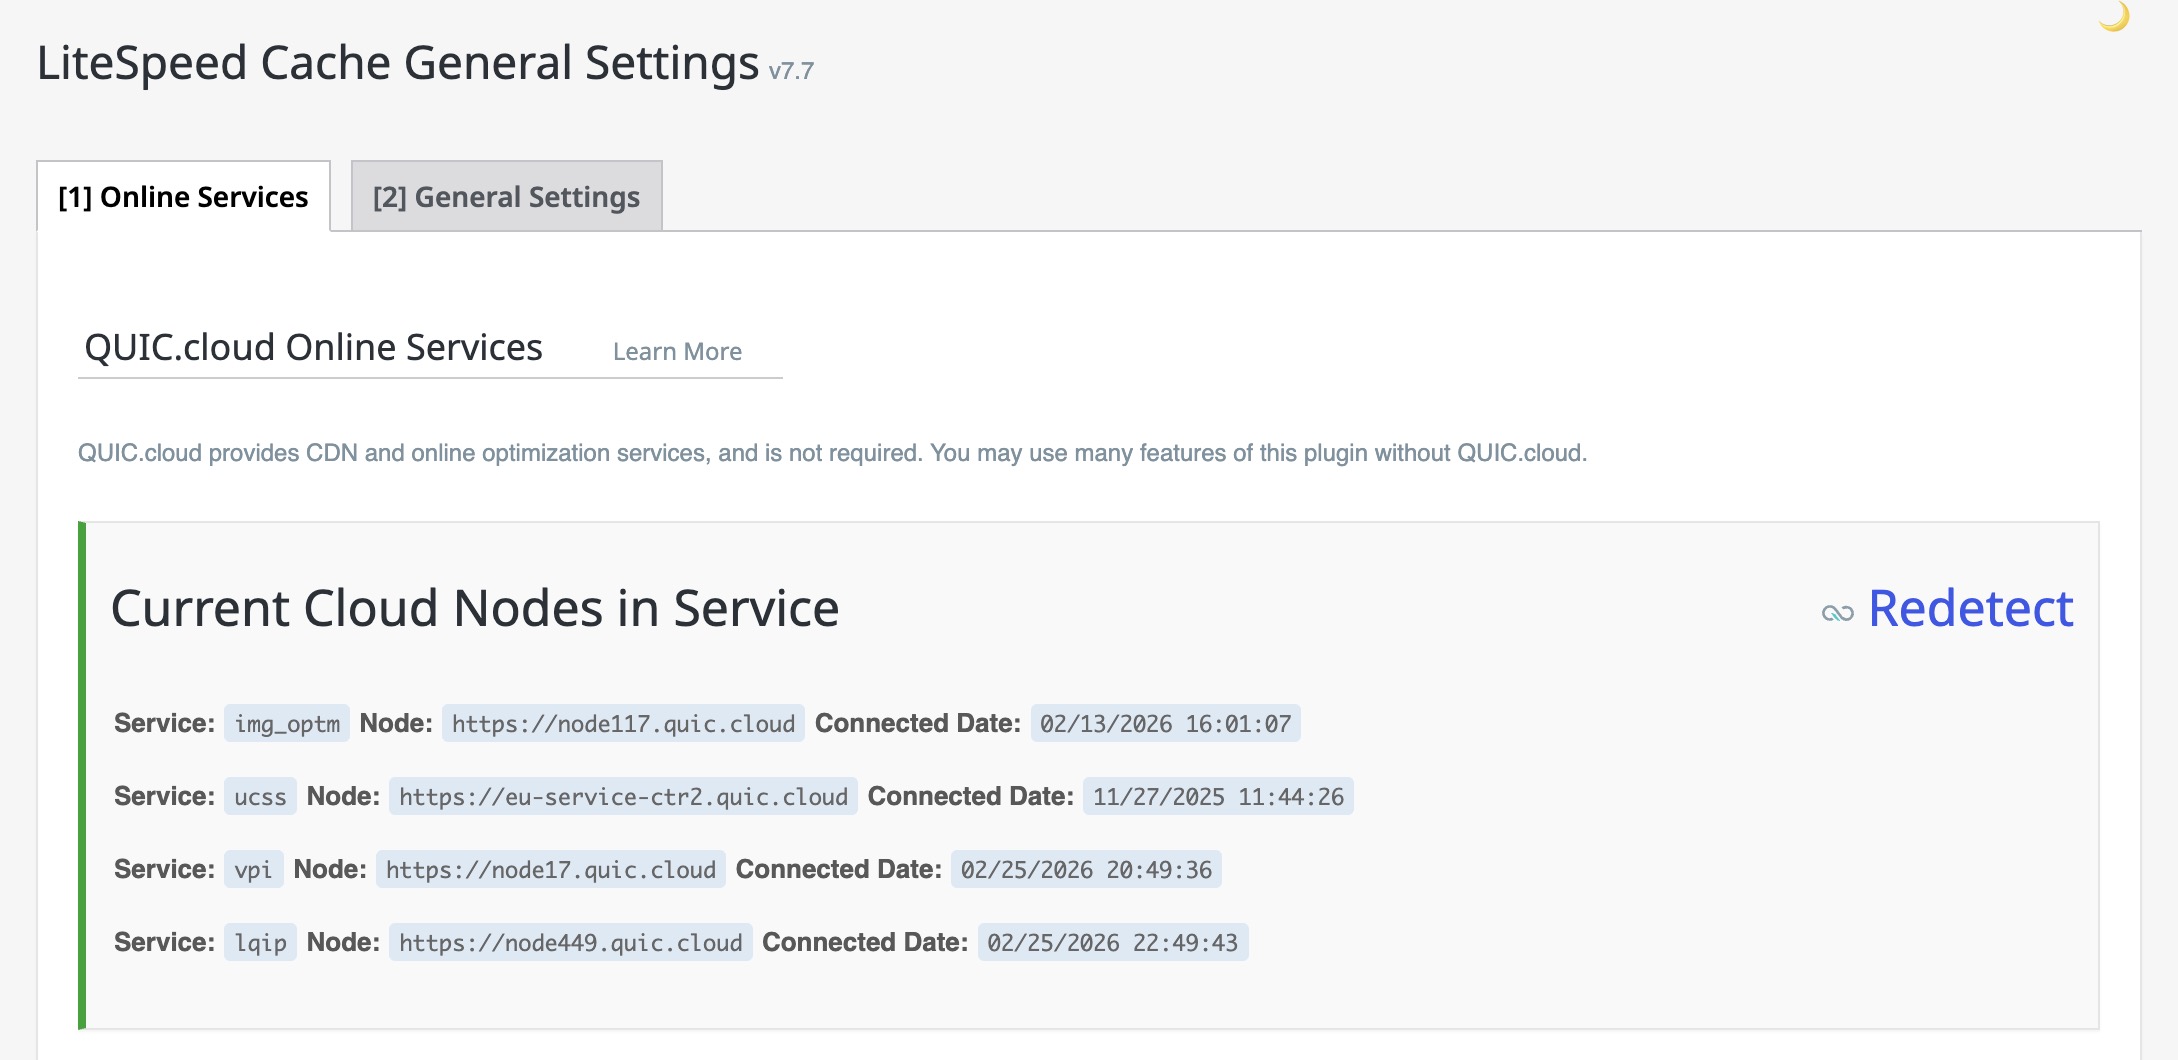
This section confirms whether your site is connected to QUIC.cloud. Once connected, services like image optimization, VPI, and LQIP are enabled.
Connection to QUIC.cloud is optional but unlocks powerful cloud optimization features. The setup is straightforward – just click the enable button and follow the prompts.
[2] General Settings
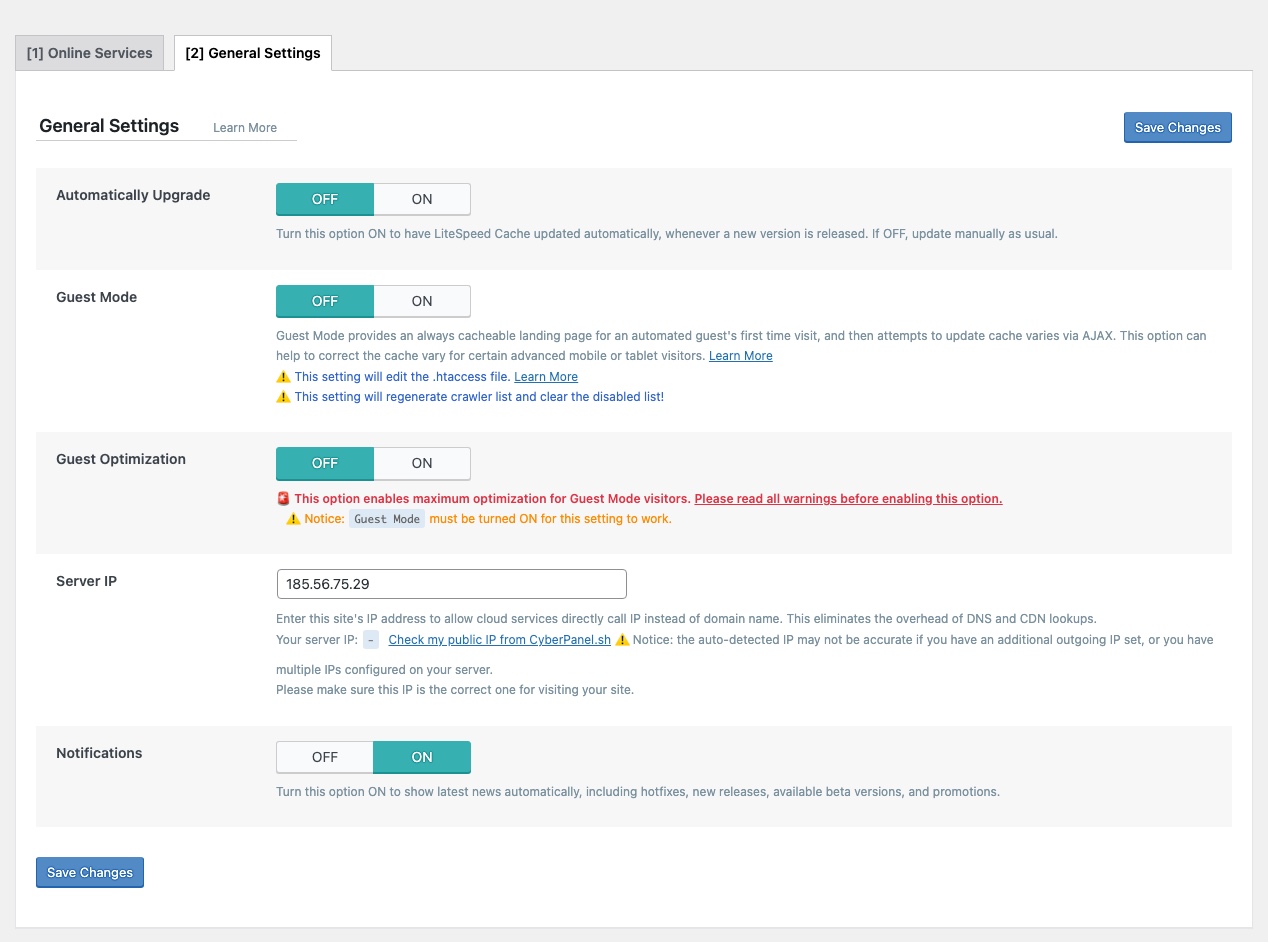
This section includes core configuration options that impact how the LiteSpeed Cache plugin behaves globally, especially for first-time visitors and integration with cloud services.
- ON – Automatically Upgrade: Ensures LiteSpeed Cache updates automatically when a new version is released. Disable if you prefer manual updates.
- ON – Guest Mode: Enables always-cacheable landing pages for new visitors and handles advanced cache variation via AJAX. Useful for dynamic themes and devices.
- OFF – Guest Optimization: This setting enables advanced optimizations like UCSS and CCSS for Guest Mode via QUIC.cloud. Use with caution, it relies on external QUIC.cloud services, and if not properly configured, may cause layout shifts or style issues for first-time visitors.
- Server IP: Set your server’s IP here so that LiteSpeed services (like CDN and optimization) can connect directly without relying on DNS resolution. This reduces lookup overhead.
- ON – Notifications: Displays news, hotfixes, beta releases, and promotions directly within the plugin interface.
Guest Mode and Guest Optimization work together to maximize first-visit speed, but use caution when enabling both. They may modify your
.htaccess, clear optimization queues, and impact certain theme/plugin behaviors.
⚠️ Note: Enabling Guest Optimization may break site layout or functionality in some themes, especially those heavily reliant on dynamic CSS or JavaScript. Be sure to test thoroughly before using in production.
Want to dive deeper into how Guest Mode works and whether you should enable it? Check out our full guide on LiteSpeed Cache Guest Mode.
Cache
This section allows you to fine-tune which content gets cached and how the cache behaves in various scenarios. It includes configuration for exclusions, cache duration, purge triggers, and advanced logic like ESI and object caching.
[1] Cache
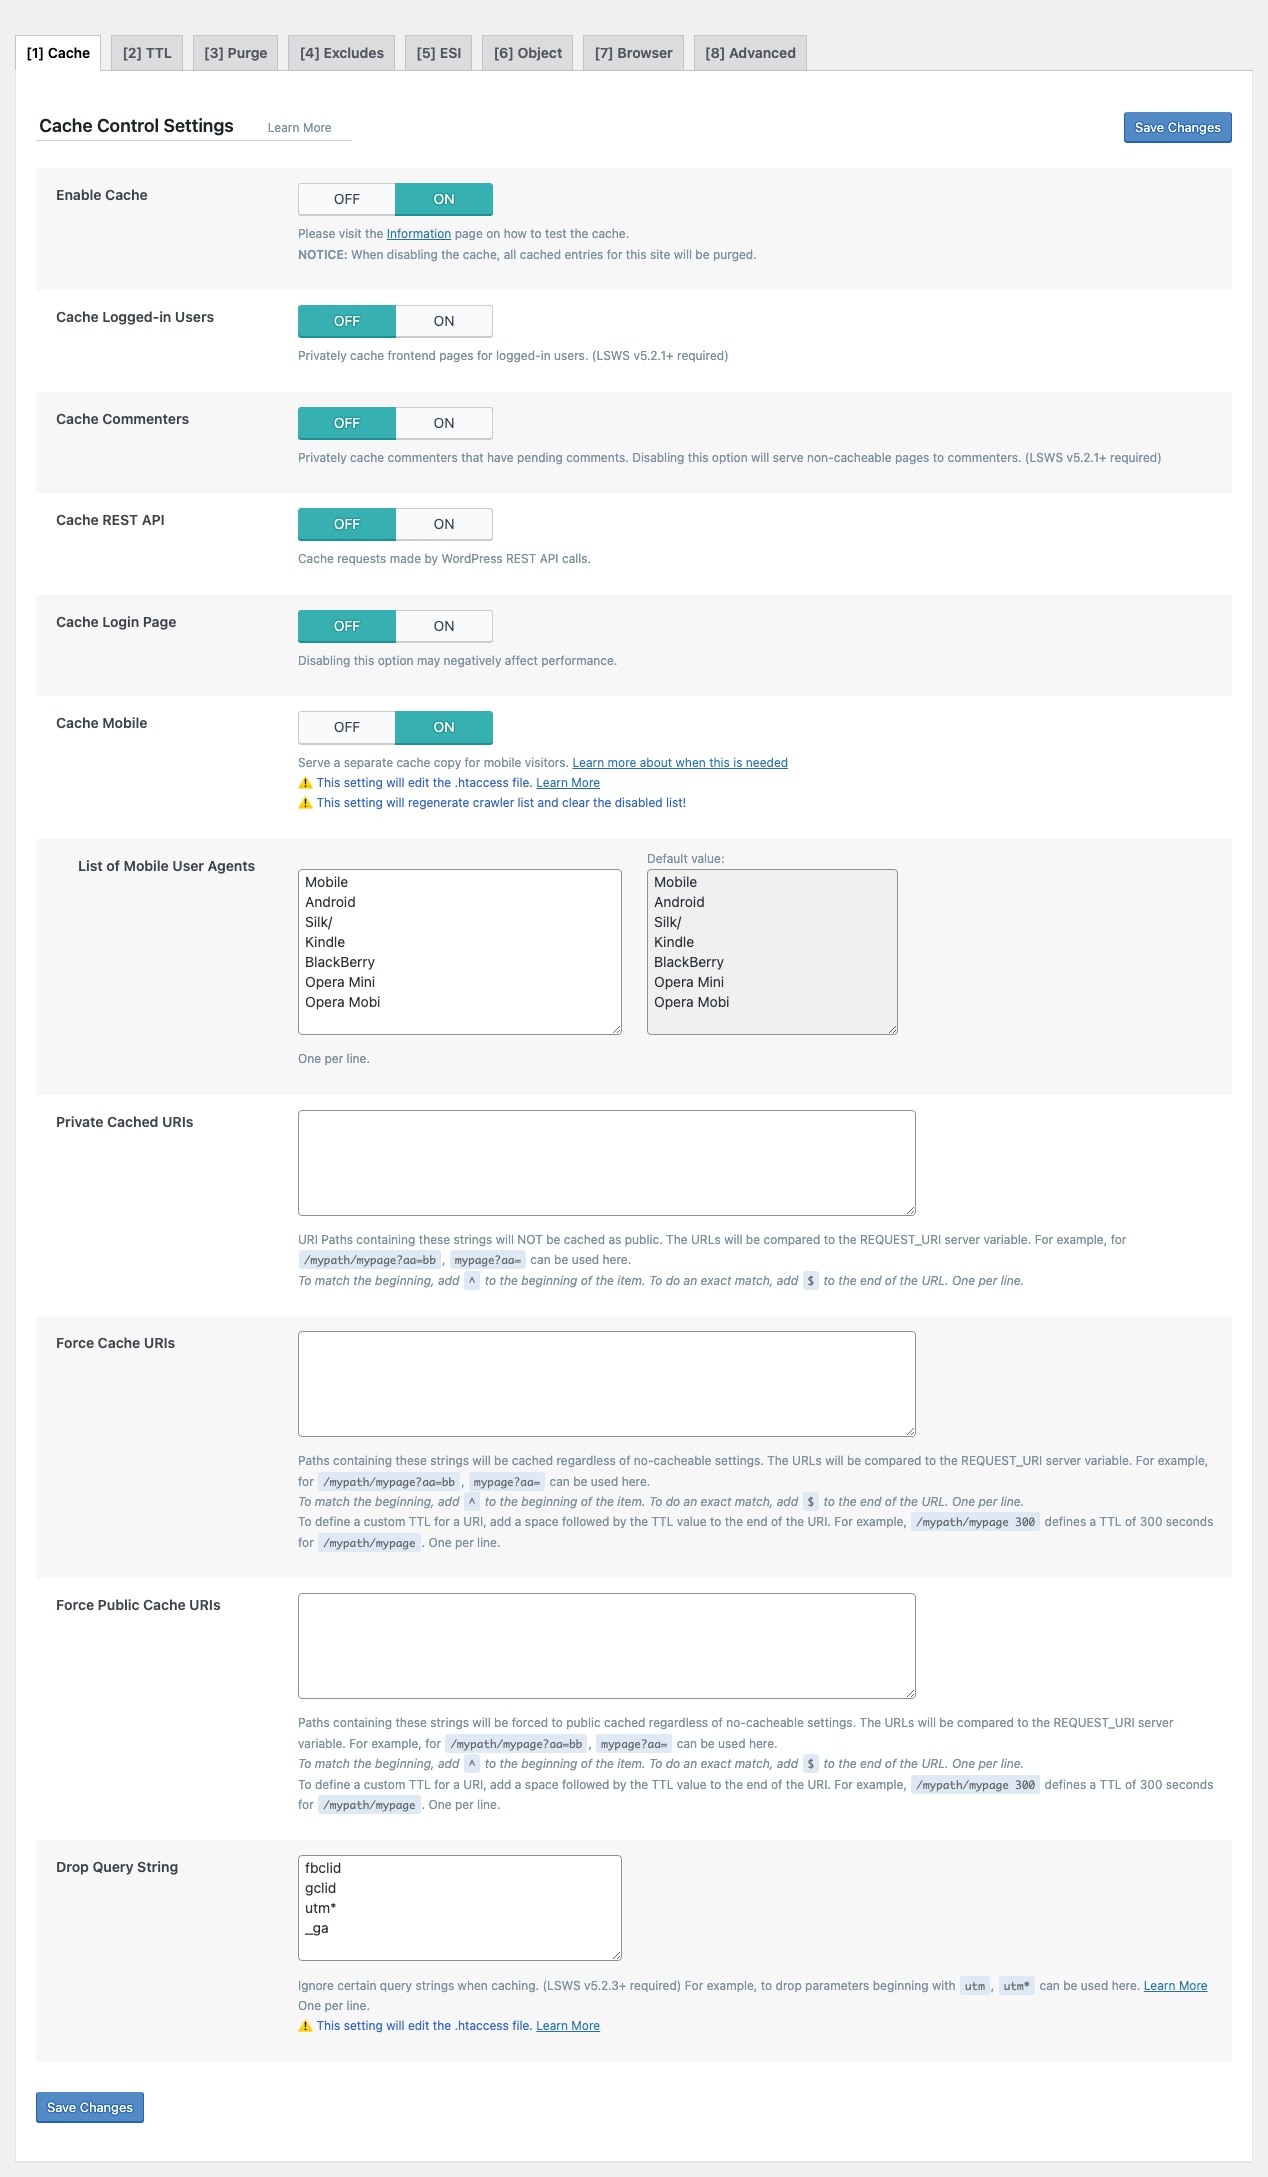
This section defines which types of requests and visitors are eligible for caching. Enabling the right options here can significantly improve performance by reducing server load and delivering pages faster.
- ON – Enable Cache: The master switch for enabling LiteSpeed Cache on your site.
- OFF – Cache Logged-in Users: Disabled by default to prevent serving cached content to users with dynamic or personalized dashboards. Enable only if you’ve tested thoroughly on membership or intranet-style sites.
- ON – Cache Commenters: Caches pages for users who have commented but aren’t logged in. Improves performance on discussion-heavy content.
- ON – Cache REST API: Caches WordPress REST API requests to improve response speed, especially for headless or AJAX-heavy themes.
- ON – Cache Login Page: Improves performance on login pages but may need testing with security plugins.
- OFF – Cache Mobile: Disabled by default. Enable only if your theme or site serves completely different layouts or content to mobile users. Turning this on will modify your
.htaccessand reset the crawler list.
Enable only the cache options relevant to your setup. Mobile caching can improve performance for sites with separate mobile layouts, but test carefully if your theme is highly dynamic.
[2] TTL
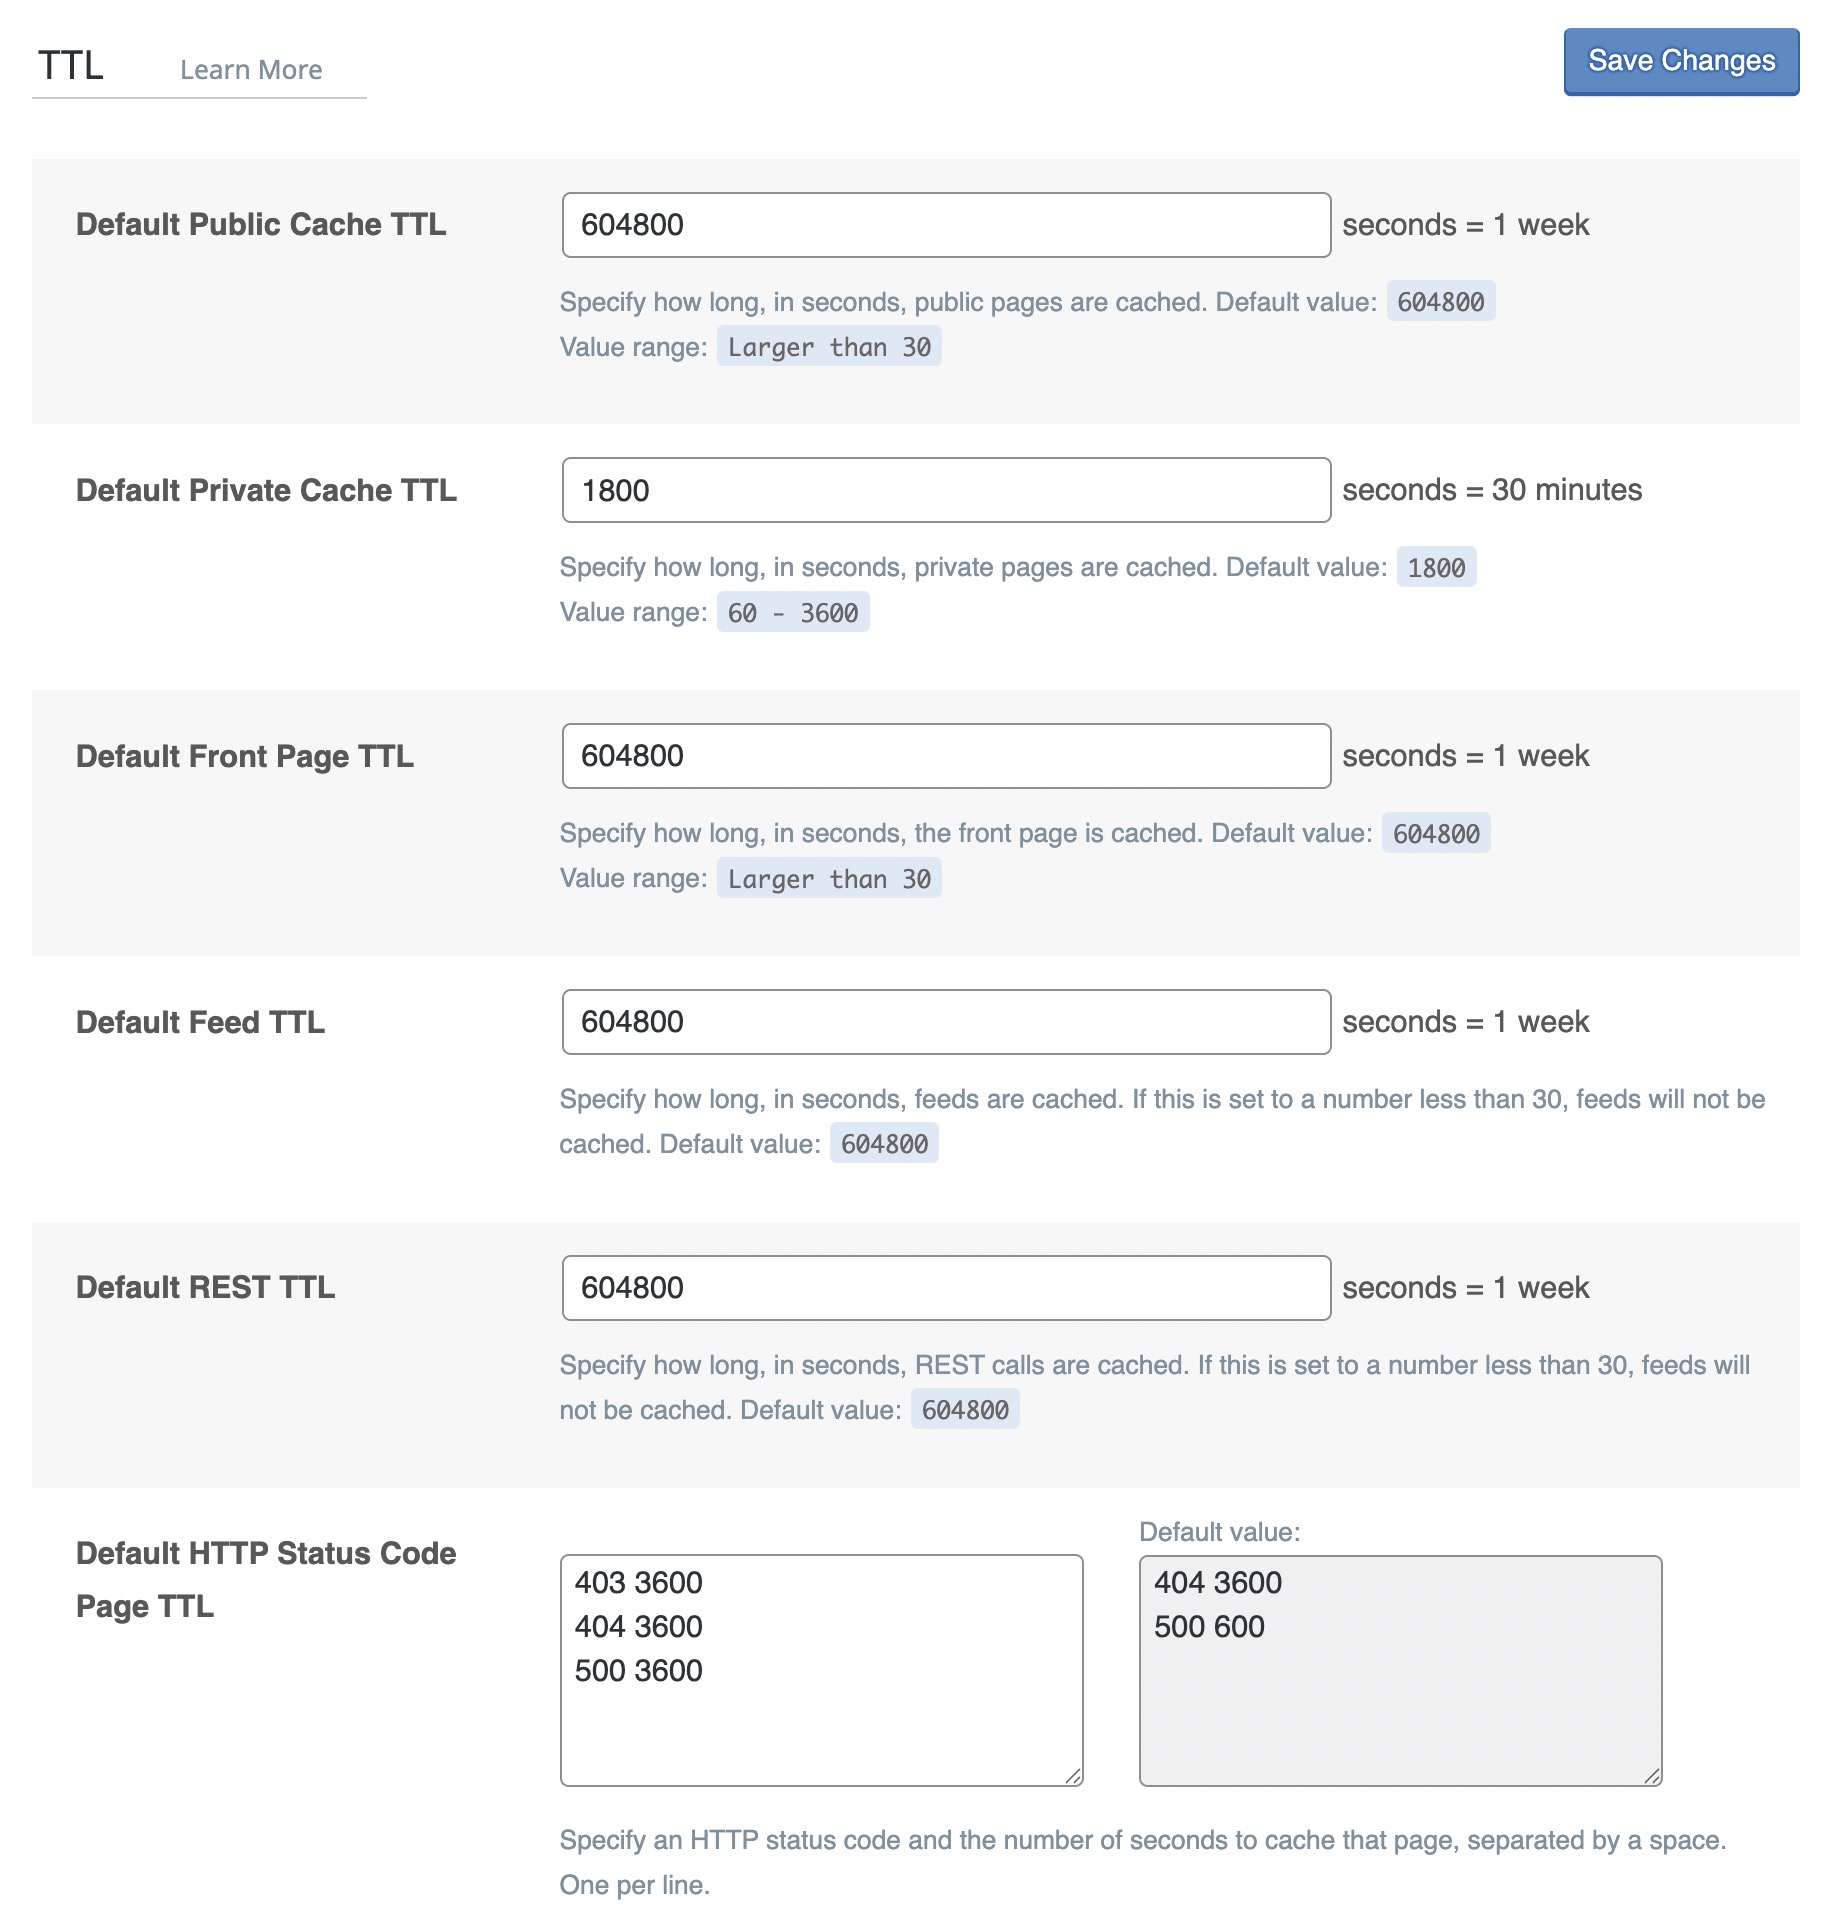
TTL (Time To Live) settings define how long specific types of content stay in cache before they expire and are regenerated. Adjusting these values helps balance between performance and content freshness depending on how frequently your content updates.
- Default Public Cache TTL:
604800seconds (1 week), for pages accessible to all users. - Default Private Cache TTL:
1800seconds (30 minutes), for personalized content like logged-in user views. - Default Front Page TTL:
604800seconds (1 week), controls how often the homepage is refreshed. - Default Feed TTL:
604800seconds (1 week), used for RSS/Atom feeds. Setting below 30 disables caching. - Default REST TTL:
604800seconds (1 week), applies to REST API responses. - Default HTTP Status Code Page TTL: Set custom TTL for specific status codes like:
403 3600, cache “Forbidden” pages for 1 hour404 3600, cache “Not Found” pages for 1 hour500 3600, cache “Server Error” pages for 1 hour
Longer TTLs improve performance but may serve stale content. For frequently updated pages, lower TTLs ensure users see the latest version sooner.
[3] Purge
The Purge settings determine when cached content should be automatically cleared and regenerated. Proper configuration here helps ensure visitors receive fresh, up-to-date content without manual intervention, especially after site changes.
- ON – Purge All On Upgrade: Automatically clears the cache when a plugin, theme, or WordPress core is updated.
- Auto Purge Rules For Publish/Update: Select which page types to purge when a post or page is created or updated. Recommended options include:
- Front page and Home page
- Pages and Post type archive
- Term archive (categories, tags, taxonomies)
Additional options like author, yearly, and monthly archives may be selected based on your site’s structure.
- OFF – Serve Stale: Disabled by default to avoid serving outdated content. Consider enabling if your site experiences traffic spikes or slow regeneration times, as it can maintain speed while the new cache is being built.
- Scheduled Purge URLs: Add specific URLs to be purged at regular intervals if needed (one per line).
Configure purging thoughtfully. Over-purging can reduce performance, while under-purging may result in outdated content. “Serve Stale” offers a good middle ground by keeping things fast during regeneration.
[4] Excludes
The Excludes tab allows you to define specific content types or request patterns that should bypass caching. This is essential for ensuring dynamic pages, user-specific views, or third-party tools operate correctly without interference from cached responses.
- Do Not Cache URIs: Add page paths like
/checkout/,/cart/, or custom dashboard pages that require dynamic updates. - Do Not Cache Query Strings: Exclude specific query parameters (e.g.,
utm_,ref=) to avoid cache conflicts in marketing or tracking campaigns. - Do Not Cache Categories / Tags: Add category or tag slugs to exclude specific taxonomy archive pages from caching. Useful if you have dynamic widgets on those pages.
- Do Not Cache User Agents: Specify bots, tools, or specific browsers that should bypass the cache. Each entry should be on a new line.
- Do Not Cache Roles: Select user roles (e.g., Administrator, SEO Editor) that should always bypass the cache to see real-time content updates or work with draft elements.
Excluding pages and roles from caching is crucial for accurate behavior in areas like WooCommerce carts, logged-in dashboards, or SEO testing environments.
[5] ESI (Edge Side Includes)
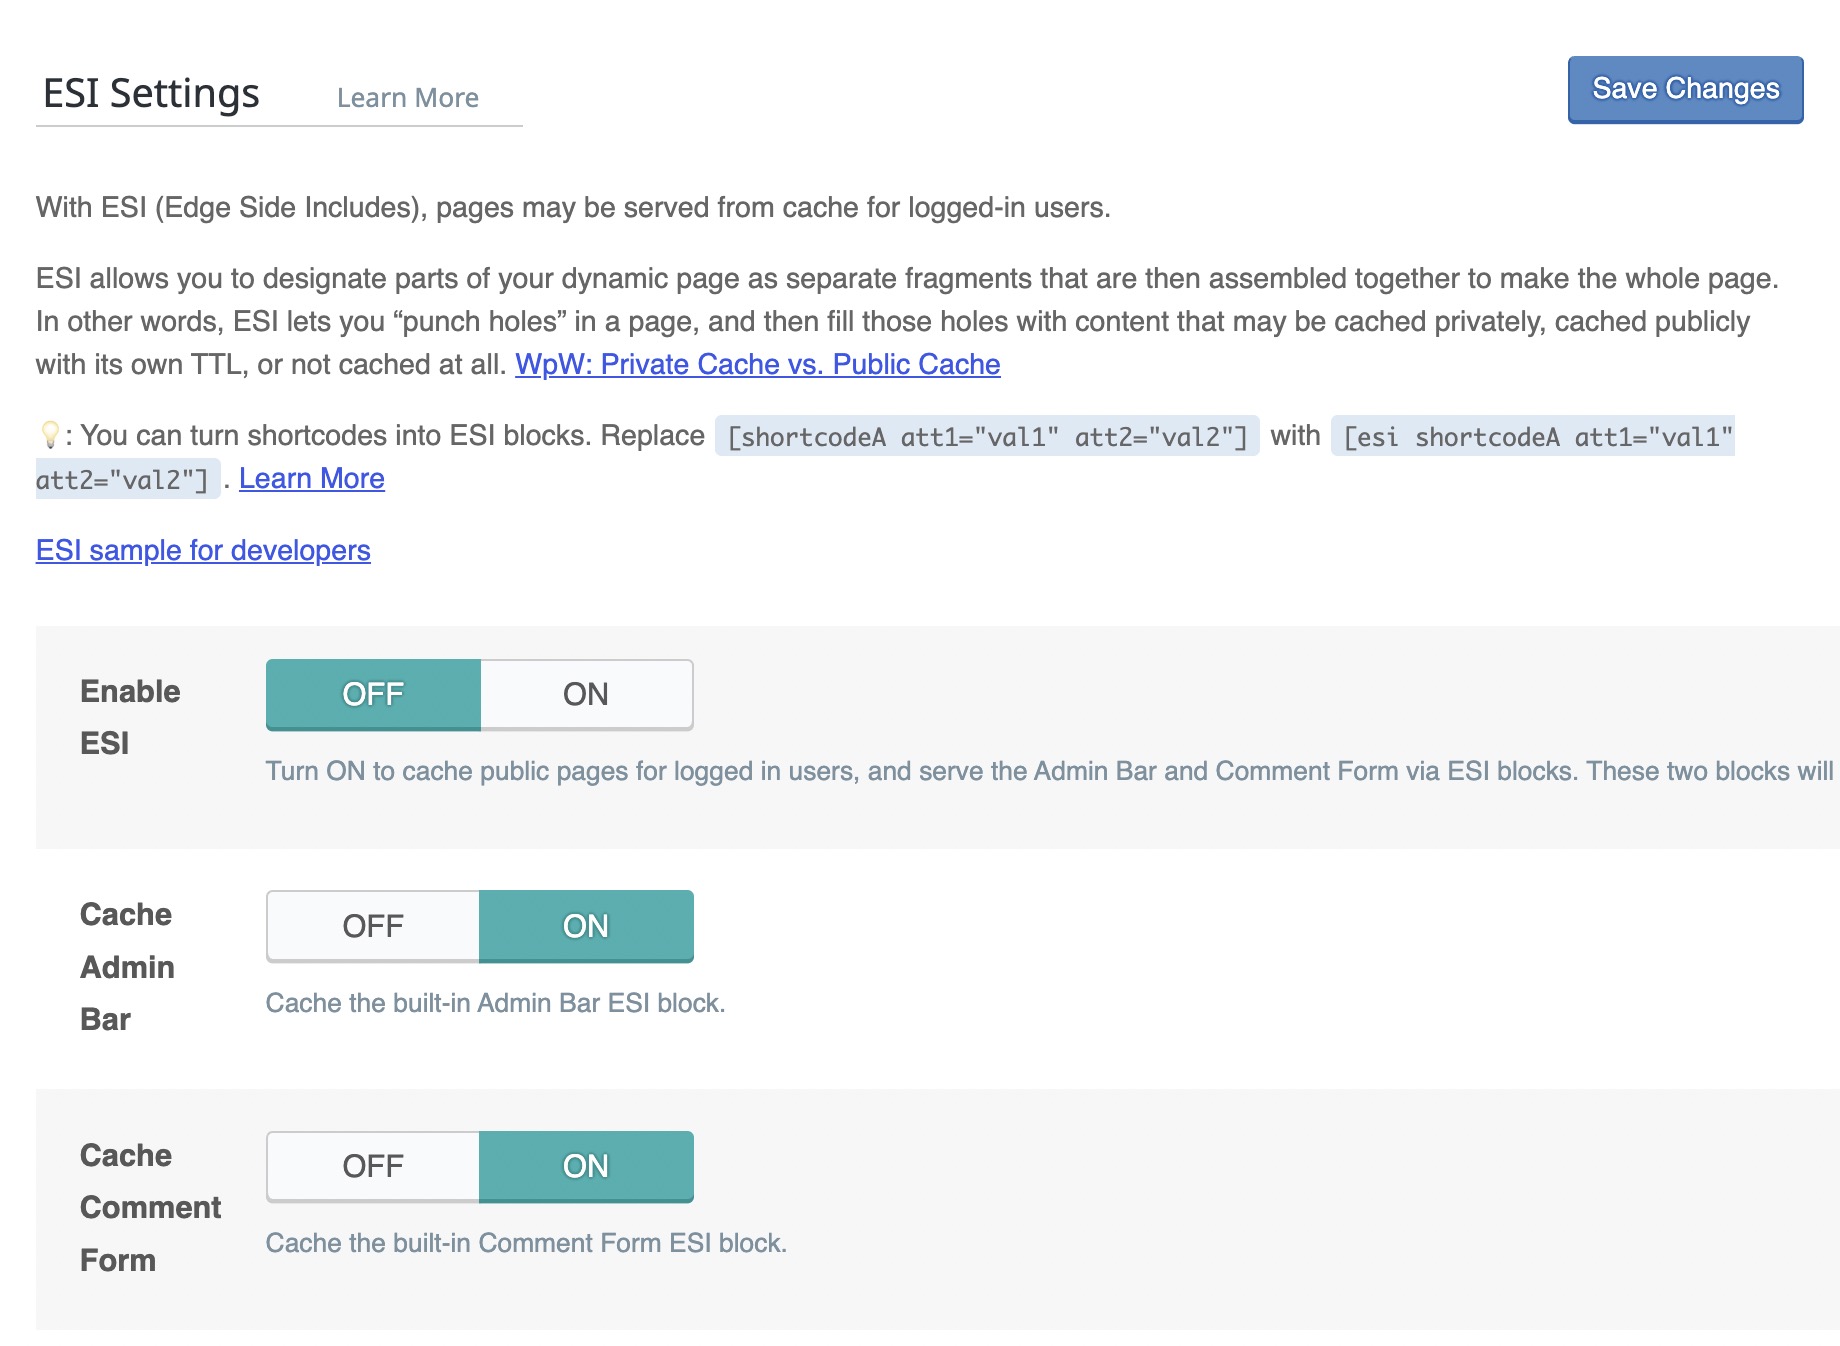
ESI allows for fine-grained caching control by treating parts of a page as separate cache blocks. This is especially useful for logged-in user experiences, WooCommerce carts, comment forms, or admin bars that should remain dynamic while the rest of the page is cached.
- OFF – Enable ESI: Disabled by default. Turn on only if your site requires partial caching of dynamic content like WooCommerce carts or user-specific widgets. Requires extra configuration and may increase complexity.
- ON – Cache Admin Bar: Caches the WordPress admin toolbar block separately using ESI.
- ON – Cache Comment Form: Enables ESI for comment forms to preserve interaction without disabling page cache.
- ESI Nonces: Add WordPress nonces that should be excluded from full-page cache and served dynamically. Useful for plugins or forms that rely on secure, time-sensitive tokens.
- Vary Group: Assign specific user roles (like Administrator) a custom Vary Group ID if you want to serve different cached versions of a page to different user roles.
ESI is powerful but should be used cautiously. Test thoroughly when enabling to ensure compatibility with dynamic plugins or role-based content delivery.
[6] Object
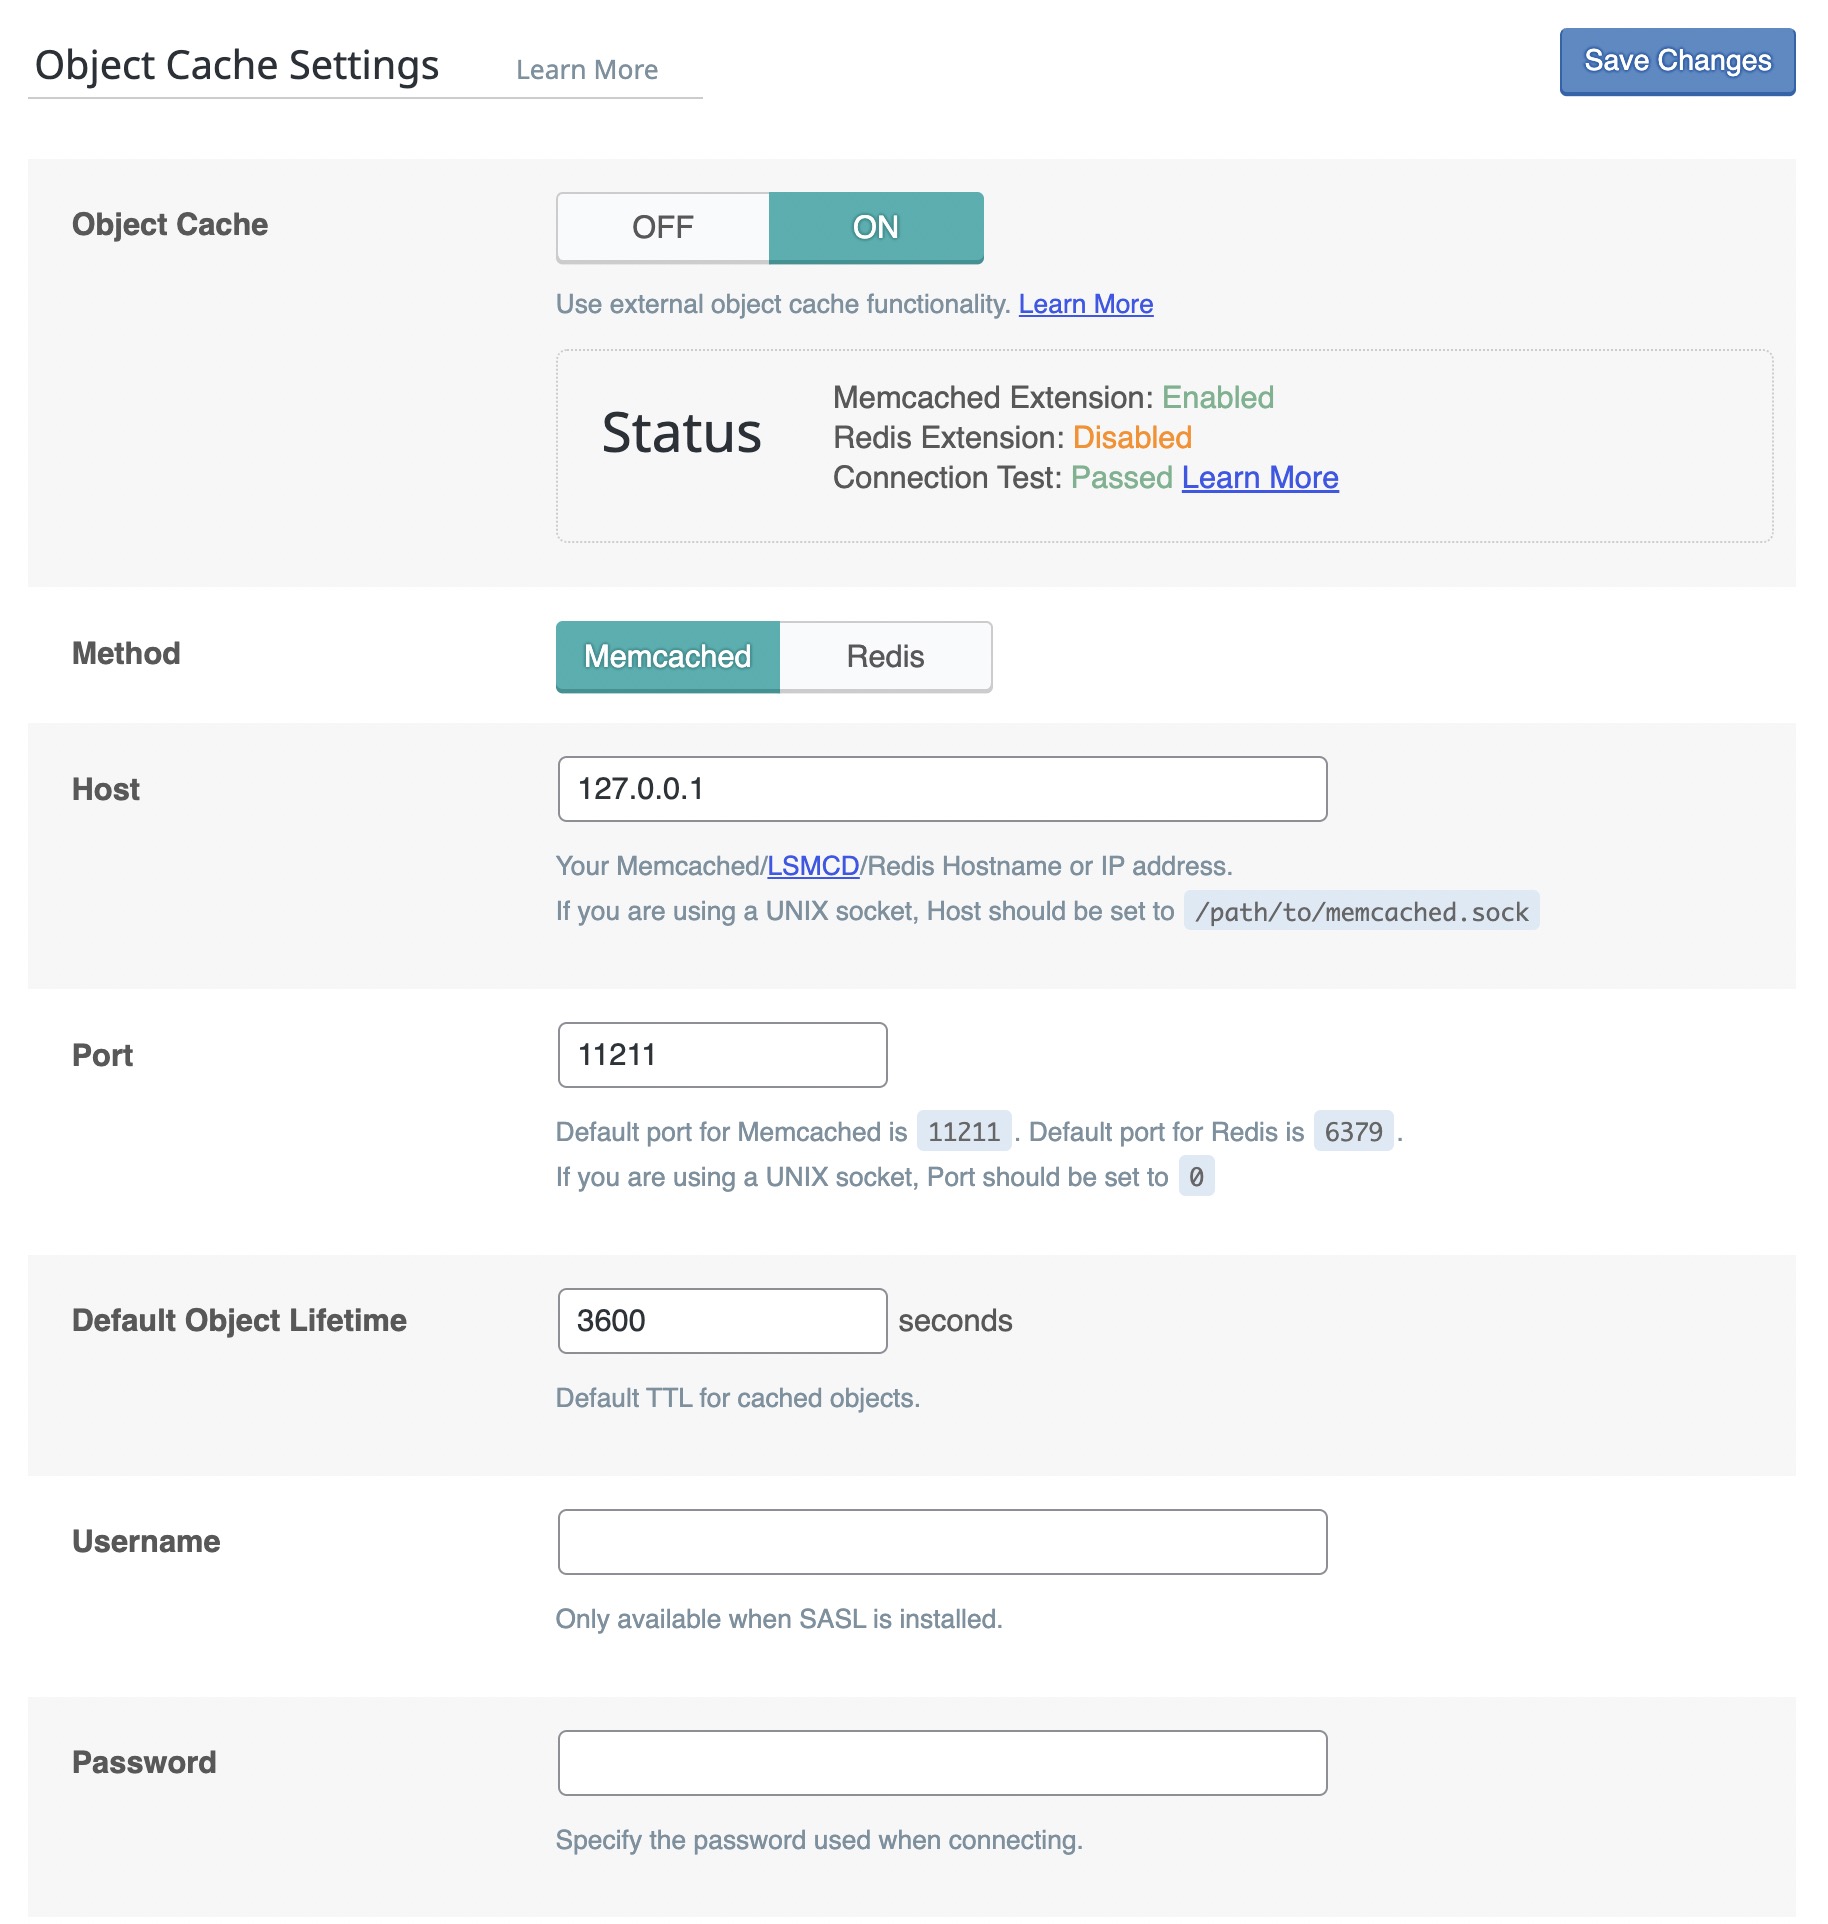
The Object Cache screen enables server-side caching of frequently executed database queries using Memcached or Redis. This significantly reduces database load and improves performance, particularly on dynamic or high-traffic websites.
- OFF – Object Cache: Disabled by default. Enable only if your server supports Redis or Memcached and you’ve confirmed it’s properly configured. Object caching can significantly improve performance on dynamic or database-heavy sites when used correctly.
- Method: Select between
MemcachedandRedis. Both are effective; use whichever is supported by your host. - Host & Port: Configure connection details (typically
127.0.0.1and11211for Memcached or6379for Redis). - Default Object Lifetime: Set TTL for cached database objects, e.g.,
3600seconds (1 hour). - Global Groups: WordPress object groups that are shared network-wide and should always be cached.
- Do Not Cache Groups: Specify groups like sessions or comments that should be excluded from object caching.
- ON – Persistent Connection: Enables long-lived connections for better performance.
- OFF – Cache WP-Admin: It’s recommended to disable caching for the WordPress admin area, as it can show outdated data. This is especially important for dynamic environments with frequent updates to posts, plugins, orders, or settings.
- ON – Store Transients: Stores WordPress transients in memory, improving their retrieval time.
Object caching is especially beneficial for sites with lots of logged-in users or database-intensive plugins. Always test both Memcached and Redis to see which performs better for your setup.
[7] Browser
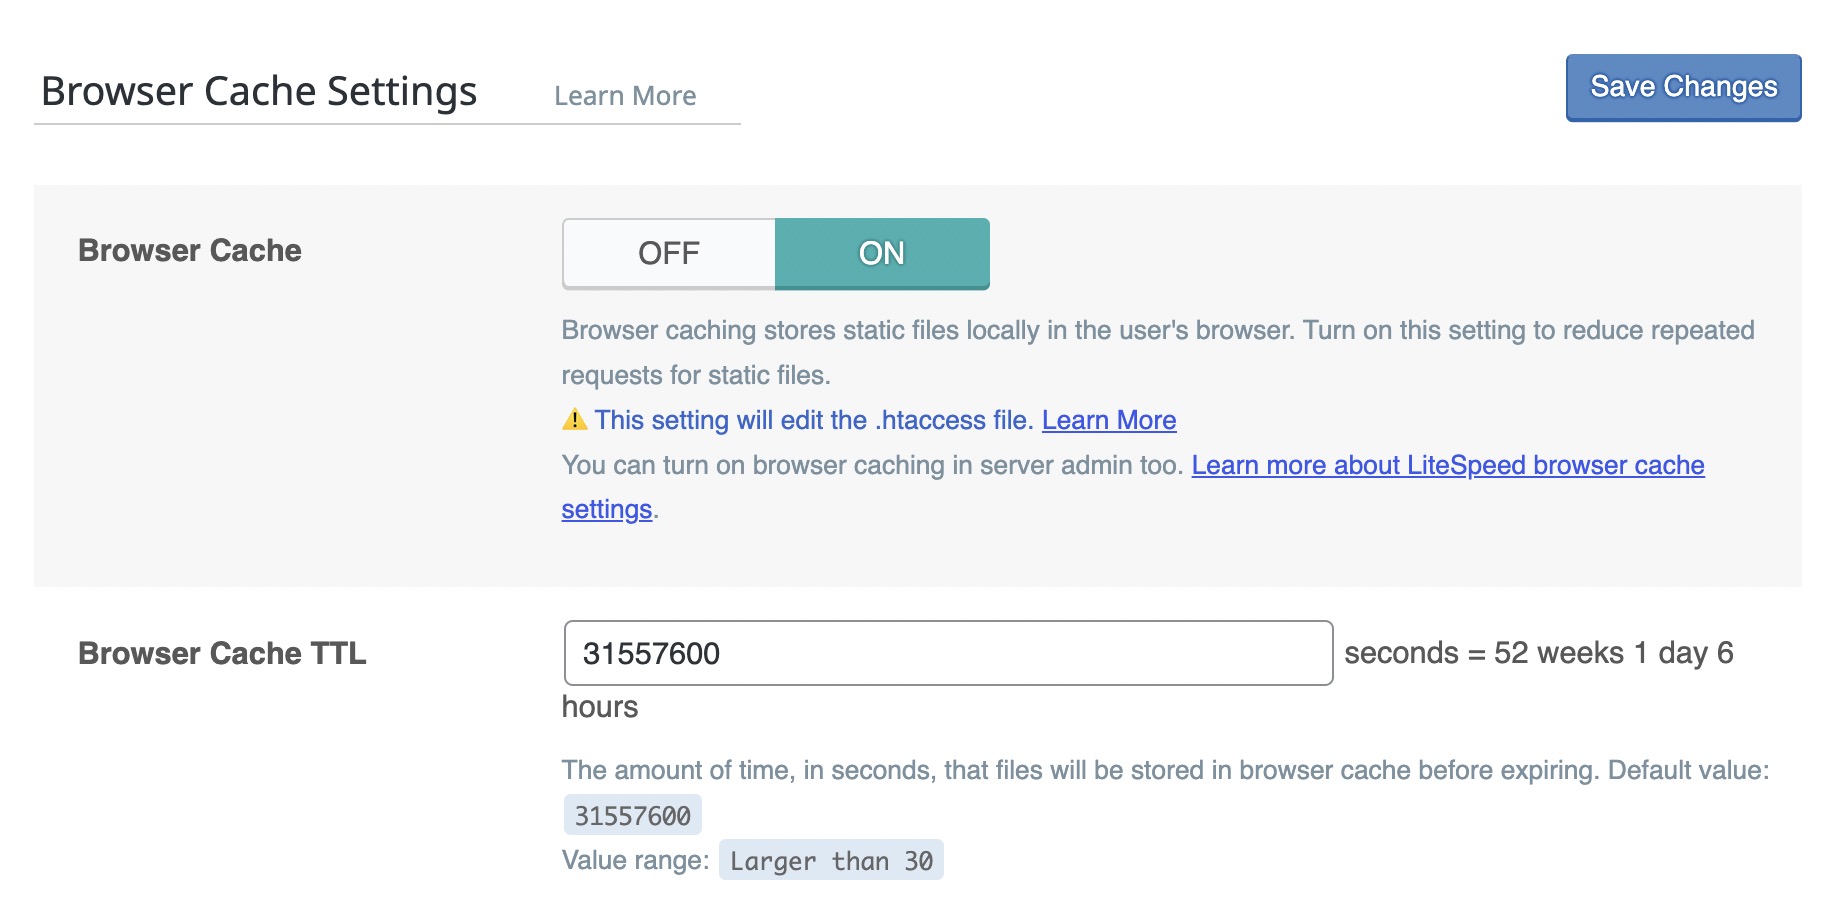
This section manages how static files (like images, JavaScript, and CSS) are cached in the user’s browser. Enabling browser caching reduces repeated requests and improves load times for returning visitors by storing resources locally.
- ON – Browser Cache: Activates browser-level caching for static assets. This setting modifies the
.htaccessfile to apply proper cache-control headers. - Browser Cache TTL: Set to
31557600seconds (1 year), which is optimal for long-term caching of versioned files.
Browser caching is essential for performance. Make sure to use versioned file names (e.g.,
style.css?v=2.0) to avoid serving outdated files when making updates.
[8] Advanced
The Advanced settings section is intended for experienced users who need to customize cache behavior for special cases like AJAX requests, login cookies, or cross-protocol compatibility.
Use these options with caution, as improper configuration can affect caching accuracy or increase server load.
- AJAX Cache TTL: Allows you to cache specific AJAX POST/GET actions. Define the action and TTL in seconds per line.
- Login Cookie: Custom login cookie identifier. Required when running multiple web applications on the same domain to avoid login detection conflicts. Default is
_lscache_vary. - Vary Cookies: Lets you add additional cookies to distinguish cache variations (e.g., for A/B testing or multilingual setups).
- OFF – Improve HTTP/HTTPS Compatibility: Disabled by default. Only enable if your site serves both HTTP and HTTPS URLs, which is rare. Most modern sites should be fully HTTPS, making this setting unnecessary.
- ON – Instant Click: Preloads page content when a user hovers over a link, improving perceived speed. May slightly increase server load.
Only adjust advanced options when you fully understand their impact. Misuse can lead to inconsistent cache behavior across users and sessions.
CDN
Content Delivery Network integration can dramatically improve global reach and loading times. This section allows you to configure CDN services to deliver your static assets from servers located closer to your visitors.
[1] QUIC.cloud
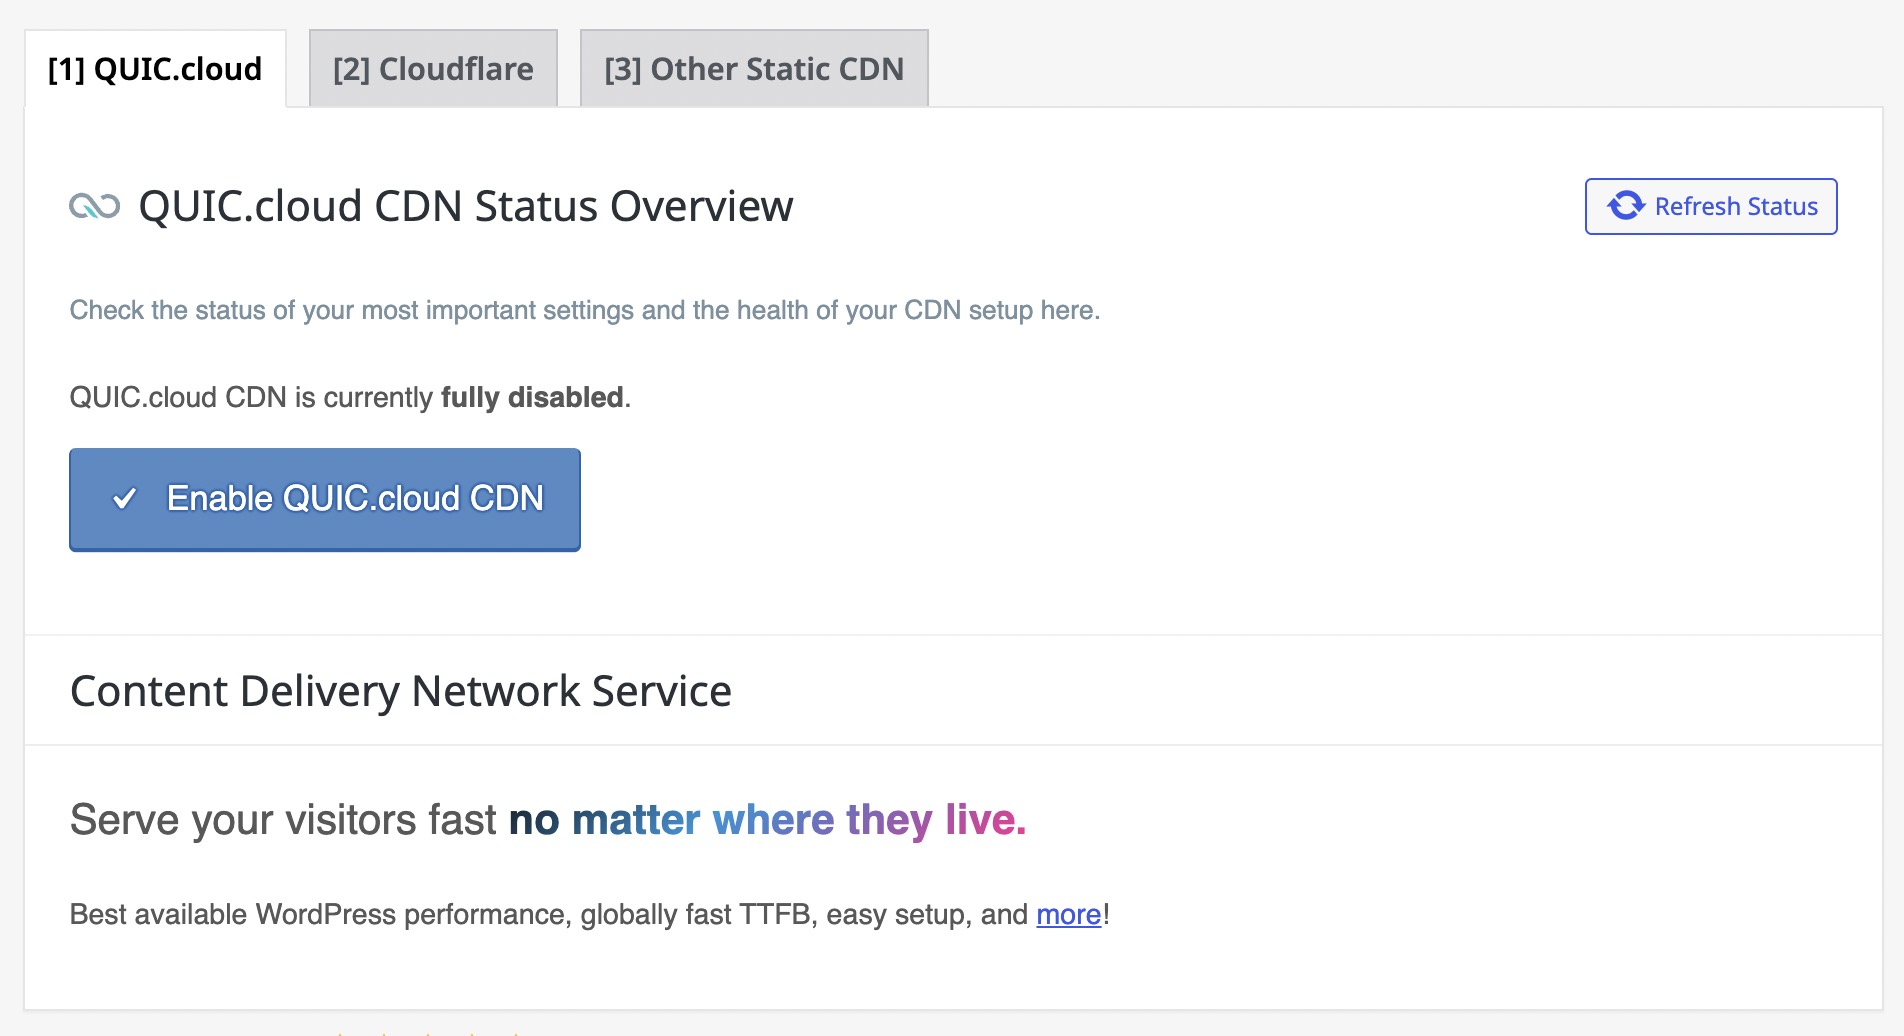
QUIC.cloud is LiteSpeed’s own content delivery network (CDN) built specifically for WordPress performance. It improves global TTFB by caching both dynamic and static assets across multiple edge locations. It’s also a requirement for using certain LiteSpeed Cloud features like image optimization and critical CSS.
- OFF – Enable QUIC.cloud CDN only after you’ve configured your DNS properly (either through LiteSpeed DNS, Cloudflare in proxy mode, or other supported setups).
QUIC.cloud offers performance benefits for dynamic and static caching. Enable only if you are ready to manage DNS changes or already use a supported CDN integration.
[2] Cloudflare
LiteSpeed Cache can integrate with Cloudflare’s API to automatically purge cache and sync basic settings like development mode, minification, and more.
- OFF – Enable only if you want LiteSpeed to control your Cloudflare settings directly from WordPress.
- Cloudflare API Token: Add only when integration is enabled and properly tested.
This integration is optional. It’s useful if you want unified control, but not necessary if you already manage Cloudflare manually or via their own dashboard.
[3] Other Static CDN
If you’re using a third-party CDN like Bunny.net, KeyCDN, or CloudFront, you can enable CDN mapping and control how assets are replaced across your site.
- ON – Use CDN Mapping: Replaces static URLs with your CDN endpoint.
- CDN URL: The full URL of your CDN (e.g.,
https://cdn.yoursite.com). - HTML Attribute To Replace: Define which attributes (like
srcorhref) should be rewritten. - Original URLs: Your site’s domain(s) that should be replaced (auto-filled by default).
- Included Directories: Typically
wp-contentandwp-includes, to limit CDN use to static assets. - Exclude Path: Use to prevent specific files or folders from being served via the CDN.
CDN mapping improves asset delivery speed. Always check critical features (like fonts or third-party scripts) after enabling to ensure they work as expected.
Image Optimization
This section allows you to optimize image delivery through compression, lazy loading, and WebP conversion. Most optimization processes are handled via QUIC.cloud, minimizing load on your server.
[1] Image Optimization Summary
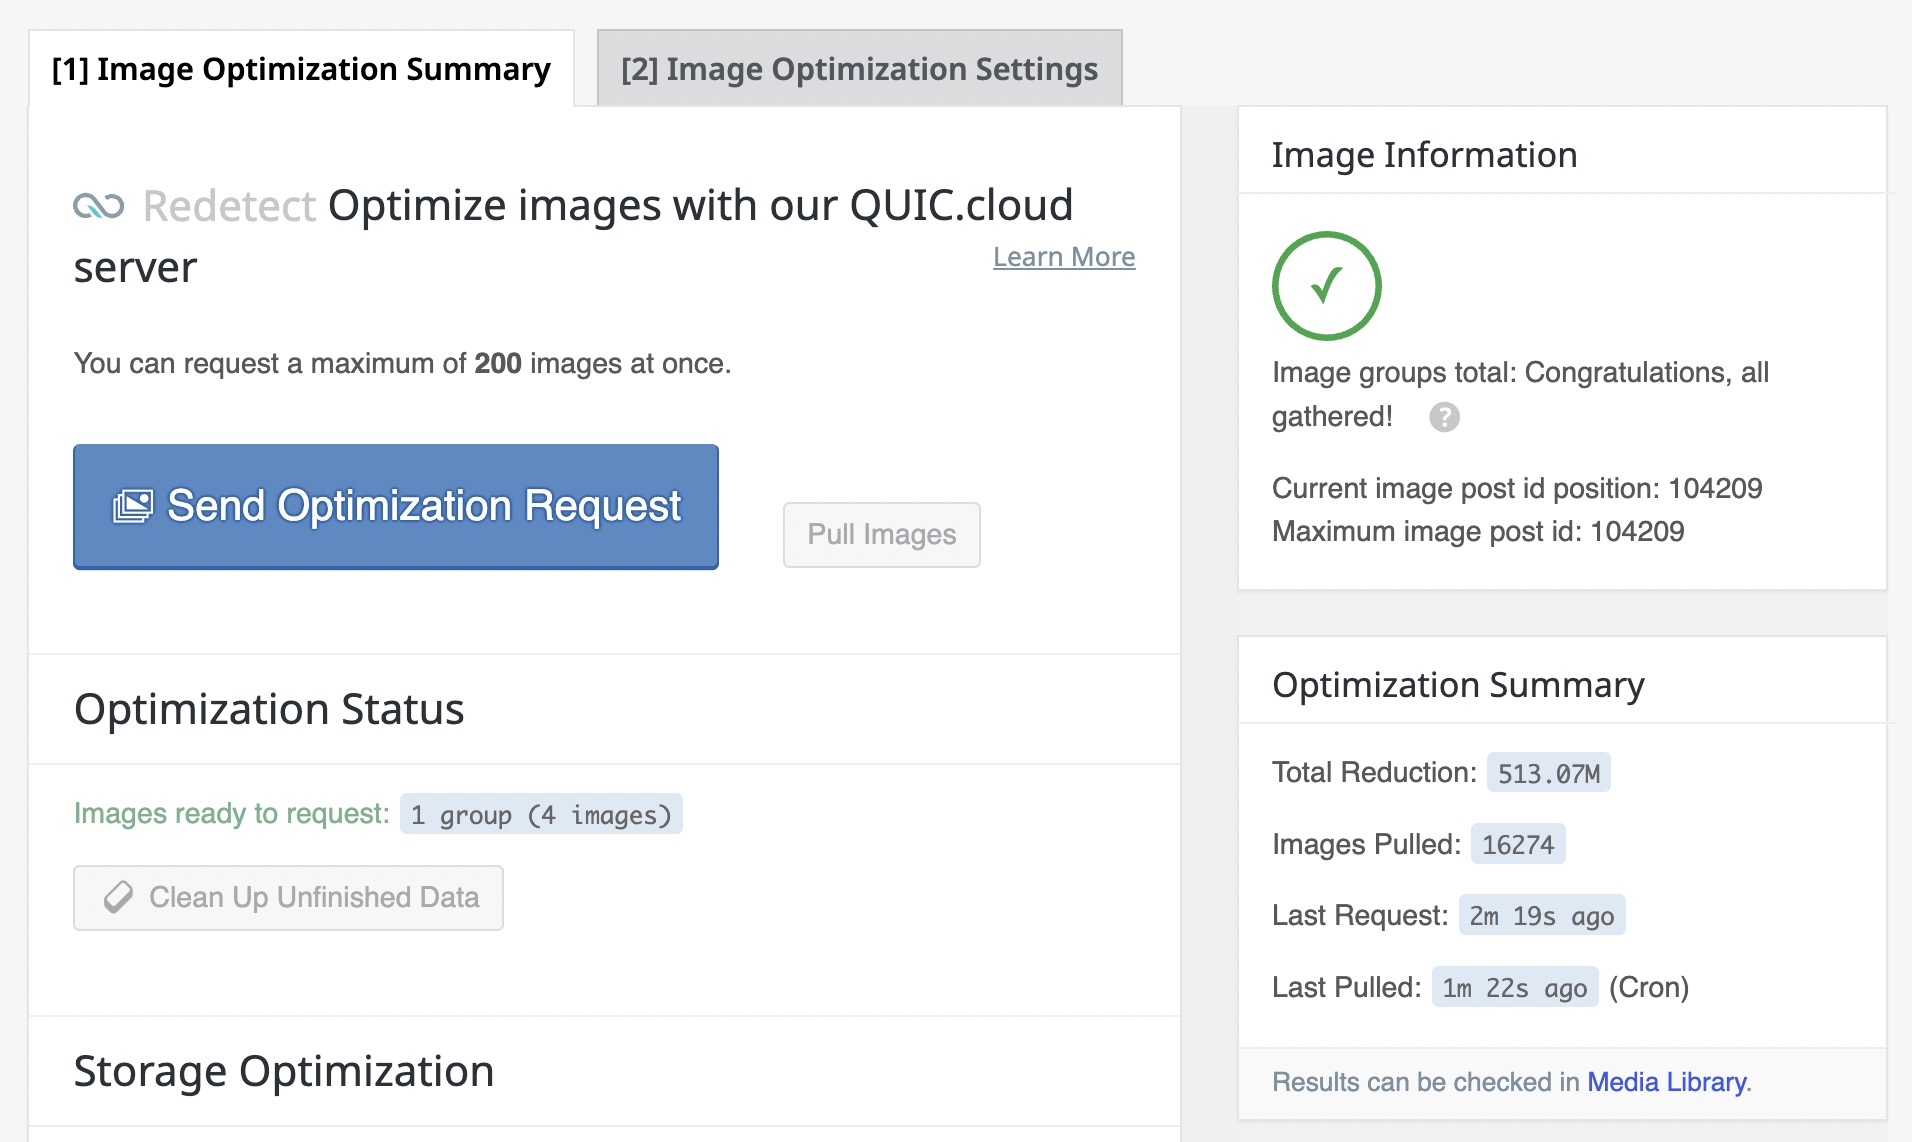
This page shows how many images are pending, optimized, or failed, and lets you manually trigger optimization tasks. It’s useful for tracking progress and re-optimizing if needed.
- Status Table: View number of optimized, failed, or pending images
- Resend Optimization Request: For stuck images
[2] Image Optimization Settings
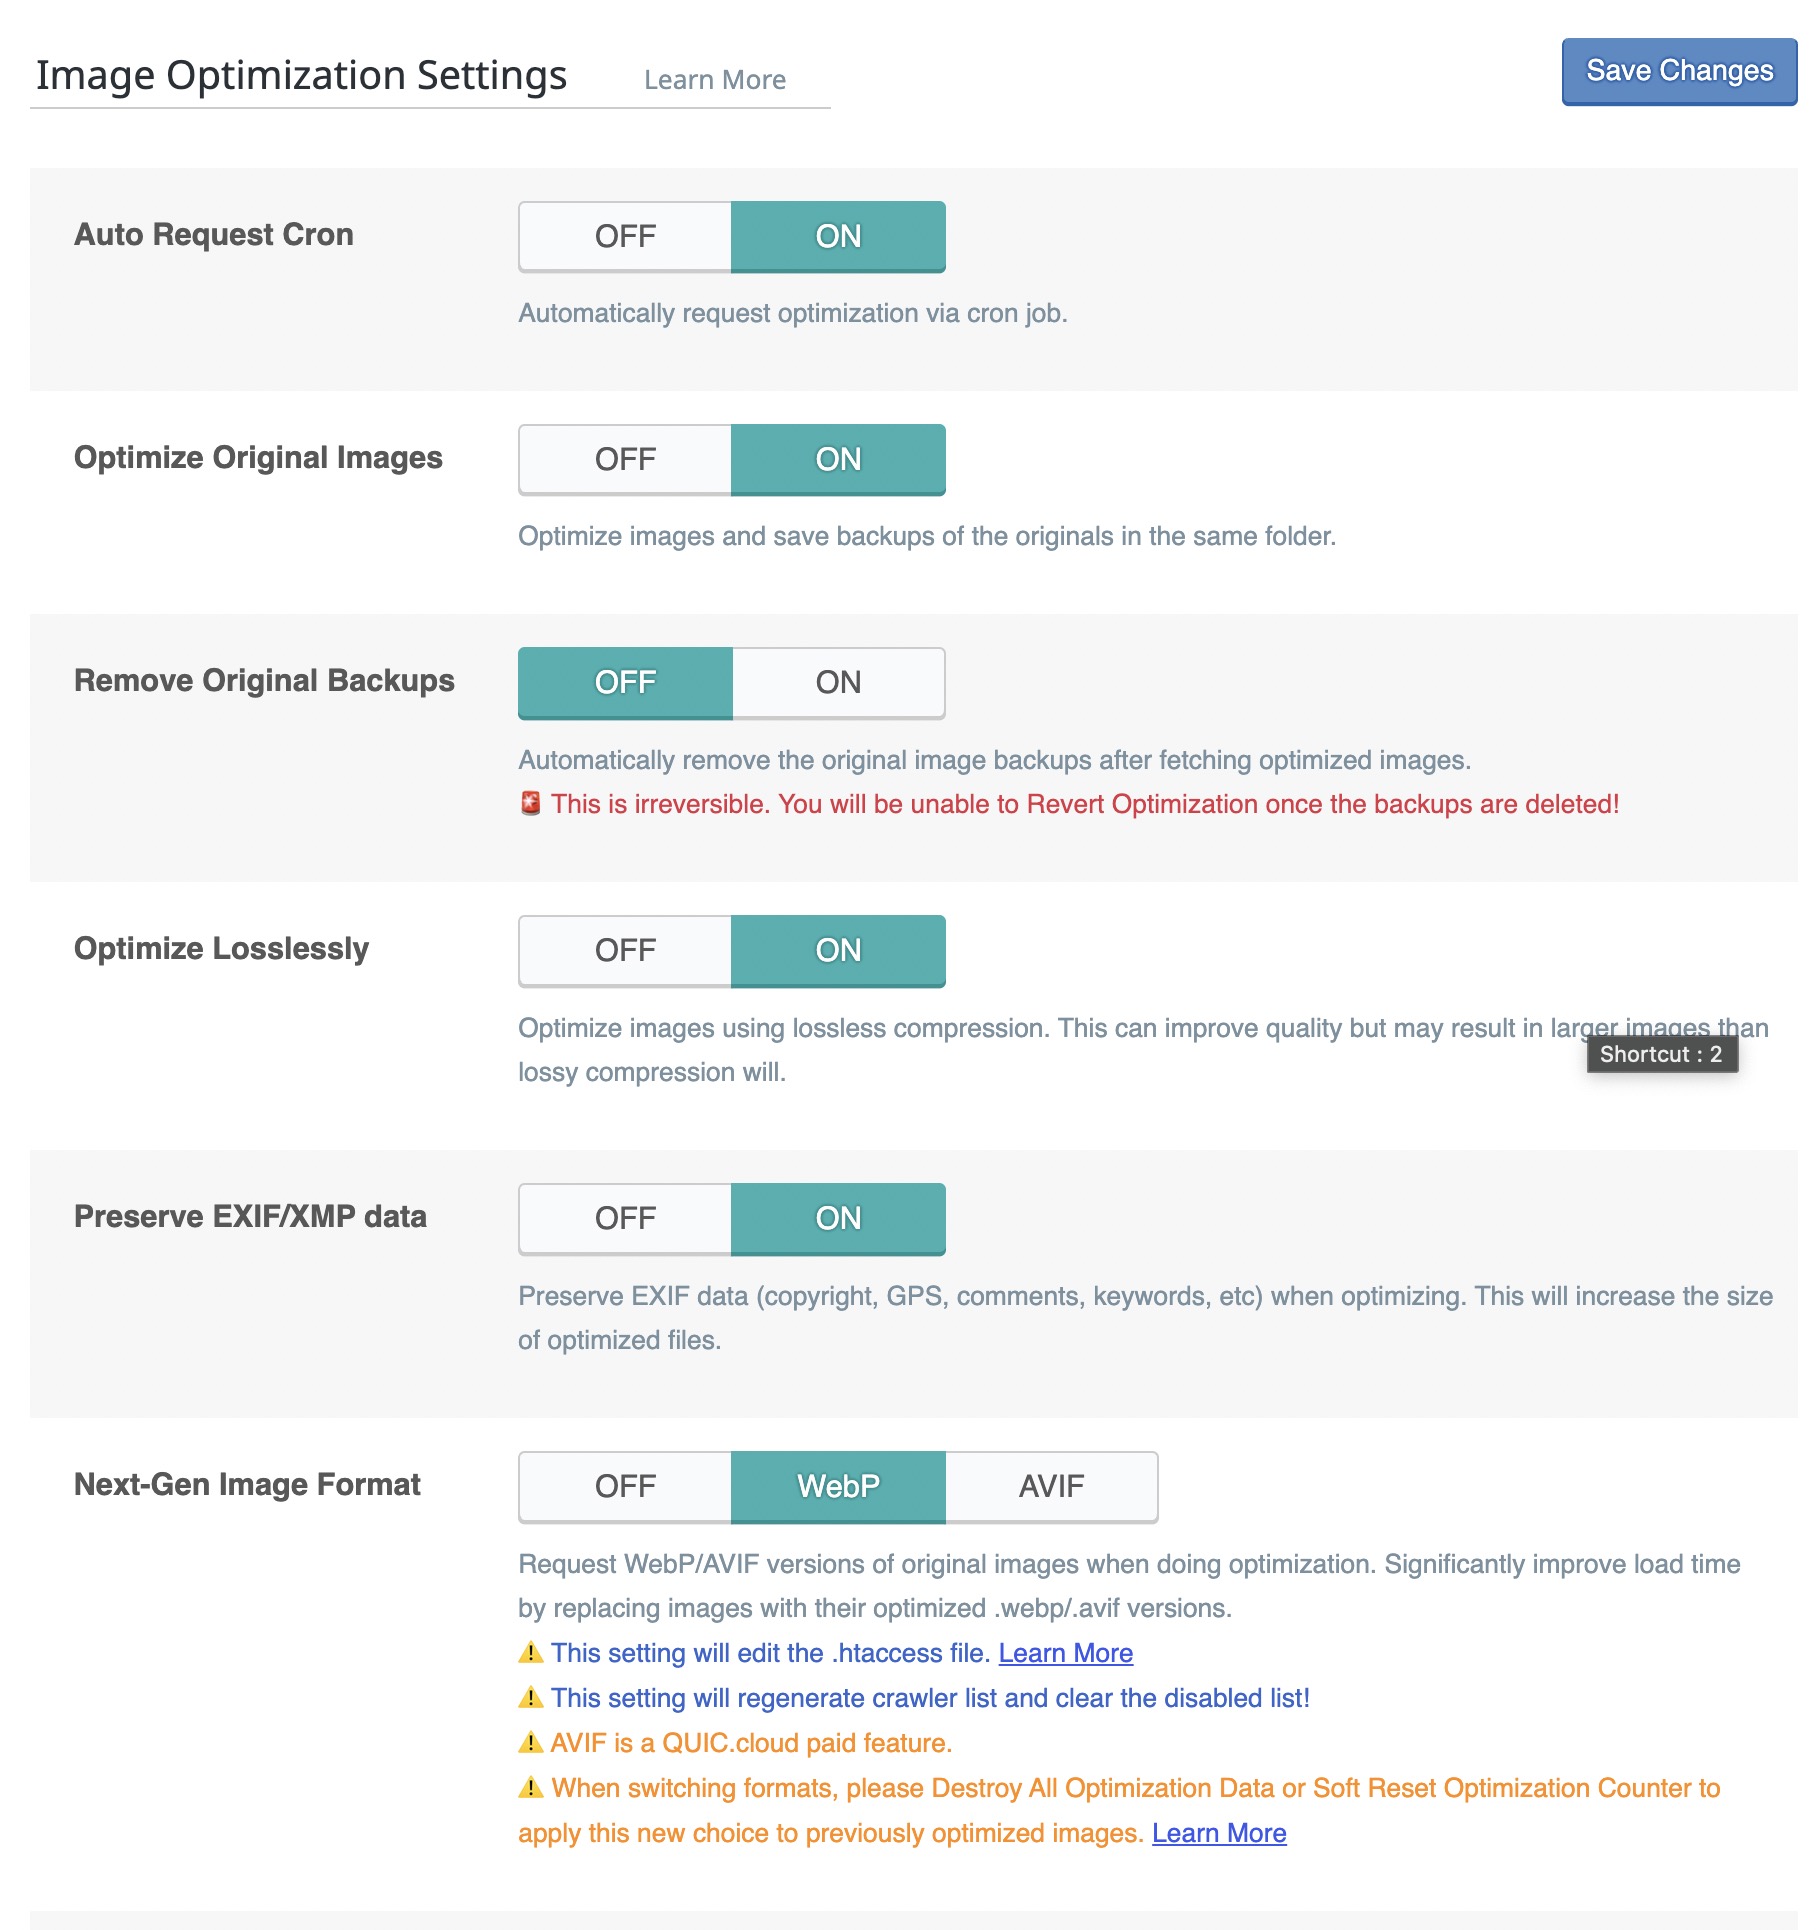
This section controls how images are optimized and delivered, including automation, compression type, WebP/AVIF formats, and fallback attributes. Proper setup here ensures faster loading without compromising visual quality.
- ON – Auto Request Cron: Automatically requests new optimization tasks in the background without manual triggers.
- ON – Optimize Original Images: Reduces file sizes of original uploads and saves server space.
- OFF – Remove Original Backups: Permanently deletes pre-optimized images. Not recommended unless storage is extremely limited.
- ON – Optimize Losslessly: Uses a lossless algorithm to preserve quality. May result in larger files.
- OFF – Preserve EXIF/XMP Data: Only enable if metadata is essential (e.g., for photographers).
- Next-Gen Image Format: Choose between
WebPandAVIFfor modern image delivery. AVIF is more efficient but not supported on all devices. - WebP/AVIF Attribute to Replace: Customize which HTML attributes will be replaced with optimized versions (e.g.
img.src,div.data-src). - OFF – WebP/AVIF for Extra Srcset: Enable only if you serve images via custom
srcsetoutside of WordPress logic.
Optimized images speed up your website and reduce server bandwidth. Be careful with irreversible options like removing backups, and test WebP/AVIF compatibility before enabling. Here’s a post about the AVIF image format.
Page Optimization
These settings control how your site handles HTML, CSS, and JavaScript delivery, significantly affecting load times and Core Web Vitals. Careful tuning can eliminate render-blocking resources and improve FCP and LCP scores.
[1] CSS Settings
This section handles how your CSS files are optimized for better performance and faster page rendering. It includes minification, combining, async loading, UCSS generation, and font rendering behavior.
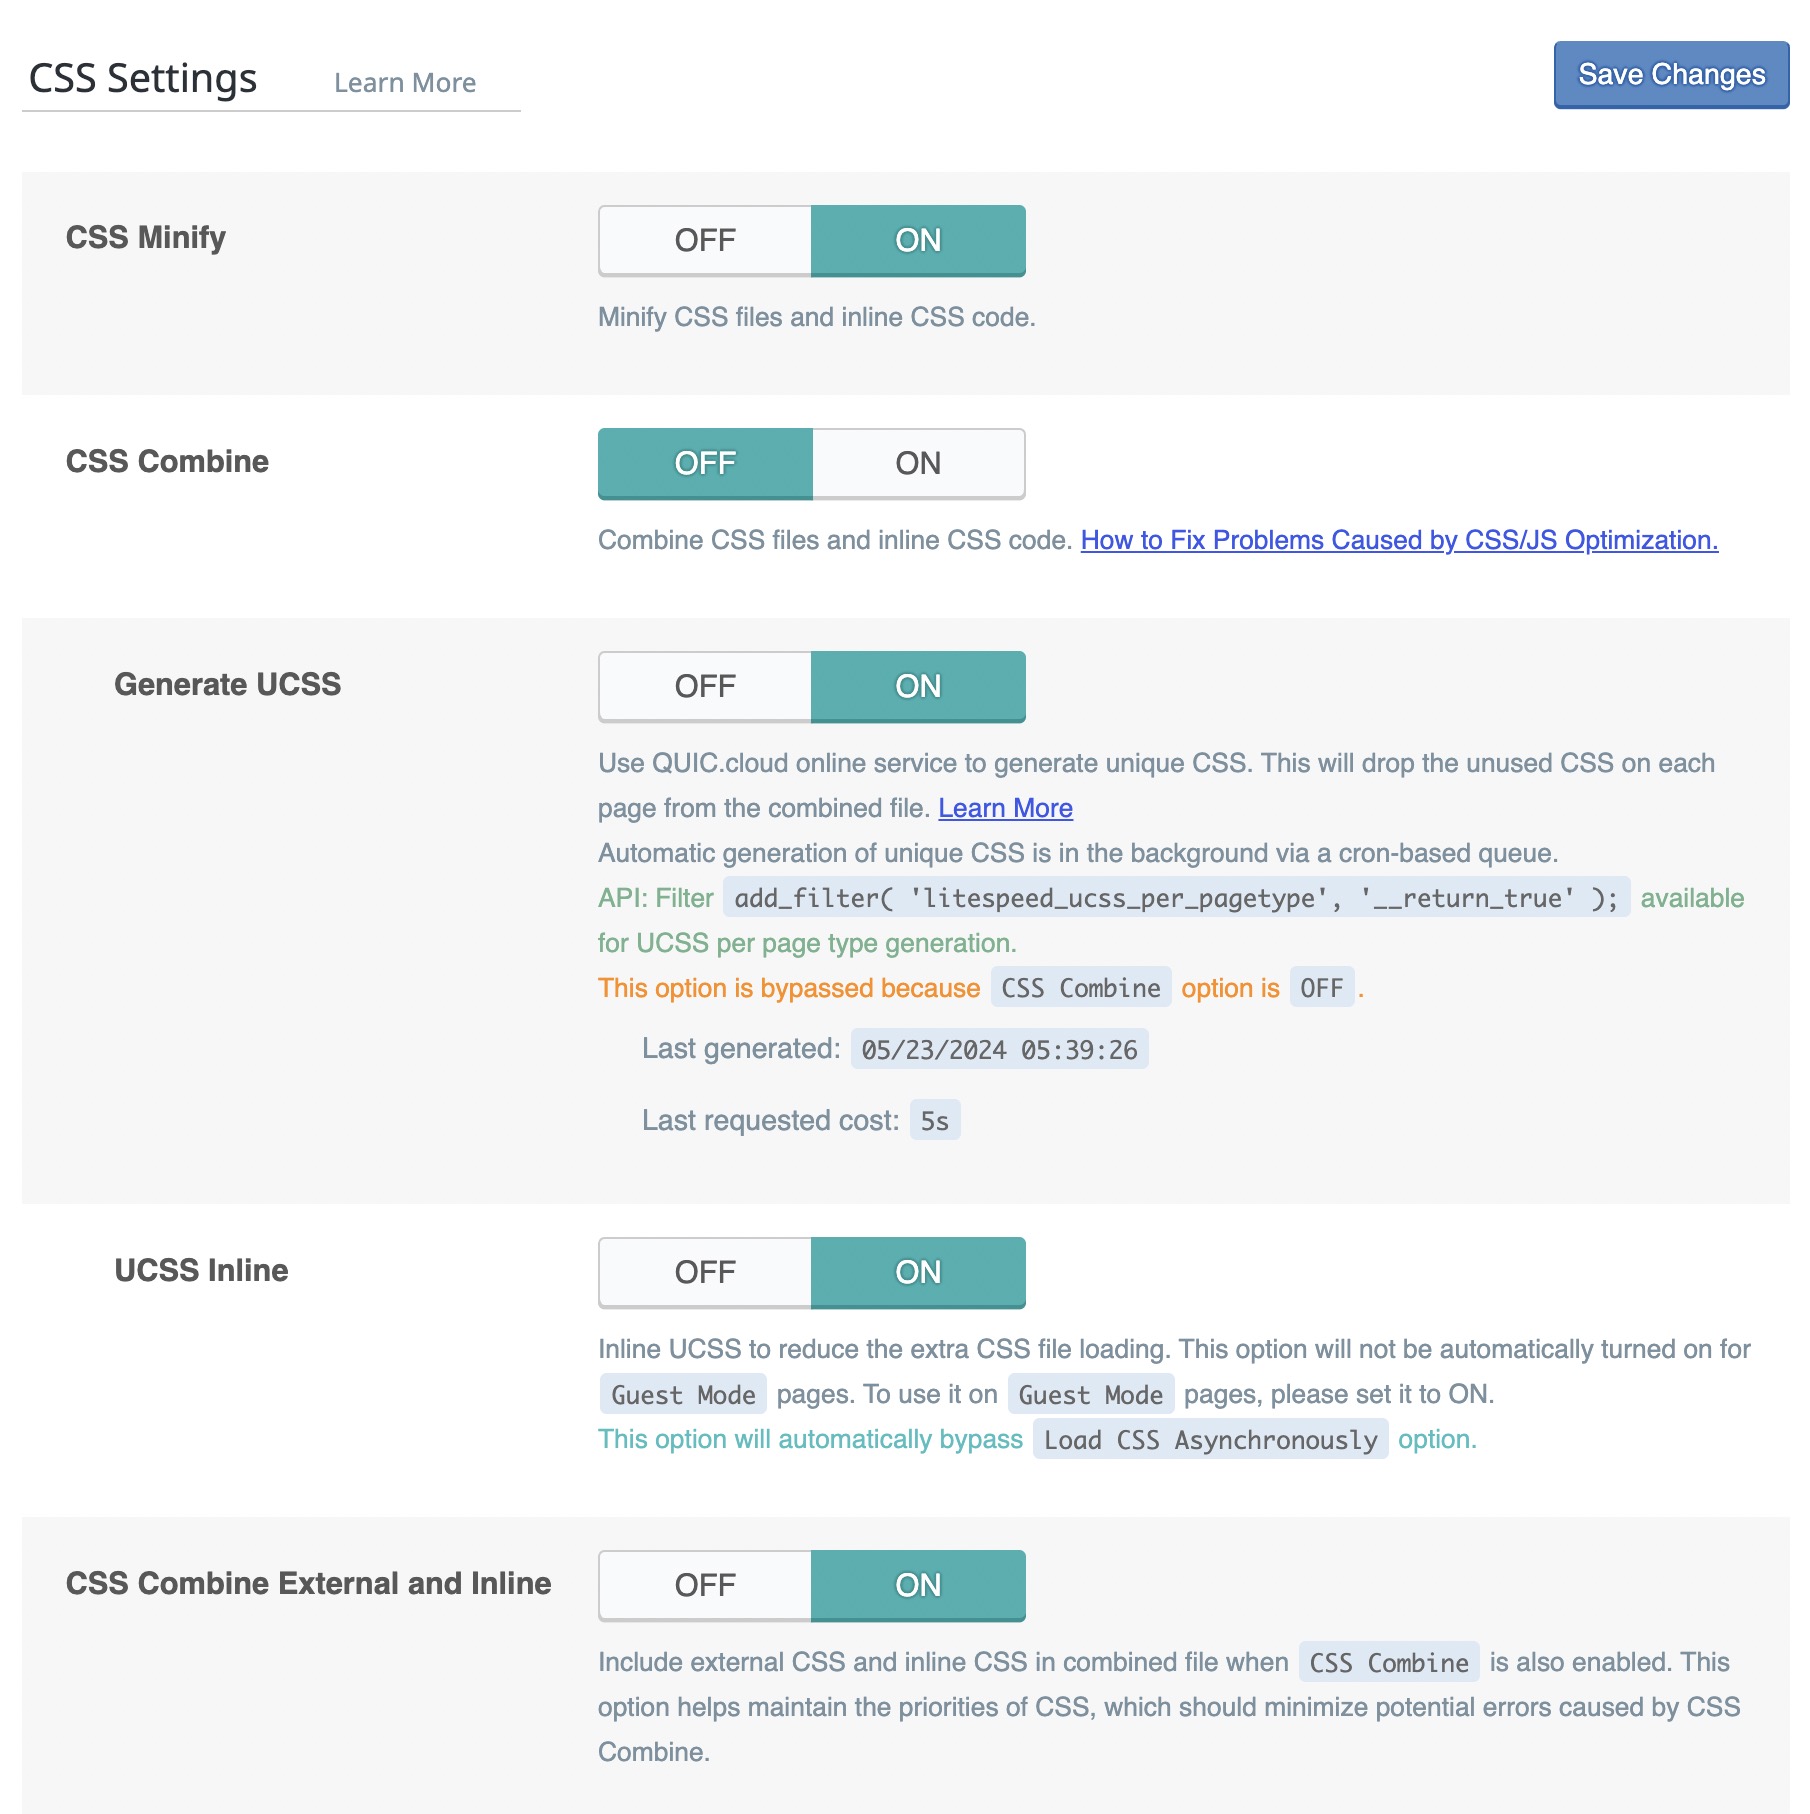
- ON – CSS Minify: Removes unnecessary characters from CSS files to reduce size.
- OFF – CSS Combine: Not recommended when using HTTP/2, as parallel requests are more efficient than combining files.
- ON – Generate UCSS: Uses QUIC.cloud to generate unused CSS removal per page. Note: Bypassed if CSS Combine is off.
- ON – UCSS Inline: Inlines the unique CSS generated by QUIC.cloud for better performance.
- ON – CSS Combine External and Inline: Also includes inline styles in the combined file.
- OFF – Load CSS Asynchronously: Disabled by default. This setting can improve performance but may cause layout issues if not properly configured. Enable only if you’ve
tested it thoroughly and understand how it interacts with UCSS and critical CSS.
Use this option carefully. Misuse can lead to flashes of unstyled content (FOUC) or broken page layouts.
- OFF – CCSS Per URL: Use only if you need CCSS per post/page. Saves quota but may cause styling issues on dynamic layouts.
- ON – Inline CSS Async Lib: Inlines the async loader to ensure styles load properly even with JavaScript delays.
- Font Display Optimization: Set to
Swapfor faster perceived load by allowing text to display before webfonts finish loading.
CSS optimizations like async loading and UCSS can significantly improve performance, especially for mobile visitors. Always test thoroughly when enabling these options to ensure no visual regressions.
[2] JS Settings
This section focuses on JavaScript optimization to improve load times and reduce render-blocking behavior. Options include minification, combining files, and deferring JS execution.
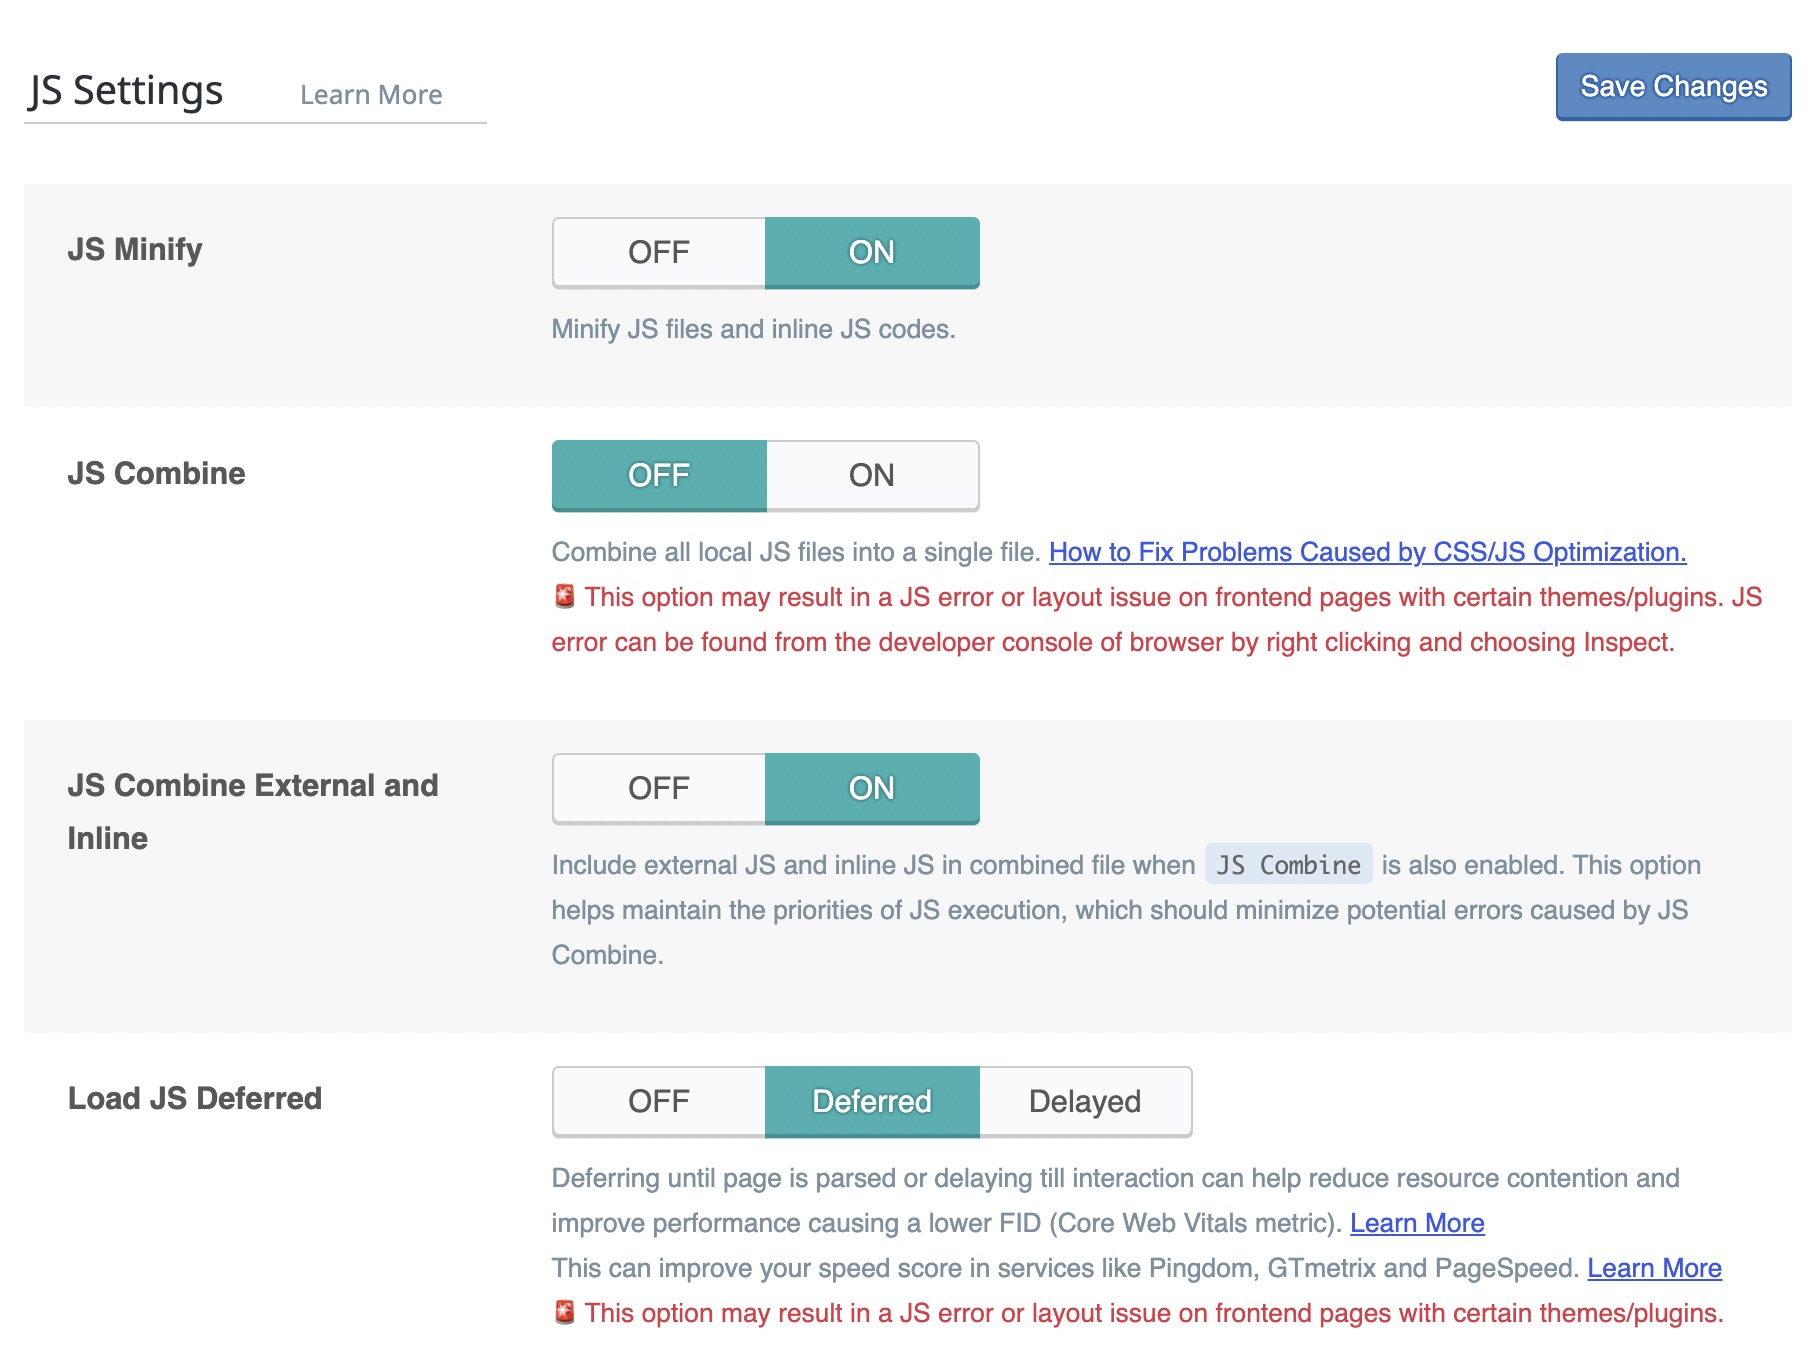
- ON – JS Minify: Removes extra characters from JS files to reduce file size.
- OFF – JS Combine: Not necessary when using HTTP/2, which handles multiple parallel requests efficiently. Combining scripts may introduce compatibility issues and is generally discouraged unless required for legacy setups.
- OFF – JS Combine External and Inline: Disabled because JS Combine is also off. You can enable this setting only after turning on JS Combine and confirming it doesn’t cause conflicts. Useful for consolidating global JS files and inline scripts.
- Deferred – Load JS Deferred: Loads scripts after the HTML is parsed, improving performance and Core Web Vitals like INP (Interaction to Next Paint). Use “Delayed” if scripts should wait until interaction.
JS optimization can greatly enhance perceived performance, but may cause layout or script errors. Always test thoroughly after enabling Combine and Defer options.
[3] HTML Settings

This section includes advanced options to reduce HTML output size, improve DNS resolution, and strip unnecessary elements like emojis, Google Fonts, or noscript tags. These optimizations can help speed up page rendering and reduce bandwidth usage.
- ON – HTML Minify: Strips out unnecessary spaces and comments in the HTML output to reduce page size.
- DNS Prefetch: Allows you to manually specify external domains to pre-resolve, improving load time for third-party resources.
- OFF – DNS Prefetch Control: Disabled because automatic prefetching may introduce unnecessary DNS lookups and increase page complexity. It’s better to manually define only the essential domains using the DNS Prefetch setting.
- DNS Preconnect: Lets the browser initiate early connections to specified origins for faster resource fetching.
- HTML Lazy Load Selectors: Enables lazy loading for custom off-screen HTML elements by selector. Useful for delaying non-critical content.
- HTML Keep Comments: Allows retention of specific HTML comments during minification by matching text. Helpful for preserving dynamic placeholders.
- ON – Remove Query Strings: Removes version/query strings from static resource URLs to improve caching efficiency.
- OFF – Load Google Fonts Asynchronously: Disabled because loading fonts asynchronously may still delay rendering and introduce layout shifts. Consider self-hosting fonts or removing Google Fonts entirely for better performance and privacy.
- ON – Remove Google Fonts: Completely disables loading Google Fonts from your pages.
- ON – Remove WordPress Emoji: Prevents loading of the default WP emoji script. Browser-native emoji will still display.
- ON – Remove Noscript Tags: Removes all
<noscript>tags from the HTML output to reduce DOM size.
While many of these settings provide great performance benefits, make sure to test critical design elements like fonts and third-party tools after applying them.
[4] Media Settings
This section controls lazy loading behavior, image placeholders, LQIP generation, and WordPress image compression. Proper configuration here can reduce load times and improve Core Web Vitals scores.
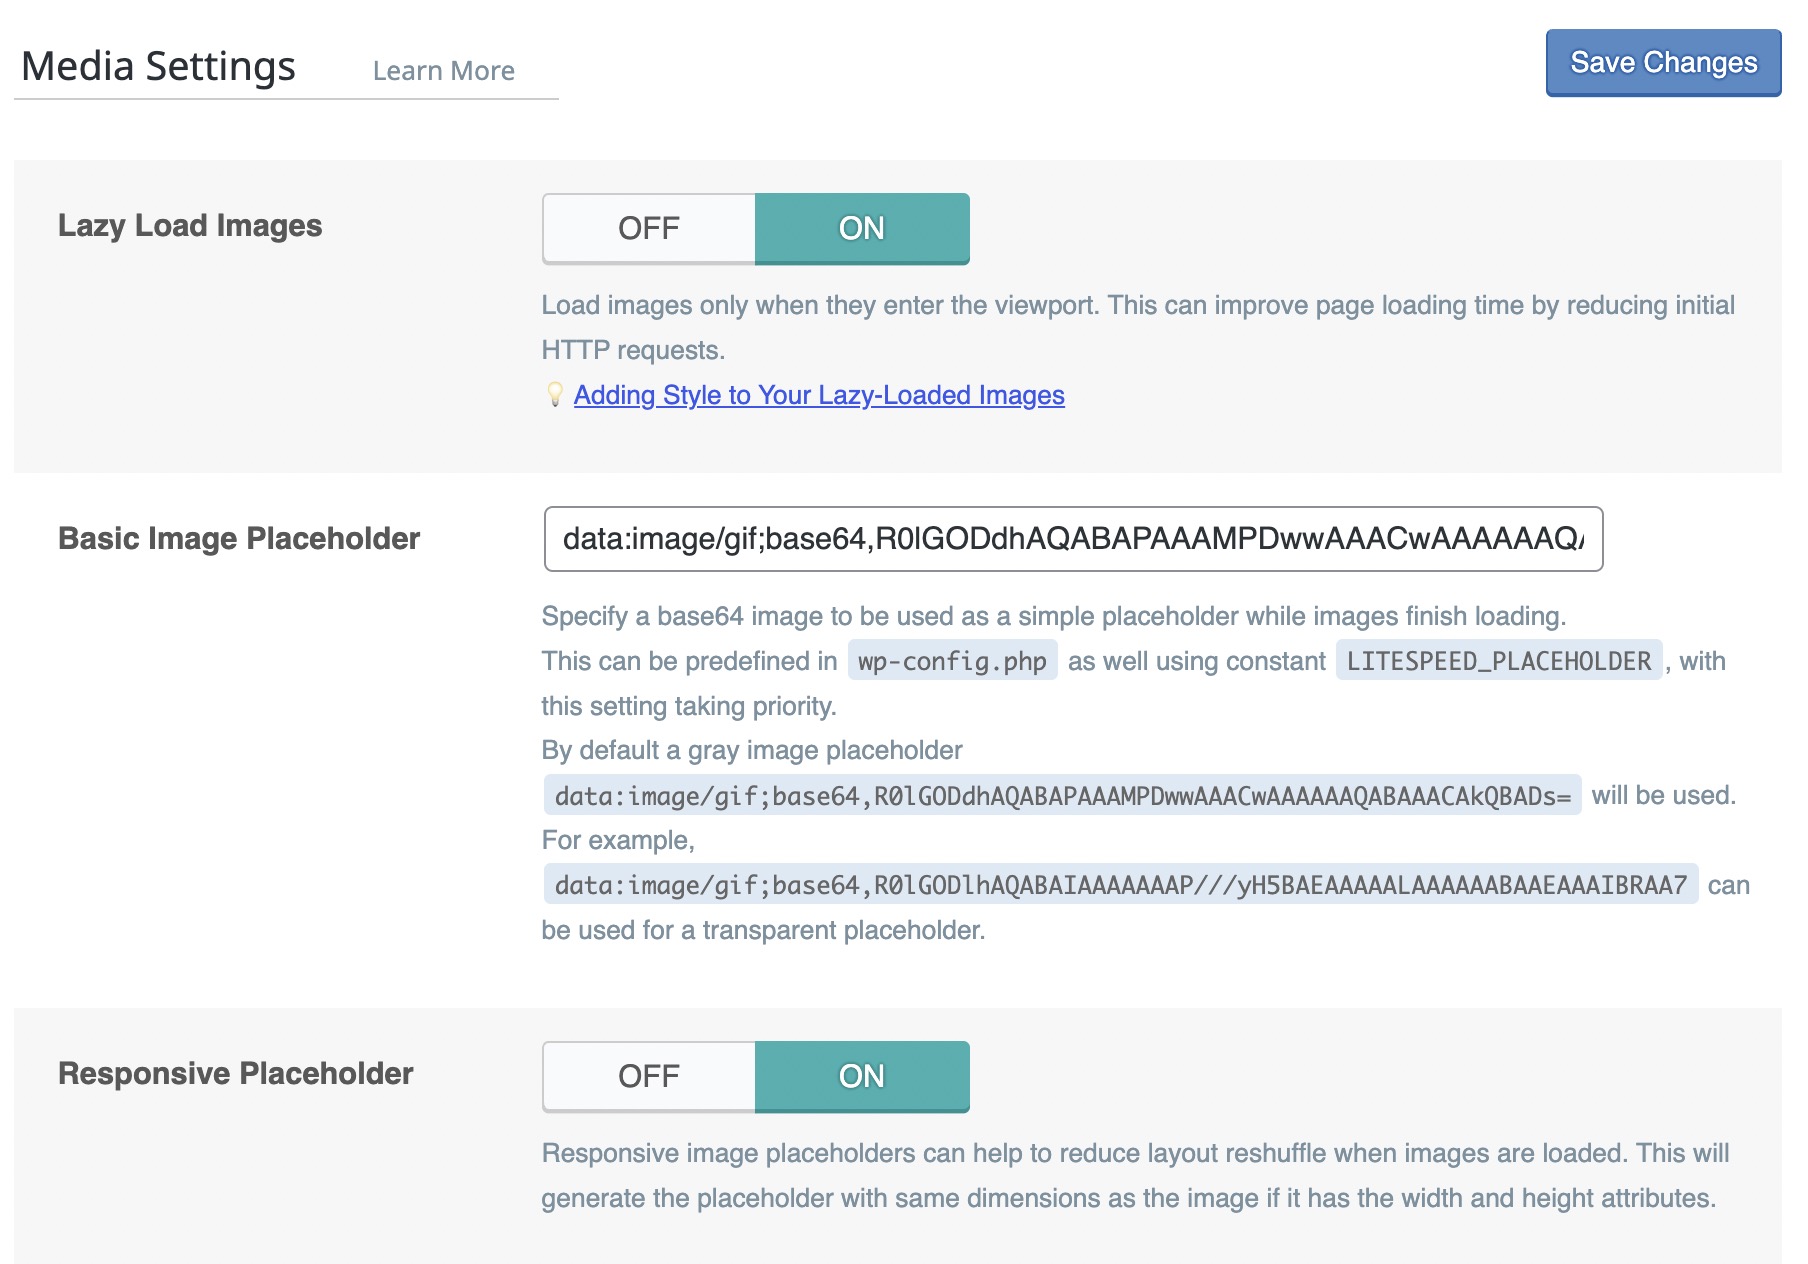
- ON – Lazy Load Images: Delays loading images until they enter the viewport, reducing initial requests.
- Basic Image Placeholder: Default base64 image used before the real image loads. Can be customized in
wp-config.php. - ON – Responsive Placeholder: Keeps layout stable by maintaining image dimensions during load.
- Responsive Placeholder SVG: Custom SVG used as a responsive placeholder, converted to base64 on the fly.
- Responsive Placeholder Color: Hex color used to fill SVG placeholder. Default:
#cfc4db. - ON – LQIP Cloud Generator: Uses QUIC.cloud to create Low Quality Image Placeholders for better perceived load time.
- LQIP Quality: Currently set to 4. Higher values improve quality but increase size and usage quota.
- LQIP Minimum Dimensions: Set to 150×150 pixels. Images smaller than this won’t get LQIP.
- ON – Generate LQIP in Background: Handles generation asynchronously with cron, improving admin performance.
- ON – Lazy Load Iframes: Delays iframe loading until they enter the viewport.
- ON – Add Missing Sizes: Adds width and height attributes to prevent layout shift and improve CLS. Requires lazy load enabled.
- WordPress Image Quality Control: Leave the default setting. Controls image compression level during WordPress image generation (default is 82).
To optimize visual performance and improve Core Web Vitals, it’s recommended to enable lazy load, use responsive placeholders, and generate LQIP in the background.
[5] Viewport Images (VPI)
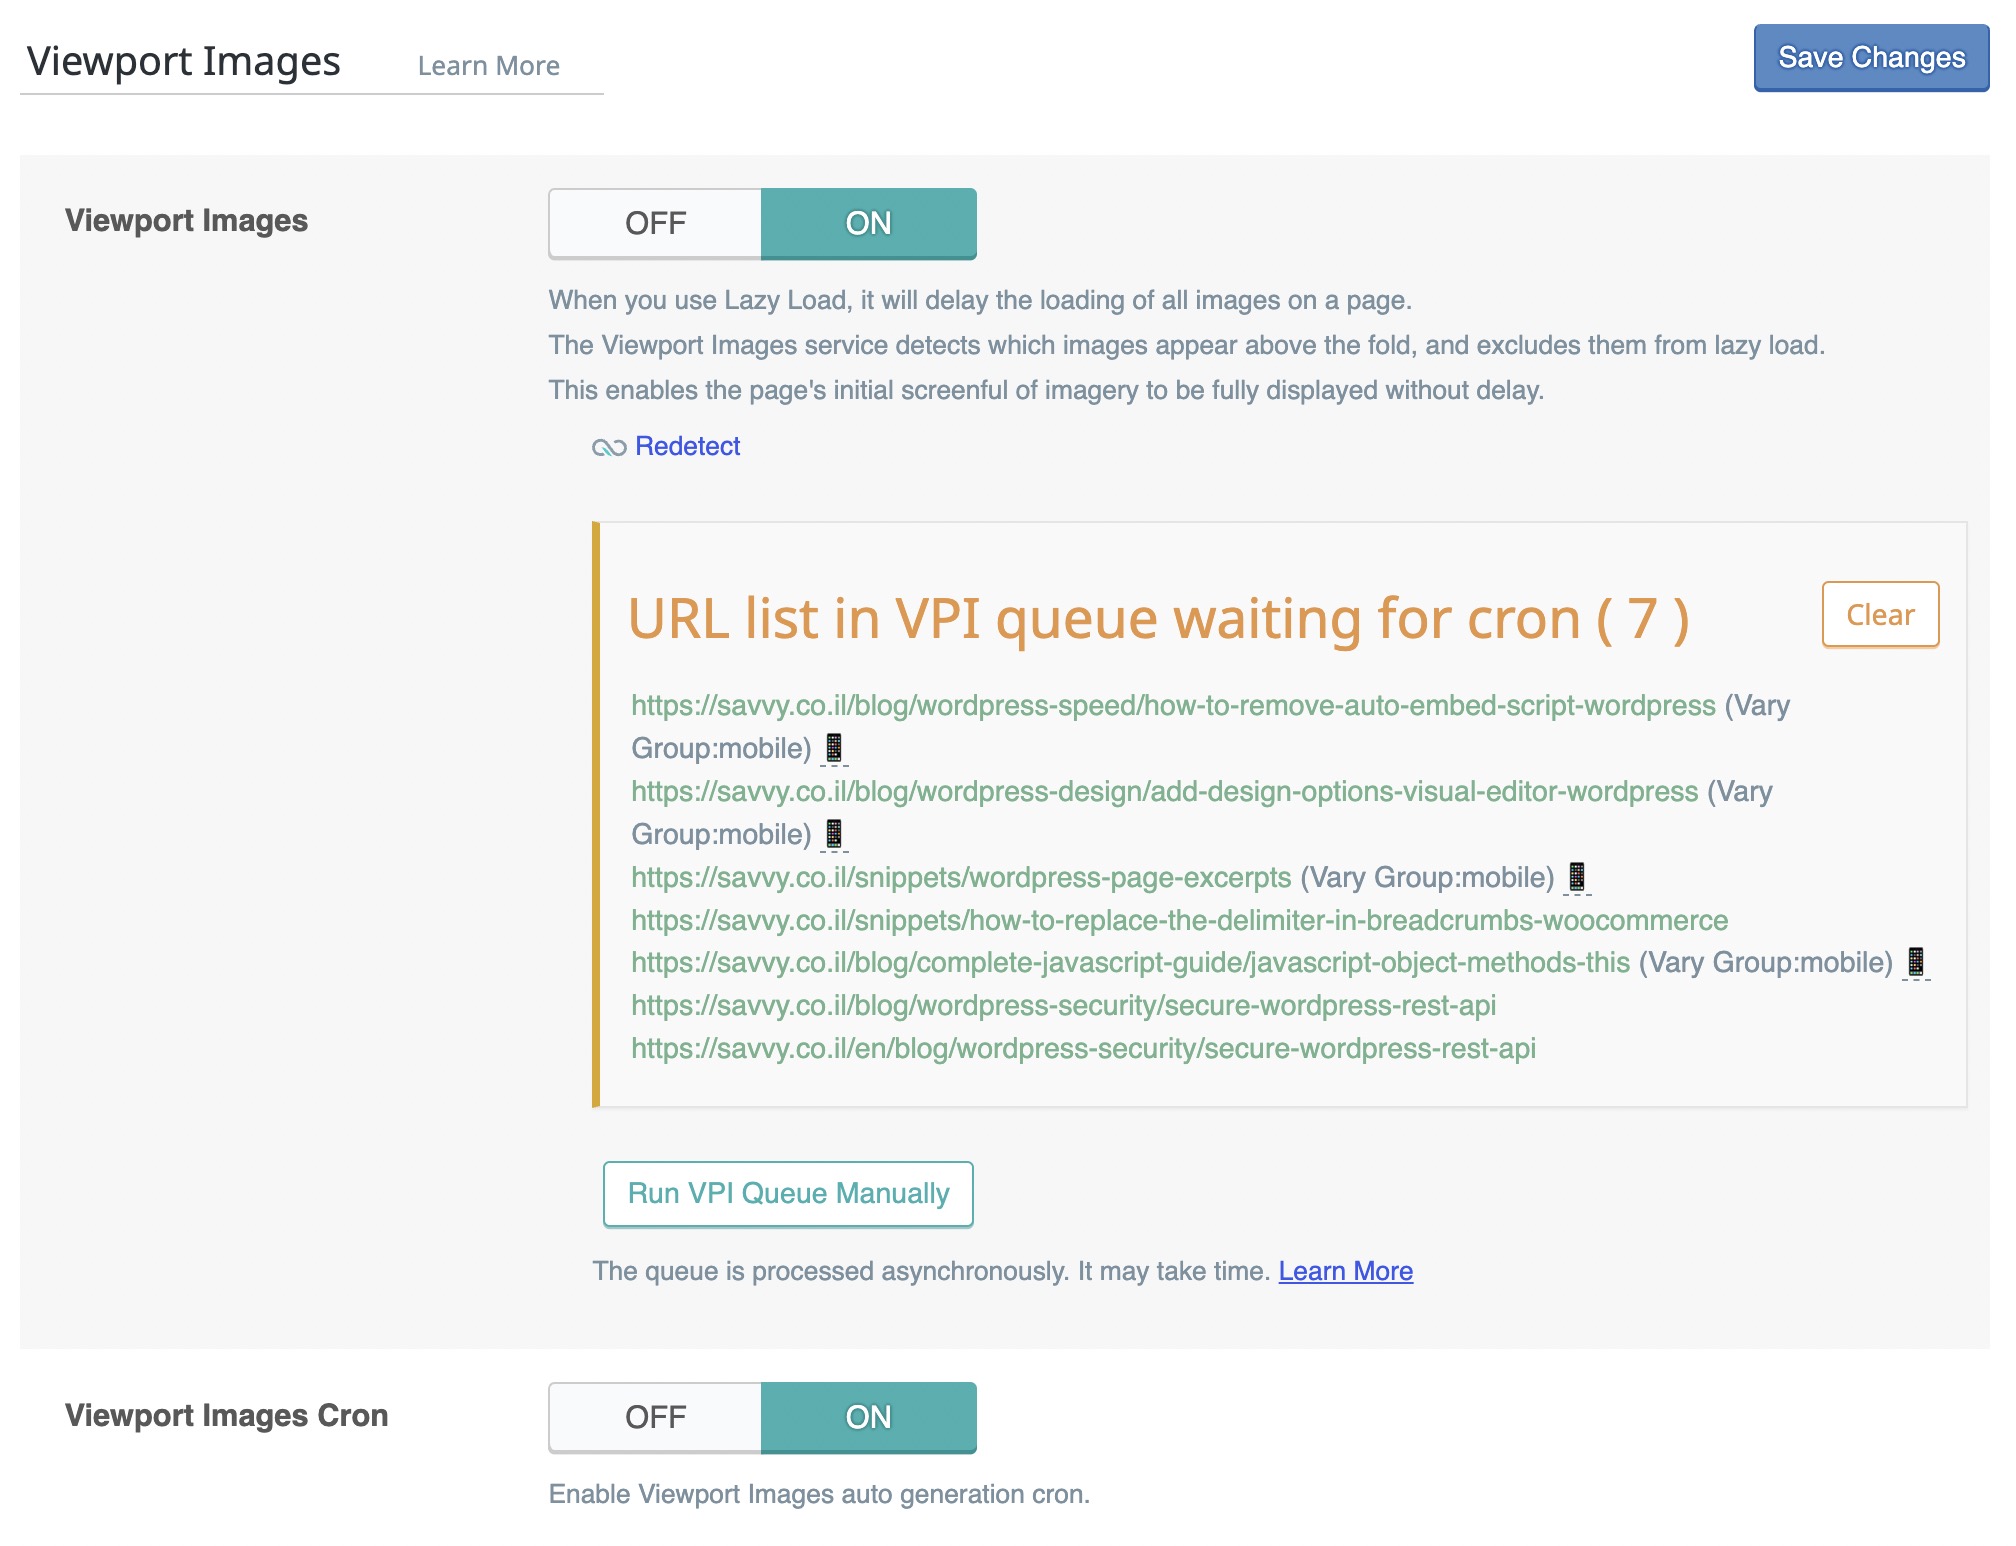
This setting optimizes lazy loading by detecting which images appear above the fold and excluding them from lazy load. It helps ensure faster visual rendering for the initial screen.
- ON – Viewport Images: Automatically excludes above-the-fold images from lazy load to improve first paint and LCP.
- ON – Viewport Images Cron: Automates VPI generation using a background cron job.
This feature enhances user-perceived performance by ensuring that the most important images load immediately, especially useful for mobile users and Core Web Vitals.
[6] Media Excludes
This section lets you prevent specific images, iframes, or URLs from being lazy loaded or optimized. It’s especially useful for avoiding layout shifts or conflicts with key visual elements.
- Lazy Load Image Excludes: Leave blank or specify exact image URLs or patterns to prevent lazy loading.
- Lazy Load Image Class Name Excludes:
wmu-preview-img,no-lazy, disables lazy load for any image with these classes. - Lazy Load Image Parent Class Name Excludes: (Empty), can be used if you want to exclude all images inside a specific container.
- Lazy Load Iframe Class Name Excludes: (Empty), define iframe classes to skip lazy loading.
- Lazy Load Iframe Parent Class Name Excludes: (Empty), skip iframe lazy loading based on parent container classes.
- Lazy Load URI Excludes: (Empty), allows skipping lazy loading on specific pages or post types by matching URI patterns.
- LQIP Excludes: Prevents low-quality image placeholders on specific images.
Use exclusions sparingly and only for elements that require full loading immediately or where lazy loading causes visual or functional issues.
[7] Localization
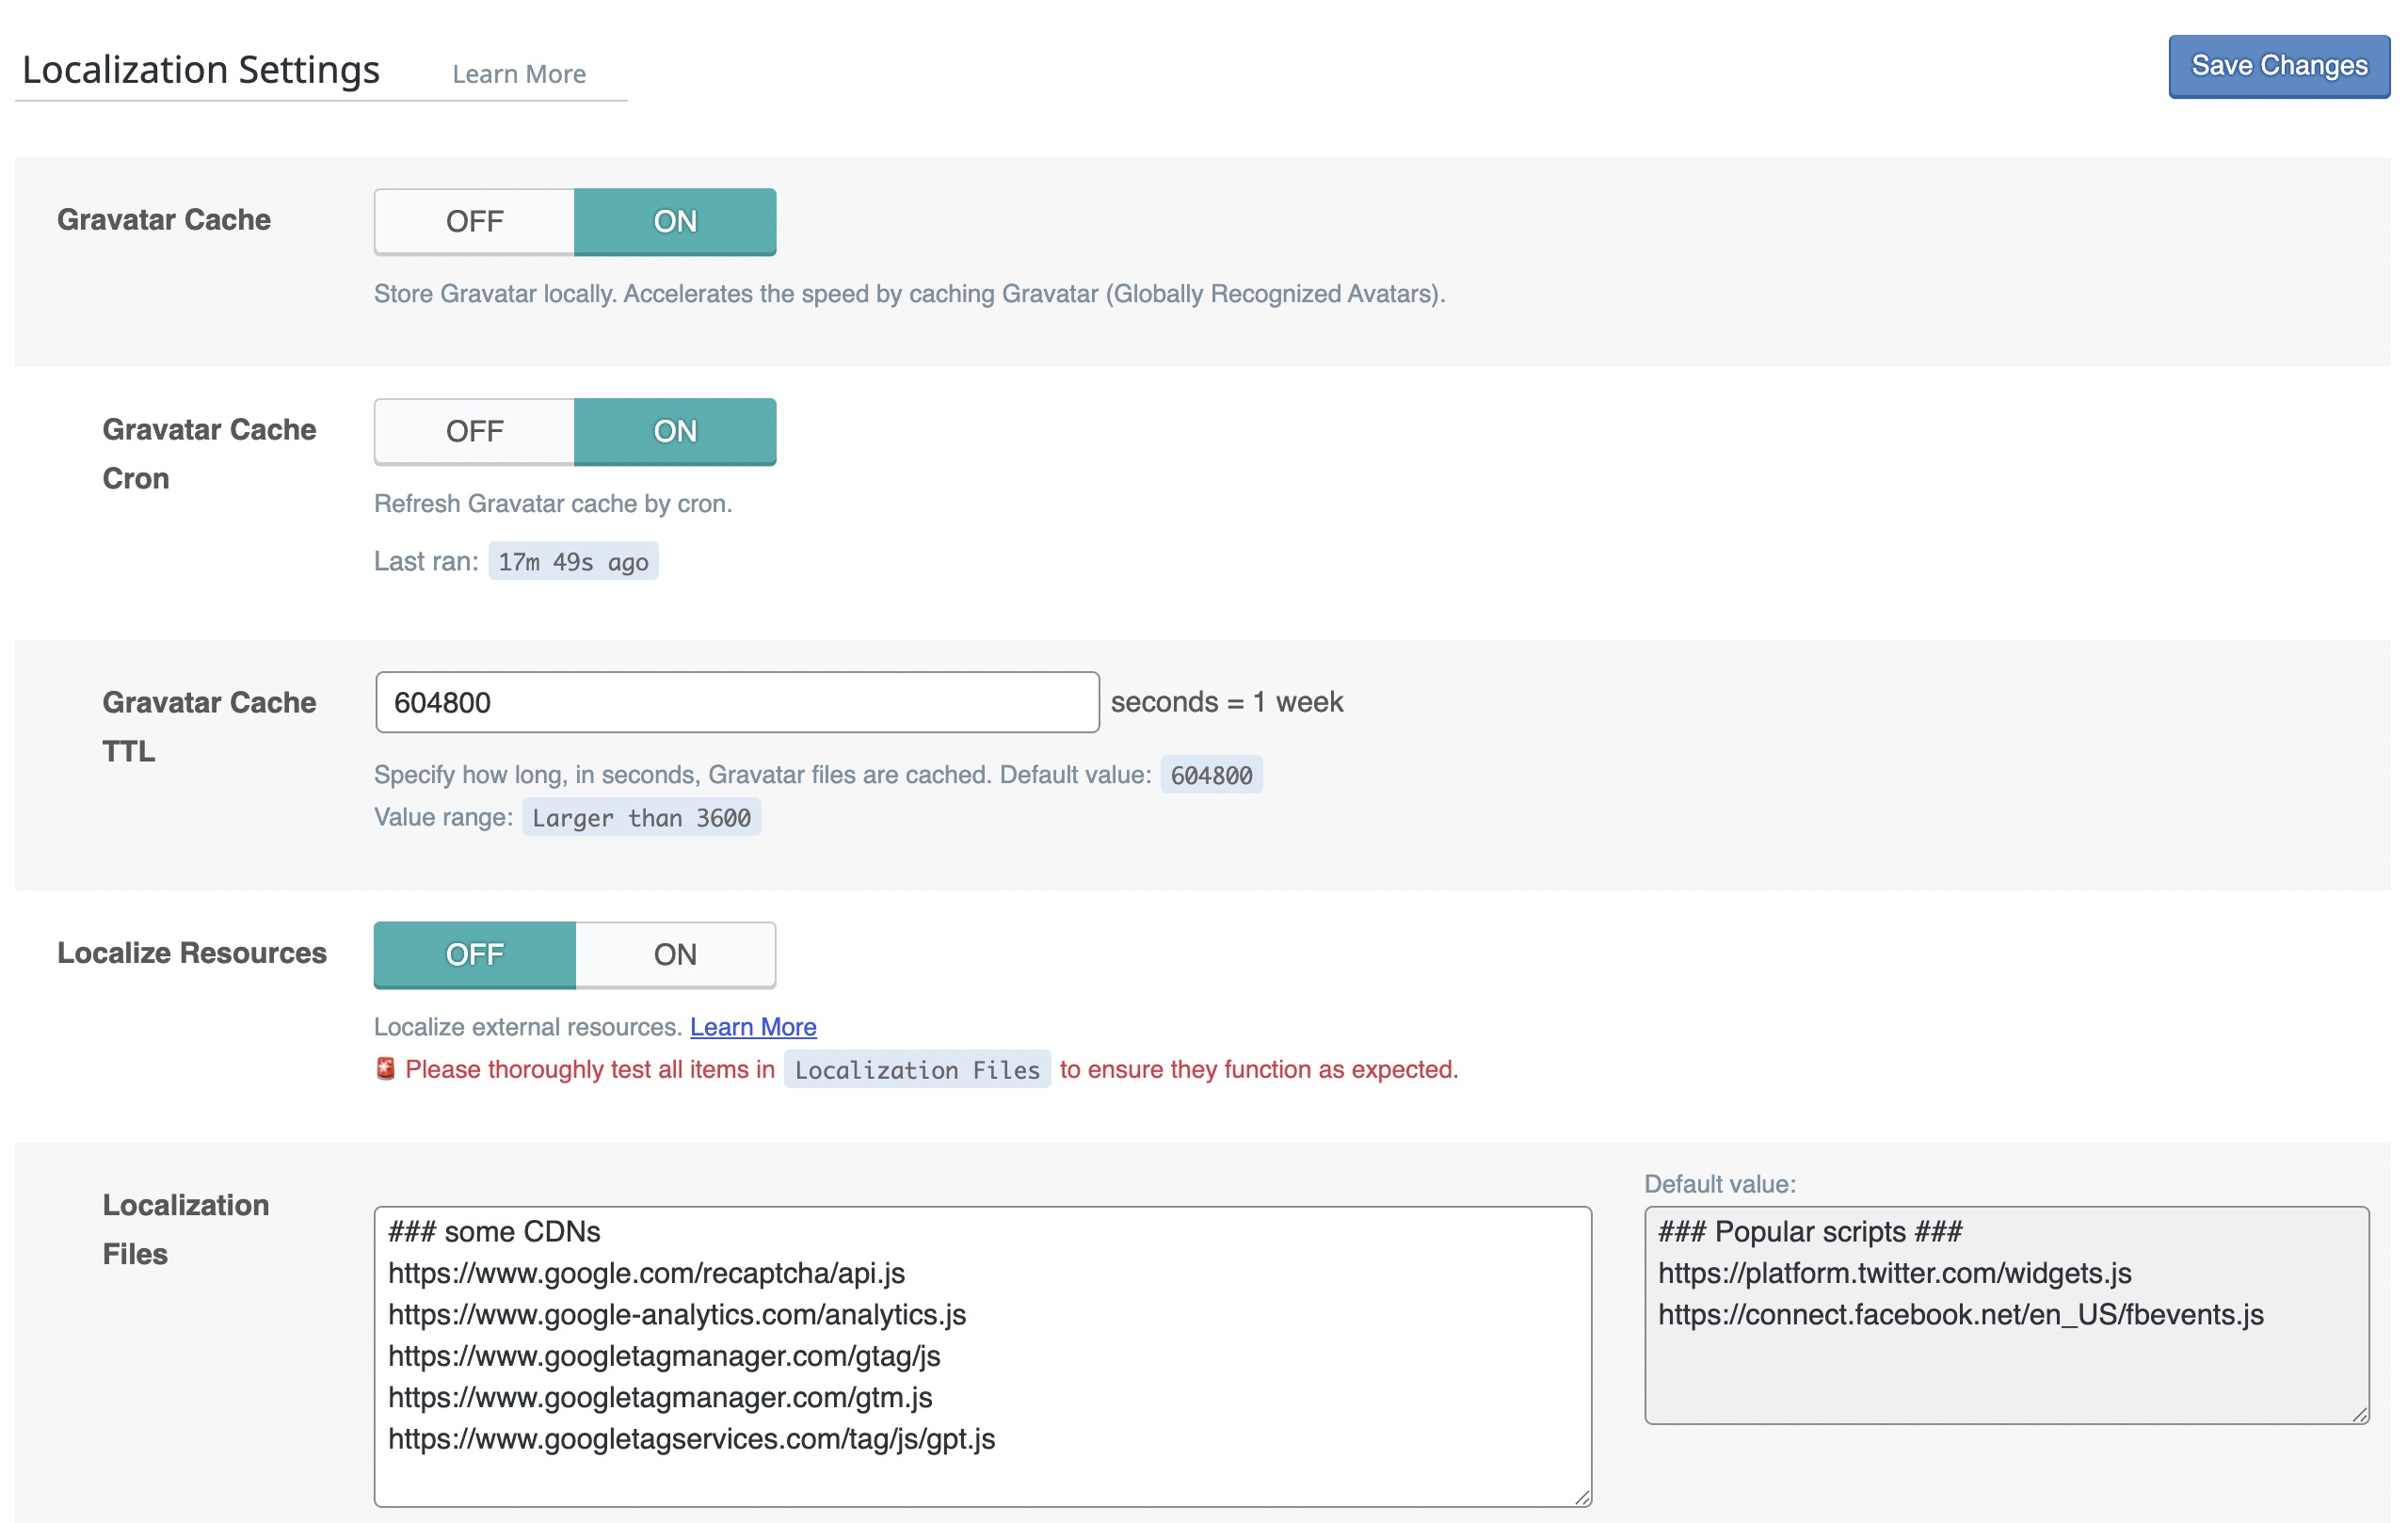
This section is used to cache Gravatar images locally and localize external JavaScript resources to reduce external HTTP requests and speed up loading.
- ON – Gravatar Cache: Stores avatar images locally to reduce Gravatar load time.
- ON – Gravatar Cache Cron: Automatically refreshes cached Gravatar images.
- Gravatar Cache TTL: Set to
604800seconds (1 week), the duration Gravatar images are cached. - OFF – Localize Resources: Disabled because serving external scripts locally (like Google Analytics or reCAPTCHA) can lead to functionality issues, outdated scripts, or compliance concerns. Use with caution and only if you fully understand the implications.
- Localization Files: Includes external URLs like:
- https://www.google.com/recaptcha/api.js
- https://www.google-analytics.com/analytics.js
- https://savvy.co.il/wp-content/litespeed/localres/aHR0cHM6Ly93d3cuZ29vZ2xldGFnbWFuYWdlci5jb20vZ3RhZy9qcw==
- https://savvy.co.il/wp-content/litespeed/localres/aHR0cHM6Ly93d3cuZ29vZ2xldGFnbWFuYWdlci5jb20vZ3RtLmpz
- https://www.googletagservices.com/tag/js/gpt.js
Localizing third-party scripts can reduce external calls but should be tested carefully to avoid breaking analytics or ad tracking functionality.
[8] Tuning Settings
These advanced options help fine-tune the behavior of JavaScript and CSS optimization. They’re especially useful for resolving compatibility issues or targeting performance optimizations to specific user groups.
- JS Delayed Includes: Add specific JS files or patterns to be delayed (loaded after user interaction).
- JS Excludes: Prevent specific JS files from being minified or combined if they cause layout issues.
- JS Deferred/Delayed Excludes: Exclude critical JS from deferring or delaying to avoid frontend errors.
- Guest Mode JS Excludes: JS files listed here will not be optimized in Guest Mode, useful for dynamic scripts.
- URI Excludes: Prevent optimization on specific page paths (like checkout, login, or dashboard pages).
- ON – Optimize for Guests Only: Restricts CSS/JS optimization to guests for safety and performance balance.
- Role Excludes: Lets you exclude specific WordPress roles from optimizations (e.g., Editor, Administrator).
Use the Tuning panel to prevent conflicts on sensitive pages or scripts. This is particularly helpful when dealing with third-party integrations or role-specific features.
[9] Tuning – CSS
This section offers precise control over CSS optimization, particularly for Critical and Unused CSS (CCSS/UCSS). Use these settings to resolve display issues, prevent layout shifts, or handle dynamic content more gracefully.
- CSS Excludes: Prevent specific stylesheets from being minified, combined, or loaded asynchronously.
- UCSS File Excludes and Inline: Prevent certain stylesheets from being processed by Unused CSS and optionally force them inline.
- UCSS Selector Allowlist: Ensure specific CSS selectors are never removed, even if detected as unused (e.g., animation classes).
- UCSS URI Excludes: Skip UCSS optimization for specified page URLs. Useful for dynamic or interactive layouts.
- Separate CCSS Cache Post Types: Generate separate Critical CSS per post type. Recommended when layouts differ significantly.
- Separate CCSS Cache URIs: Generate CCSS for specific pages. Improves rendering accuracy at the cost of extra processing.
- CCSS Selector Allowlist: Keep essential selectors in all Critical CSS files to prevent layout flickers.
- Critical CSS Rules: Define CSS rules that should always be injected into the critical path. Useful for site-wide elements like headers or menus.
Fine-tuning Critical and Unused CSS helps balance speed with visual integrity. Be cautious when excluding or forcing styles – test thoroughly across templates and devices.
Database
A clean, optimized database improves query speed and overall site performance. This section helps you set up automatic database maintenance to keep your WordPress installation running smoothly.
[1] Manage
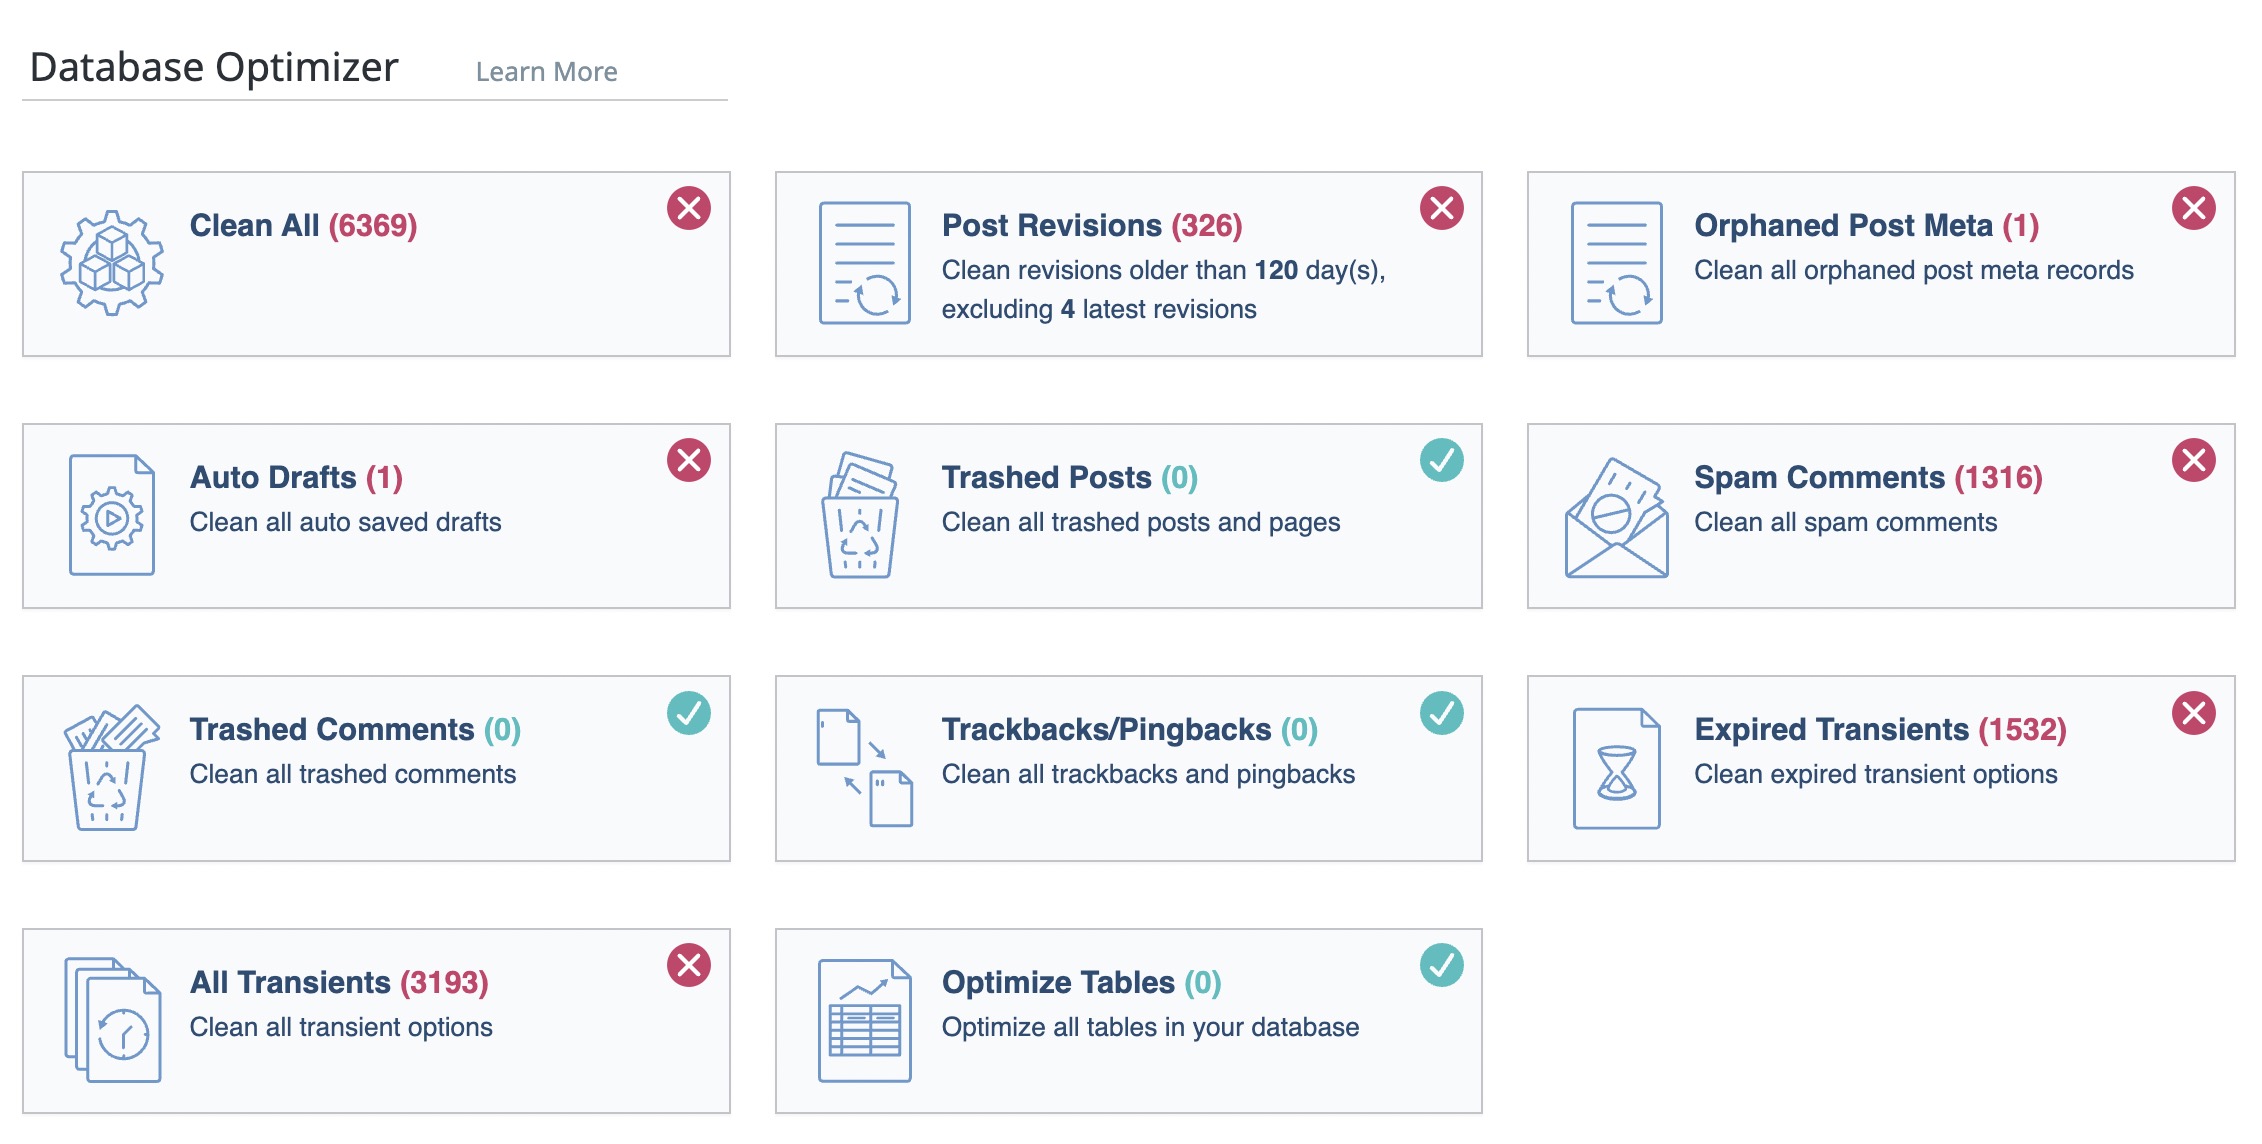
This section helps clean up unnecessary or outdated database entries to reduce overhead and improve performance.
You can manually delete revisions, spam comments, auto drafts, transients, and more, streamlining your database without affecting active content.
- Clean All: Runs a bulk cleanup across all categories (revisions, drafts, spam, etc.).
- Post Revisions: Deletes old post revisions beyond the last 4 and older than 120 days.
- Orphaned Post Meta: Removes leftover meta entries from deleted posts.
- Auto Drafts: Clears autosaved drafts no longer in use.
- Trashed Posts & Comments: Cleans up deleted content sitting in the trash.
- Spam Comments: Removes spam comments automatically marked by moderation tools.
- Trackbacks/Pingbacks: Deletes unused or outdated trackbacks and pingbacks.
- Expired Transients: Clears expired temporary options used by plugins and themes.
- All Transients: Removes all transients, useful if expired values weren’t cleared properly.
- Optimize Tables: Runs a MySQL table optimization to reclaim unused space and improve speed.
Regular database cleanups can significantly improve backend performance and reduce disk usage, especially for sites with frequent content updates or comment activity.
[2] DB Optimization Settings
These settings control how post revisions are retained when performing database cleanup. This helps reduce unnecessary database bloat while still keeping recent changes for safety.
- Revisions Max Number: Set to
4– keeps the last 4 revisions per post before deletion. - Revisions Max Age: Set to
120days – revisions newer than 120 days will be preserved.
Limiting both the number and age of revisions is an effective way to maintain a lean database without losing access to recent edits.
Crawler
The crawler helps pre-warm your cache by visiting pages automatically in the background. This ensures your visitors receive the fastest cached version even after content updates.
[1] Summary
The crawler status and statistics give you insights into which URLs were scanned, skipped, or failed. Use this data to identify gaps in cache coverage.
[2] Map
Displays the sitemap or internal link structure used by the crawler. You can customize or upload your own sitemap to control what’s included.
[3] Blocklist
Allows you to block specific URIs, query strings, or patterns from being crawled, useful for excluding high-CPU or dynamic pages.
[4] Settings
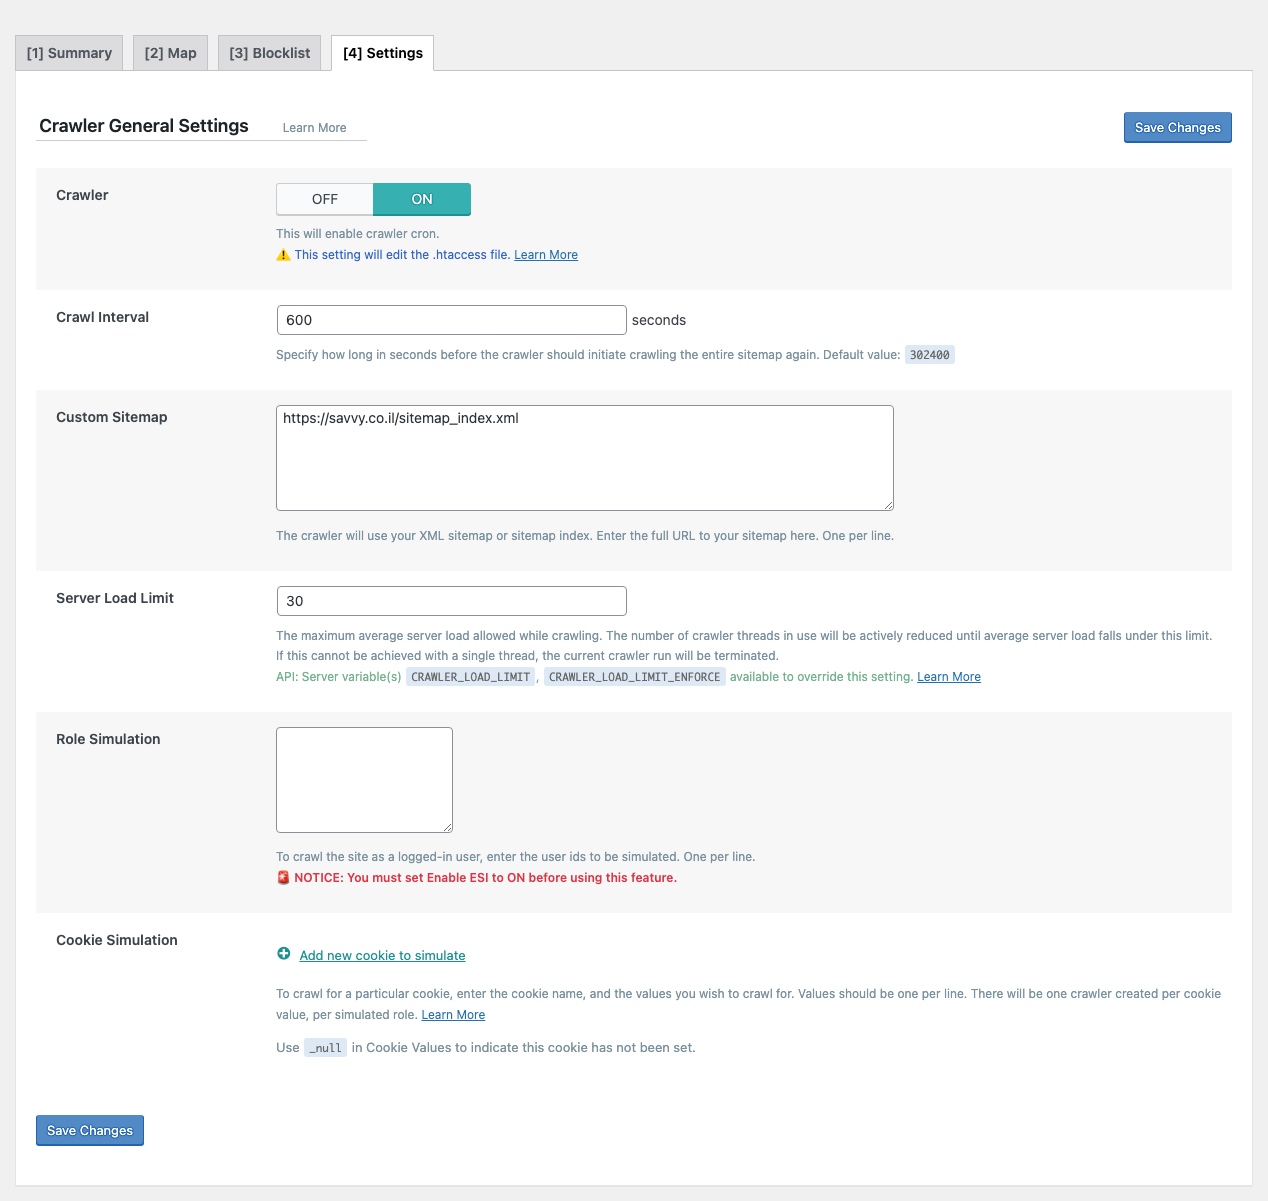
This section controls how the LiteSpeed Cache Crawler behaves, ensuring cached content remains fresh and ready for visitors by simulating traffic based on the sitemap.
- ON – Crawler: Enables cron-based pre-caching of site content.
- Crawl Interval: Set to 302400 seconds (approx. 3.5 days) between full sitemap crawls.
- Custom Sitemap: You must add your sitemap URL here (e.g.,
https://yourdomain.com/sitemap_index.xml) to define the source of URLs the crawler will pre-cache. - Server Load Limit: Default is set to 1. You can increase the limit according to your server strength & resources. Prevents the crawler from overloading the server.
- Role Simulation: Empty, only guest crawling is used unless ESI is enabled and roles defined.
- Cookie Simulation: Not configured, can simulate visitors based on cookie values if needed.
The crawler ensures critical pages stay warm in the cache, improving TTFB and performance for first-time visits. Monitor server load to avoid excessive resource usage.
Toolbox
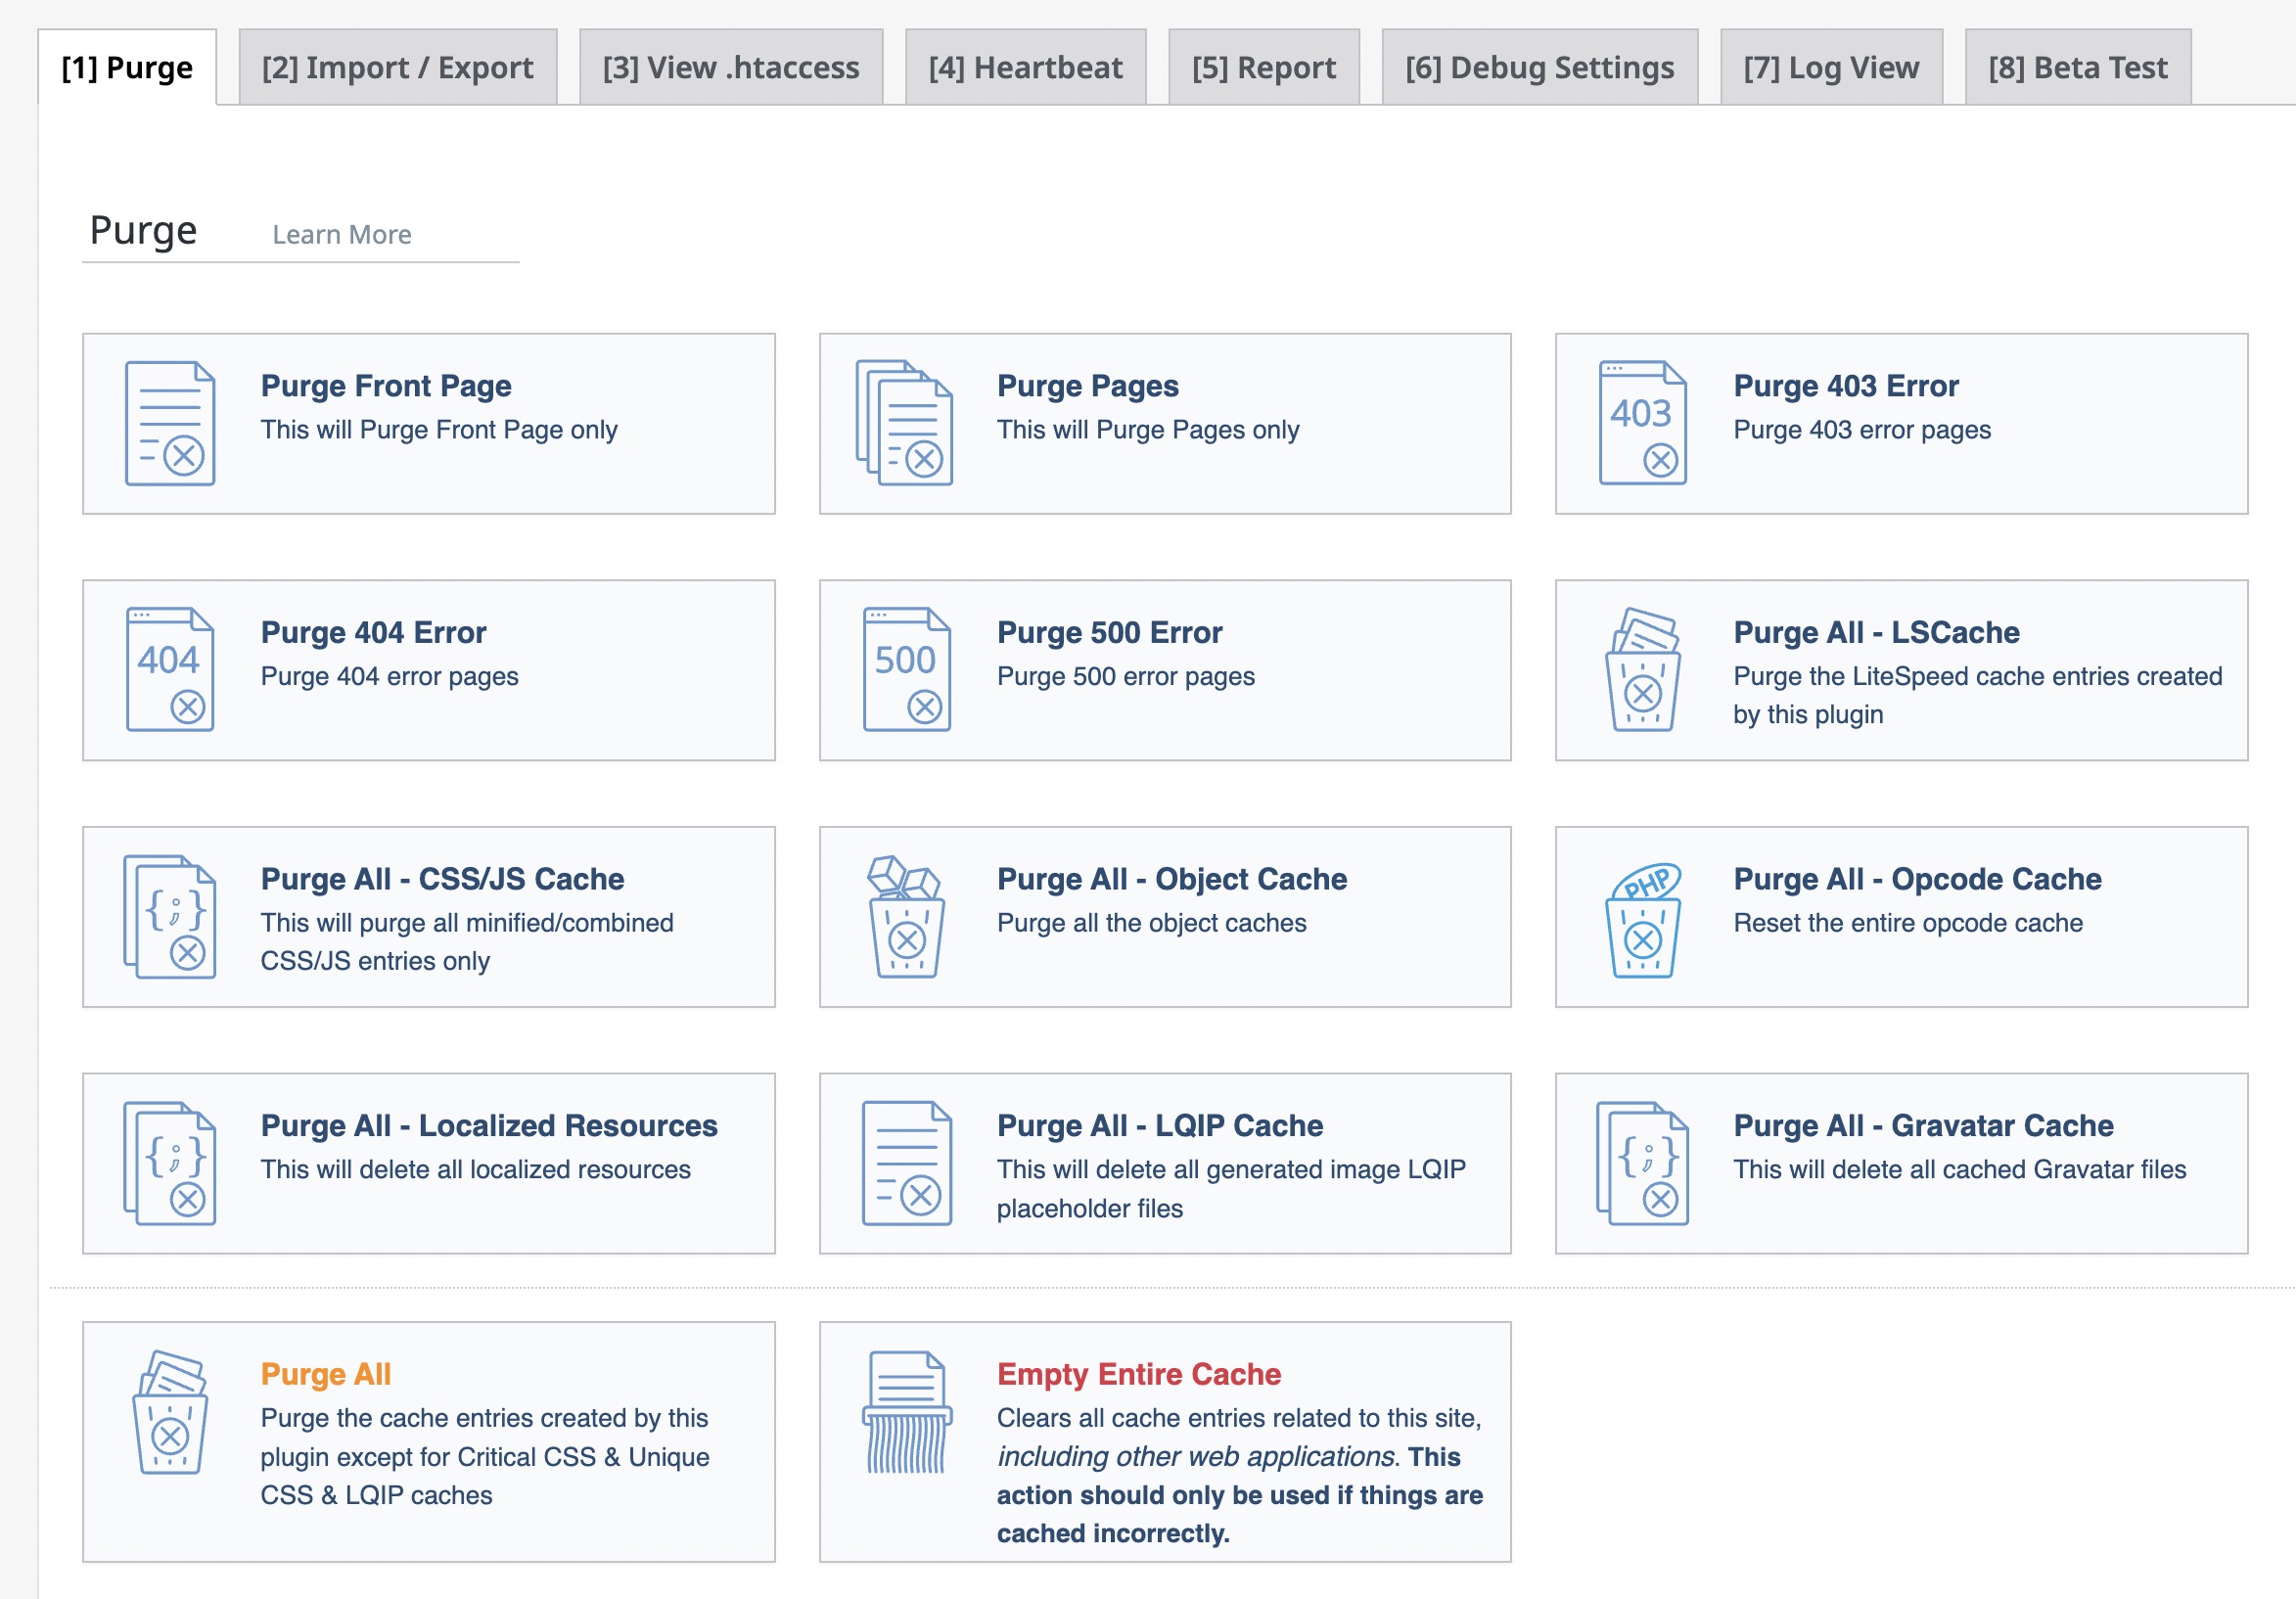
The Toolbox provides quick access to critical maintenance functions like cache purge, .htaccess edits, import/export settings, and debug logs.
This section helps troubleshoot, test, and reset LiteSpeed settings without navigating through the full settings panels.
If you’re comparing options, check out our WP Rocket guide for a different approach to WordPress caching.
FAQs
quic.cloud.Summary: Optimal LiteSpeed Cache Configuration
LiteSpeed Cache covers far more ground than most caching plugins. It handles server-side caching, image optimization, CSS/JS processing, database cleanup, and CDN integration – all from a single plugin.
With the settings above applied, your WordPress site should see measurable improvements in load times and Core Web Vitals scores.
- Start with a preset: Use the “Standard” preset as a base, then customize settings for your site’s specific needs.
- Cache wisely: Cache all public-facing content, but always exclude dynamic pages like login, cart, checkout, and user dashboards.
- Enable Guest Mode + Optimization: Huge performance benefits for first-time, anonymous visitors.
- Use QUIC.cloud CDN: Seamless integration, dynamic CDN support, and essential for Guest Optimization and Critical CSS generation.
- Optimize images: Use WebP and lazy loading, and run image optimization automatically in the background.
- Fine-tune Page Optimization: Minify, combine, and defer JS/CSS, but test carefully with your theme and plugins.
- Schedule database cleanups: Weekly cleanups remove bloat and speed up backend operations.
- Use the crawler: Pre-warm your cache before traffic peaks to deliver snappy performance consistently.
Remember: Every WordPress site is unique. After applying these recommended settings, test thoroughly across devices and page types. Tools like Google PageSpeed Insights, GTmetrix, and WebPageTest are your allies for tracking improvements.
Every site is different, so test after each change. What works for a blog won’t necessarily work for a WooCommerce store.
For edge cases, troubleshooting, or deeper configuration, the official LiteSpeed Cache documentation is the best reference.

Great summary. If the browser cache is set to 1 year, why does pagespeed always complain about images being cached for 1 week only?
It’s a good question. I encountered it as well if i’m not mistaken. Add the following at the end of your htaccess file and it should solve the issue. Backup the file content before just in case:
Let me know if it solves the issue…