If you are working with WordPress, it is reasonable to assume that at some point, you will encounter a situation where you want to duplicate, back up, or transfer a WordPress site to a new domain or server with a new hosting company.
But how can you easily perform these actions and ensure that the process is fast and straightforward? We’ll discuss this in the next post, and to do so, we’ll use a free plugin called Duplicator.
It is also possible to manually migrate a WordPress site to a new domain/server. Depending on your consideration…
Why Would You Want to Duplicate a WordPress Site Using Duplicator?
The Duplicator plugin allows you to create an exact and ready-to-use duplicate of your WordPress site and deploy it on any server that meets WordPress’s requirements.
Duplicating a WordPress site can be useful for various situations, as mentioned above, and for the following reasons:
- When you want to create a development environment. Testing significant changes or updates on a live site can be risky. If you have a copy or duplicate of the site, you can perform tests and ensure everything works properly before updating the live site.
- When you want to migrate to a different hosting company. If you want to move your site to a new hosting server, you can take your WordPress site, copy it to the new server, and have the exact same site as it was on the old server.
- When you are changing the domain (site address). Changing a domain involves copying the site to a new location on the hosting server.
- When you want to back up the site. Duplicator creates an exact copy of your site, so you can use it for backup purposes if you are not backing up your site differently.
Before we move on to the first step, you need to create an account with the new hosting company or set up a local WordPress environment (on your personal computer) where you can store the duplicate of your site. But don’t rush to install WordPress on the new server; the Duplicator plugin eliminates that need. Let’s get started…
We note that we are using the Pro version of the Duplicator plugin, so you may see additional options in the screenshots that you won’t have, but apart from that, the entire process is the same…
1. Create a Copy of Your Site and Download It to Your Computer
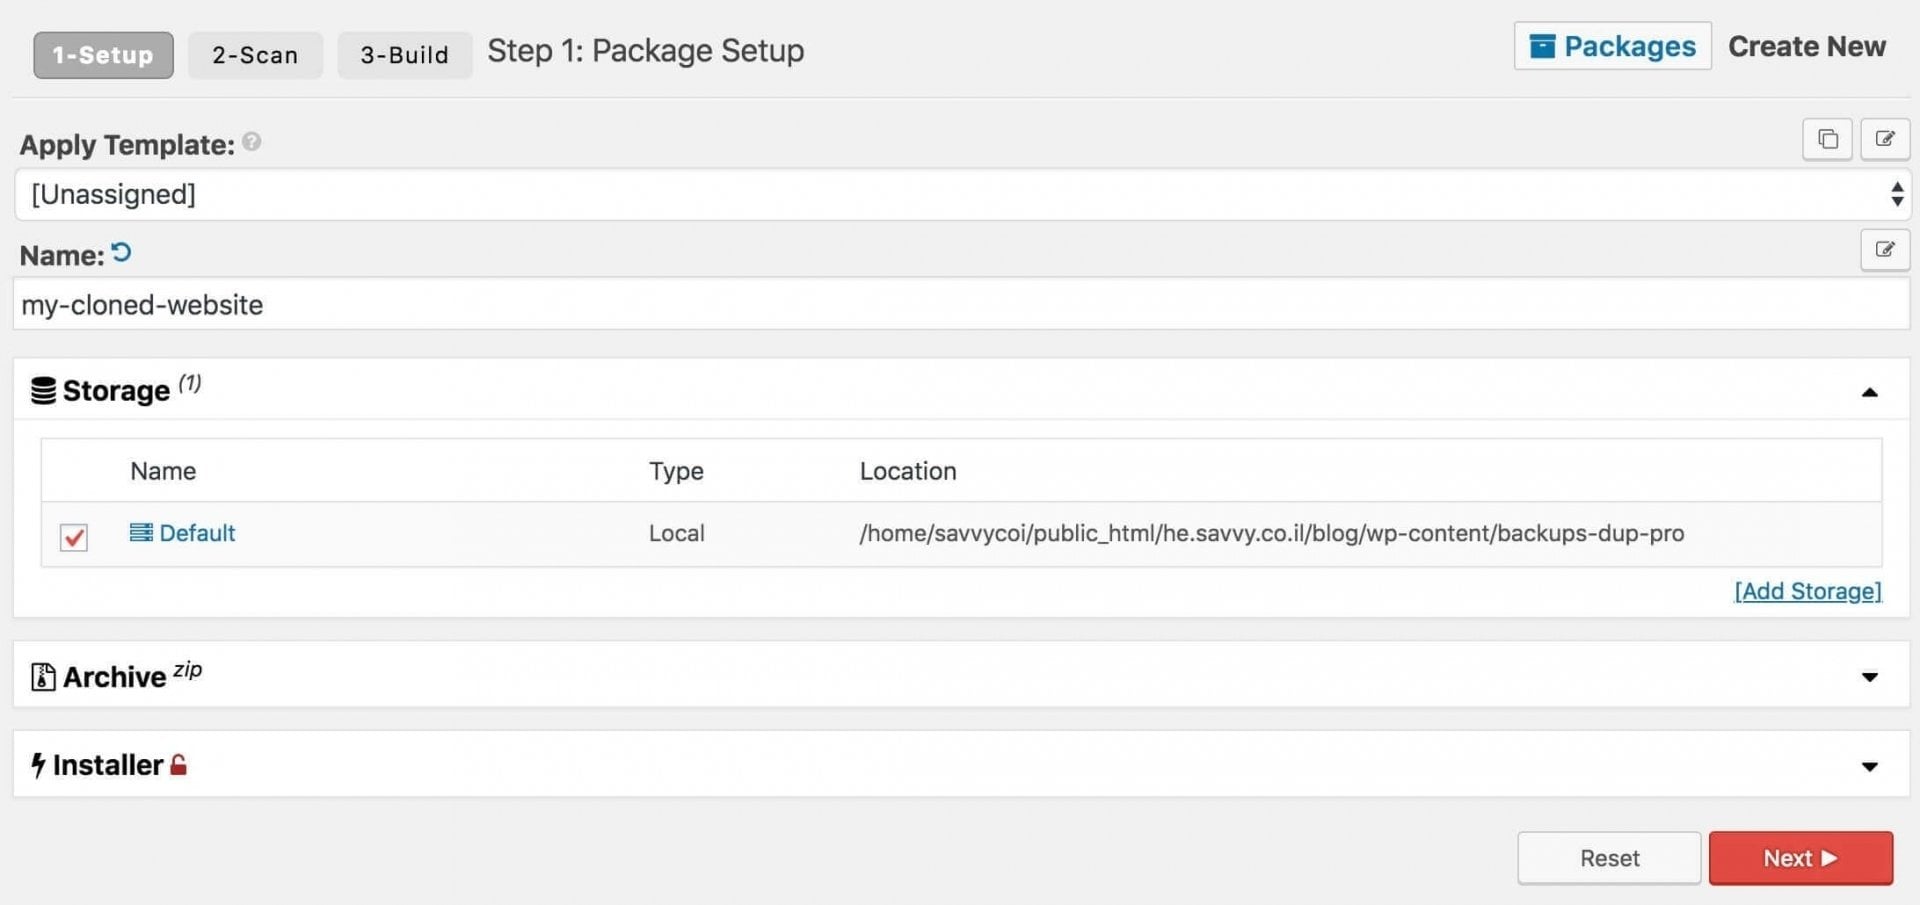
The first action you need to take is to install and activate the Duplicator plugin on the site you want to duplicate. After doing so, go to the WordPress dashboard and find a new tab called “Duplicator.” Click on this tab and then on the “Create New” button.
This action will create a “package.” At the end of this process, the package will contain two files that will allow you to duplicate the site to a new server using a self-installation system.
One file is the Zip file containing the site files and the database, and the other is the installation file named installer.php.
There are several settings you can configure on this screen, but we won’t touch on those in this guide. In most cases, there’s no need to change them, so there’s no need to worry.
By the way, the plugin allows you to create multiple packages as you wish. Either way, all you need to do is choose a name for the package (or keep the default name) and then click the “Next” button.
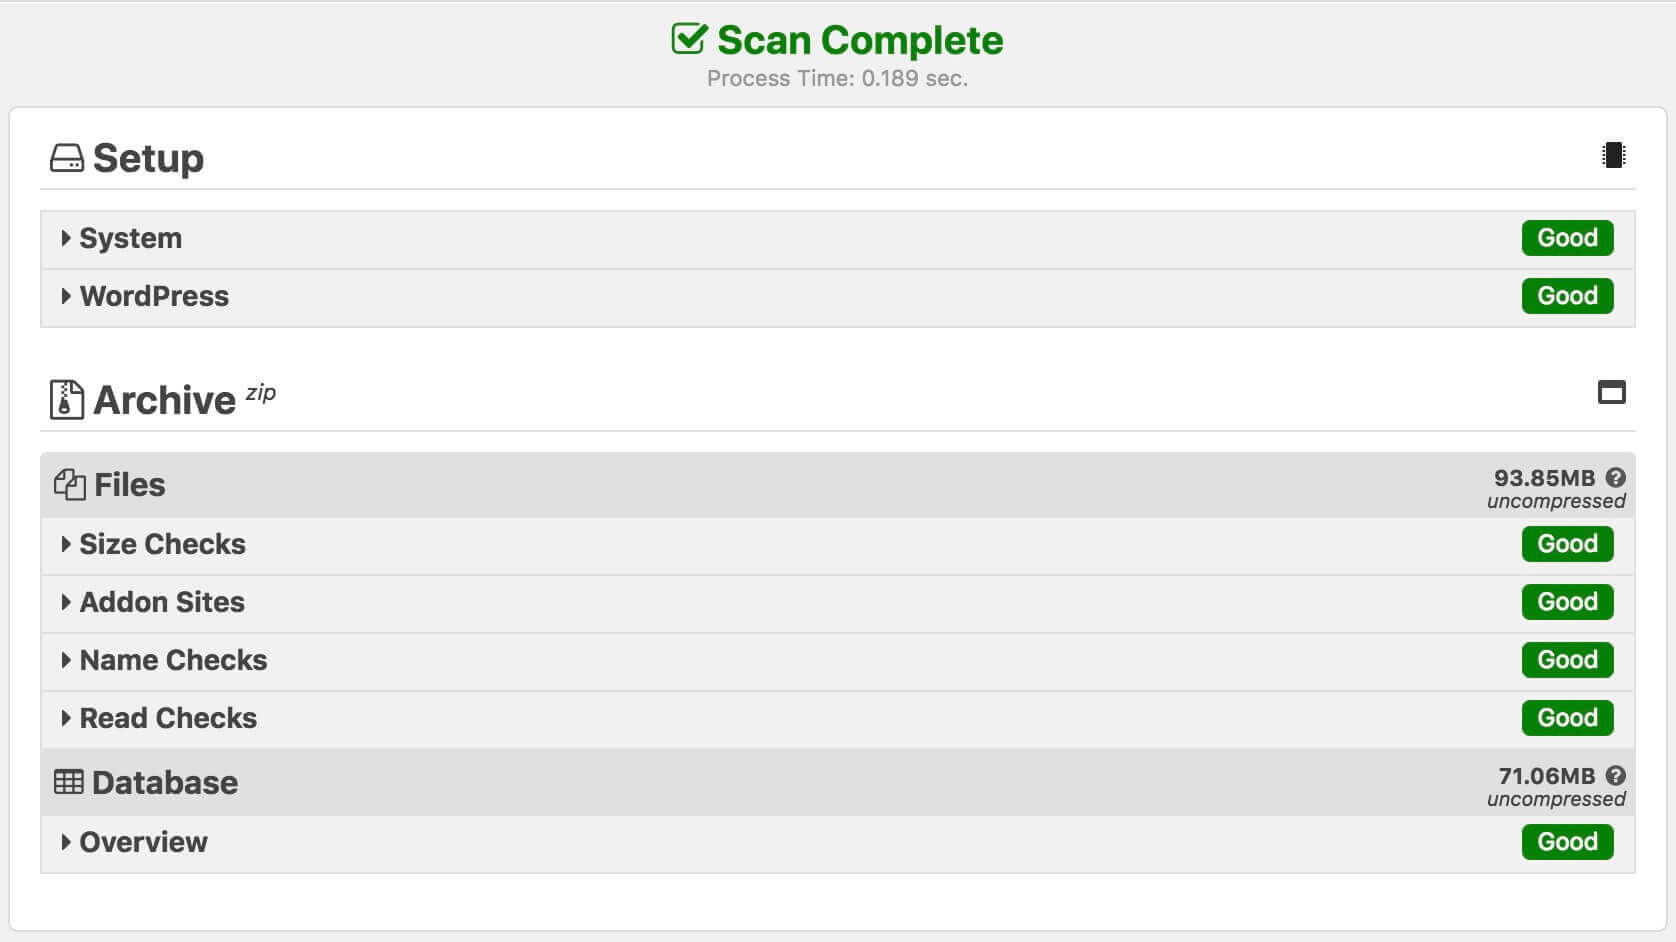
After a brief scan, the Duplicator plugin will provide some information about your site. You might see a warning or two depending on your hosting server and the size of the site.
It’s normal to receive some notes on this screen. For instance, here are some issues that Duplicator might alert you to:
- File name issues. If you have files in your images folder with names in Hebrew or special characters, you will likely get a warning. This is because these names are not supported by certain hosting servers.
- If there are extremely large files. Duplicator will warn about excessively large files that you may not want to include in the duplicate you are creating.
- If there’s an unusually large table in the database. The plugin will also alert you and may recommend optimizing the database before creating the package.
- If there are permission issues on files or directories in your site, preventing the plugin from performing actions necessary for package creation.
If you encounter a specific issue, you can click on the corresponding warning, get more information on how to resolve the problem, and even resolve it with a button click.
Most of them can be resolved by yourself, but some might require assistance from the hosting company.
You need to address the notes under “Setup” and “Database,” but you can mostly ignore the ones under “Archive.” In any case, make sure that all the checks are green, as shown in the image:
When everything is ready, click the “Build” button. The process will take a few minutes, and at the end, you can download both files to your personal computer using the “Download” button.
2. Upload the Downloaded Files to the New Server
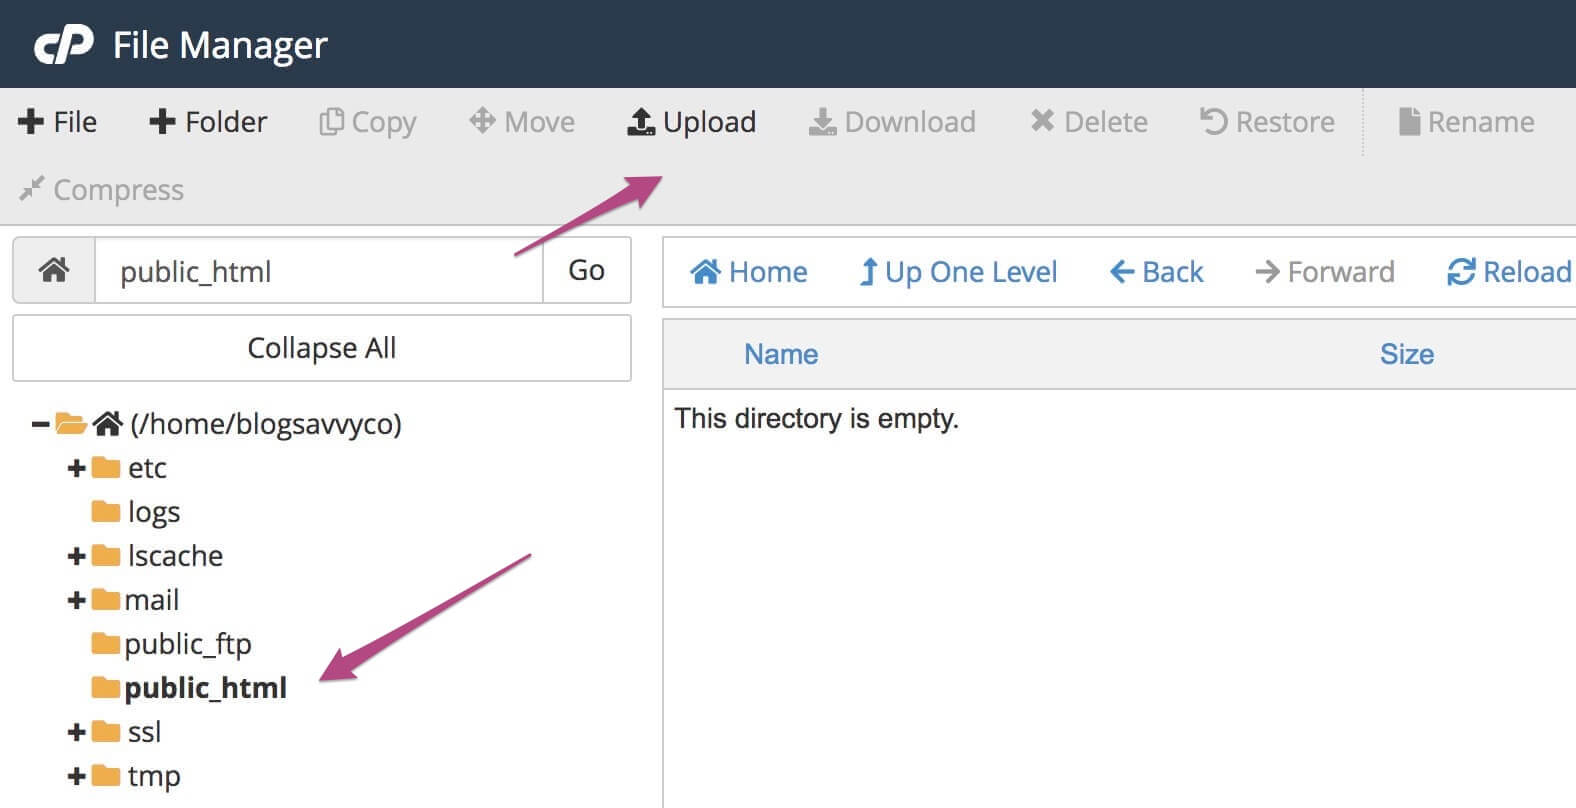
At this stage, you need to upload the files you just downloaded to the new server. You can do this using the File Manager in the server’s management interface (such as cPanel) or using FTP.
This guide won’t cover how to do this using FTP, but let’s take a look at how to do it using cPanel.
Log in to cPanel and click on “File Manager.” Then, upload both files to the root directory of the server, usually named public_html or www.
3. Create a New Database for Your Site Duplicate
Every WordPress site requires a database containing the site’s information. In this case as well, you need to create a database for the duplicate.
To create a new database, go to MySQL Databases in cPanel. Go to Create New Database and choose a name for the database.
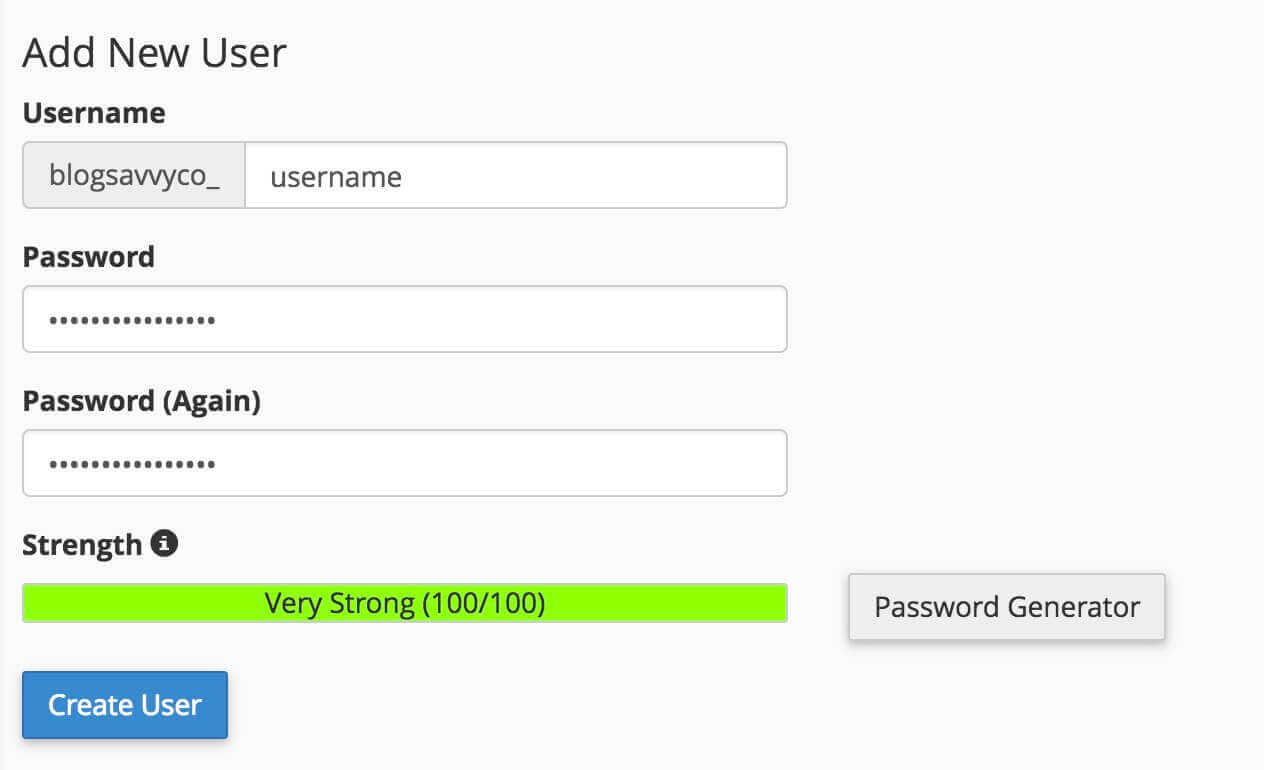
Go to Add new User on the same screen. Choose a username and password, and create a new user by clicking on Create User.
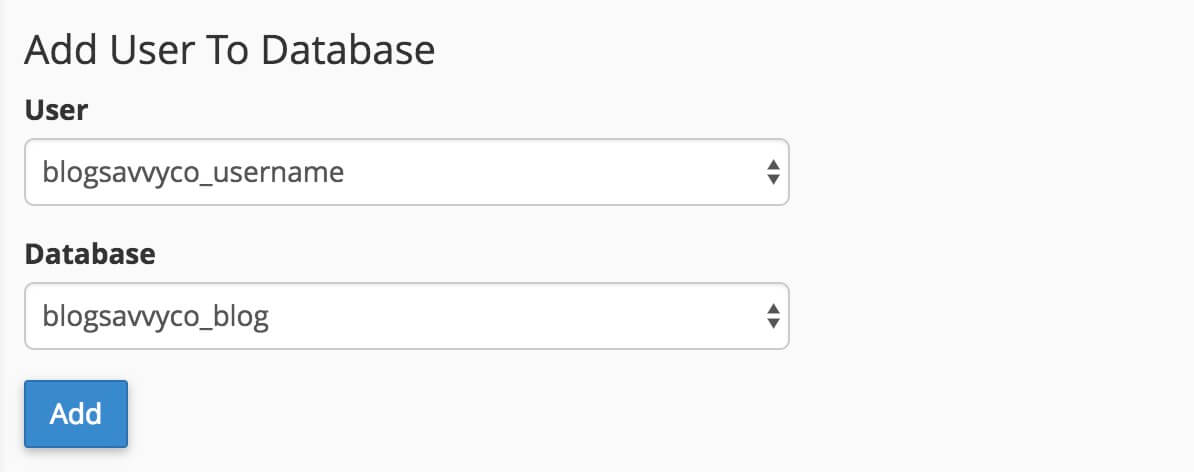
Next, scroll down to the section labeled Add User to Database, select the username and the database you created, and click Add.
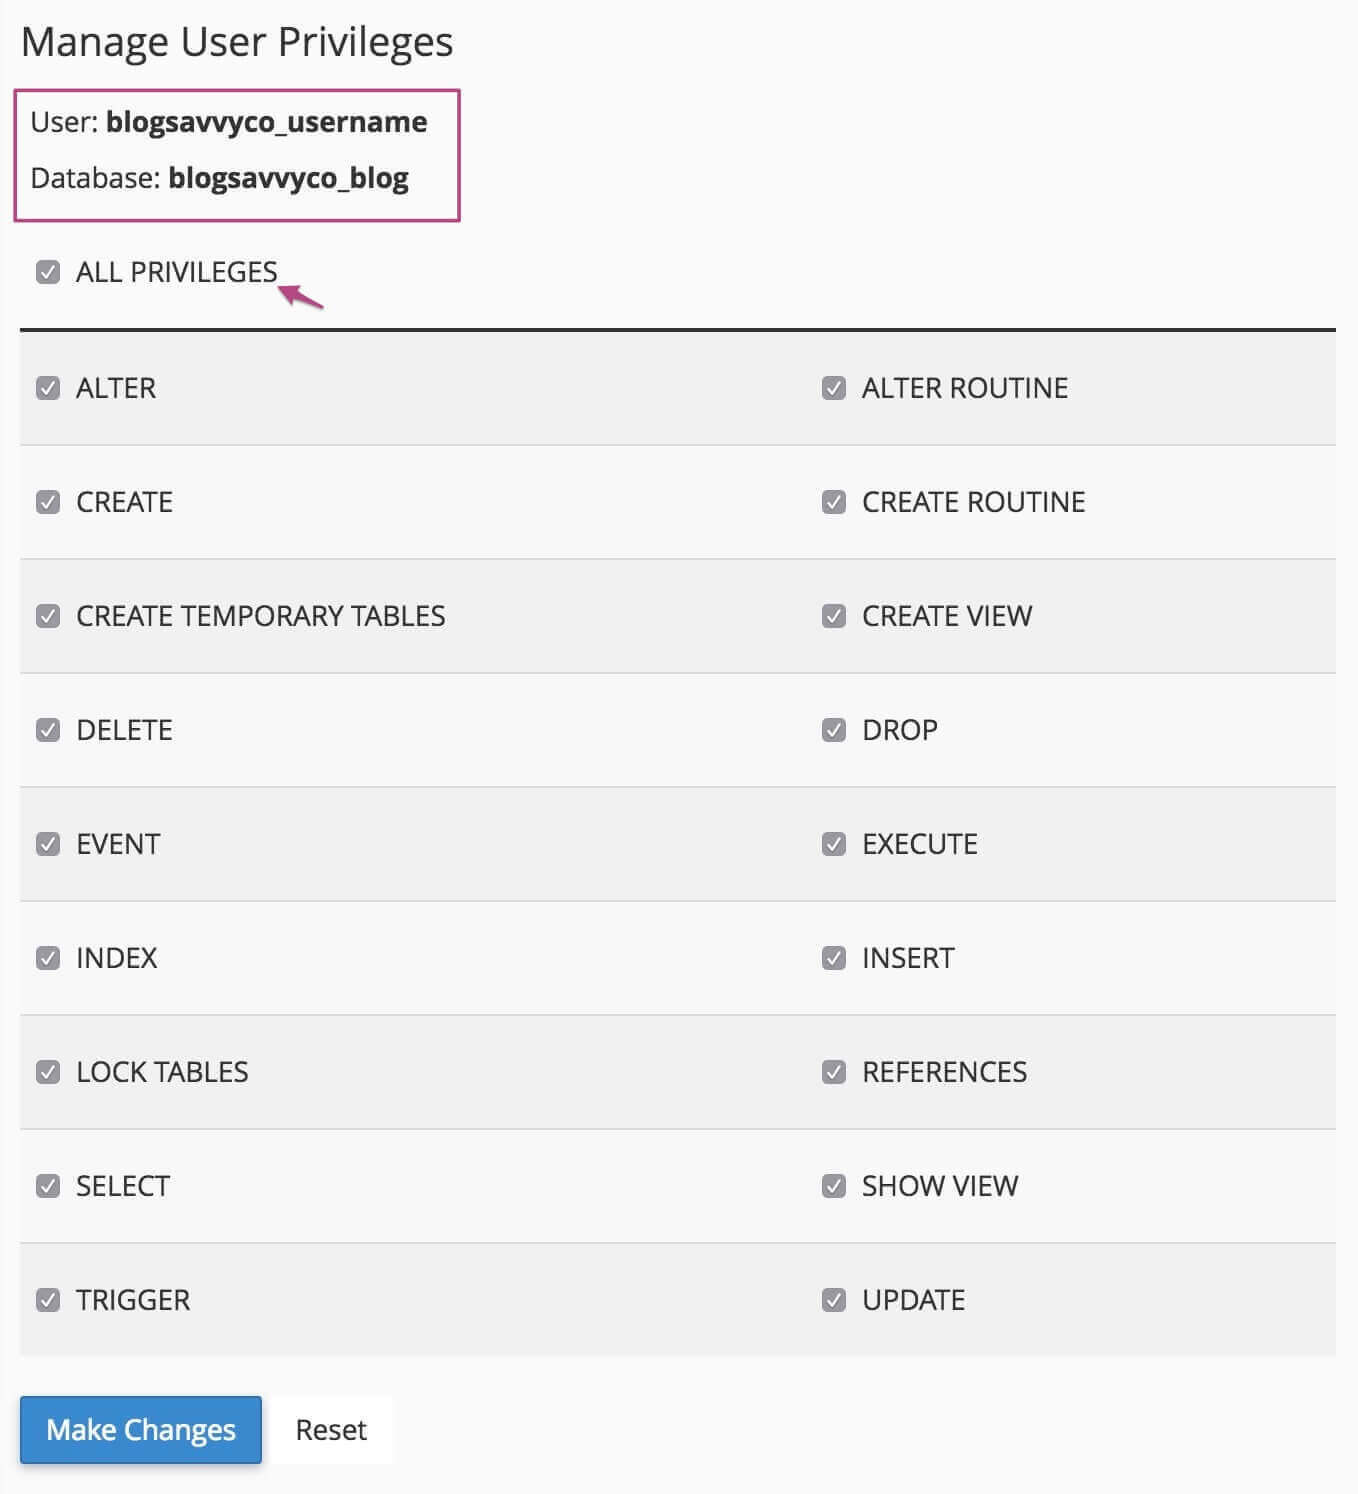
In the next screen, click on All Privileges to grant all necessary permissions to the user, and apply the changes by clicking the Make Changes button.
Note: At the top of this screen, you’ll find the database name and the username. Remember them or jot them down as we’ll use them in a minute.
4. Run the Duplicator Installation and Complete the Duplication Process
Now that we have an empty database and the necessary files in the root directory of the server, open your browser and go to your site’s address, adding installer.php/ at the end, like this:
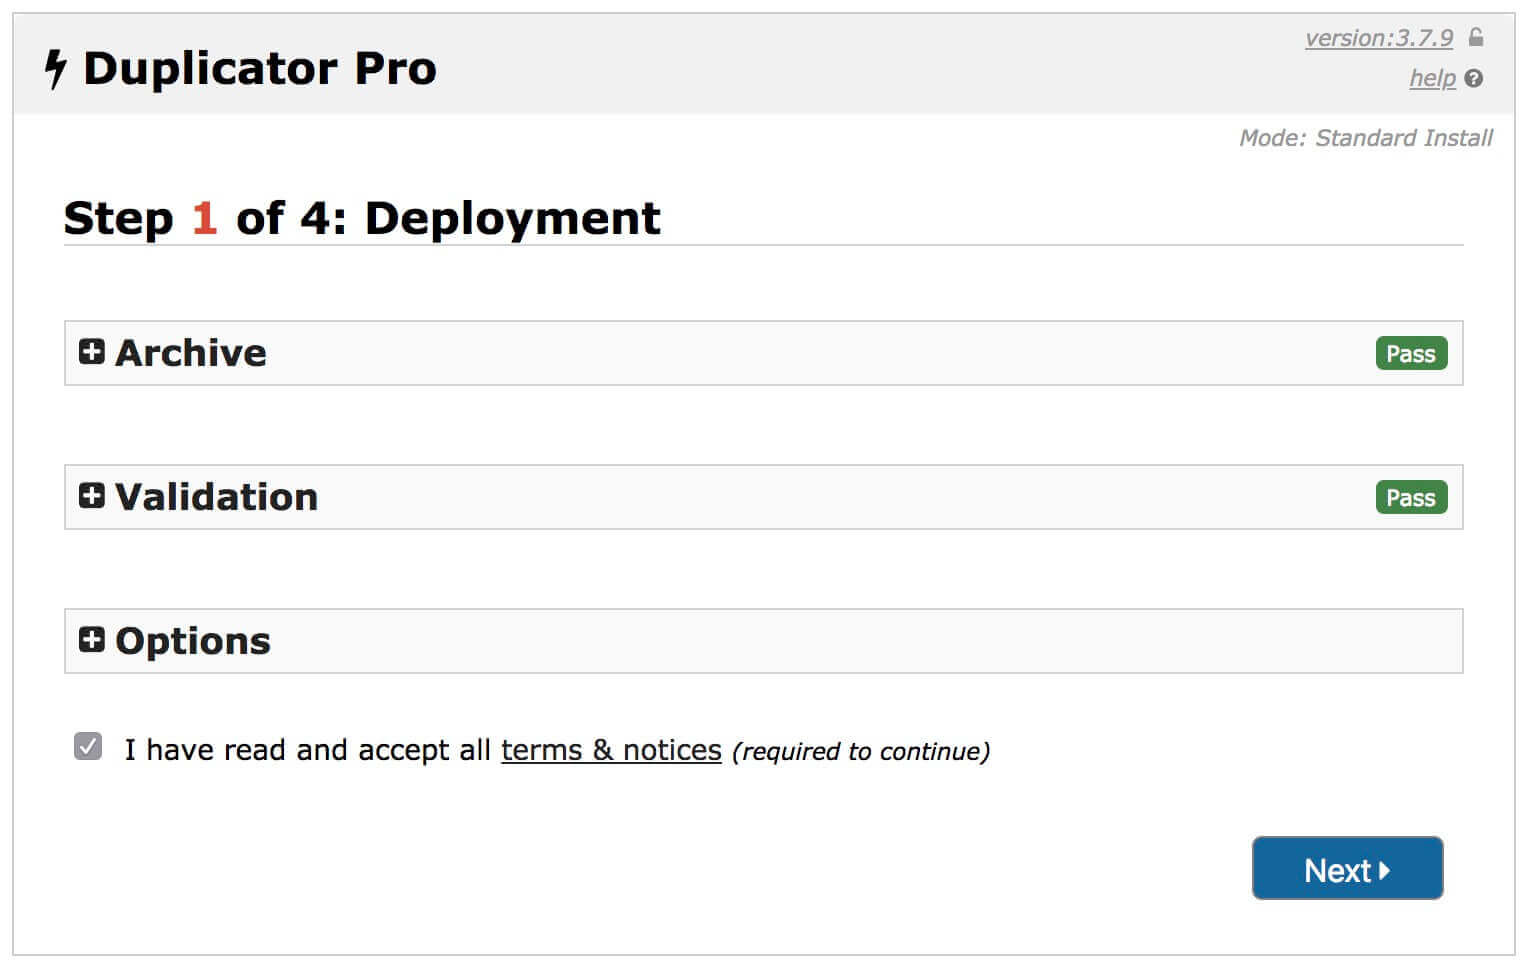
http://www.myclonedsite.co.il/installer.phpThis address will allow you to access the installation file you downloaded in the first step and start the duplication process. At this stage, Duplicator will notify you of any potential issues and ask for your confirmation to proceed.
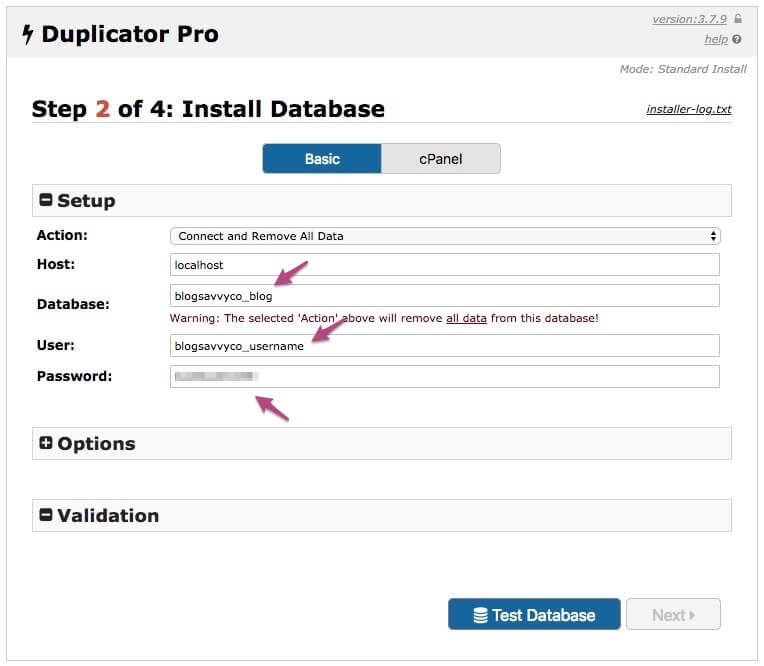
The plugin will unpack the archives on the server, and upon completion, it will prompt you to enter the database information (the information we asked you to remember earlier).
Enter the database name, the username, and the password you chose for that user, and click on Test Database to ensure a valid connection to the database.
If the connection is successful, click Next for Duplicator to import the data into the new database you created.
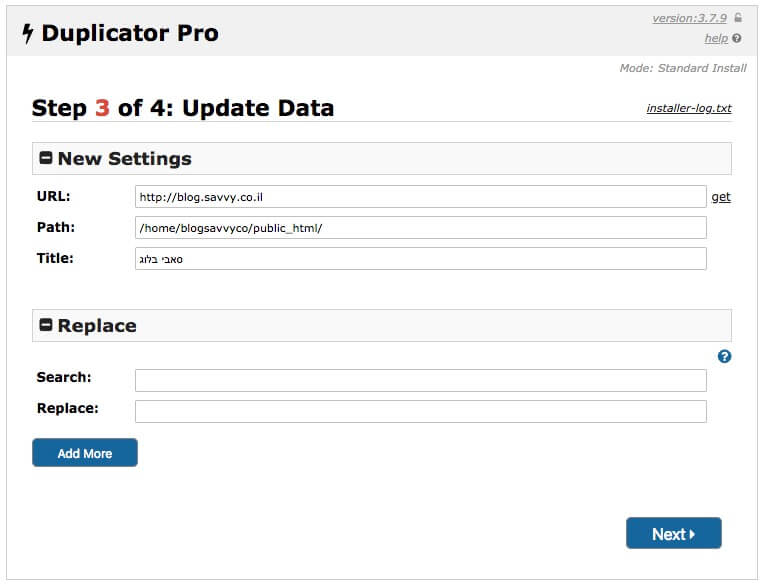
At the end of the process, the plugin will allow you to change the domain name, the path to the site’s directory, and the site title within the database.
You might want to change the domain if you’ve switched domains, the path might need to be changed if you’ve changed servers, and the site title probably doesn’t need to be changed.
In general, these actions will perform search and replace operations within the database as needed, ensuring the proper functioning of the site.
If the process finishes successfully, you’ll see a button labeled Admin Login and an option to delete the Duplicator package files. Make sure you allow the deletion of the package files and log in to your cloned WordPress site, as this concludes the process.
In Conclusion
Cloning a WordPress site might seem like a complex process, but it’s relatively straightforward in the end, whether you choose to do it manually or through the Duplicator plugin.
Keep in mind that if you’ve changed and modified the domain, you might need to change certain paths in the code if they’re not relative paths.
The plugin does most of the heavy lifting for us, allowing us to clone the site in four simple steps:
- Create a copy of the site and download it to your computer.
- Upload the files to the new hosting server.
- Create a new database on the new hosting server.
- Run the Duplicator installation and complete the process.
As always, if you have questions and comments, feel free to share your thoughts… Good luck!

