Local WordPress development lets you build and test your site on your personal computer before touching the live server. It’s the standard way most developers work, and it’s faster than developing on a remote host. This guide covers how to do it using MAMP – free software that runs Apache, MySQL, and PHP locally on Windows or Mac.
Four steps to get running:
- Install MAMP on your computer. Relevant for both Windows and Mac systems – the software is no longer limited to Mac users as it used to be.
- Start the MAMP servers and modify the relevant ports if needed (it might sound complicated, but it’s not).
- Create a database on your computer where all your site’s information will be stored (a minute’s work).
- Install WordPress on the local server.
TL;DR: Install MAMP, start the Apache and MySQL servers, create a MySQL database, then run the WordPress installer. The whole process takes about 15-20 minutes.
1. Installing MAMP
The first action to take is to install the MAMP software. The term “MAMP” stands for Macintosh, Apache, MySQL, and PHP, reflecting the fact that MAMP was originally designed for Mac computers only. However, this is no longer the case, and you can run this software on Windows and Linux as well.

MAMP is required because it runs PHP – the language in which WordPress is written – and also runs a MySQL database. Essentially, it simulates an Apache server or other servers of your choice on your computer. This allows you to run and execute queries against the database where WordPress stores all the information and content.
Let’s get straight to the point. Go to the MAMP website, download the free software (click the Free Download button), choose the version relevant to your operating system, and install it on your computer.
2. Running the Local Server with MAMP
Once the installation is complete, we need to run MAMP to start the servers on your computer. You have two options for leaving the default port settings or changing them. Here are the two relevant options:
- First Option – Keep the Apache port as the default 8888. This means that when you access your site in the browser, you’ll also need to specify this port number.
- Second Option – Change the Apache port to 80 so you won’t need to include the port number in the browser but you’ll be prompted for your password during MAMP’s initial launch and will need to allow the execution.
Choosing between these two options doesn’t affect how MAMP will run or how your site will work. Personally, I prefer the second option since it’s much easier to type your site’s URL in the browser than to start MAMP. But before we change any settings, let’s run MAMP…
Starting MAMP
Open MAMP as you would any software on your computer, and you’ll see a window like this:
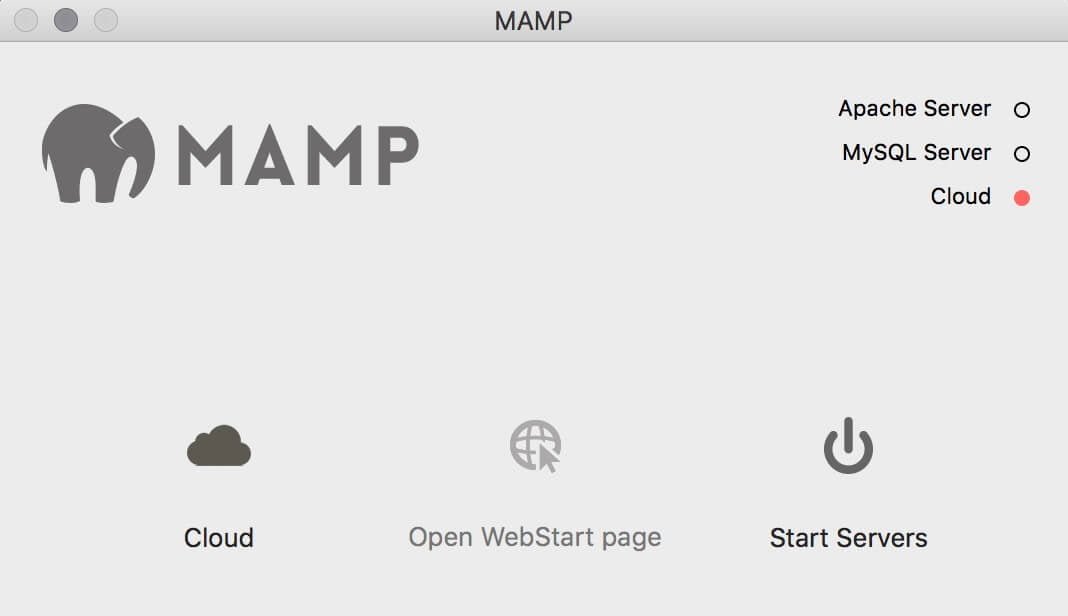
Click the checkboxes next to Apache Server and MySQL Server to turn them on (they’ll turn green). If they don’t turn on, click the Start Servers button.
Now, if you want to keep the default port settings, you can skip the next step. If you want to change them, proceed to the following section.
Editing Port Settings
To adjust the ports, go to MAMP’s Preferences, and then click on the Ports tab:
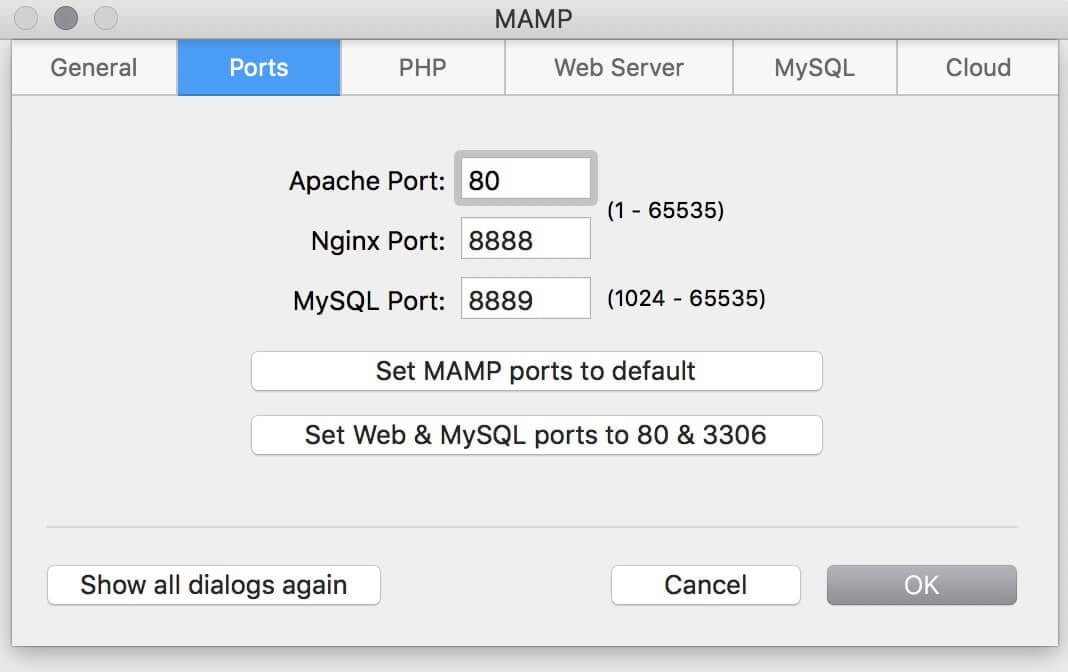
Change the Apache Port to 80 and click the confirmation button (OK). You’ll be prompted to enter your password at this point. That completes the port settings. Whether you decide to change them or not, the next step is to create the database for your site.
3. Creating the Database
From the initial MAMP window, click the Open WebStart page button, and a browser window will open with the MAMP startup page, which should look similar to this:

Note that the window displays details about your access settings for your database (MySQL), which you’ll use later when installing WordPress. Don’t worry about memorizing these at this point; I’ll present them to you later on.
From the menu, click on Tools and then on phpMyAdmin to open the phpMyAdmin module. Then click on the Databases tab at the top of the screen to view the databases:

Create a new database by entering a name for the database in the Create Database field. It’s desirable for this name to be relevant in some way to your website’s name. For the purpose of this article, we will create a database named wordpress.
The database name cannot contain spaces and various punctuation marks…
After you’ve entered the database name, click on the Create button, and the database will be created. Now, let’s continue and install WordPress…
4. Installing WordPress
If you’ve previously installed WordPress (manually) on a remote server, this action will be familiar to you. You need to download the latest version of WordPress from WordPress.org. Then open the downloaded Zip file and copy all its contents to the MAMP/htdocs directory.
- On Mac computers, you’ll find the directory under Applications, so the WordPress files should be in the
Applications/MAMP/htdocs/wordpressdirectory. - On PC computers, you should copy the files to the
c:/MAMP/htdocs/wordpressdirectory.
If the ‘wordpress’ directory doesn’t exist, create it yourself. If you plan to run more than one local site, it’s advisable to change the directory name to something meaningful for the site you’re creating (without spaces, of course).
Now let’s start the WordPress installation process. Open your web browser and type localhost/wordpress in the address bar. If you didn’t change the ports as recommended at the beginning of the article, type localhost:8888/wordpress. Of course, if you changed the directory name to something other than ‘wordpress’, enter that name instead.
At this point, you should see the initial WordPress installation screen asking you to select the language you want to work with.

Choose your desired language and click Continue.
Next, you’ll see a screen that describes the database information you need to install WordPress. Simply click the Let’s Go button to proceed to the next screen.

If you receive a database connection error, double-check the details you entered. Still not working? Review the post on fixing the error establishing a database connection.
In this screen, you need to enter the database settings we created earlier. Enter the following information (as shown in the image):
- Database Name – wordpress (or whatever name you chose when creating the database).
- Username – root
- Password – root
- Database Host – enter localhost
- Table Prefix – enter wp_
Most likely, you’ll find that most of the fields are already pre-filled with the necessary data. Either way, click the Submit button. If the entered data is correct, you’ll arrive at the next screen:

Click the Run the Install button, and you’ll see a screen asking you to enter some details about your new site:

Enter the relevant information.
Please note that WordPress will insist on you choosing a strong password. Additionally, you can uncheck the Privacy box since Google won’t have access to your local site. However, if you later move this site to a remote server, remember to re-enable this setting through the WordPress admin interface.
Finally, click the Install WordPress button, and you’ll reach the following screen:

Click the Log in button to access the admin interface of your newly created local WordPress site. Use the username and password you chose during the WordPress installation process.
Modern Alternatives to MAMP
MAMP remains a solid option, but the WordPress community now offers several dedicated tools designed specifically for local WordPress development:
- Local WP (formerly Local by Flywheel) – a free tool that sets up WordPress sites with one click, including automatic SSL certificates and easy PHP/MySQL version switching.
- DevKinsta – a free tool by Kinsta that offers one-click site creation, a built-in database manager, and email testing. It integrates directly with Kinsta hosting if you use their services.
Both Local WP and DevKinsta eliminate the manual database creation and port configuration steps described above. If you prefer a traditional server stack that you can also use for non-WordPress projects, MAMP is still an excellent choice.
Once your local site is ready, make sure to review the wp-config.php configuration guide to set up your WordPress environment properly. Also ensure you have a reliable backup strategy in place before pushing changes to a live server.
FAQs
Common questions about installing WordPress locally with MAMP:
MAMP/htdocs directory and create a dedicated database for each one in phpMyAdmin. You can then access each site at localhost/folder-name.root), and password (root) are correct and that the MySQL server in MAMP is running (the indicator should be green). Check the troubleshooting guide linked above for more details.Summary
Installing WordPress locally with MAMP involves four steps: install MAMP, start the servers, create a database via phpMyAdmin, and run the WordPress installer. The entire process takes about 10 minutes and gives you a safe environment for development and testing.
If you prefer a more streamlined setup, tools like Local WP and DevKinsta can automate most of these steps. Regardless of the tool you choose, developing locally is the recommended approach before making changes to a live website.


It’s a very detailed tutorial. However, I think SERVBAY is more user-friendly than MAMP.