If you’ve ever used WordPress’s built-in search functionality to look for content on your site, you’ve likely noticed its shortcomings. WordPress falls short in this area, leaving much to be desired.
When a visitor searches your site and doesn’t quickly find what they’re looking for, there’s a good chance they’ll leave and look elsewhere. This highlights a critical issue: WordPress’s default search mechanism lacks effectiveness. As a result, you might be losing potential customers or missing opportunities to present them with the content they need.
Fortunately, there’s a solution that significantly improves search functionality on WordPress sites. It involves simply installing and configuring a plugin called Relevanssi – A Better Search. In this post, we’ll explore the features Relevanssi offers and guide you through its setup and usage.
Better Search with Relevanssi
There’s a free version of the plugin available for download from the WordPress plugin repository. However, in this post, we will review the Premium version of the plugin, which is available for purchase from the developer’s website.
Even using the free version of the plugin provides excellent results, so if you don’t have specific requirements, you can rely on it without needing to buy the Premium version. However, if you do decide to purchase the Premium version, the SAVVY coupon code should give you a 20% discount.
In a few words, the purpose of the plugin is to present your users with more relevant search results for specific words or phrases on your WordPress site. Additionally, the plugin gives you much more control over how search results are displayed and presented on your site.
To provide these capabilities, the plugin includes several features and capabilities that are not found in WordPress’s basic search mechanism:
- Searching in comments and author names
- Searching in categories, tags, or any other taxonomy
- Searching in meta fields – Custom Fields
- Searching within content contained in shortcodes
- Searching in excerpts
- Searching in user profiles
- Displaying “Did you mean…” in a Google-style
- Highlighting relevant results
- Option to filter private content tailored for pages, tags, and categories
- Using logical expressions for search
- Choosing the “weight” for each content type
Full List of Relevanssi Plugin Features
We will present a table that differentiates between WordPress’s standard search and the free and Premium versions of the Relevanssi plugin.
| Feature | WordPress search | Relevanssi Free | Relevanssi Premium |
|---|---|---|---|
| Easy to install | X | X | X |
| Index is updated automatically | X | X | X |
| Newest posts first | X | X | X |
| Best results first | X | X | X |
| Search posts and pages | X | X | X |
| Search comments and comment authors | – | X | X |
| Search post categories, tags and custom taxonomies | – | X | X |
| Search custom fields | – | X | X |
| Search shortcode content | – | X | X |
| Search post excerpts | – | X | X |
| Include user profiles in search results | – | – | X |
| Index PDF content | – | – | X |
| Include taxonomy terms in search results | – | – | X |
| Search arbitrary MySQL columns in wp_posts | – | – | X |
| Show “Did you mean” suggestions | – | x | X |
| Search results show and highlight the matches | – | X | X |
| Posts highlight the search term matches | – | X | X |
| Exclude posts, pages, tags or categories from search | – | X | X |
| Use fuzzy matching to make getting hits easier | – | X | X |
| Choose between AND and OR operator in search | – | X | X |
| Change the operator on the fly if necessary | – | – | X |
| Use the NOT operator to exclude search terms | – | – | X |
| Adjust the weight of post content, titles and comments | – | X | X |
| Adjust weights by post type | – | – | X |
| Adjust weights by taxonomy | – | – | X |
| Adjust weights by post date | – | – | X |
| Adjust weights manually with a filter hook | – | X | X |
| Log user queries | – | X | X |
| Use stop words to make search better | – | X | X |
| Expand queries with synonyms | – | X | X |
| WPML and Polylang integration | – | X | X |
| WordPress Multisite support * | – | – | X |
| Throttling to make searches perform better on big databases | – | X | X |
| Export / import settings | – | – | X |
| WP CLI support | – | – | X |
| Guaranteed support from Mikko | – | – | X |
| Have sticky posts in searches based on search term | – | – | X |
As you can see, one of the key advantages of the Relevanssi plugin over the standard WordPress search is its ability to search across all types of content on your site.
With a bit of customization, Relevanssi can even search within metadata fields created using Advanced Custom Fields, a favorite among WordPress developers. Without this capability, users may struggle to find the most relevant results for their search queries.
Another significant feature of Relevanssi is its ability to assign weight to different content types and elements. This means you can make certain content more prominent by prioritizing it in search results.
For example, you could give more weight to the post title, body content, or even comments, ensuring that posts containing the search term in these elements rank higher.
Additionally, you can prioritize newer content by assigning higher weight to recently published posts, ensuring users see the most up-to-date information first.
It’s fair to say that Relevanssi covers everything you’ve ever wanted in a WordPress search mechanism. The Premium version even allows you to index PDF files uploaded to your media library, a feature that can be incredibly useful for many WordPress sites.
Relevanssi also enhances search functionality for WooCommerce and other WordPress-based e-commerce sites. It enables SKU (Stock Keeping Unit) searches and delivers more relevant results for potential buyers, increasing the chances that visitors will find the products they’re looking for.
Settings and Usage of Relevanssi

Once you’ve downloaded and installed the plugin (this guide uses the Premium version, but it’s equally applicable to the free version), navigate to the plugin’s settings by going to Settings > Relevanssi.
Under the Indexing tab, select the types of content you want to include in your search results by configuring the Indexing Options.
Note that you shouldn’t expect to see search results on your site immediately after activating the plugin, as the index needs to be built. You won’t see results if you perform a search on your site before the index is built.
Indexing Settings
We won’t dive into too much detail here, but below are some of the key options available in this section. Keep in mind that after making changes in any specific window, you’ll need to save your options to apply them:
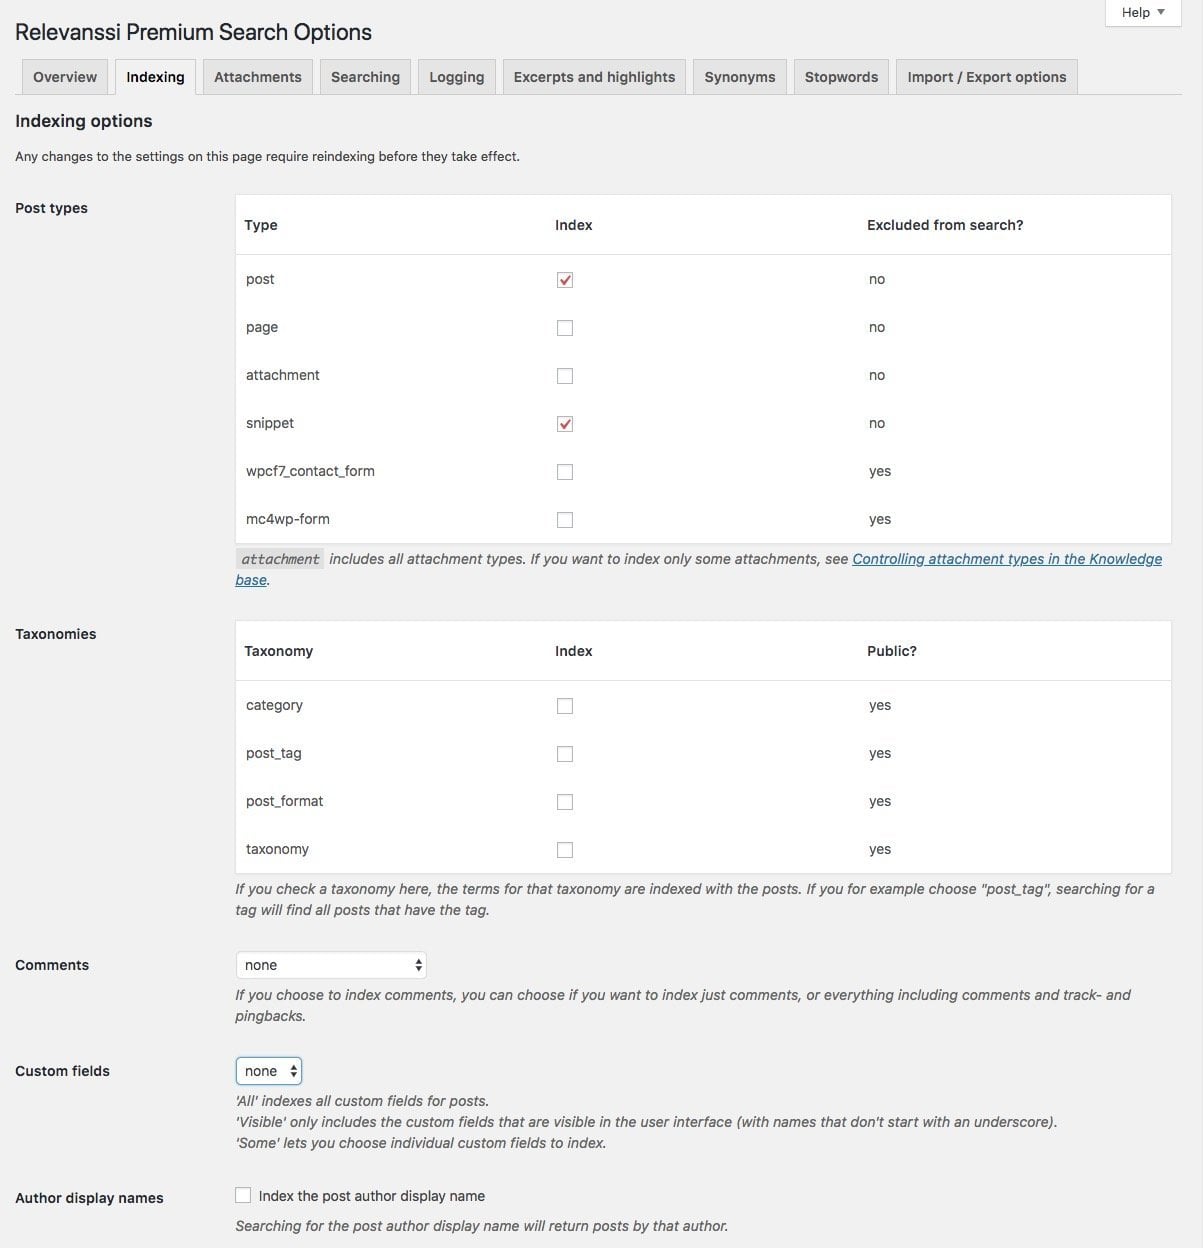
Post Types – All content types on your site will appear here. You’ll need to specify which content types you want to index, such as pages, posts, file attachments, or any custom content types. For example, on the Savvy blog, I choose to index only posts and snippets.
Taxonomies – All taxonomies on your site, including categories, tags, or any other custom taxonomies, will appear in this section. If you want specific taxonomies to show in search results, you can select them here.
For instance, selecting post_tags will allow search results to include content tagged with matching terms. On this blog, I choose not to index any taxonomies.
Comments – This option allows the content within your comments to be included in the index, meaning the text in comments can contribute to search results.
Custom Fields – Here, you can choose whether to index the custom fields on your site. Premium users can also index fields from the Advanced Custom Fields plugin, including repeater fields.
Expand Shortcodes – If your WordPress site uses shortcodes in its content, this option ensures that the content generated by those shortcodes is indexed. For sites built with Page Builders, which often rely heavily on shortcodes, enabling this option could be beneficial.
Two Tips for WooCommerce Sites – If your site is an e-commerce platform using WooCommerce, avoid selecting “Expand Shortcodes.” WooCommerce uses its own shortcodes, and enabling this option may cause compatibility issues with Relevanssi.
However, if you want to index SKUs, simply add the SKU metadata field name in the Custom Fields section. This is how it should look:

Another tip for WooCommerce and Relevanssi: if your SKUs contain hyphens (-), scroll to the bottom of the page, click on Advanced Settings, and enable the option Hyphens and dashes to Remove. This ensures that Relevanssi will ignore hyphens in SKUs, providing accurate results whether users search with or without hyphens.
Search Settings
Let’s review a few search settings:
Default Operator – This setting determines how the search will function. You can choose whether the search should be performed using the entire phrase or if results will include posts containing any individual word from the search phrase.
For example, if a user searches for “site speed,” the search results could include posts containing either “site” or “speed.” On the Savvy blog, I prefer to display results for each word rather than requiring the exact phrase.
Of course, if an exact match for the phrase exists in a post, that post will be prioritized and appear before posts containing only one of the words.

The Default Order setting should be left on Relevance…
Keyword Matching – This setting determines whether Relevanssi will display search results where only part of the letters of the searched word appear. For example, if you searched for “comme”, you will see search results that include the word “comments.”
In my case, I chose to show these results only if there are no exact matches for the word or phrase. This is how it looks:

Weights – Naturally, the weight of each type of content/element also has an impact on the order in which search results will appear. In this section, you can choose the relative weight for each type of content, taxonomy, pages, as well as components of the same post/page, such as:
- The content itself
- Article title
- Text in comments
- Internal links
You also have the option to give priority or a bonus to recently published items (Recent Posts) in this section. Here is an image illustrating how I chose the weights for each of these in Savvy Blog:
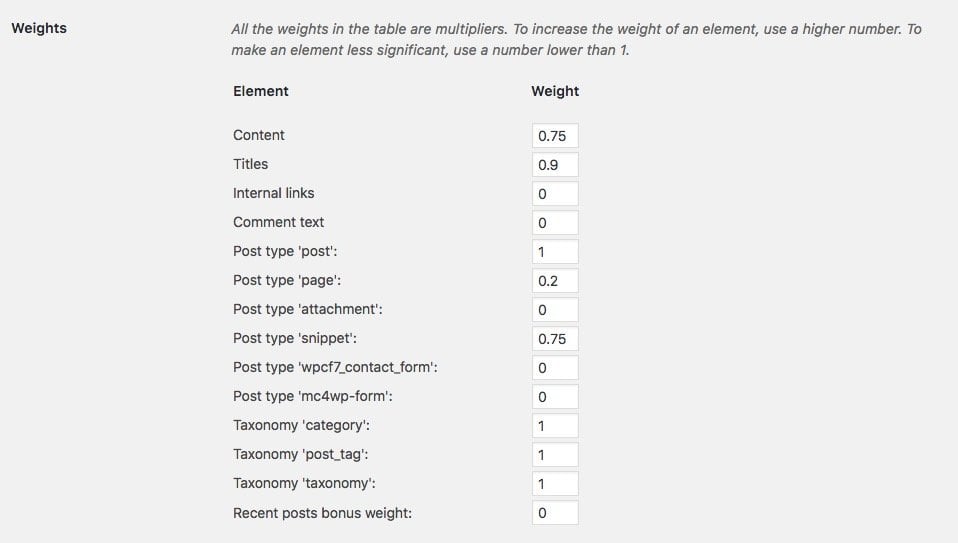
Note that I assigned a higher weight to titles than to the body of the post, and that post content type has a higher weight than snippet content type.
Exclude From Search – When you create custom post types, you can define that the post type will not appear in the standard WordPress search results by adding the parameter exclude_from_search set to true.
Enabling this option fulfills the requirement, and the content type will not be indexed by Relevanssi even if it is marked in the Relevanssi Indexing settings mentioned above.
Post Exclusion – You can enter a list of page IDs that will not be included in the Relevanssi index. Use commas to separate the IDs…
We won’t go beyond these settings in this section, you are welcome to read the notes next to each of the options. The plugin developer explains very nicely what each option is…
Building the Relevanssi Index
Go back to the Indexing screen and click on Build The Index. Let the plugin do its job, and when the process is complete, go to your site and perform a search for any phrase.

At this stage, you should see results according to the choices in the plugin settings, sorted according to the relative weight you’ve set.
There are many additional options in the plugin that allow you to make various changes and customize the Relevanssi plugin according to your needs.
There are also hooks, actions, and filters that developers among you will find very helpful. There is the option to add synonyms, highlight words in search results, and many more options…
If you want more information about the plugin, you are welcome to take a look at the official Relevanssi documentation to get an idea of its additional capabilities.
In Conclusion
Whether you are installing the free version of the Relevanssi plugin or the premium version, the plugin will certainly improve the search results on your WordPress site. This action will enhance the user experience by displaying more relevant content and preventing visitors from searching for answers on another blog – thus increasing the exposure of your posts.
In any case, even if you don’t go through all the plugin settings and only do what we mentioned in this guide, you will receive excellent results…. 🙂