In this guide, I’ll walk through the checkout page changes store owners ask for time and again: removing fields you don’t need, turning off field validation, reordering fields, adding your own fields, and more.
WooCommerce, much like WordPress itself, comes with plenty of useful hooks (actions and filters). Put all the code in this post in your child theme’s functions.php file.
I tested every snippet in this post on WooCommerce 11.3. They work with the classic checkout, meaning a checkout page that contains the [woocommerce_checkout] shortcode.
New stores use the Checkout block by default, and the block ignores the woocommerce_checkout_fields filter. The block has its own section at the end of the post.
The Checkout Fields Filter
Most of this post uses the woocommerce_checkout_fields filter. The code has comments that explain each step.
Here’s the classic checkout page we’ll be changing:
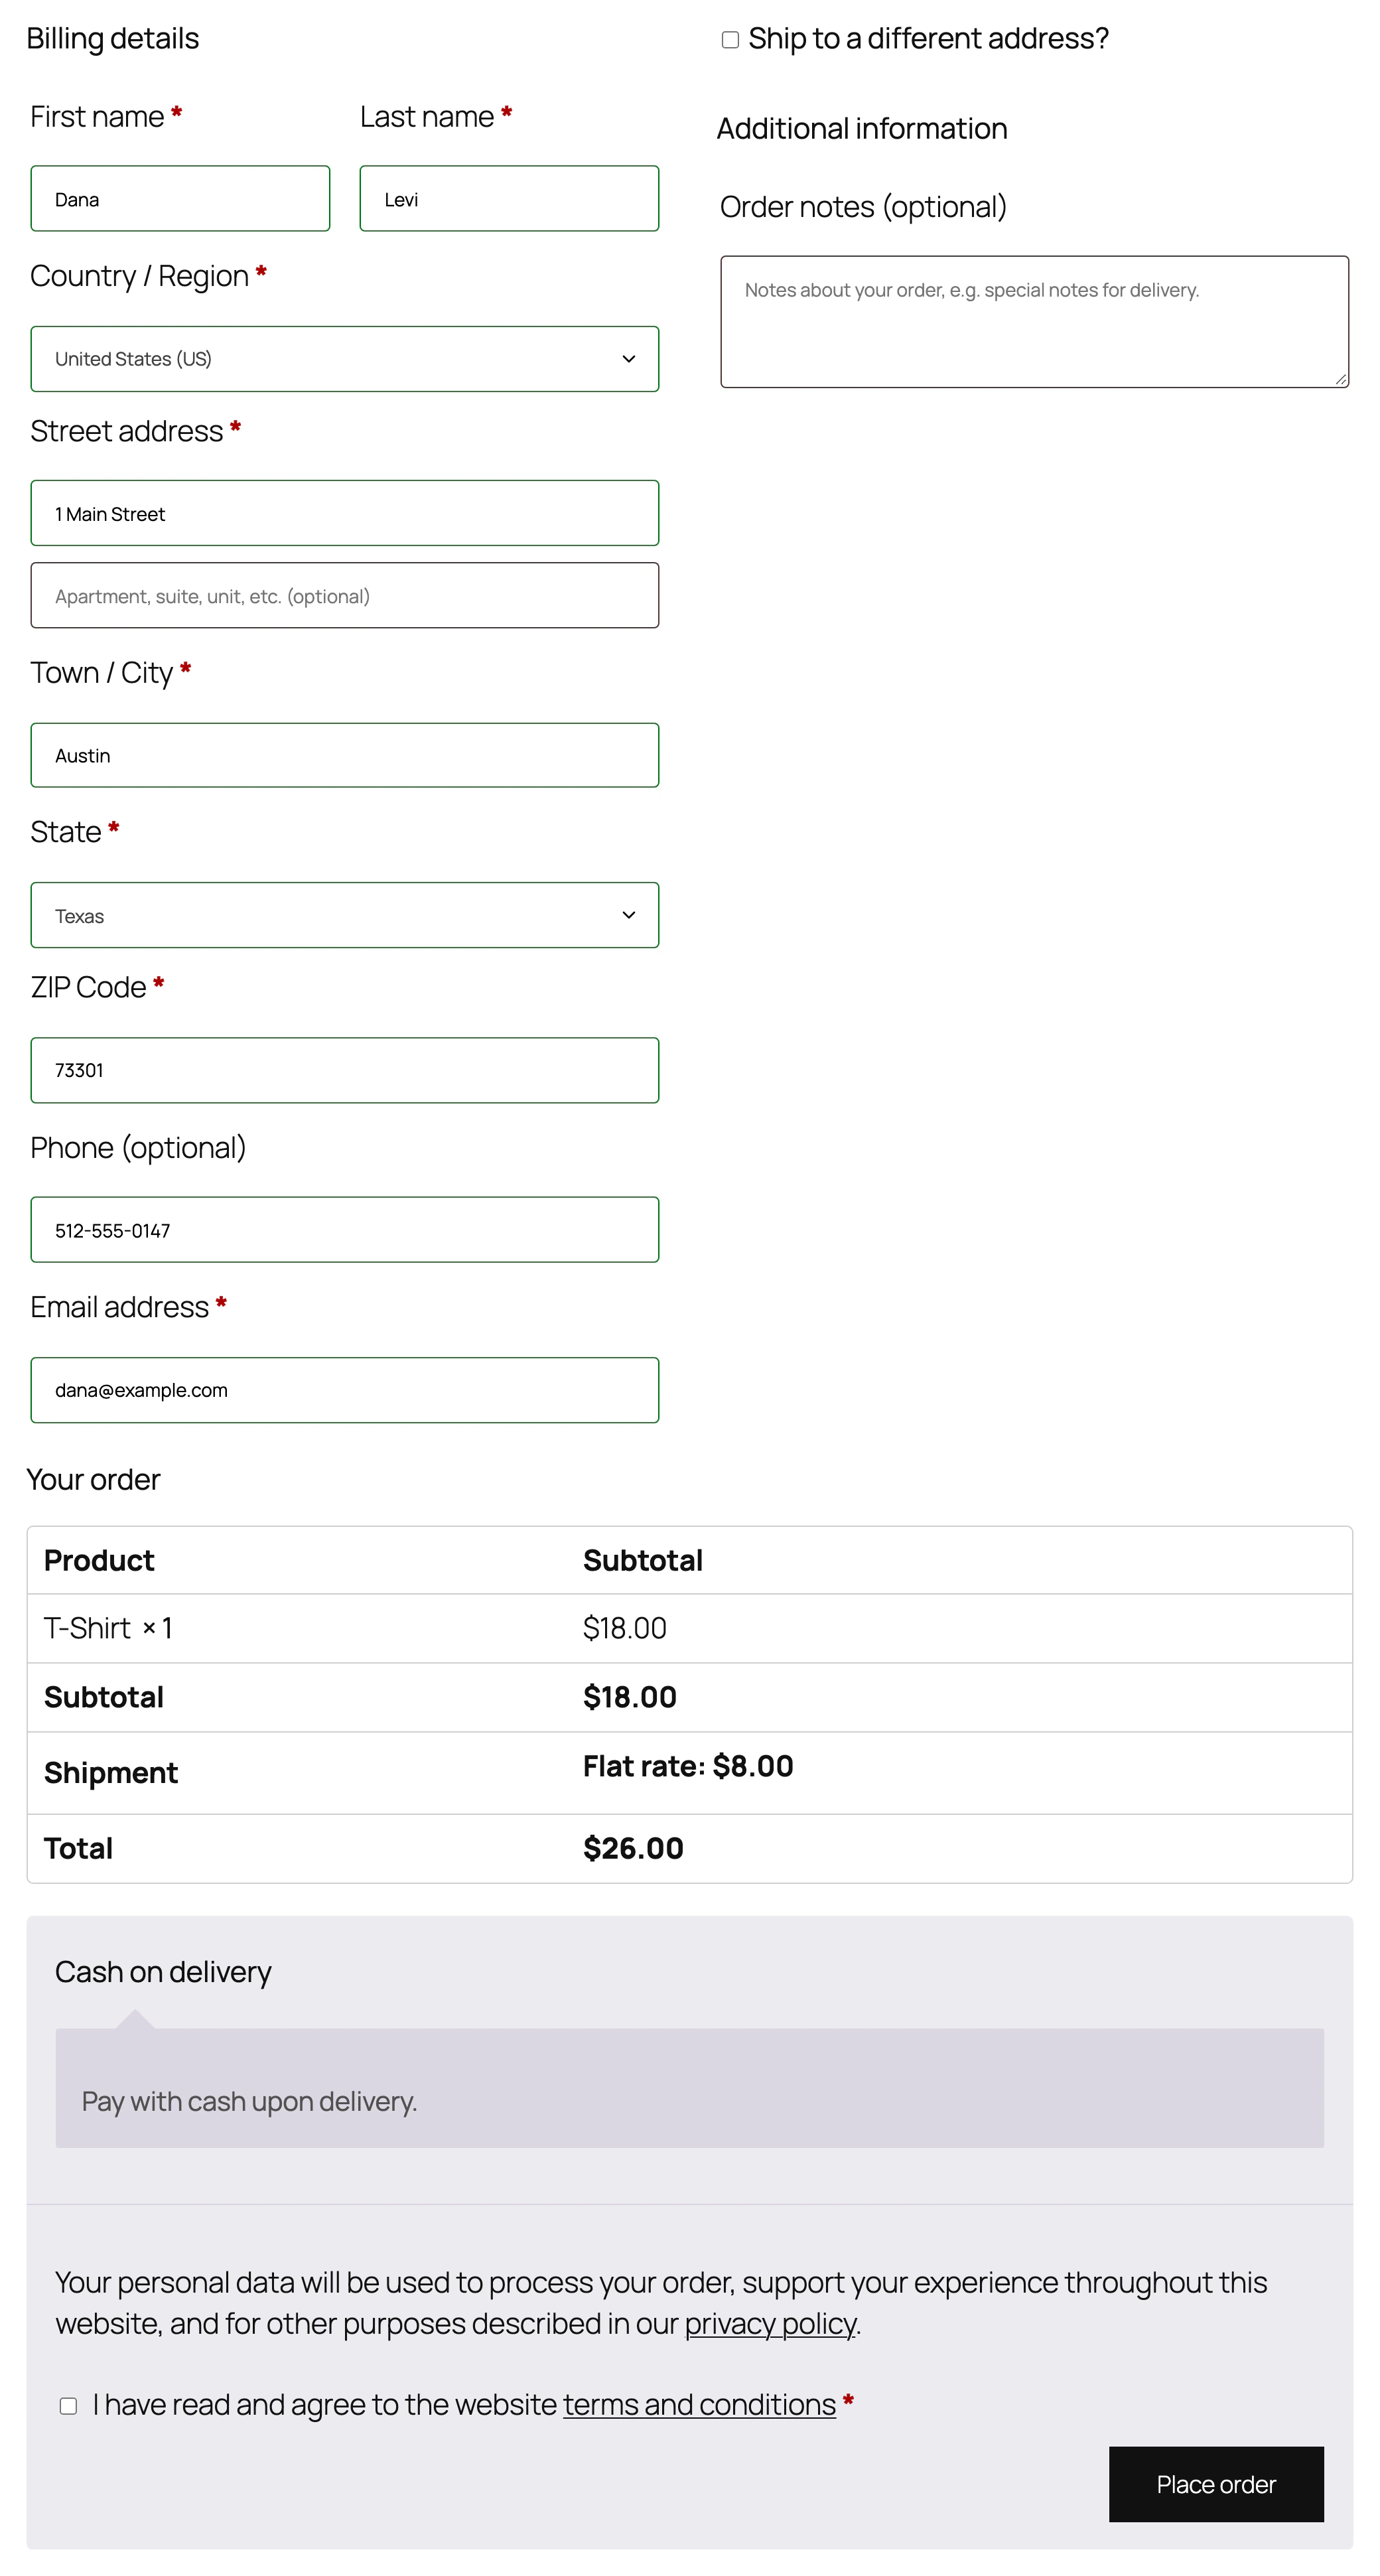
Your checkout may look a little different, depending on your theme. This store runs Twenty Twenty-Five with the classic checkout.
To see every checkout field and its settings, add this code to functions.php:
function savvy_print_all_fields( $fields ) {

	//if( !current_user_can( 'manage_options' ) )
	//	return; // in case your website is live

	print_r( $fields ); // wrap results in pre html tag to make it clearer
	exit;

}
add_filter( 'woocommerce_checkout_fields' , 'savvy_print_all_fields' );
The checkout page now prints an array of all the fields instead of the form. The fields are grouped into billing, shipping, account and order. Remove the code when you’re done.
A single field in the array looks like this:
[billing_company] => Array
(
	[label] => Company name
	[class] => Array
	(
		[0] => form-row-wide
	)
	[autocomplete] => organization
	[priority] => 30
)
Modifying the Checkout Fields
Now that you know how the fields array is built, let’s go through real requests from a store owner that call for the woocommerce_checkout_fields filter.
The first request: turn off validation for the postcode, phone and state fields.
1. Disable Validation for Postcode, Phone and State
Most of this post uses woocommerce_checkout_fields, but when you want to change a field in both the billing and the shipping address, woocommerce_default_address_fields is easier, because it handles both.
So turning off validation for the postcode and the state looks like this:
function savvy_disable_address_fields_validation( $address_fields_array ) {

	unset( $address_fields_array['state']['validate'] );
	unset( $address_fields_array['postcode']['validate'] );
	// you can also hook first_name and last_name, company, country, city, address_1 and address_2

	return $address_fields_array;

}
add_filter( 'woocommerce_default_address_fields' , 'savvy_disable_address_fields_validation' );
The phone field has a separate validation entry in the billing fields, so for the phone we use woocommerce_checkout_fields:
function savvy_no_phone_validation( $woo_checkout_fields_array ) {
	unset( $woo_checkout_fields_array['billing']['billing_phone']['validate'] );
	return $woo_checkout_fields_array;
}
add_filter( 'woocommerce_checkout_fields', 'savvy_no_phone_validation' );
Be clear about what this does. It turns off the format check for an invalid postcode or phone number, not the required check. The errors below are “required field” errors, and they still appear after this code. If you want to make a field optional, see step 3.
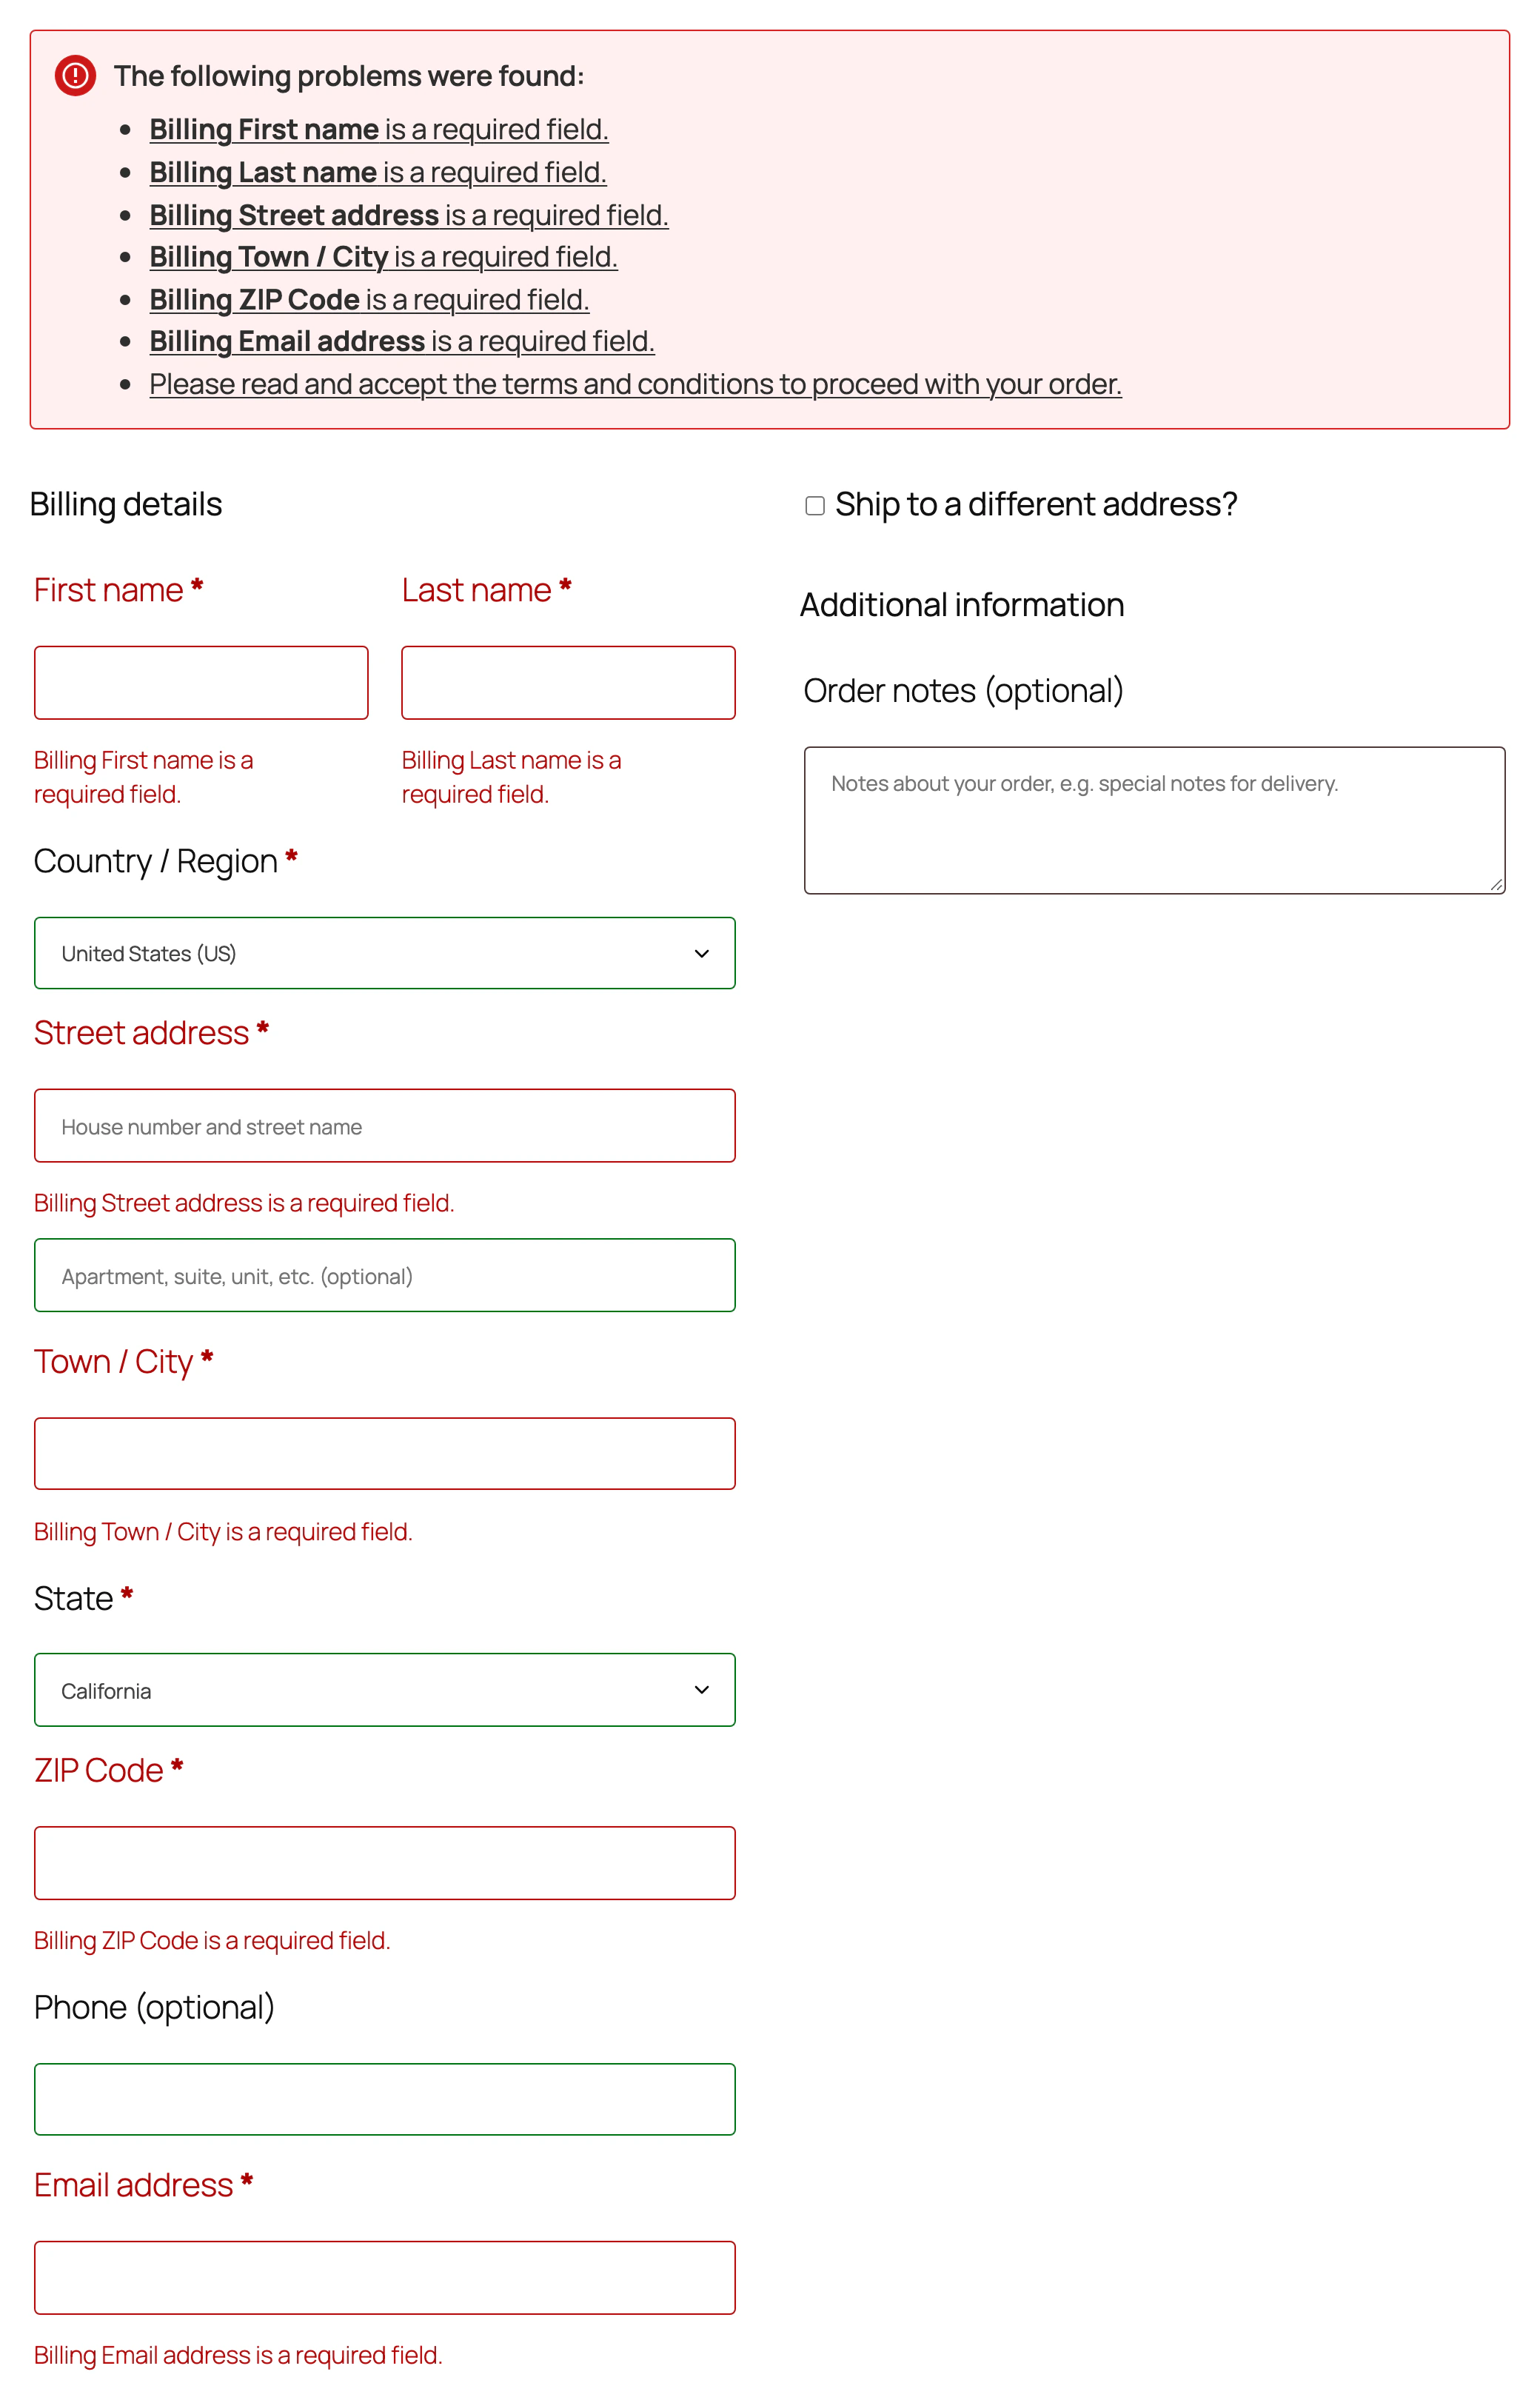
2. Remove Default Checkout Fields
The same store owner wants to remove every checkout field except name, email and phone. This comes up when customers pay in cash and collect their order in person.
Removing checkout fields is straightforward:
function savvy_remove_fields( $woo_checkout_fields_array ) {

	// she wanted me to leave these fields in checkout
	// unset( $woo_checkout_fields_array['billing']['billing_first_name'] );
	// unset( $woo_checkout_fields_array['billing']['billing_last_name'] );
	// unset( $woo_checkout_fields_array['billing']['billing_phone'] );
	// unset( $woo_checkout_fields_array['billing']['billing_email'] );
	// unset( $woo_checkout_fields_array['order']['order_comments'] );

	// keep billing_country if you sell products that need shipping
	// unset( $woo_checkout_fields_array['billing']['billing_country'] );

	// and to remove the fields below
	unset( $woo_checkout_fields_array['billing']['billing_company'] );
	unset( $woo_checkout_fields_array['billing']['billing_address_1'] );
	unset( $woo_checkout_fields_array['billing']['billing_address_2'] );
	unset( $woo_checkout_fields_array['billing']['billing_city'] );
	unset( $woo_checkout_fields_array['billing']['billing_state'] );
	unset( $woo_checkout_fields_array['billing']['billing_postcode'] );

	return $woo_checkout_fields_array;
}
add_filter( 'woocommerce_checkout_fields', 'savvy_remove_fields', 9999 );
After you add the code, the checkout looks like this:
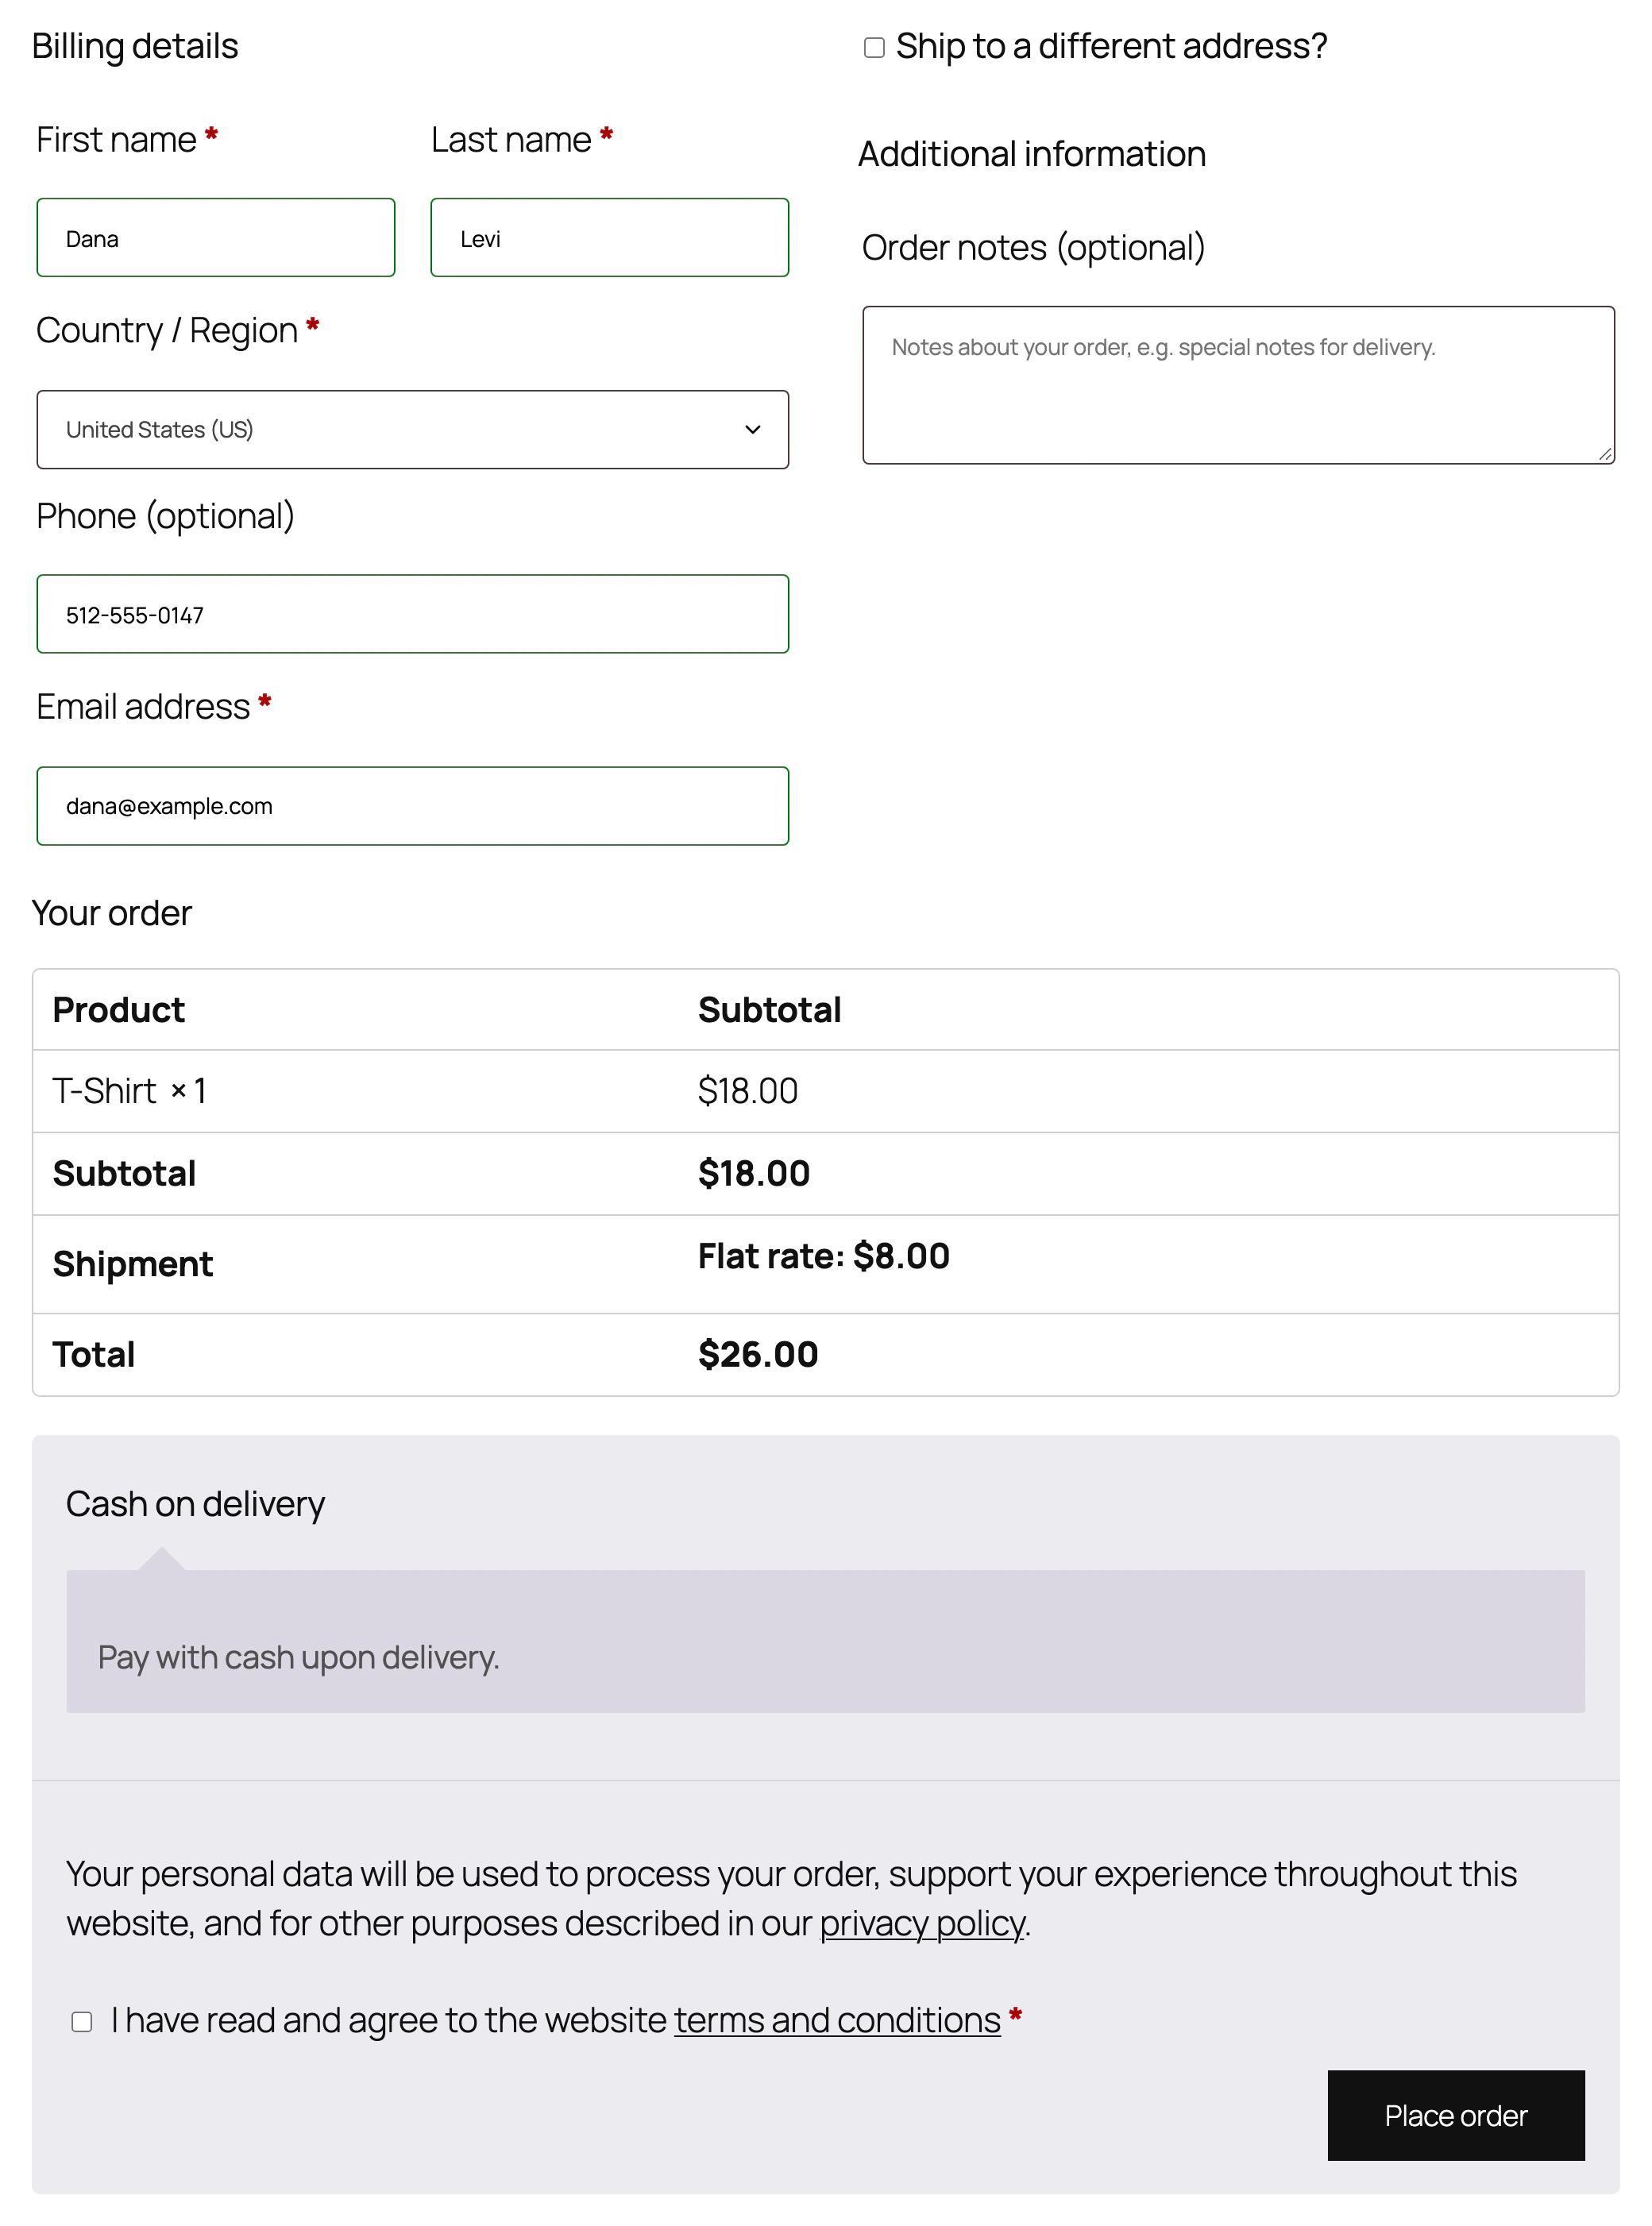
If you accept card payments on your site, be careful which checkout fields you remove.
Removed fields aren’t validated, so you don’t need to turn off their validation separately.
Keep an eye on the country field, though. If the cart contains a product that needs shipping, WooCommerce needs to know where to send it. Without a country, the order stops with “Please enter an address to continue.” If every product in your store is virtual, you can remove the country too.
Next, the store owner wants the email field above the phone field. They also want the last name and phone fields to be optional, and then they change their mind and ask for phone and email side by side.
3. Make Fields Optional (or Required)
Let’s start with making fields optional. All you need to do is change the required setting in the fields array:
function savvy_not_required_fields( $f ) {

	$f['billing']['billing_last_name']['required'] = false; // that's it

	// the same way you can make any field required, example:
	// $f['billing']['billing_company']['required'] = true;

	return $f;
}
add_filter( 'woocommerce_checkout_fields' , 'savvy_not_required_fields', 9999 );
The phone field is already optional by default in current WooCommerce versions, and its label says so.
4. Reorder Checkout Fields
The store owner asked for the email field before the phone field. Here’s the code:
function savvy_email_first( $address_fields ) {
	$address_fields['phone']['priority'] = 120;
	return $address_fields;
}
add_filter( 'woocommerce_default_address_fields', 'savvy_email_first' );
Note that this uses
woocommerce_default_address_fields, notwoocommerce_checkout_fields. In current versions, phone is one of the address fields, and the checkout page’s JavaScript re-sorts the address fields by this filter’s data. Apriorityset throughwoocommerce_checkout_fieldsgets overridden in the browser, and phone stays above email.
Changing the order isn’t always enough, because it can throw off the layout. Each checkout field has a CSS class that controls its width and position. There are three classes:
form-row-first– half width, first.form-row-last– half width, last.form-row-wide– full width.
As mentioned, the store owner now wants phone next to email, not below it:
// email: half width, first
function savvy_checkout_fields_styling( $f ) {
	$f['billing']['billing_email']['class'] = array( 'form-row-first' );
	return $f;
}
add_filter( 'woocommerce_checkout_fields', 'savvy_checkout_fields_styling', 9999 );

// phone: after the email, half width, last
function savvy_phone_next_to_email( $address_fields ) {
	$address_fields['phone']['priority'] = 120;
	$address_fields['phone']['class']    = array( 'form-row-last' );
	return $address_fields;
}
add_filter( 'woocommerce_default_address_fields', 'savvy_phone_next_to_email' );
5. Change Labels and Placeholders
The same store owner has two more requests: one about labels and placeholders, and one about the store’s terms. The code below changes the label of the first name field and the placeholder of the order notes field:
function savvy_labels_placeholders( $f ) {

	// first name can be changed with woocommerce_default_address_fields as well
	$f['billing']['billing_first_name']['label'] = 'Your nickname';
	$f['order']['order_comments']['placeholder'] = 'Tell us what you think';

	return $f;

}
add_filter( 'woocommerce_checkout_fields' , 'savvy_labels_placeholders', 9999 );
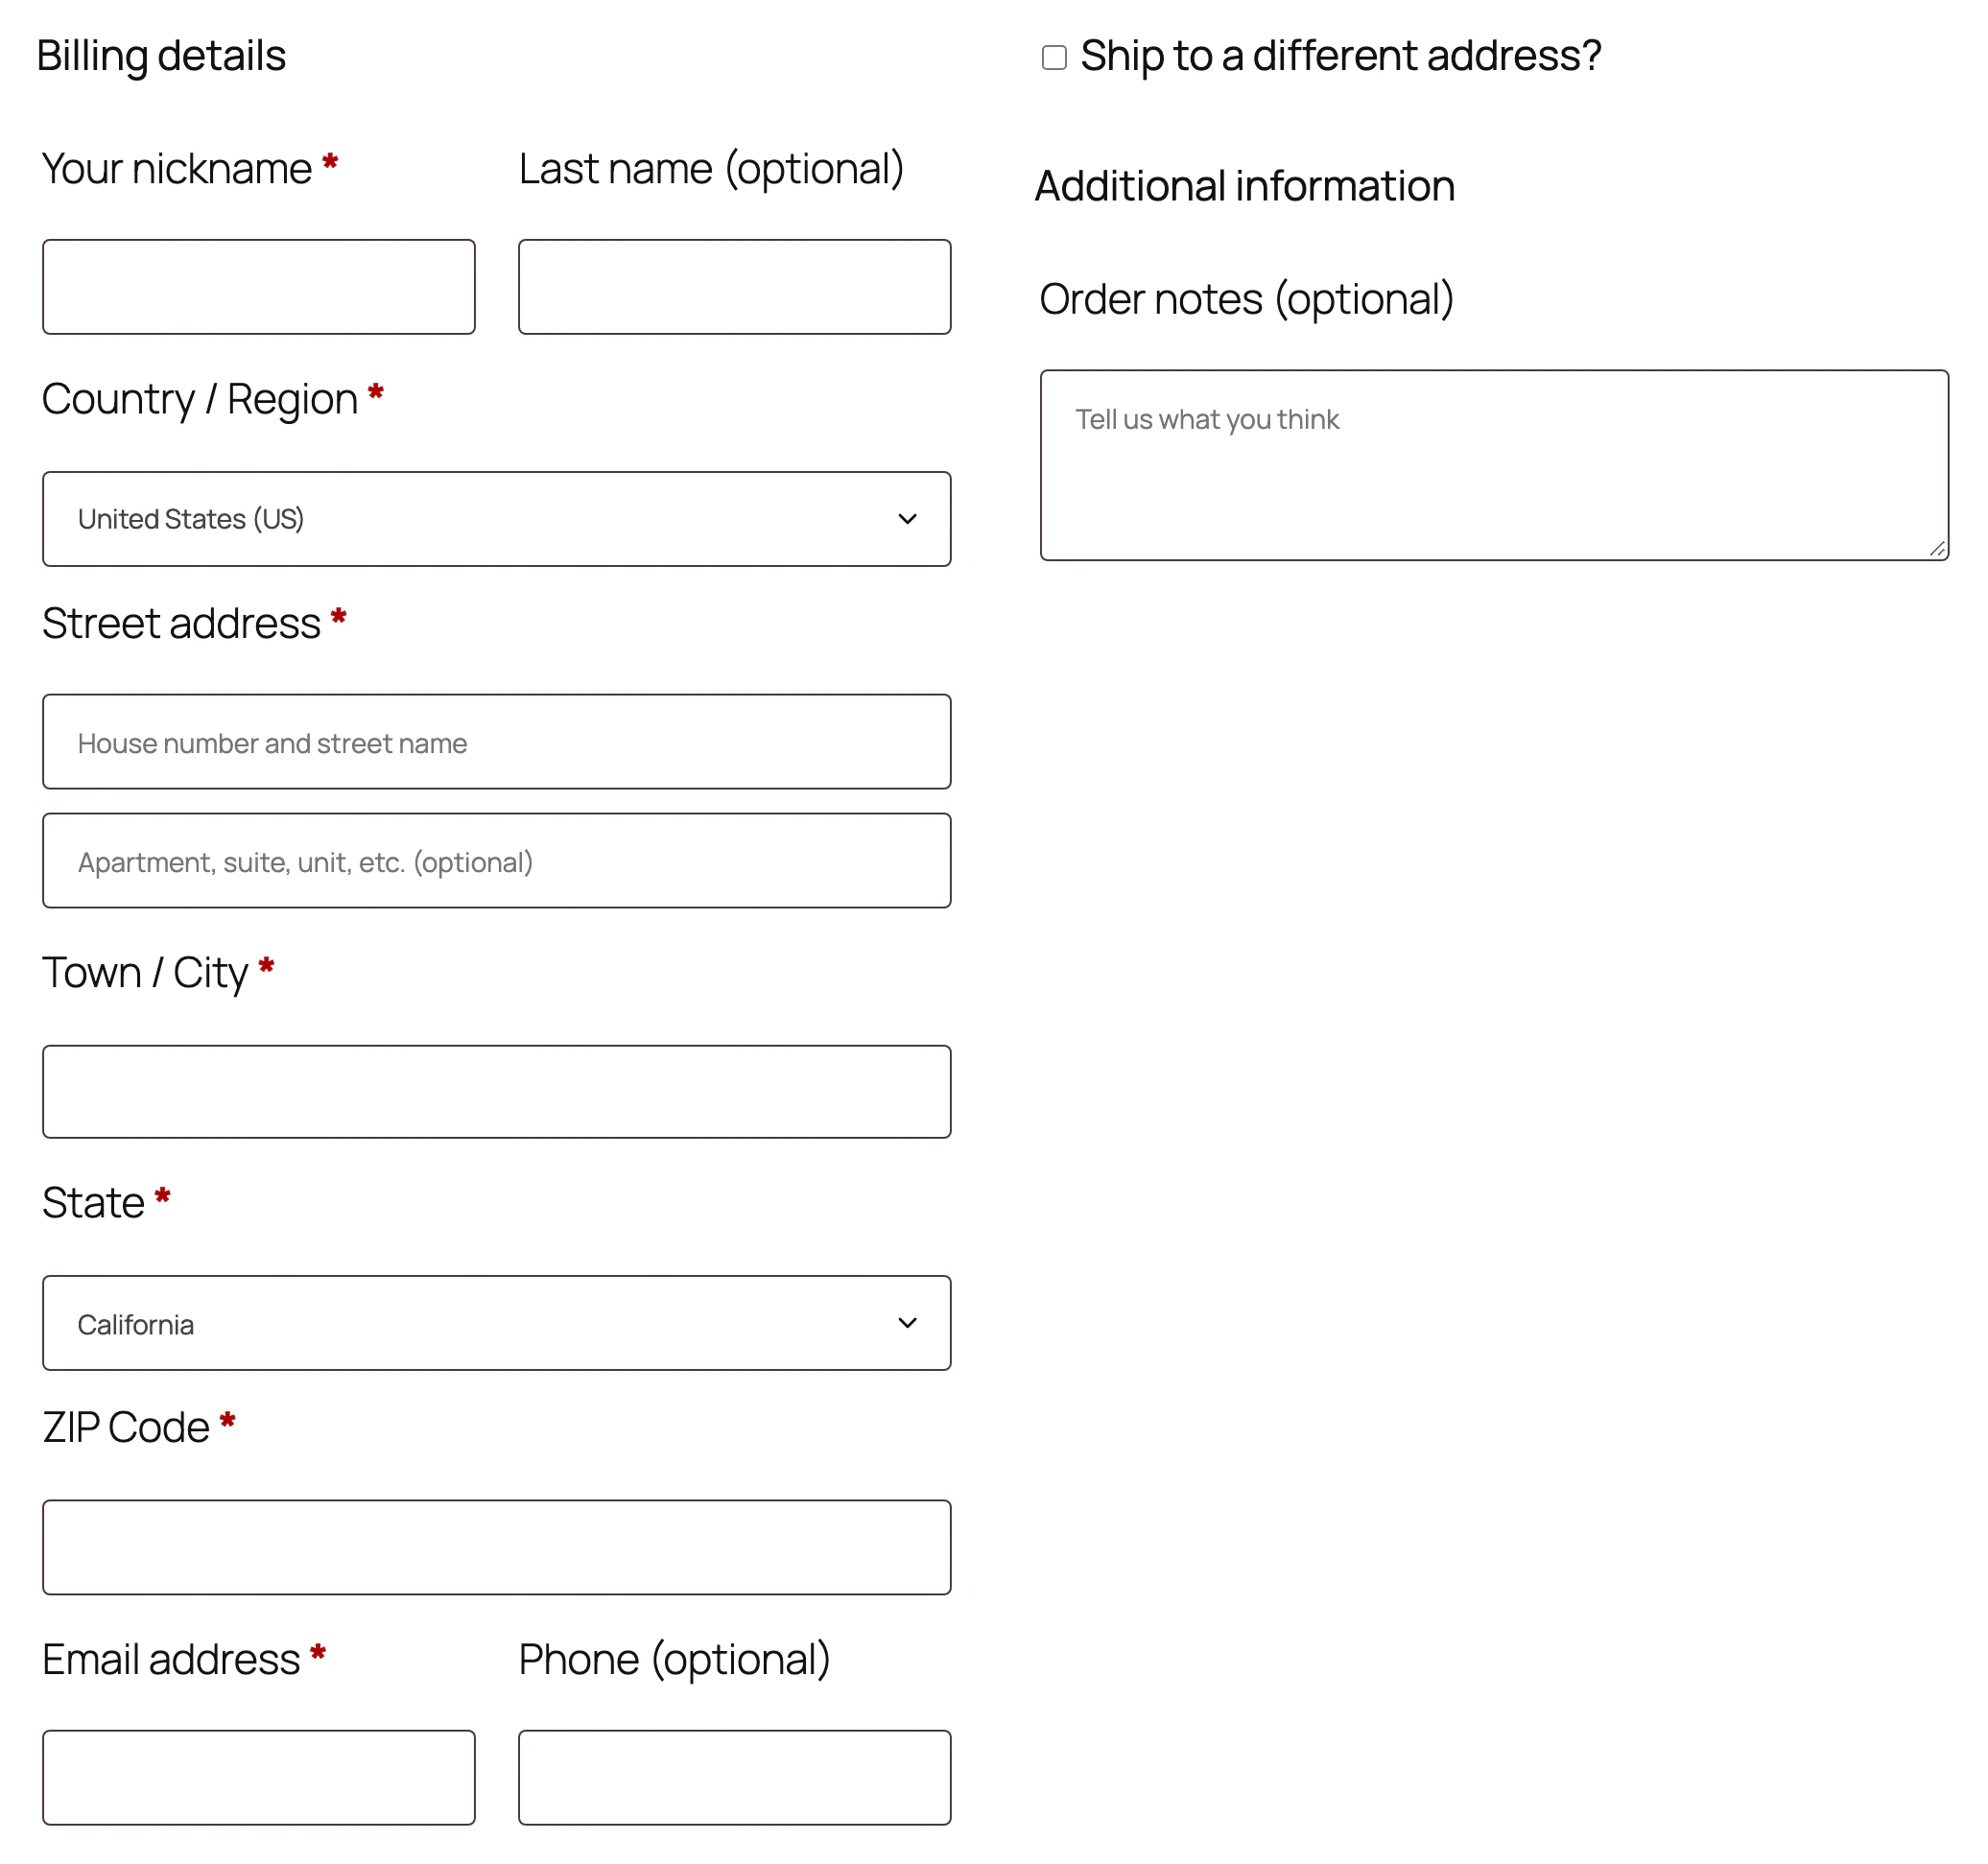
Here’s the result, together with the changes from steps 3 and 4:
6. Add a Terms and Conditions Checkbox
Before we add our own fields, let’s see the right way to add a “terms and conditions” checkbox. Store owners ask for it all the time, and it needs no code:
- Create a page called Terms and Conditions under Pages > Add New.
- Go to WooCommerce > Settings > Advanced and select that page under Terms and conditions.
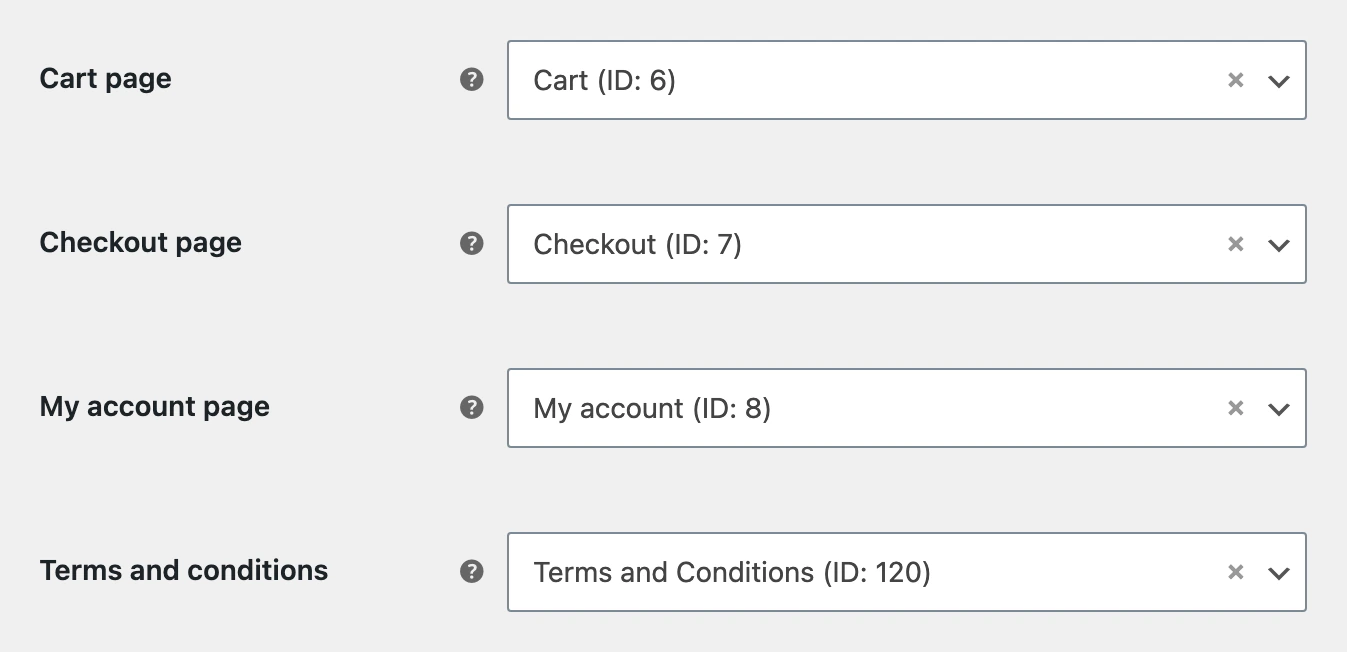
Save the settings, and the checkbox appears on the checkout page just above the Place order button.
Adding Custom Fields
In this part, we’ll add two fields to the checkout. The first is a required “Preferred contact method” dropdown under the billing details. The second is a “Subscribe to our newsletter” checkbox in the order notes section.
First, pick where the new fields go. These are the hooks you can use:
woocommerce_before_checkout_billing_formwoocommerce_after_checkout_billing_formwoocommerce_before_checkout_registration_formwoocommerce_after_checkout_registration_formwoocommerce_before_checkout_shipping_formwoocommerce_after_checkout_shipping_formwoocommerce_before_order_noteswoocommerce_after_order_notes
The names say where each one sits, and they’re listed in the order they appear in the template.
These hooks won’t fire if your theme overrides the WooCommerce templates
form-shipping.phpandform-billing.php. In that case, add the new fields directly in the template files in thewoocommerce/checkout/folder of your theme.
// select
function savvy_select_field( $checkout ) {

	woocommerce_form_field( 'contactmethod', array(
		'type'     => 'select', // text, textarea, select, radio, checkbox, password
		'required' => true, // only adds "*" to the label, see validation below
		'class'    => array( 'form-row-wide' ),
		'label'    => 'Preferred contact method',
		'options'  => array(
			''         => 'Please choose a contact method', // empty value means nothing is selected
			'By phone' => 'By phone', // 'value' => 'Label'
			'By email' => 'By email',
		),
	), $checkout->get_value( 'contactmethod' ) );
}

// checkbox
function savvy_subscribe_checkbox( $checkout ) {
	woocommerce_form_field( 'subscribed', array(
		'type'  => 'checkbox',
		'class' => array( 'form-row-wide' ),
		'label' => 'Subscribe to our newsletter',
	), $checkout->get_value( 'subscribed' ) );
}

// save field values on the order (works with HPOS)
function savvy_save_what_we_added( $order, $data ) {
	if ( ! empty( $_POST['contactmethod'] ) ) {
		$order->update_meta_data( 'contactmethod', sanitize_text_field( wp_unslash( $_POST['contactmethod'] ) ) );
	}
	if ( ! empty( $_POST['subscribed'] ) ) {
		$order->update_meta_data( 'subscribed', 1 );
	}
}

// add fields
add_action( 'woocommerce_after_checkout_billing_form', 'savvy_select_field' );
add_action( 'woocommerce_after_order_notes', 'savvy_subscribe_checkbox' );

// save fields to the order
add_action( 'woocommerce_checkout_create_order', 'savvy_save_what_we_added', 10, 2 );
After you add the code to functions.php (or to your own plugin), the fields appear on the checkout page:
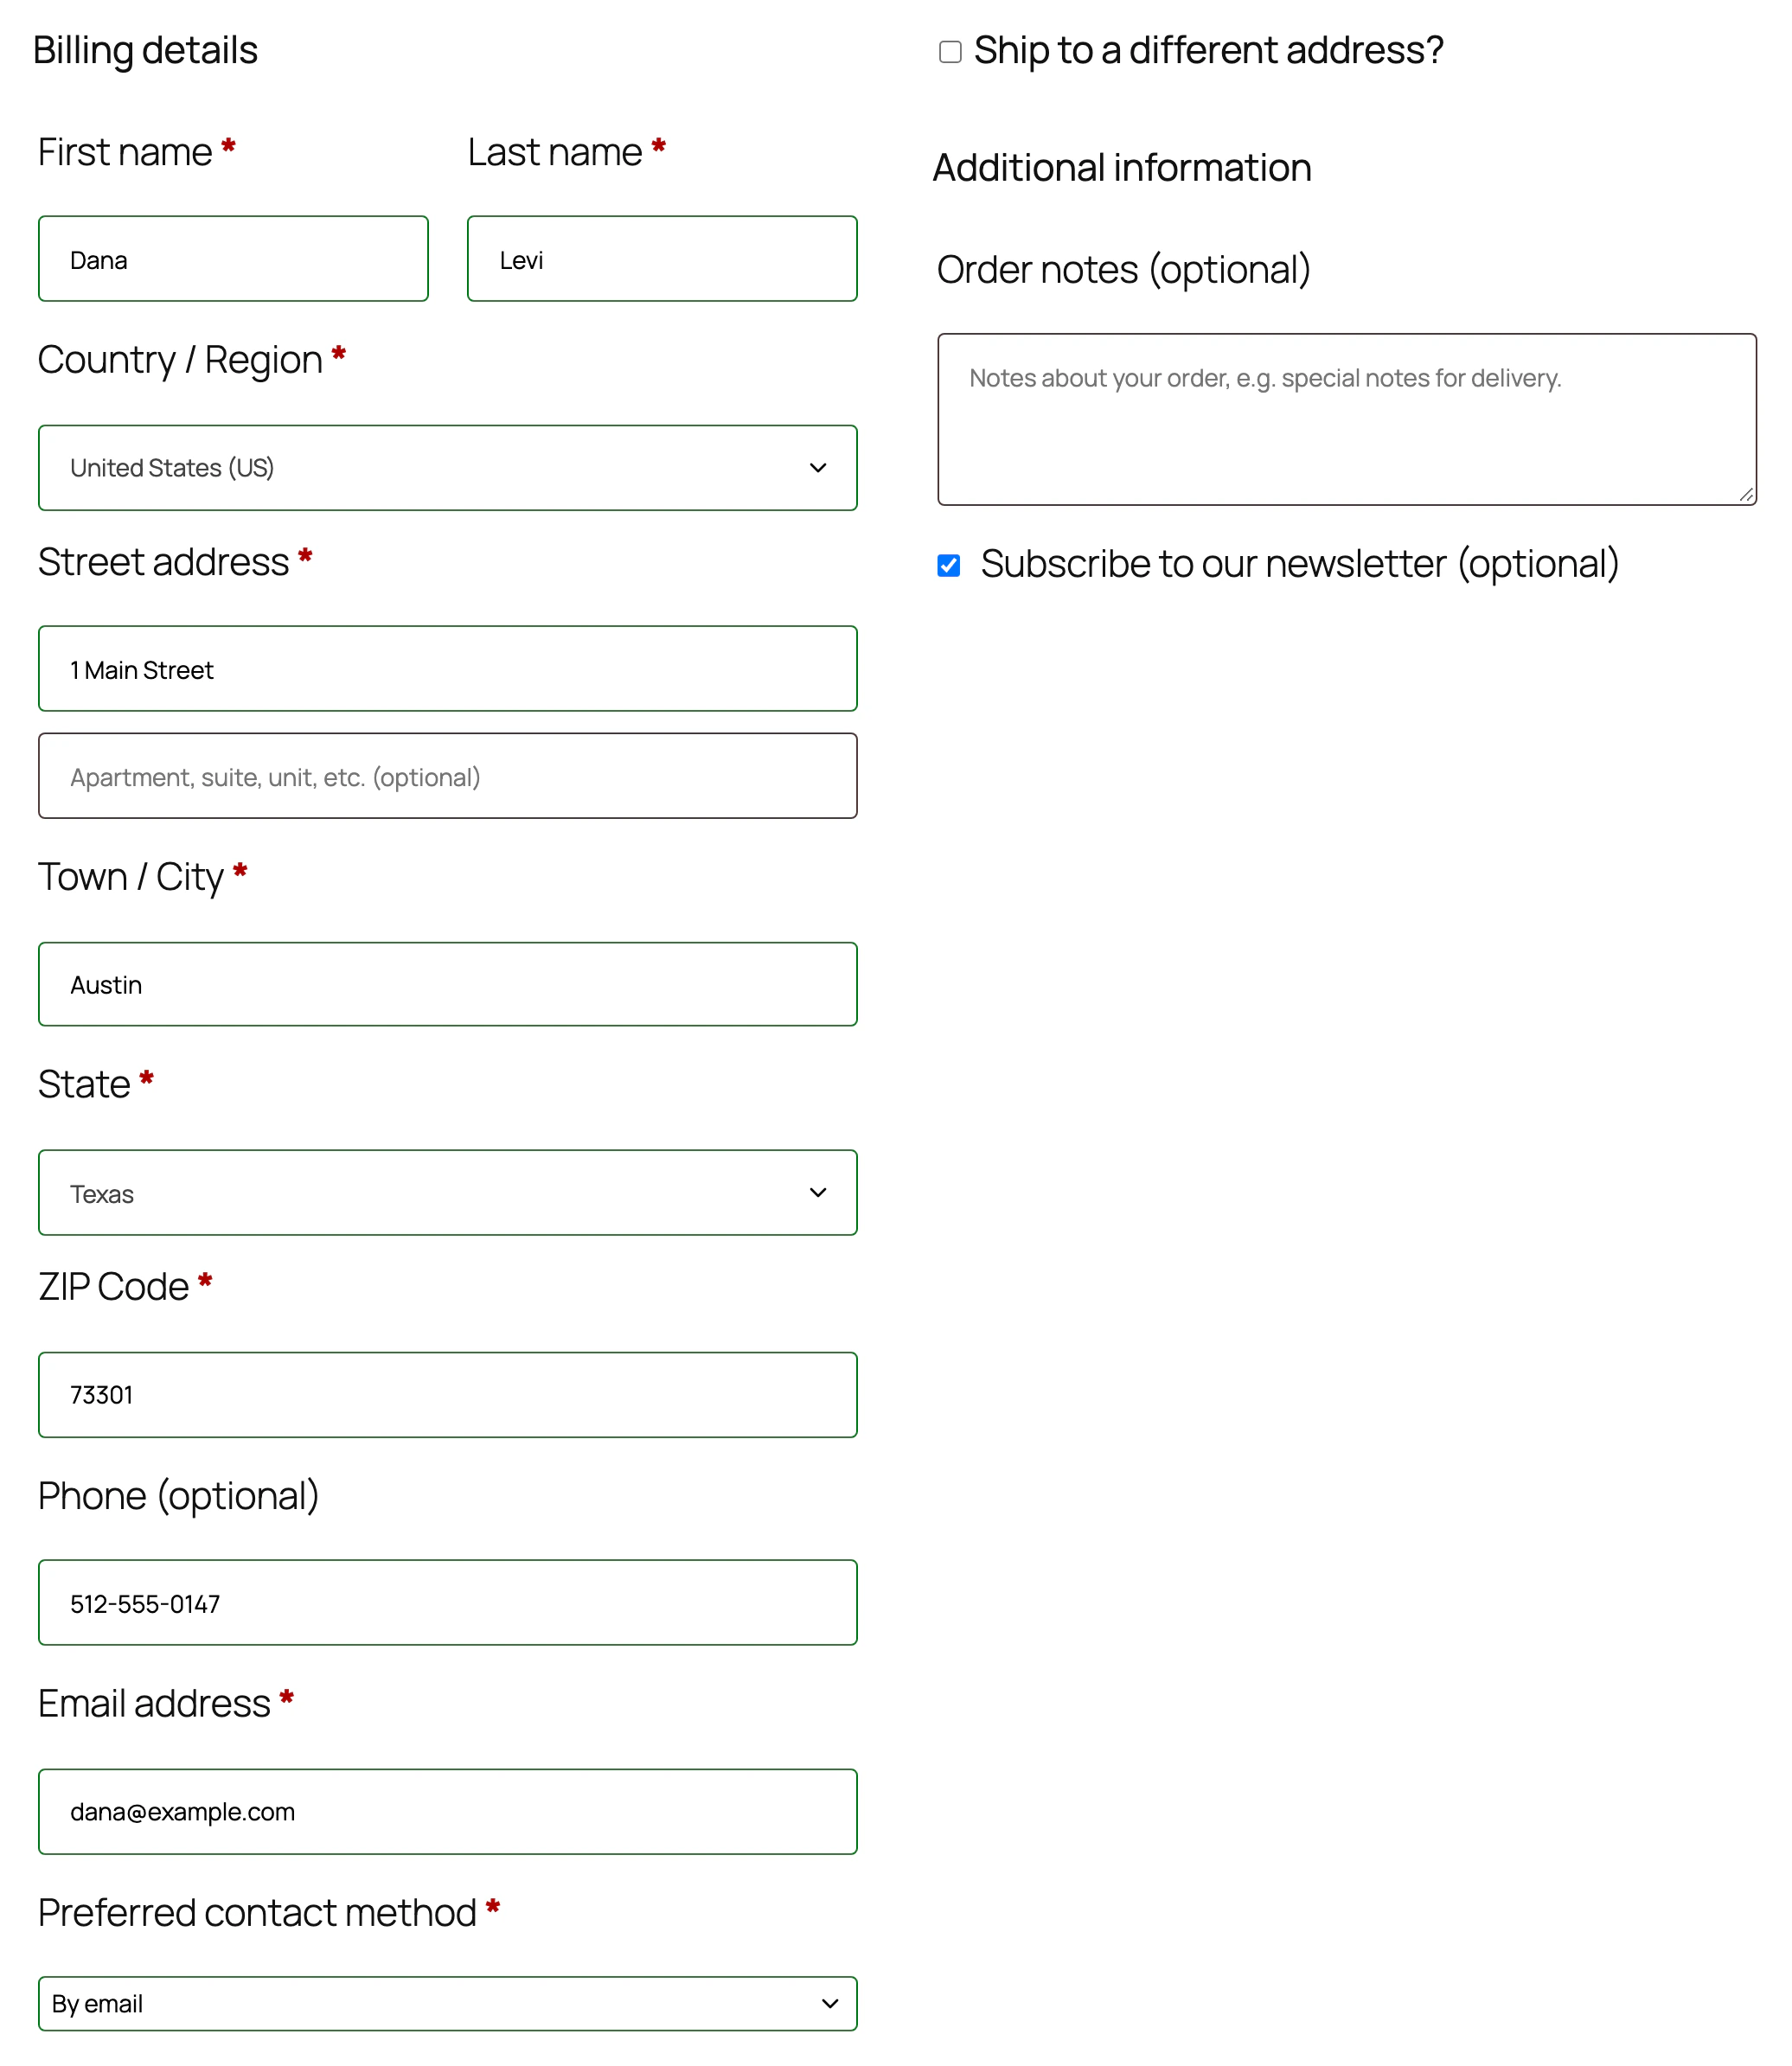
The new fields on the checkout page
Note that the code saves the values through the order object ($order->update_meta_data), not with update_post_meta. WooCommerce now stores orders in dedicated tables (HPOS), which are on by default in new stores. When I tested it, update_post_meta wrote the value to the posts table, and $order->get_meta() returned an empty string.
These values don’t appear on the order screen by default. To show them, add code like this:
function savvy_checkout_field_display_admin_order_meta( $order ) {
	$method = $order->get_meta( 'contactmethod' );
	if ( $method ) {
		echo '<p><strong>Preferred contact method:</strong> ' . esc_html( $method ) . '</p>';
	}
	if ( $order->get_meta( 'subscribed' ) ) {
		echo '<p><strong>Subscribed to the newsletter:</strong> Yes</p>';
	}
}
add_action( 'woocommerce_admin_order_data_after_billing_address', 'savvy_checkout_field_display_admin_order_meta' );
Once an order comes in, the values show up in the order details:
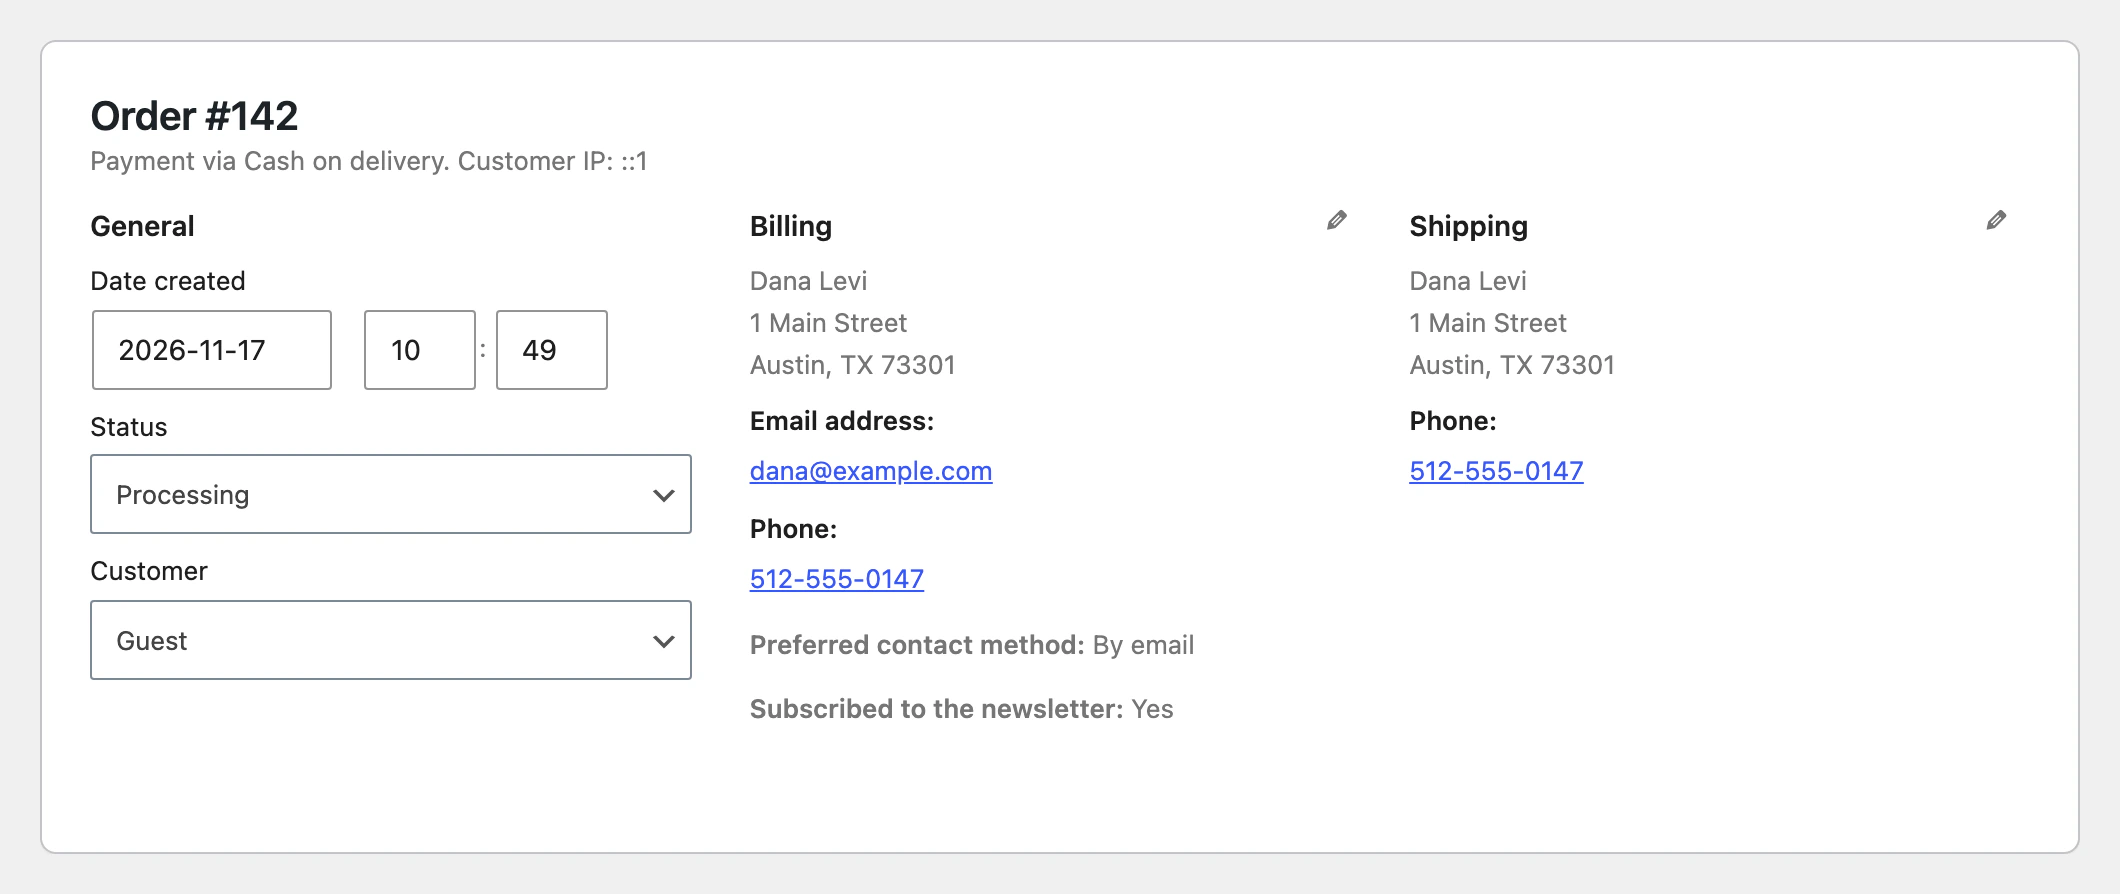
So what about validating these fields? The required parameter of woocommerce_form_field only adds the asterisk next to the label. It doesn’t validate anything. Let’s show an error when the contact method field is empty.
Validation and Error Messages
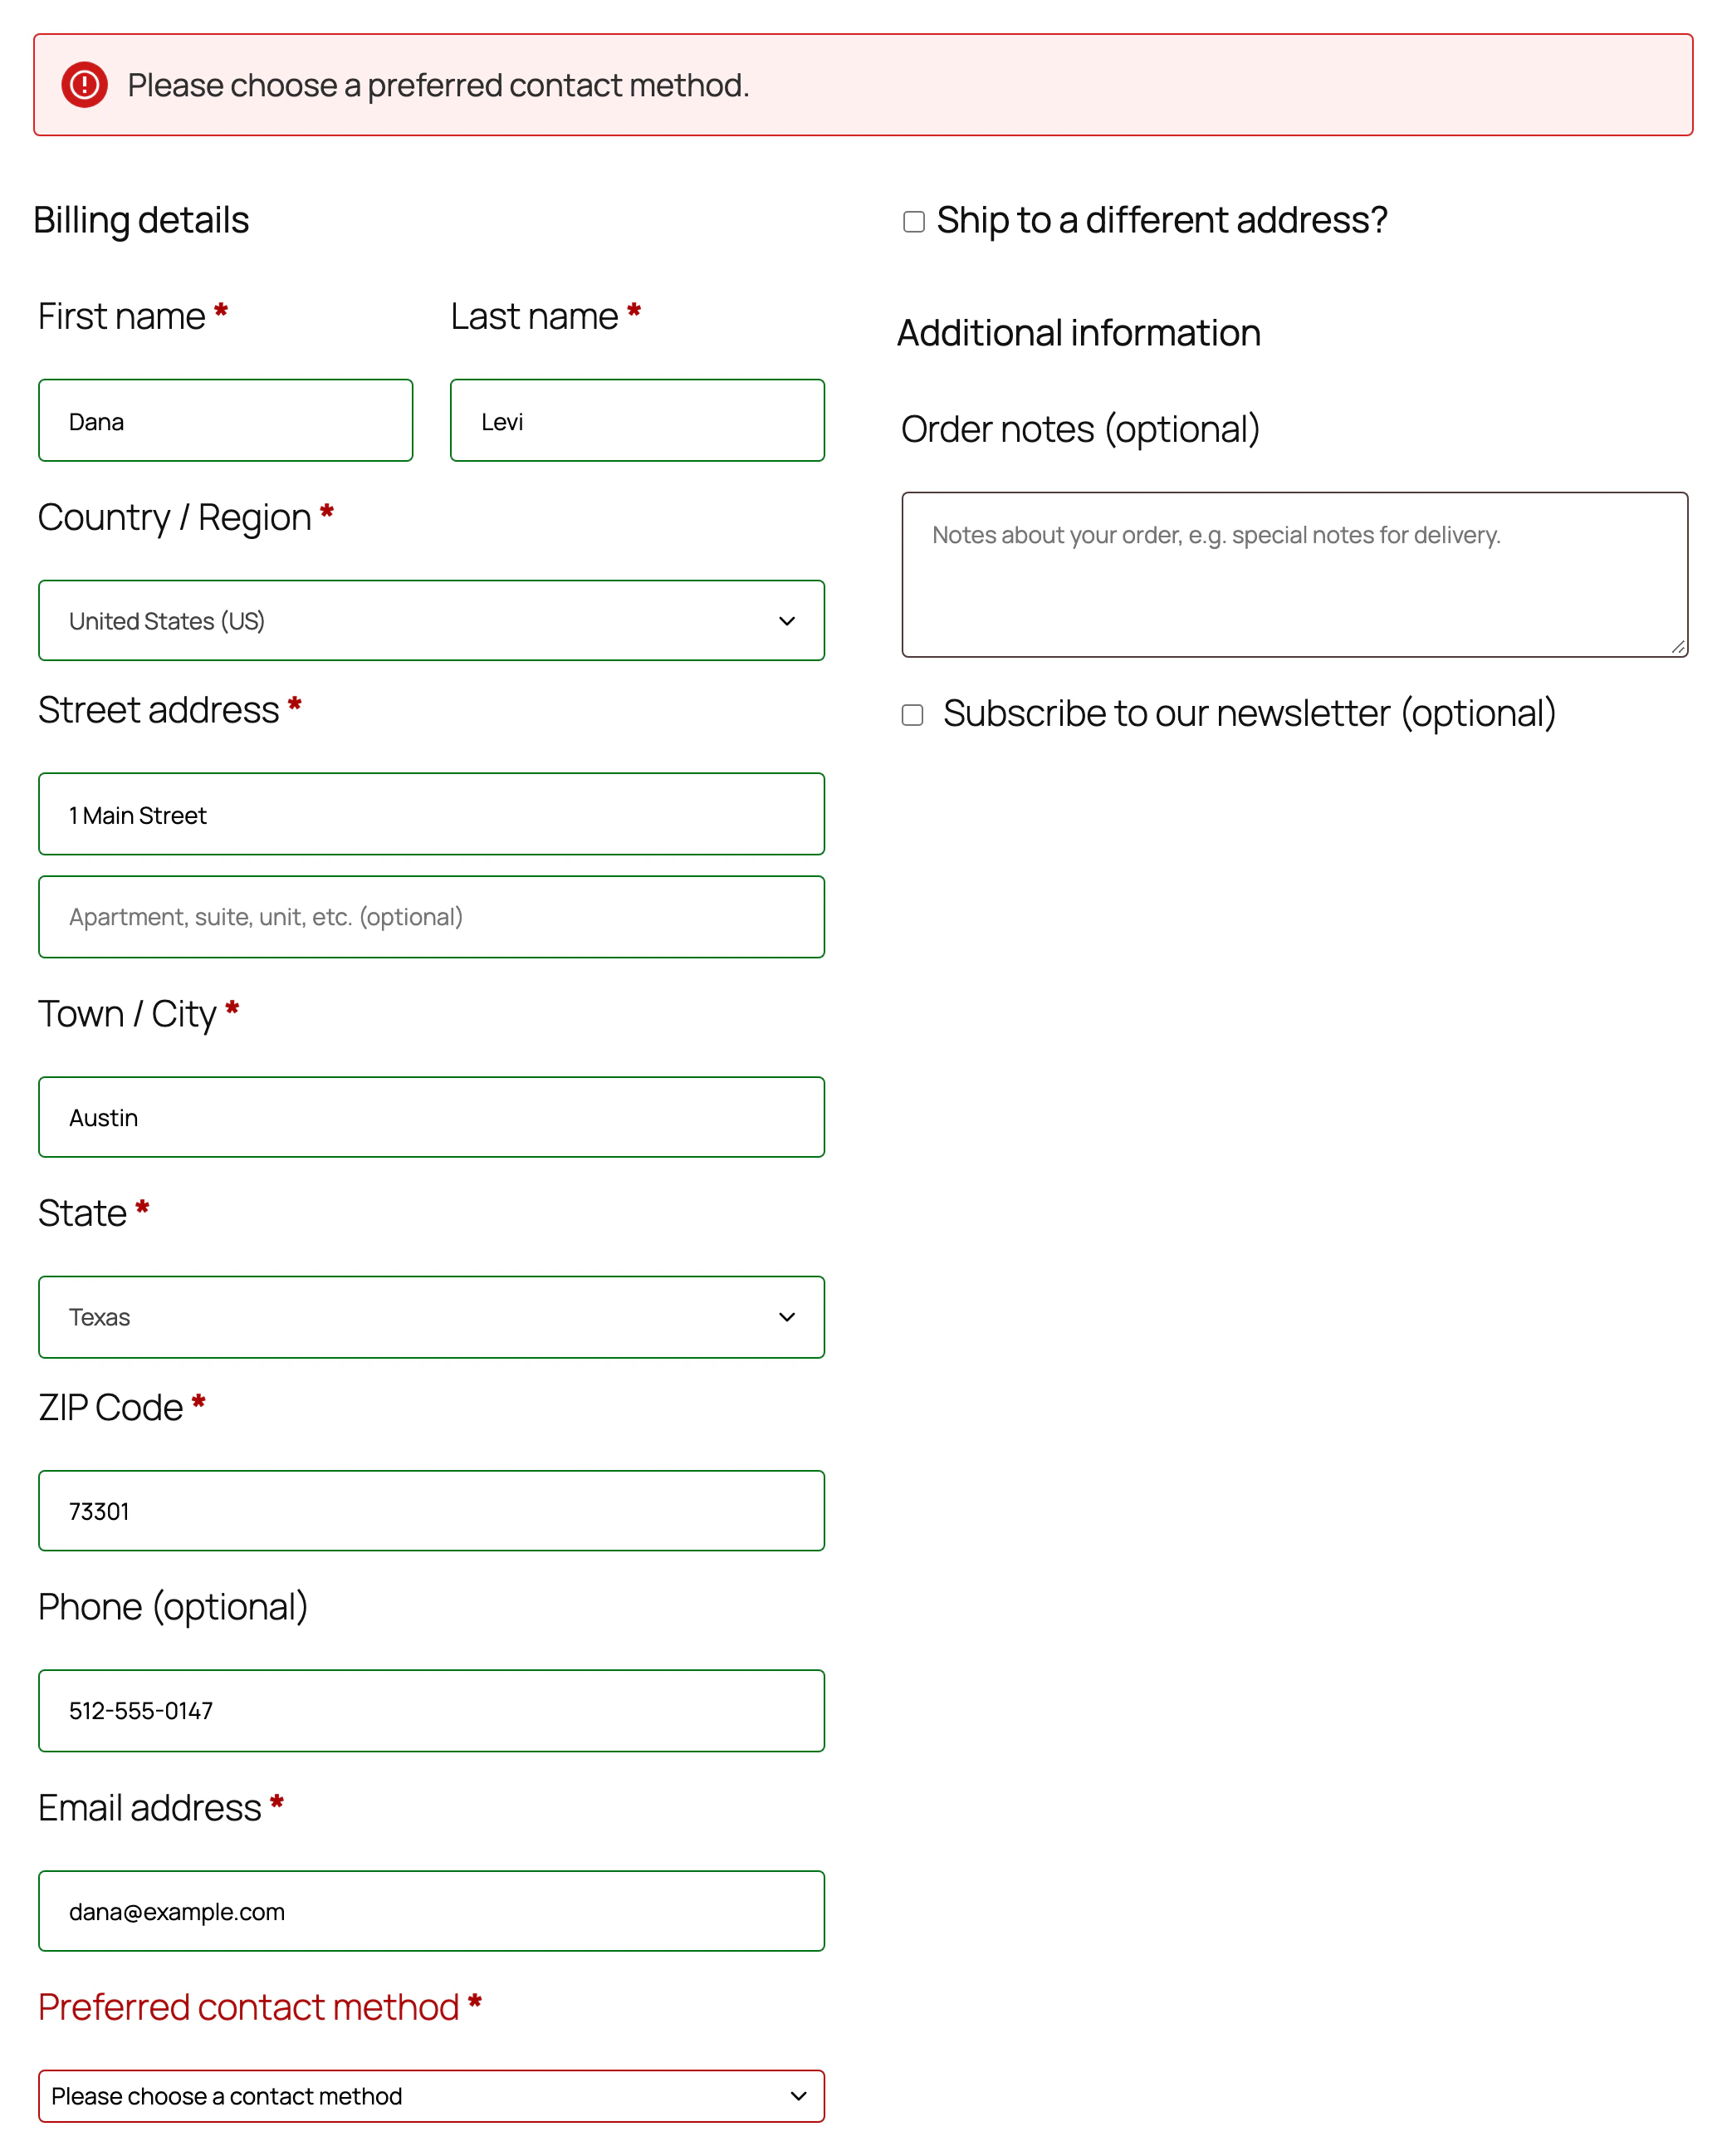
The code below shows an error when the customer hasn’t chosen a preferred contact method. For a field you added yourself, setting required to true isn’t enough to make it mandatory.
function savvy_check_if_selected() {

	// you can add any custom validations here
	if ( empty( $_POST['contactmethod'] ) ) {
		wc_add_notice( 'Please choose a preferred contact method.', 'error' );
	}

}
add_action( 'woocommerce_checkout_process', 'savvy_check_if_selected' );
Look at the second parameter of wc_add_notice. It also accepts notice and success, but here we need error.
Fields in the Checkout Block
New WooCommerce stores get a checkout page built from blocks. The Checkout block doesn’t use the woocommerce_checkout_fields filter, so the code in the previous sections doesn’t change it. I tested this: with the removal code from step 2, the address fields disappeared from the classic checkout, and nothing changed in the block.
To find out which one you have, edit your checkout page. If it contains the [woocommerce_checkout] shortcode, you have the classic checkout. If it contains the Checkout block, the code in this post won’t affect it.
In the block, you hide the company, address line 2 and phone fields, or make them required, from the block’s settings in the editor. To add your own fields, use woocommerce_register_additional_checkout_field. This code adds the same two fields we added to the classic checkout:
add_action( 'woocommerce_init', function () {
	if ( ! function_exists( 'woocommerce_register_additional_checkout_field' ) ) {
		return;
	}
	woocommerce_register_additional_checkout_field( array(
		'id'       => 'savvy/contact-method',
		'label'    => 'Preferred contact method',
		'location' => 'contact',
		'type'     => 'select',
		'required' => true,
		'options'  => array(
			array( 'value' => 'phone', 'label' => 'By phone' ),
			array( 'value' => 'email', 'label' => 'By email' ),
		),
	) );
	woocommerce_register_additional_checkout_field( array(
		'id'       => 'savvy/newsletter',
		'label'    => 'Subscribe to our newsletter',
		'location' => 'order',
		'type'     => 'checkbox',
	) );
} );
The location parameter sets where the field appears: contact next to the email, address in the address form, and order in the additional order information section. In the block, required really does block an order without a value, so you don’t need separate validation code.
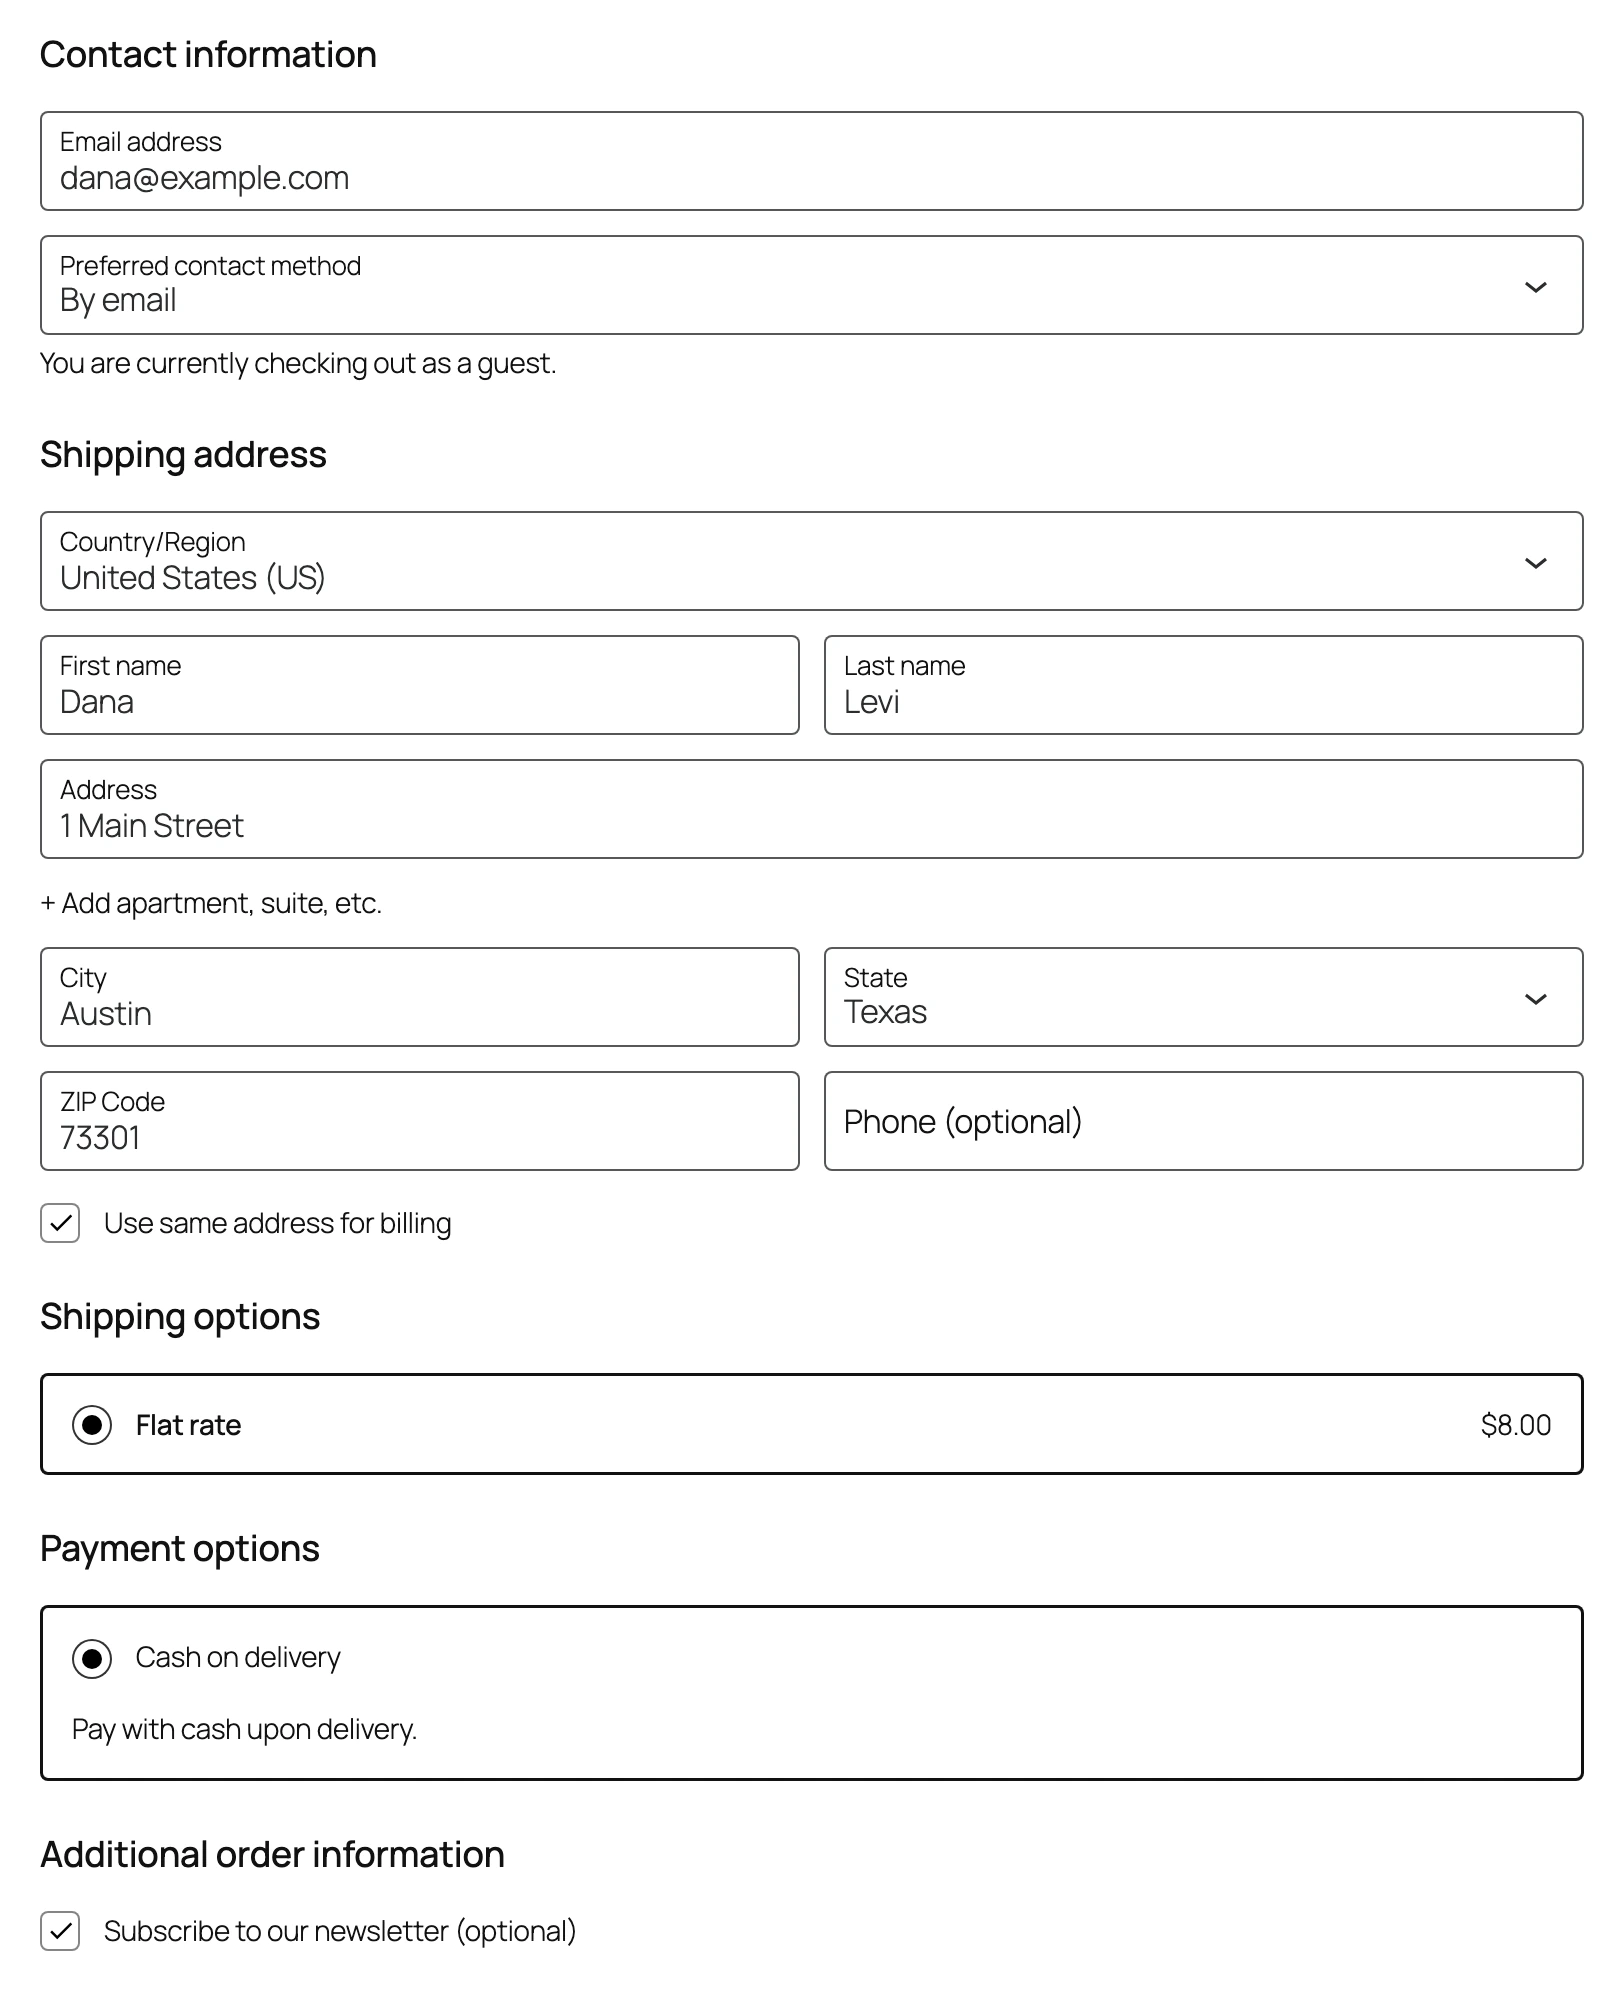
WooCommerce saves the values on the order and shows them on the order screen without any extra code.
FAQs
Common questions about WooCommerce checkout fields:
woocommerce_checkout_fields filter, so the code in this post only affects the classic checkout. In the block, you change fields from the block settings in the editor and add fields with woocommerce_register_additional_checkout_field.
[woocommerce_checkout] shortcode, it's the classic checkout. If it contains the Checkout block, it's block-based.
billing_country field and remove only the other address fields. If all your products are virtual, you can remove the country too.
woocommerce_checkout_create_order hook and save the value with $order->update_meta_data(). In a store with HPOS, update_post_meta doesn't save the value on the order, and $order->get_meta() returns an empty string.
Summary
Changing the classic WooCommerce checkout isn’t complicated. Filters give you control over every field, and this post covered the most important one, woocommerce_checkout_fields. For the Checkout block, use the block settings and the additional checkout fields API instead.
If you’d rather not touch code, the paid Checkout Field Editor extension does much of this from the dashboard.
For more about the hooks WooCommerce offers, see the guide to WooCommerce hooks. Questions or comments? Leave them below.
Credits for most of the classic checkout code go to Misha Rudrastyh.