On July 1, 2023, Google’s Universal Analytics (UA) ceased processing data. You can continue to view data collected before this date for a certain period, but any new data received from this date onward will be visible exclusively in Google Analytics 4 (GA4), which is essentially the next generation of Google Analytics.
In this guide, we will explain the differences between GA4 and UA and show how to install the tracking code for GA4, whether there is an existing analytics tag from the old version or if it’s an entirely new installation of Google Analytics.
To skip the theory and dive into practical steps, this article has two sections: setting up Google Analytics 4 for new sites and installing it alongside Universal Analytics.
A Few Words About Google Analytics 4
In a few words, Google Analytics 4 is a new type of asset that offers several advantages compared to the previous asset of Universal Analytics. It can be said that the main change is that in Google Analytics 4, everything revolves around users and events (events), not sessions as we were used to.
The event-based model processes each user interaction as an independent event, a significant change from the previous session-based model that grouped user interactions over a certain period.
I assume this might not tell you much, so for the sake of simplicity, let’s just say that the model change provides significant benefits for marketers, offering much greater flexibility in monitoring user behavior on the site.
Here are some additional advantages of Google Analytics 4 compared to the previous version:
- Focus on preserving privacy.
- Use of machine learning to understand the customer journey until conversion across different devices.
- Allows smoother integration with Google’s advertising platforms (Google Ads), enabling optimization of campaign performance leading to better marketing results.
Keep in mind that there are many aspects beyond that in which Analytics 4 differs from Universal Analytics, both in terms of reporting and in the calculation of various metrics such as Users, Pageviews, Bounce Rate, and Conversions. For more information.
So, as I mentioned, there are two options – one in the case of the initial and new installation of Analytics 4 on a site without an old version of Analytics (or when Google does not allow connecting between the two versions), and the second for those who install Google Analytics 4 on a site where an older version of Analytics already exists (and it is possible to connect between the two versions). Below is a guide for each option.
New Installation of Google Analytics 4
If this is your first time dealing with Google Analytics, the first thing you need to do is create an account and then create a new Analytics property under that account.
Creating a property will provide you with the tracking code that you will need to install on your site to monitor and track user movements through the Analytics platform. In any case, the process is very simple and short. Here are the steps to do this:
- Login with your Google account to the Analytics management interface.
- Click the blue button Start Measuring.
%22%20transform%3D%22translate(3.5%203.5)%20scale(7.0664)%22%20fill-opacity%3D%22.5%22%3E%3Cellipse%20fill%3D%22%23cbcbcb%22%20rx%3D%221%22%20ry%3D%221%22%20transform%3D%22rotate(81.8%2027.8%20194.6)%20scale(56.49983%2081.97839)%22%2F%3E%3Cellipse%20fill%3D%22%23cecece%22%20cx%3D%22123%22%20cy%3D%225%22%20rx%3D%2242%22%20ry%3D%2240%22%2F%3E%3Cellipse%20fill%3D%22%23fff%22%20rx%3D%221%22%20ry%3D%221%22%20transform%3D%22matrix(-205.99753%20150.29976%20-22.25849%20-30.507%20146.4%2079.6)%22%2F%3E%3Cellipse%20fill%3D%22%23d0d0d0%22%20rx%3D%221%22%20ry%3D%221%22%20transform%3D%22matrix(-24.614%20.17344%20-.1973%20-28.00014%2042%2090.7)%22%2F%3E%3C%2Fg%3E%3C%2Fsvg%3E)
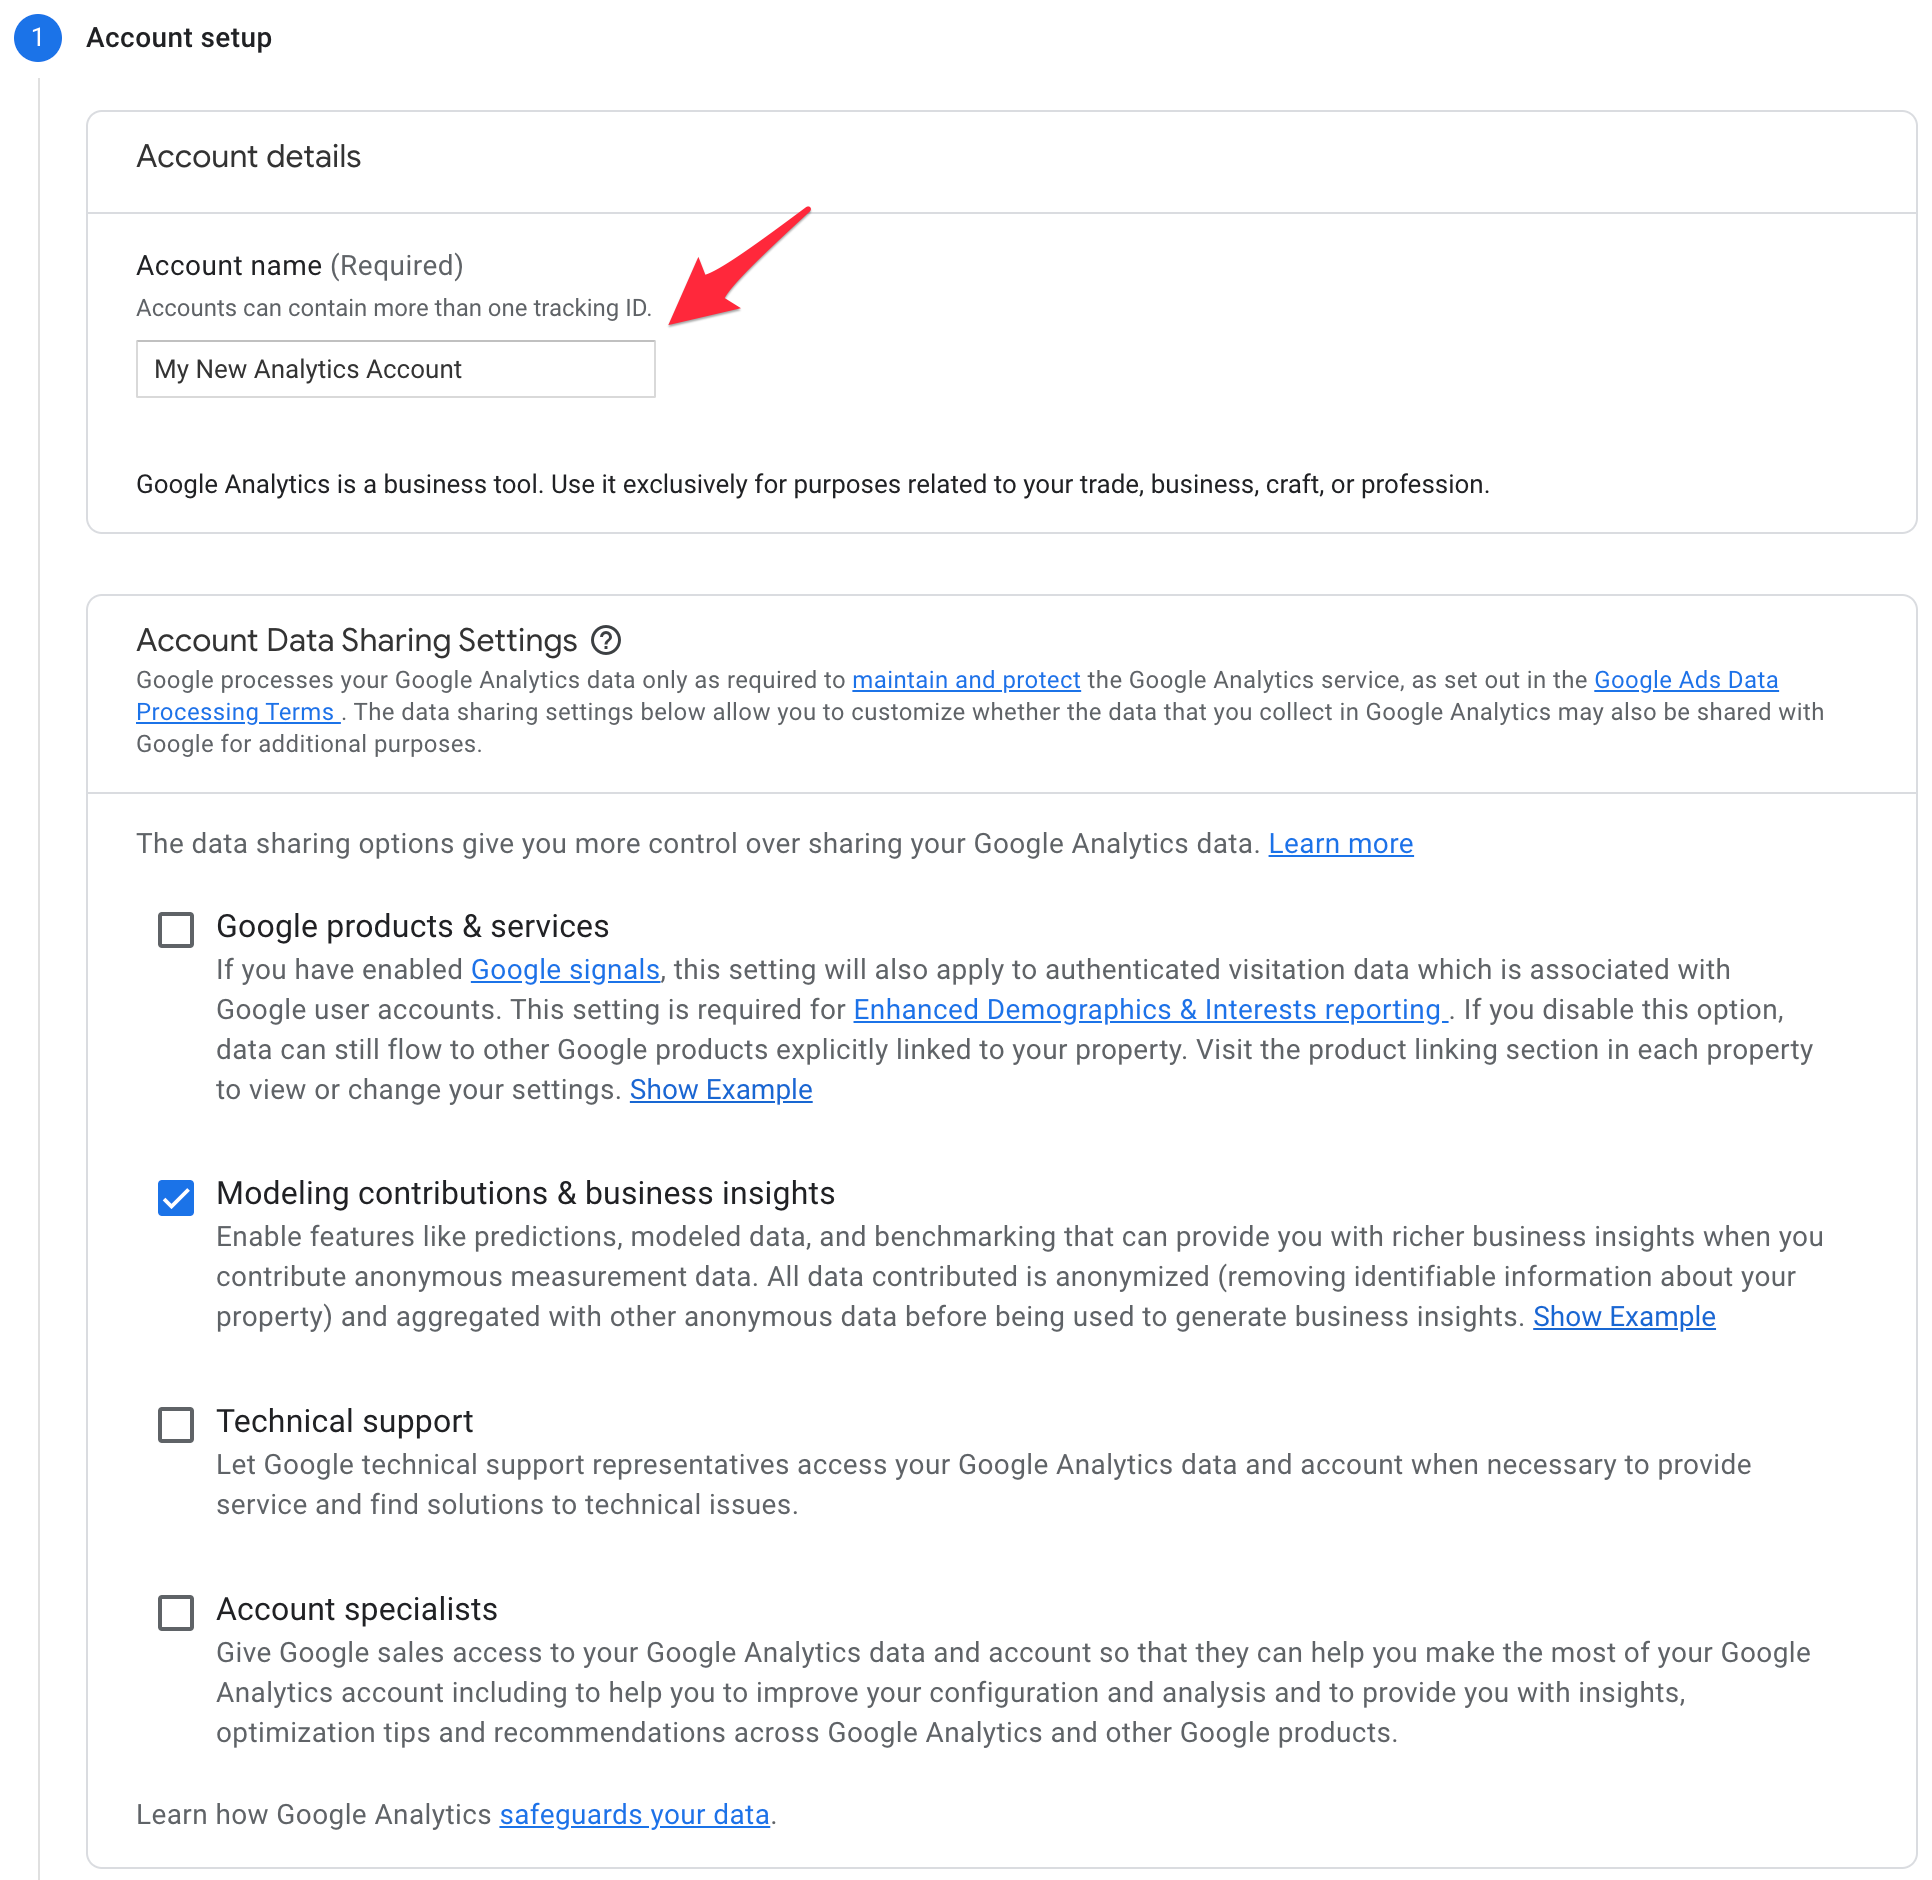
- In the screen in front of you, choose a name for your account (an account can contain multiple different Analytics properties). The bottom part is less relevant, and you can leave it as default.

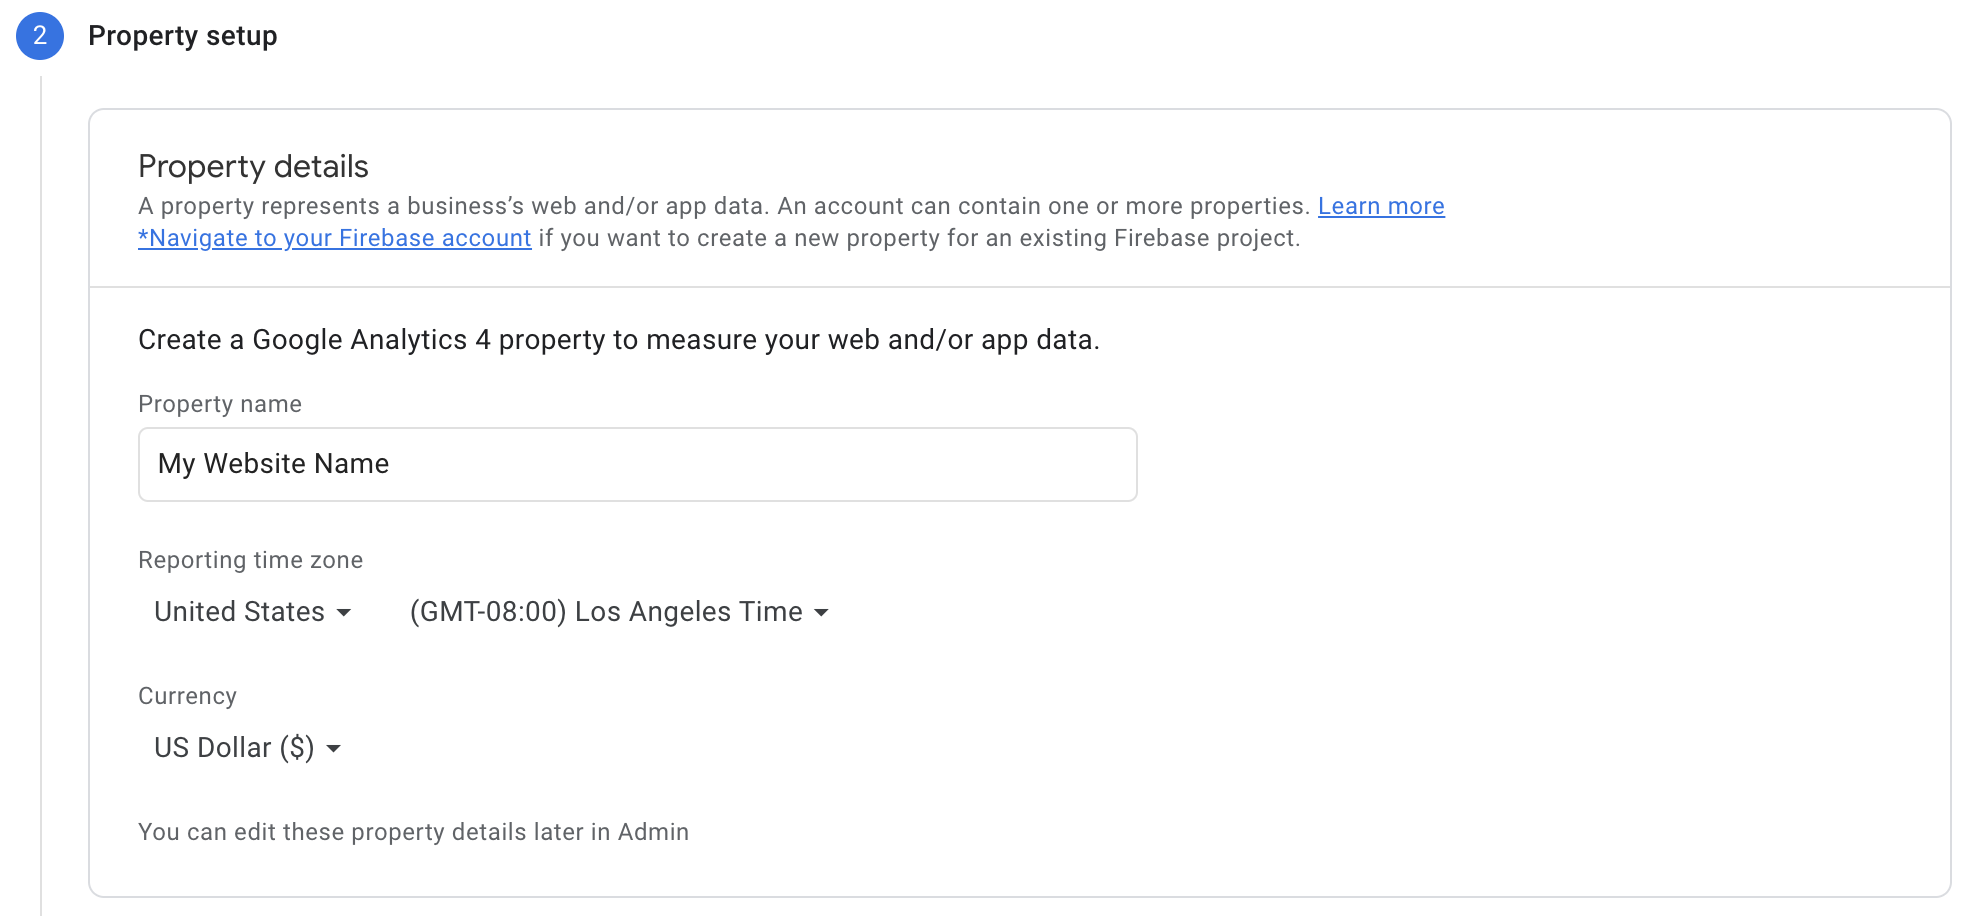
- Clicking the blue button will take you to a screen where you need to choose a name for the property you want to create. Choose a name that describes the site where you want to embed Analytics and click the button leading to the next screen. (The additional details in this screen explain themselves).
%22%20transform%3D%22translate(3.8%203.8)%20scale(7.6875)%22%20fill%3D%22%23fff%22%20fill-opacity%3D%22.5%22%3E%3Cellipse%20cx%3D%2271%22%20cy%3D%2216%22%20rx%3D%2216%22%20ry%3D%227%22%2F%3E%3Cpath%20d%3D%22M29.3%20133L8.8%20122.6l10-19.6%2020.4%2010.4z%22%2F%3E%3Cellipse%20rx%3D%221%22%20ry%3D%221%22%20transform%3D%22matrix(2.32654%204.85694%20-21.4483%2010.27405%20207.4%202.8)%22%2F%3E%3Cpath%20d%3D%22M54%2019l27-5-23%2014z%22%2F%3E%3C%2Fg%3E%3C%2Fsvg%3E)
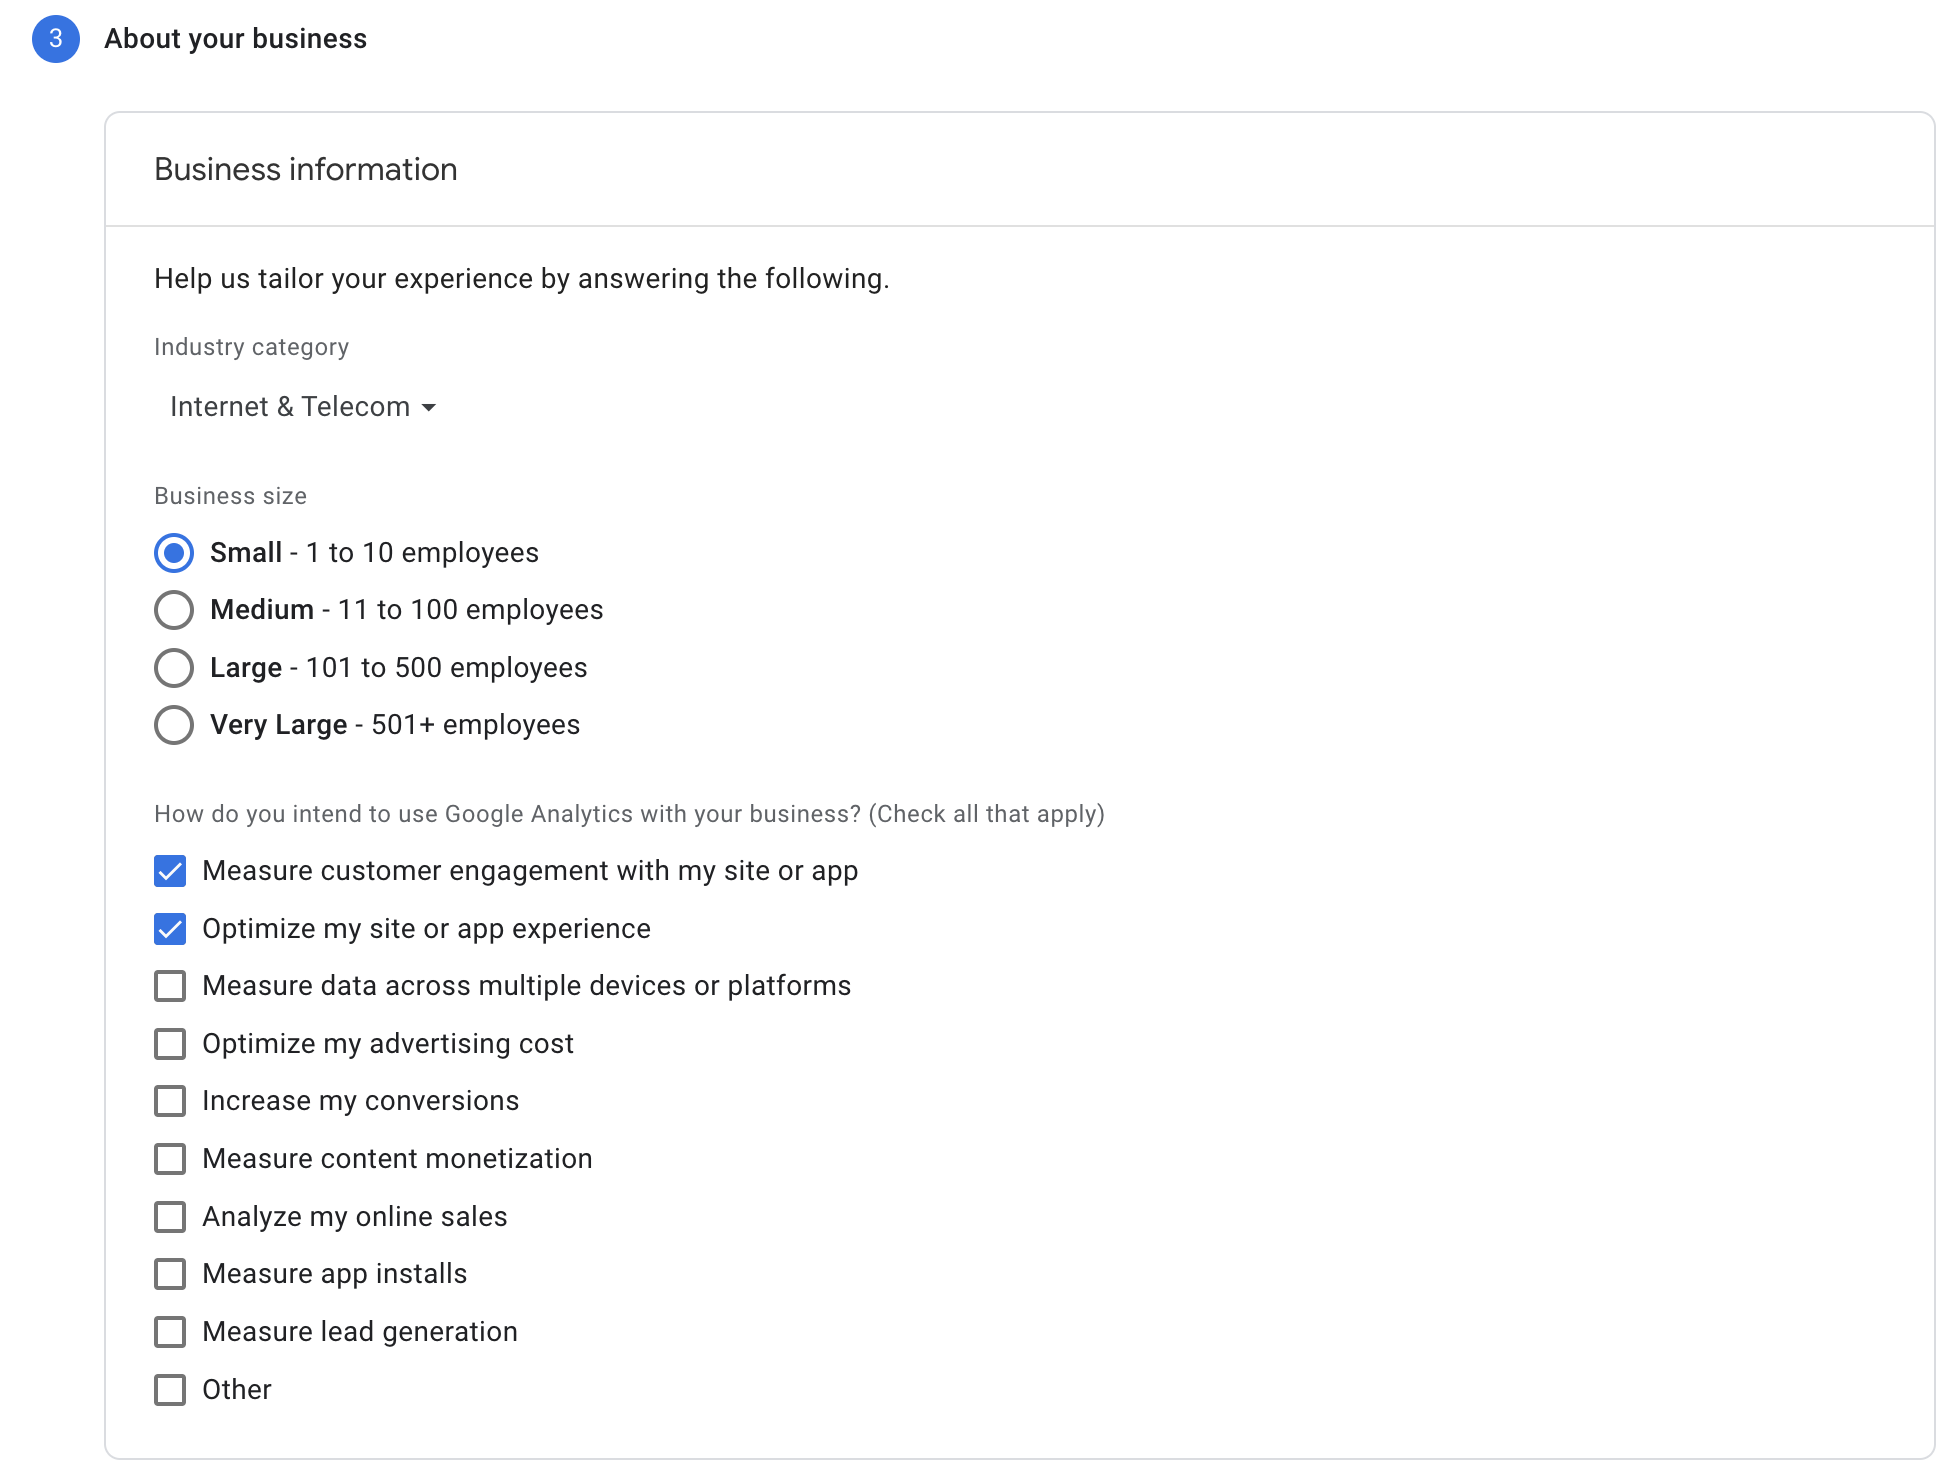
- In this screen, you need to choose some details about the business in question, namely details about the site where you plan to embed Analytics. Choose the appropriate details and click the blue button again (you can change these details later).
%22%20transform%3D%22translate(3.8%203.8)%20scale(7.60938)%22%20fill-opacity%3D%22.5%22%3E%3Cpath%20fill%3D%22%23c7c7c7%22%20d%3D%22M34%20118h26v19H34z%22%2F%3E%3Cpath%20fill%3D%22%23fff%22%20d%3D%22M271%20209L250%2023-16%20171z%22%2F%3E%3Cpath%20fill%3D%22%23ddd%22%20d%3D%22M35%20139l-3-22%2032%2011z%22%2F%3E%3Cellipse%20fill%3D%22%23fff%22%20cx%3D%2248%22%20cy%3D%2245%22%20rx%3D%22255%22%20ry%3D%2272%22%2F%3E%3C%2Fg%3E%3C%2Fsvg%3E)
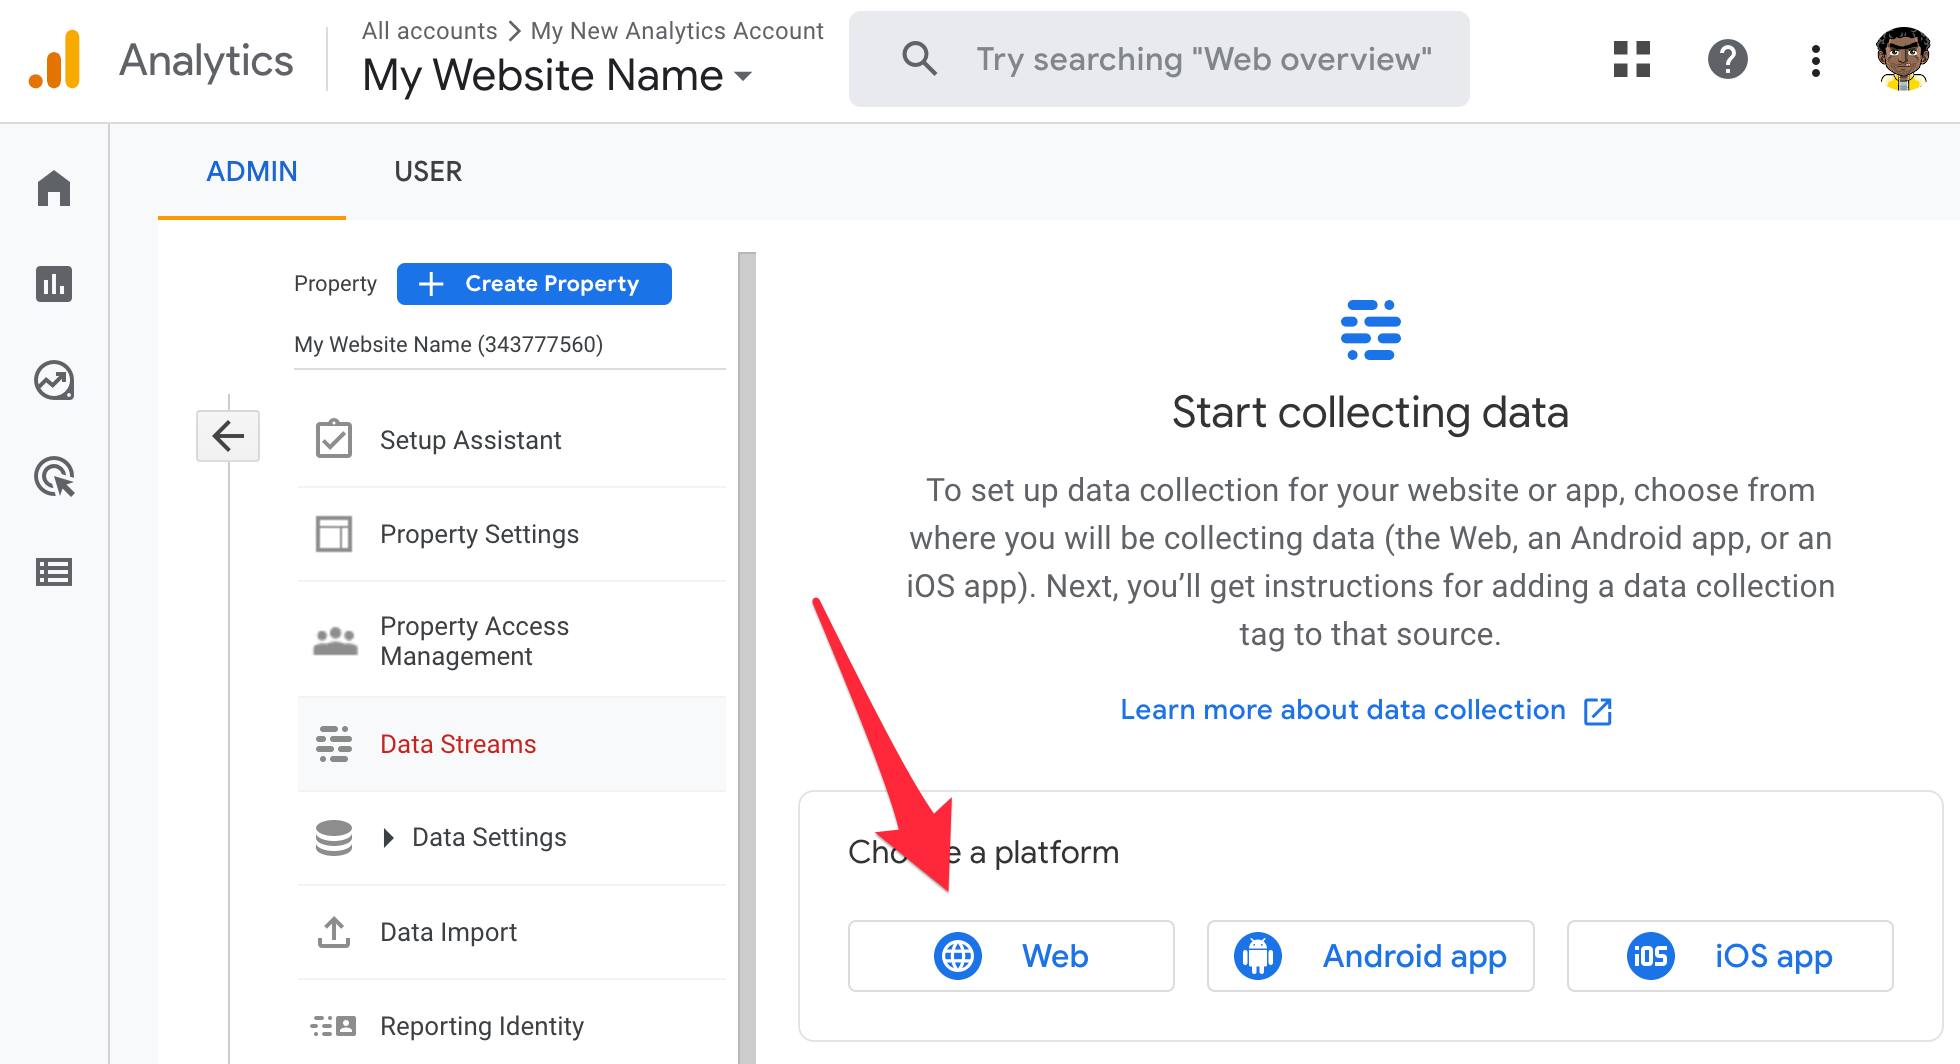
- Now you need to agree to the terms of use that Google will present to you. When you do this, you will move to the Data Streams screen in the Analytics management interface, where you need to choose where you intend to embed the tracking code. In the case of a website, choose Web.
%27%20fill-opacity%3D%27.5%27%3E%3Cellipse%20fill%3D%22%23c9c9c9%22%20fill-opacity%3D%22.5%22%20rx%3D%221%22%20ry%3D%221%22%20transform%3D%22matrix(50.48345%20-318.73999%20132.27088%2020.94965%20502.8%2045.5)%22%2F%3E%3Cellipse%20fill%3D%22%23fff%22%20fill-opacity%3D%22.5%22%20rx%3D%221%22%20ry%3D%221%22%20transform%3D%22matrix(587.89043%20512.84951%20-444.61957%20509.67699%201294.9%20452)%22%2F%3E%3Cellipse%20fill%3D%22%23fff%22%20fill-opacity%3D%22.5%22%20rx%3D%221%22%20ry%3D%221%22%20transform%3D%22matrix(1643.54667%20-193.53354%2050.42861%20428.25535%201186.1%20674)%22%2F%3E%3Cpath%20fill%3D%22%23ddd%22%20fill-opacity%3D%22.5%22%20d%3D%22M386.6%203.8H578v306.3H386.6z%22%2F%3E%3C%2Fg%3E%3C%2Fsvg%3E)
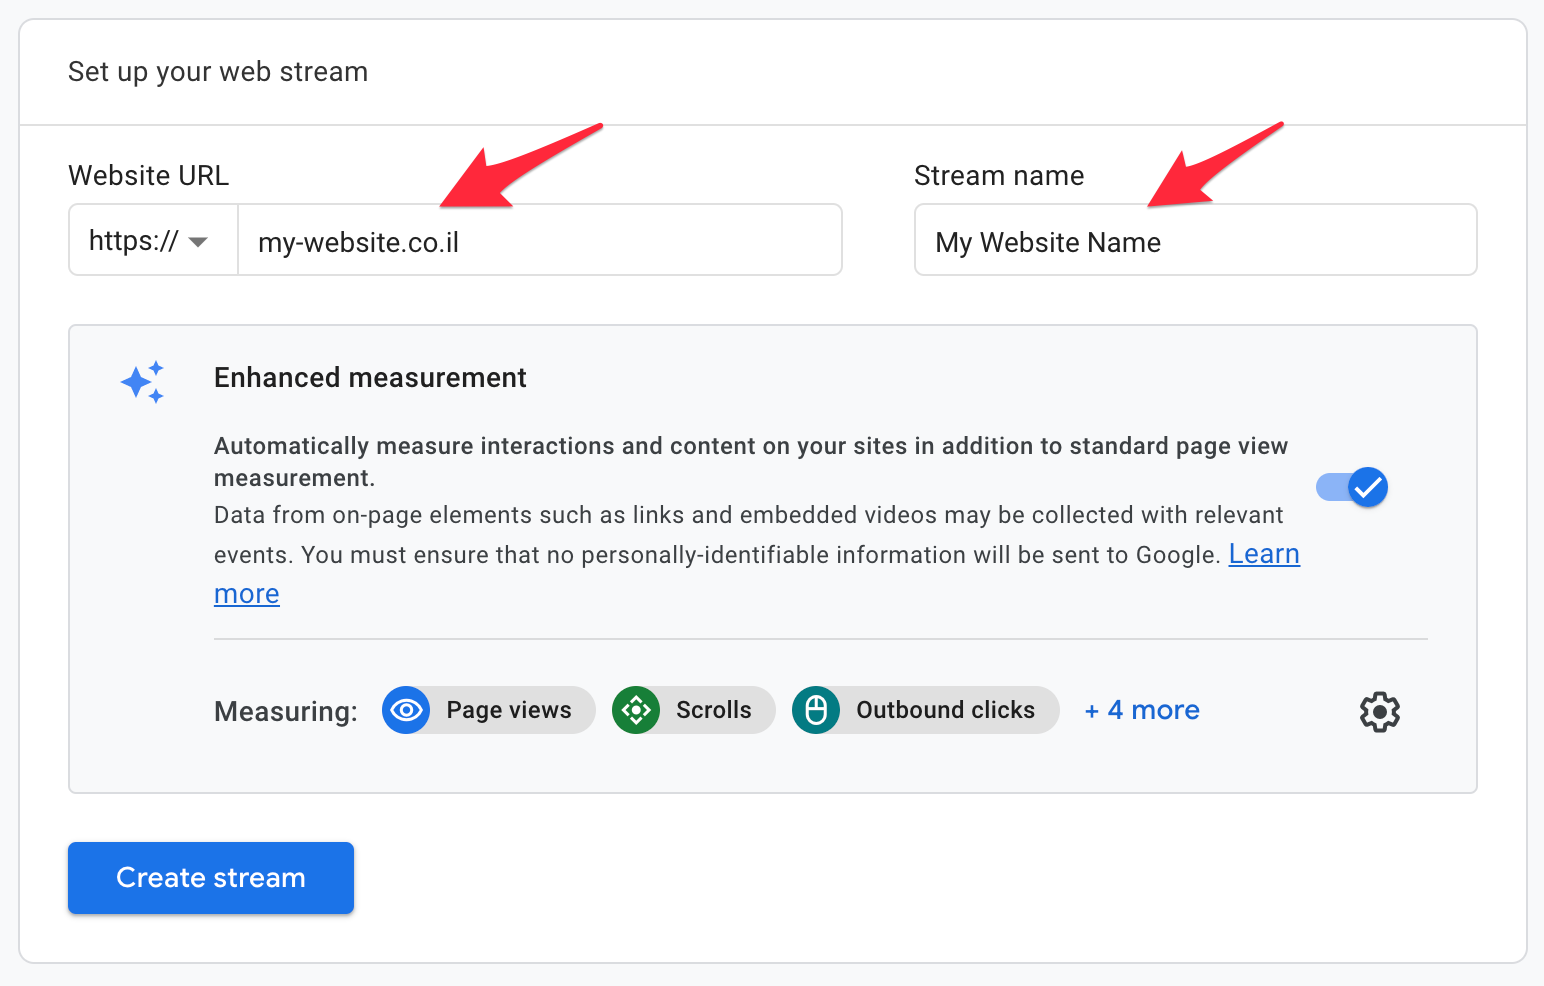
- In the next screen, you will need to enter the domain of the relevant site and choose any name for that Data Stream. Leave the default under Enhanced measurements at the bottom and click Create Stream.
%22%20transform%3D%22translate(3%203)%20scale(6.03125)%22%20fill-opacity%3D%22.5%22%3E%3Cellipse%20fill%3D%22%23d8d7d8%22%20cx%3D%2260%22%20cy%3D%22110%22%20rx%3D%2254%22%20ry%3D%2254%22%2F%3E%3Cpath%20fill%3D%22%23d5d5d4%22%20d%3D%22M45%2081h106v37H45z%22%2F%3E%3Cellipse%20fill%3D%22%23d6d4dd%22%20rx%3D%221%22%20ry%3D%221%22%20transform%3D%22matrix(-51.4926%2014.568%20-9.6055%20-33.95196%2024.3%20142.2)%22%2F%3E%3Cpath%20fill%3D%22%23fff%22%20d%3D%22M75%20121h181v42H75z%22%2F%3E%3C%2Fg%3E%3C%2Fsvg%3E)
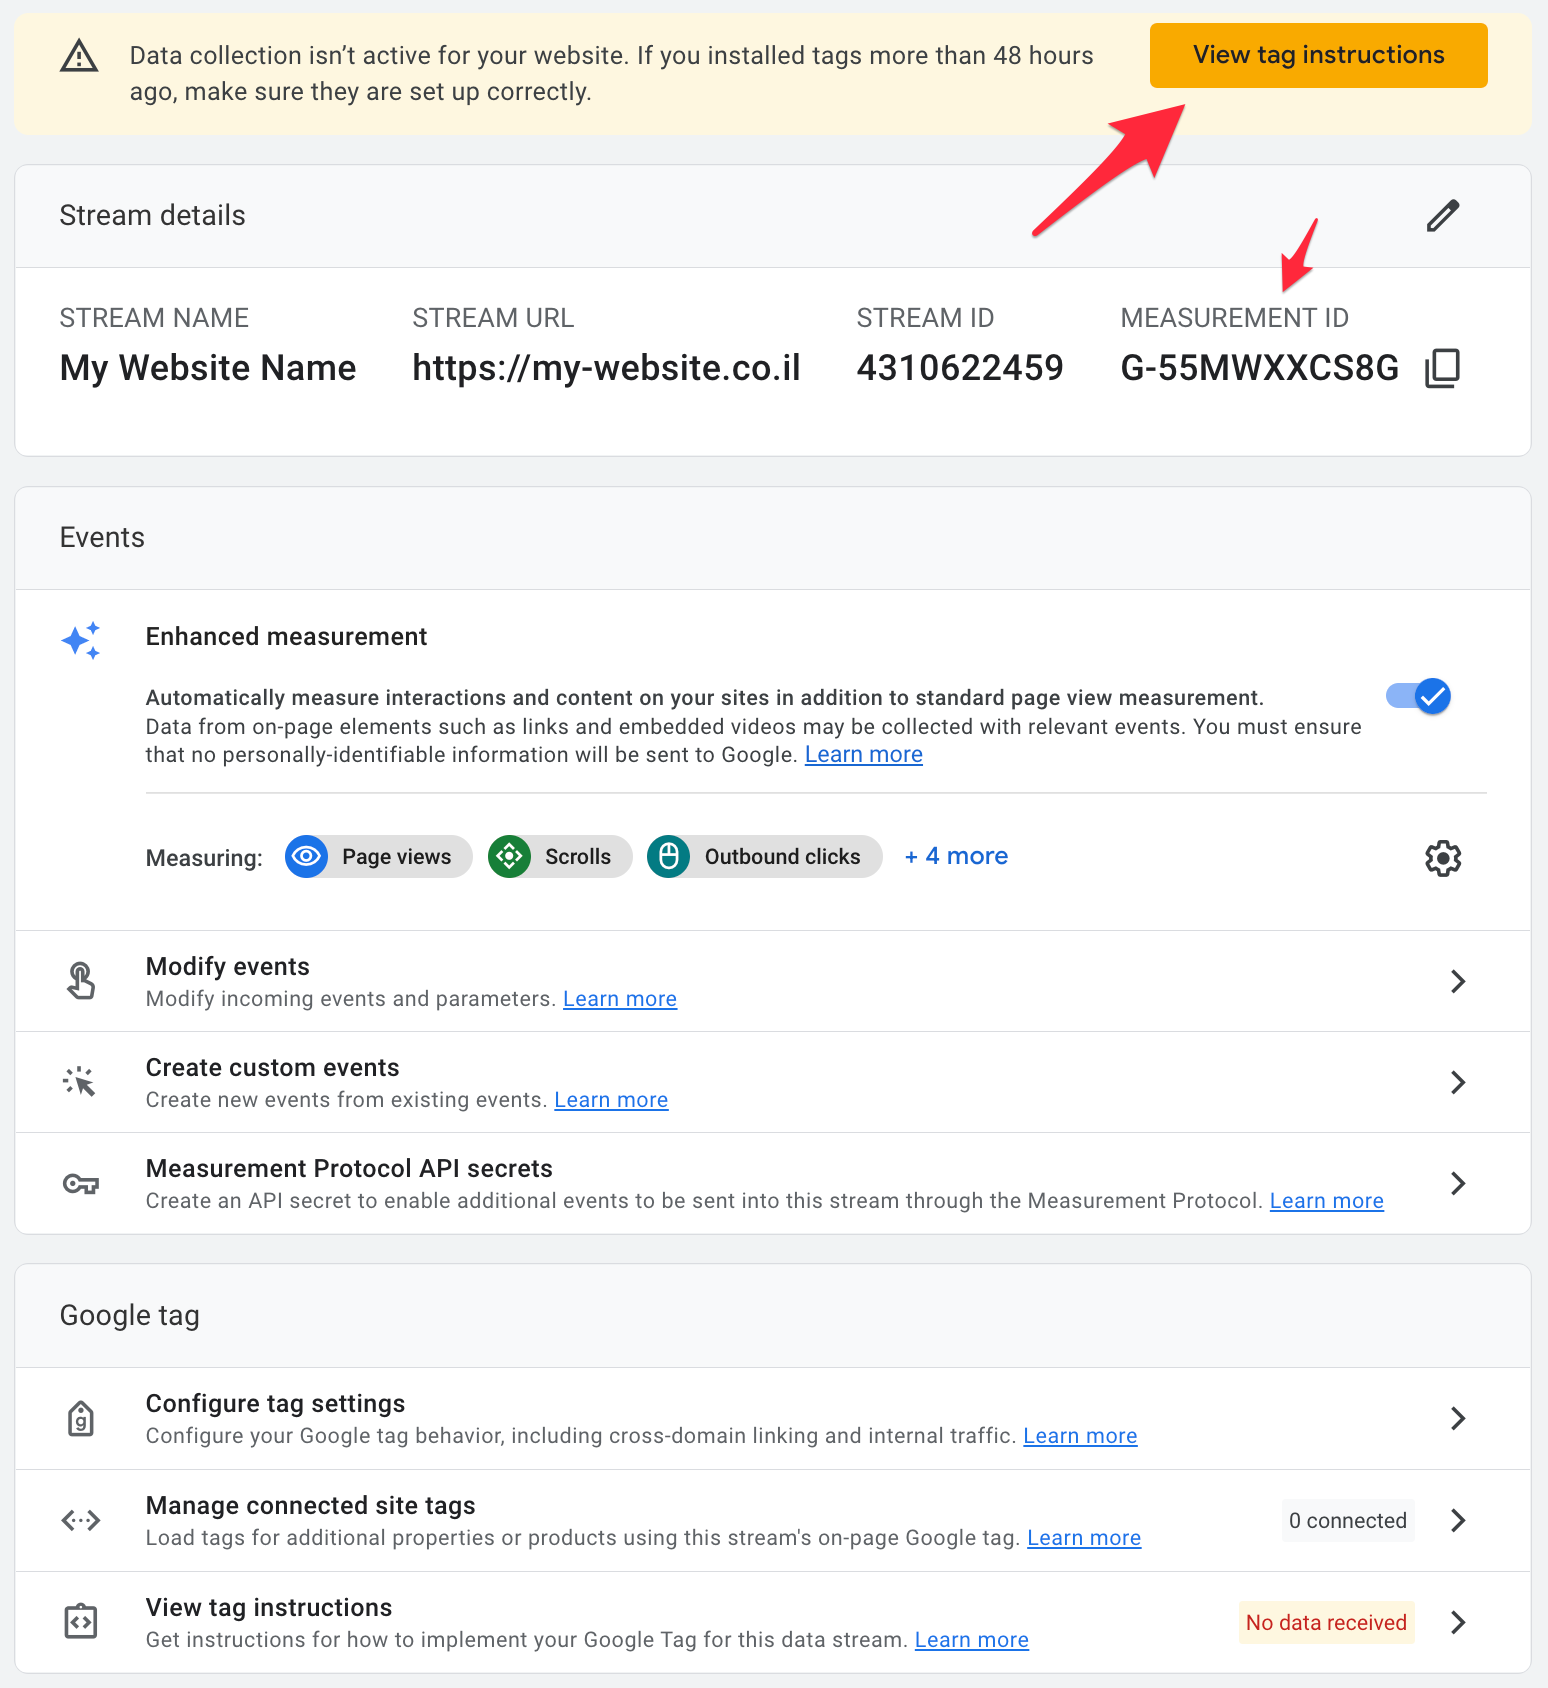
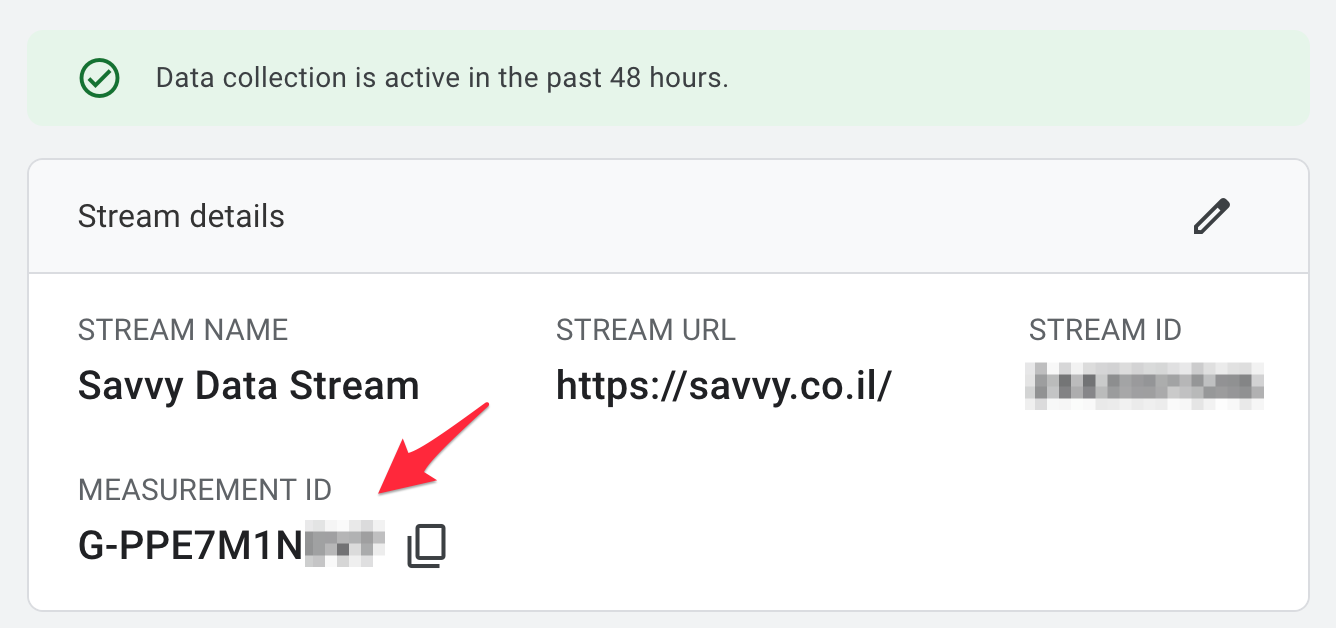
- The next screen will show you information about the new property you created, as well as the MEASUREMENT ID. Now, to get the tracking code, click on the yellow button View Tag Instructions.
%22%20transform%3D%22translate(3.3%203.3)%20scale(6.59375)%22%20fill-opacity%3D%22.5%22%3E%3Cellipse%20fill%3D%22%23cbcd9c%22%20rx%3D%221%22%20ry%3D%221%22%20transform%3D%22matrix(8.88077%2040.39207%20-49.58441%2010.90184%20189.8%203.9)%22%2F%3E%3Cellipse%20fill%3D%22%23c9c9ca%22%20rx%3D%221%22%20ry%3D%221%22%20transform%3D%22matrix(15.96188%2010.17189%20-9.16885%2014.3879%2059%20110.8)%22%2F%3E%3Cellipse%20fill%3D%22%23c9c9ca%22%20rx%3D%221%22%20ry%3D%221%22%20transform%3D%22matrix(-36.04356%205.98184%20-2.76073%20-16.63475%2049.4%20.5)%22%2F%3E%3Cellipse%20fill%3D%22%23e8eb87%22%20cx%3D%22202%22%20cy%3D%225%22%20rx%3D%2244%22%20ry%3D%2216%22%2F%3E%3C%2Fg%3E%3C%2Fsvg%3E)
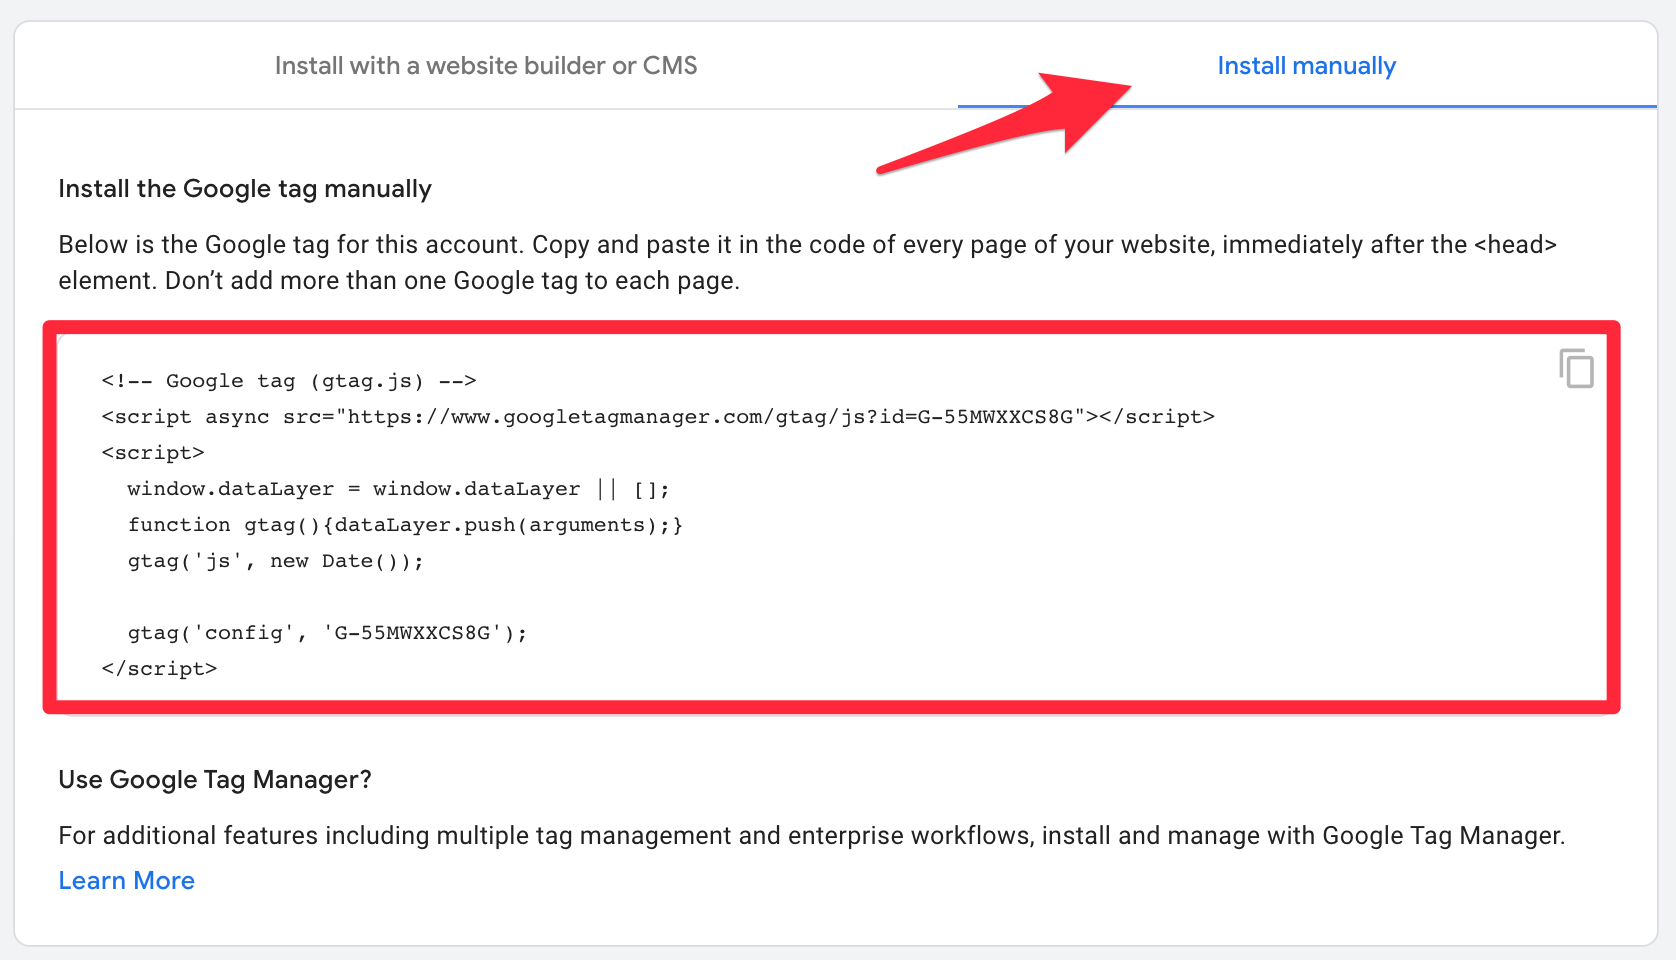
- In the next screen, click on the Install Manually tab to get the tracking code for the Analytics property you created. You will need to embed this code on your website pages (detailed explanation later).
%22%20transform%3D%22translate(3.3%203.3)%20scale(6.54688)%22%20fill-opacity%3D%22.5%22%3E%3Cellipse%20fill%3D%22%23c9c9c9%22%20rx%3D%221%22%20ry%3D%221%22%20transform%3D%22matrix(-22.922%20-35.2203%2051.96657%20-33.82077%2022%2074)%22%2F%3E%3Cellipse%20fill%3D%22%23fff%22%20cx%3D%22182%22%20cy%3D%22133%22%20rx%3D%22125%22%20ry%3D%22125%22%2F%3E%3Cellipse%20fill%3D%22%23ccc%22%20rx%3D%221%22%20ry%3D%221%22%20transform%3D%22matrix(.97529%20-20.42777%2013.87596%20.66248%20160.8%200)%22%2F%3E%3Cellipse%20fill%3D%22%23fff%22%20rx%3D%221%22%20ry%3D%221%22%20transform%3D%22rotate(105.2%2042.7%2051.1)%20scale(19.45696%20251.29598)%22%2F%3E%3C%2Fg%3E%3C%2Fsvg%3E)
You have completed this part! Now, all that’s left is to install the tracking code you received on your WordPress site…
Installing Google Analytics 4 Tracking Code on a WordPress Site
The tracking code you received can be installed on WordPress sites in several ways. Here are some of them:
A. Adding GA4 Tracking Code via functions.php File
One way to add this tracking code to WordPress sites is manually. Connect to the server via FTP, edit your functions.php file in your theme (in the child theme if it exists), and add the following function (without the opening PHP tag on the first line!):
<?php
function add_analytics_ga4_tag() {
    ?>
       /*** Your google tracking code here ***/
    <?php
}
add_action( 'wp_head', 'add_analytics_ga4_tag', 100 );
B. Adding GA4 Tracking Code Using a Plugin
If you don’t feel comfortable doing this with code, there are plugins available that allow you to add GA4 tracking code. One such plugin is a simple one called Insert Header and Footer.
Install and activate the plugin. Then, go to the plugin settings under Settings > Insert Headers and Footers Scripts and add the tracking code you received under Scripts in Header, and you’re done.
C. Adding GA4 Tracking Code Using Google Tag Manager (GTM)
You can also add the tracking code through Google Tag Manager, which is Google’s tag management system. Here’s how to do it:
- Log in to your account on Google Tag Manager.
- Add a new tag and give it a name (e.g., GA4 Analytics).
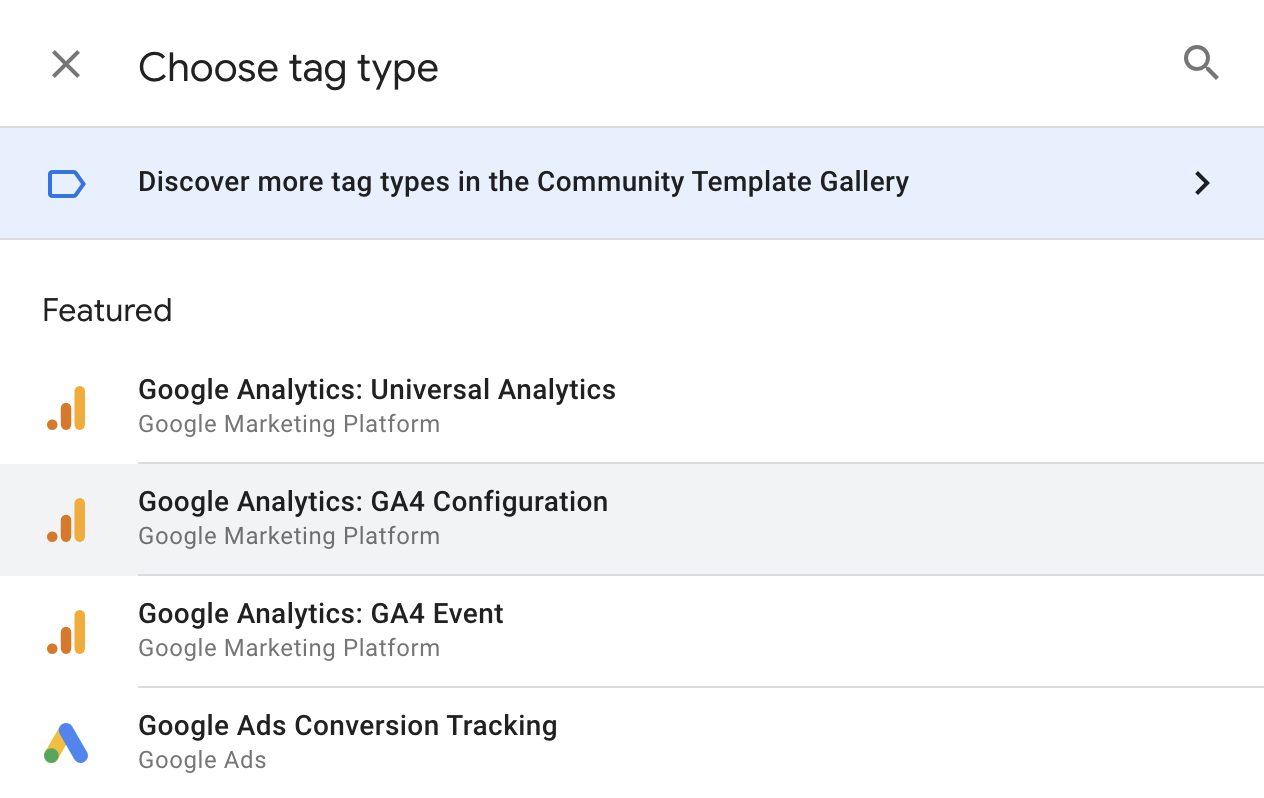
- Under Tag Configuration, choose Google Analytics: GA4 Configuration.
%27%20fill-opacity%3D%27.5%27%3E%3Cellipse%20fill%3D%22%23cbcbcb%22%20fill-opacity%3D%22.5%22%20rx%3D%221%22%20ry%3D%221%22%20transform%3D%22matrix(53.31426%20-326.89538%20193.71697%2031.59383%20285.4%20398.8)%22%2F%3E%3Cellipse%20fill%3D%22%23fff%22%20fill-opacity%3D%22.5%22%20rx%3D%221%22%20ry%3D%221%22%20transform%3D%22matrix(-422.23596%20-39.5926%2096.86651%20-1033.03444%20889%20561.3)%22%2F%3E%3Cellipse%20fill%3D%22%23fff%22%20fill-opacity%3D%22.5%22%20rx%3D%221%22%20ry%3D%221%22%20transform%3D%22matrix(-146.7694%20484.18394%20-93.72149%20-28.40955%202.5%20378.7)%22%2F%3E%3Cpath%20fill%3D%22%23cacaca%22%20fill-opacity%3D%22.5%22%20d%3D%22M312.2%20717.7l2.6%20148.1-79%201.4-2.6-148z%22%2F%3E%3C%2Fg%3E%3C%2Fsvg%3E)
- Under Measurement ID, enter the ID of the new property you created. You can find this ID on the property settings page in the GA4 management interface under Property > Data Streams. Clicking on the Data Stream itself will display the same Measurement ID (among other things) that you need to enter in the tag you created in Tag Manager. Add it and click Save.
%27%20fill-opacity%3D%27.5%27%3E%3Cellipse%20fill%3D%22%23cbcbcb%22%20fill-opacity%3D%22.5%22%20rx%3D%221%22%20ry%3D%221%22%20transform%3D%22rotate(-85.8%20403.2%20157.2)%20scale(222.52221%20184.83541)%22%2F%3E%3Cellipse%20fill%3D%22%23cdcdcd%22%20fill-opacity%3D%22.5%22%20rx%3D%221%22%20ry%3D%221%22%20transform%3D%22matrix(-542.86888%2033.69482%20-6.58336%20-106.06685%20206%2046.8)%22%2F%3E%3Cellipse%20fill%3D%22%23fff%22%20fill-opacity%3D%22.5%22%20rx%3D%221%22%20ry%3D%221%22%20transform%3D%22matrix(563.15252%20-120.49392%2071.32638%20333.35817%20957.3%20337.7)%22%2F%3E%3Cellipse%20fill%3D%22%23fff%22%20fill-opacity%3D%22.5%22%20rx%3D%221%22%20ry%3D%221%22%20transform%3D%22matrix(-.5751%20-140.22512%20316.00429%20-1.296%20505.6%20242.7)%22%2F%3E%3C%2Fg%3E%3C%2Fsvg%3E)
- Now, Tag Manager will ask you if you want to create a Trigger, indicating when to load that GA4 tag you just created. We want to load it on all pages (in most cases), so create a new Trigger, choose All Pages, and click Save.
- You have completed this part; don’t forget to publish the changes in Tag Manager by clicking the blue Submit button on the main screen.
D. Adding GA4 Tracking Code Using the WordPress Admin Interface
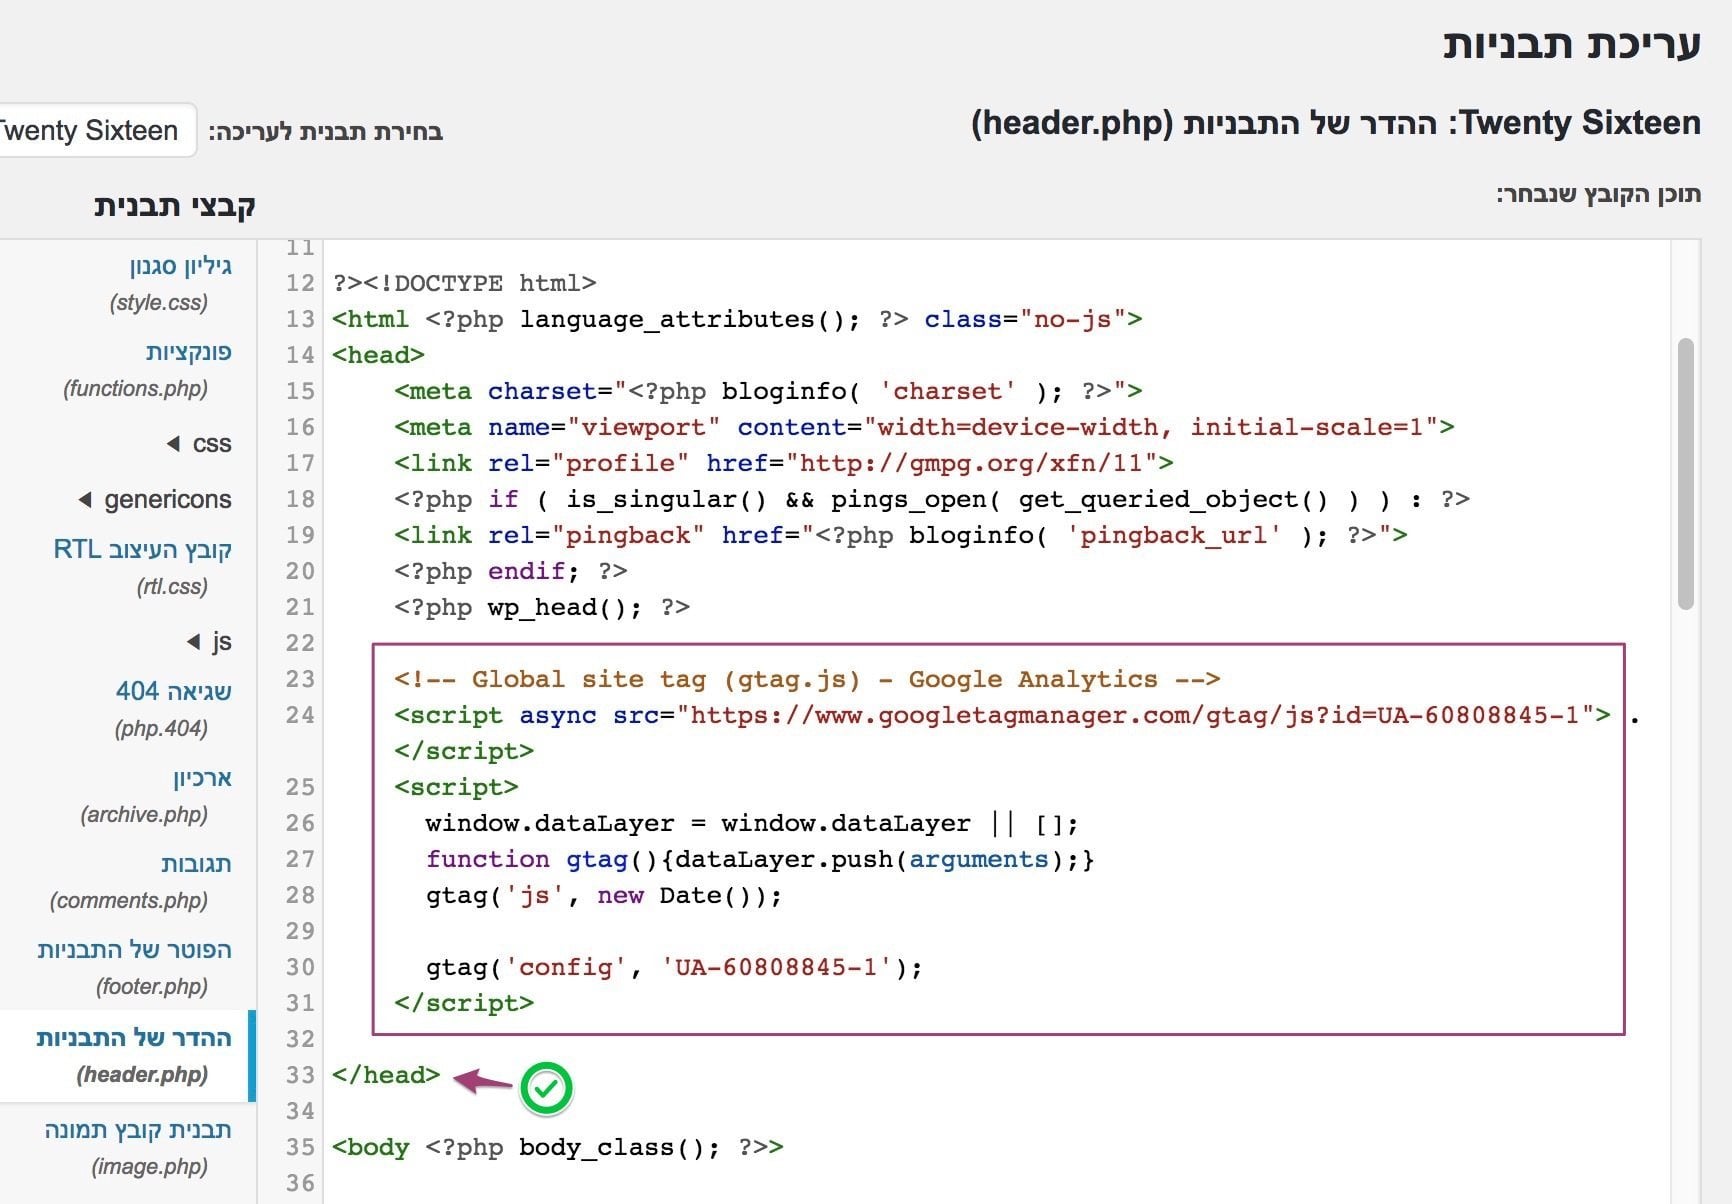
There is also the option to copy the tracking code through the WordPress admin interface. Go to Admin > Appearance > Editor, edit the header.php file, and add the code as shown below:
Hereby, the process has concluded. If you now go to Google Analytics, you’ll be able to see the data for which you worked so hard in the Google Analytics interface.
Adding Analytics 4 to a Site Already Using Old Google Analytics
If you’ve reached this part, it’s likely that your site already has the Universal Analytics tracking code, and you want to install the Google Analytics 4 tracking code in addition.
It’s important to note that adding a new Google Analytics 4 property will not affect data collected by UA in any way. Data will be collected in parallel, and there will be no changes in the data received in UA in any way. Additionally, after adding a GA4 property, you can access both properties at any time – the UA property and the GA4 property.
I’ll add and mention that at the current stage, data is no longer received in Analytics from the old version. Furthermore, adding a GA4 property will not transfer data from the old Universal Analytics property but will only collect future data. If you want to view historical data, use UA reports.
Here are the steps you need to take to install GA4 on a site where UA already exists:
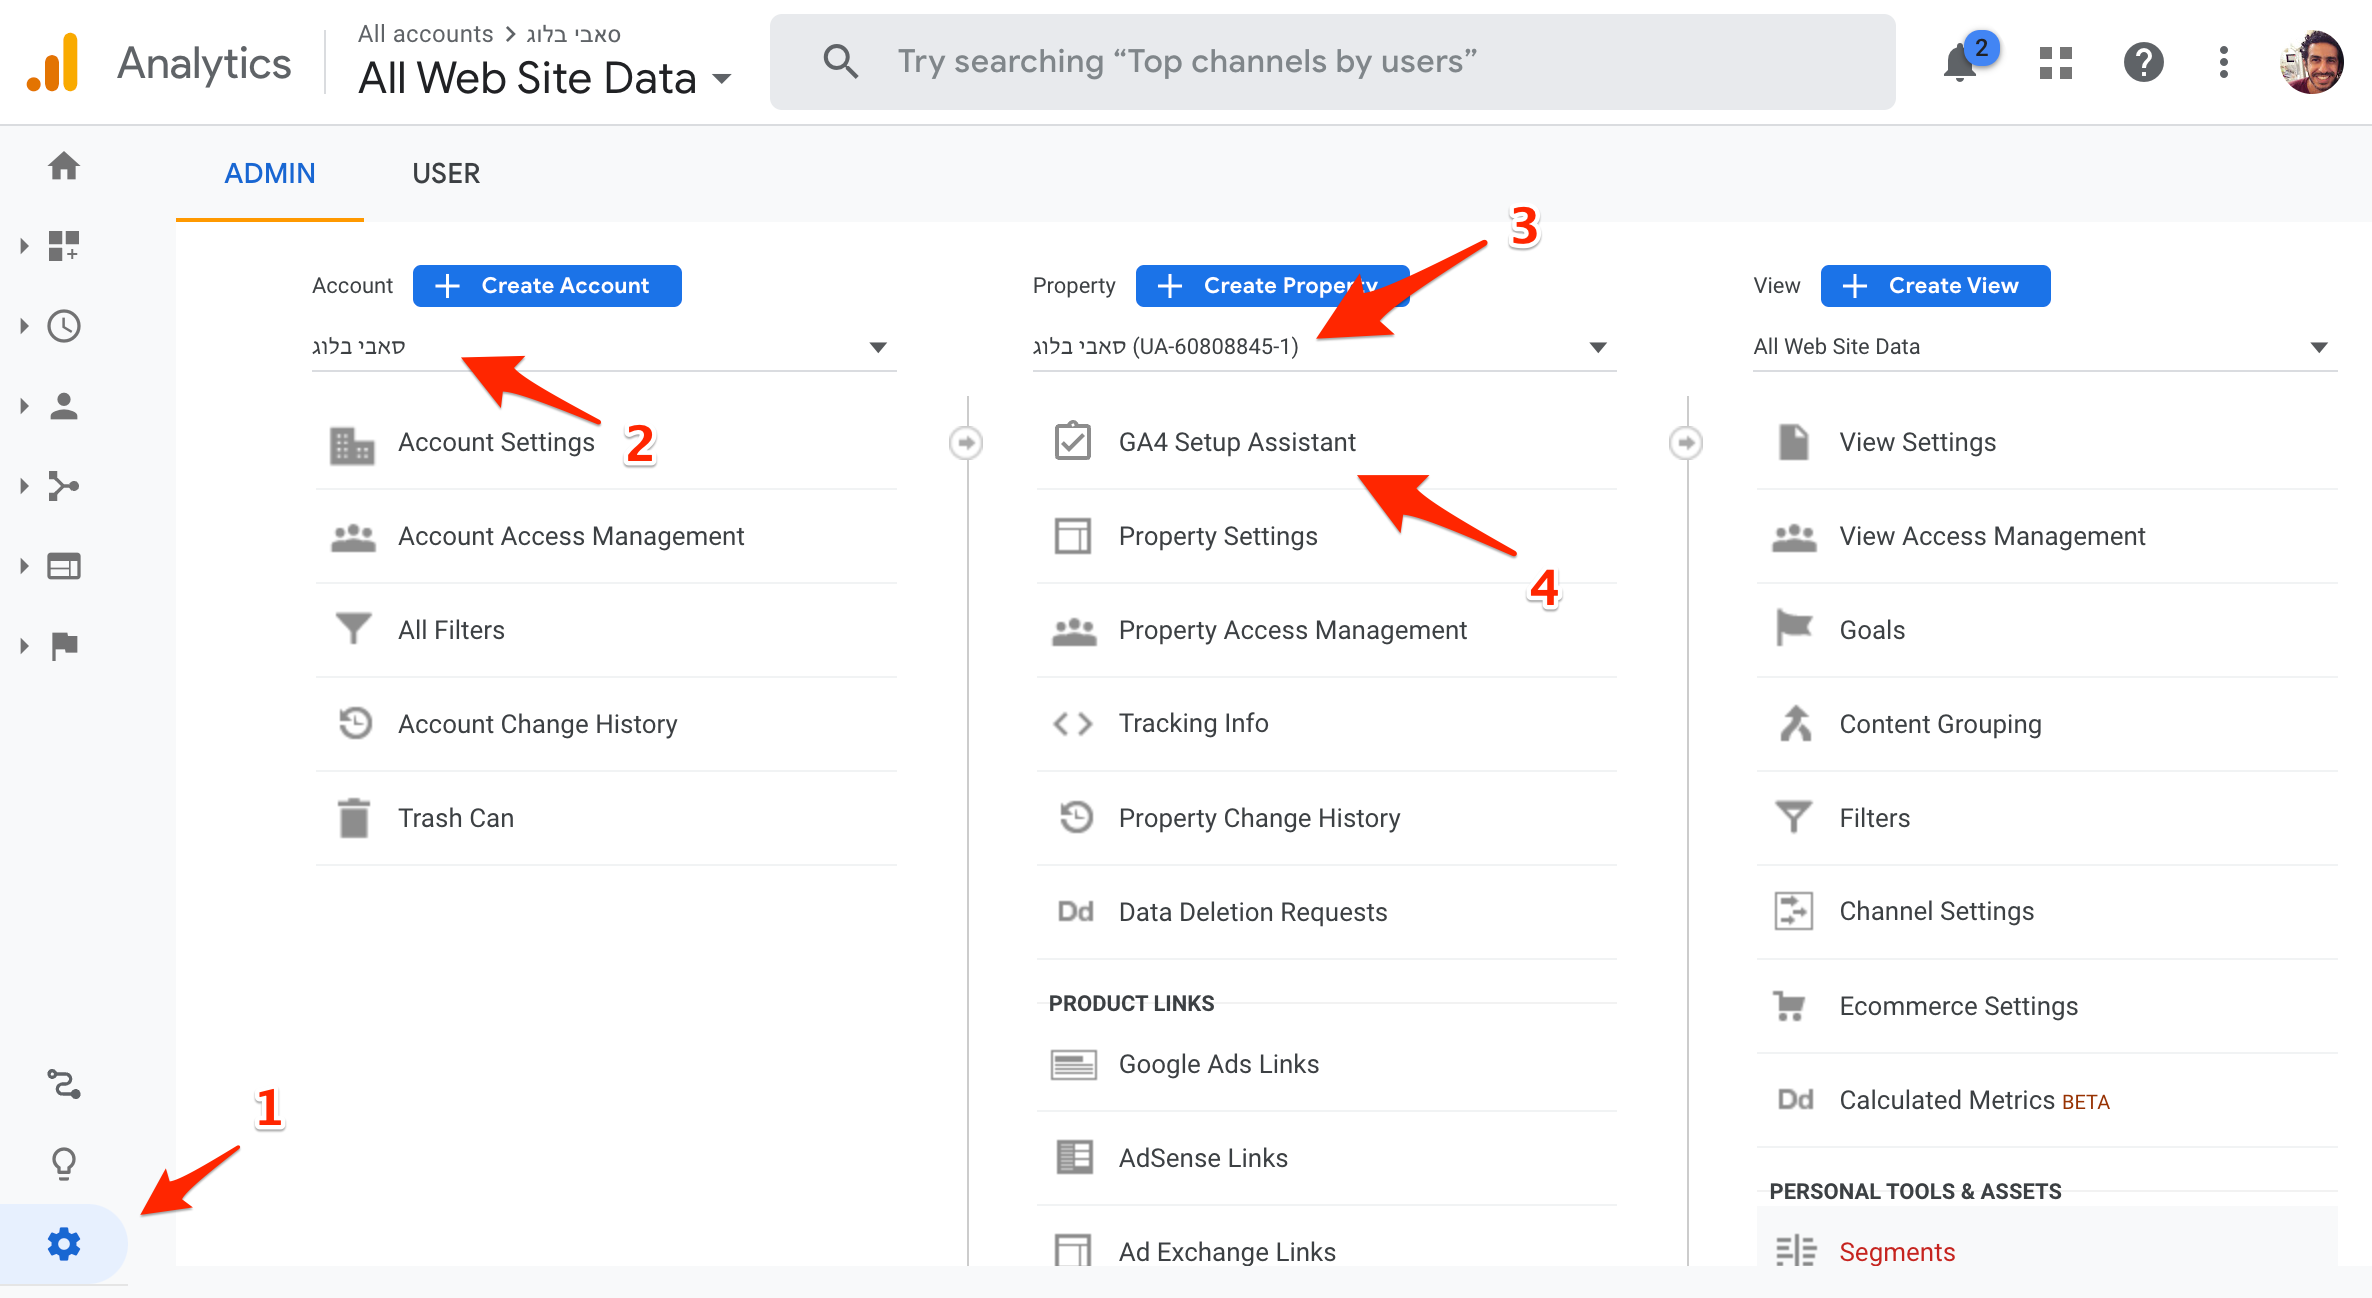
- Click on the Google Analytics admin interface on Admin.
- Under the Account column, make sure you are in the desired account.
- In the Property column, select the Universal Analytics property – the property that currently collects data on the site.
- In the same column, click on the first option GA4 Setup Assistant.

- Click on Get Started.
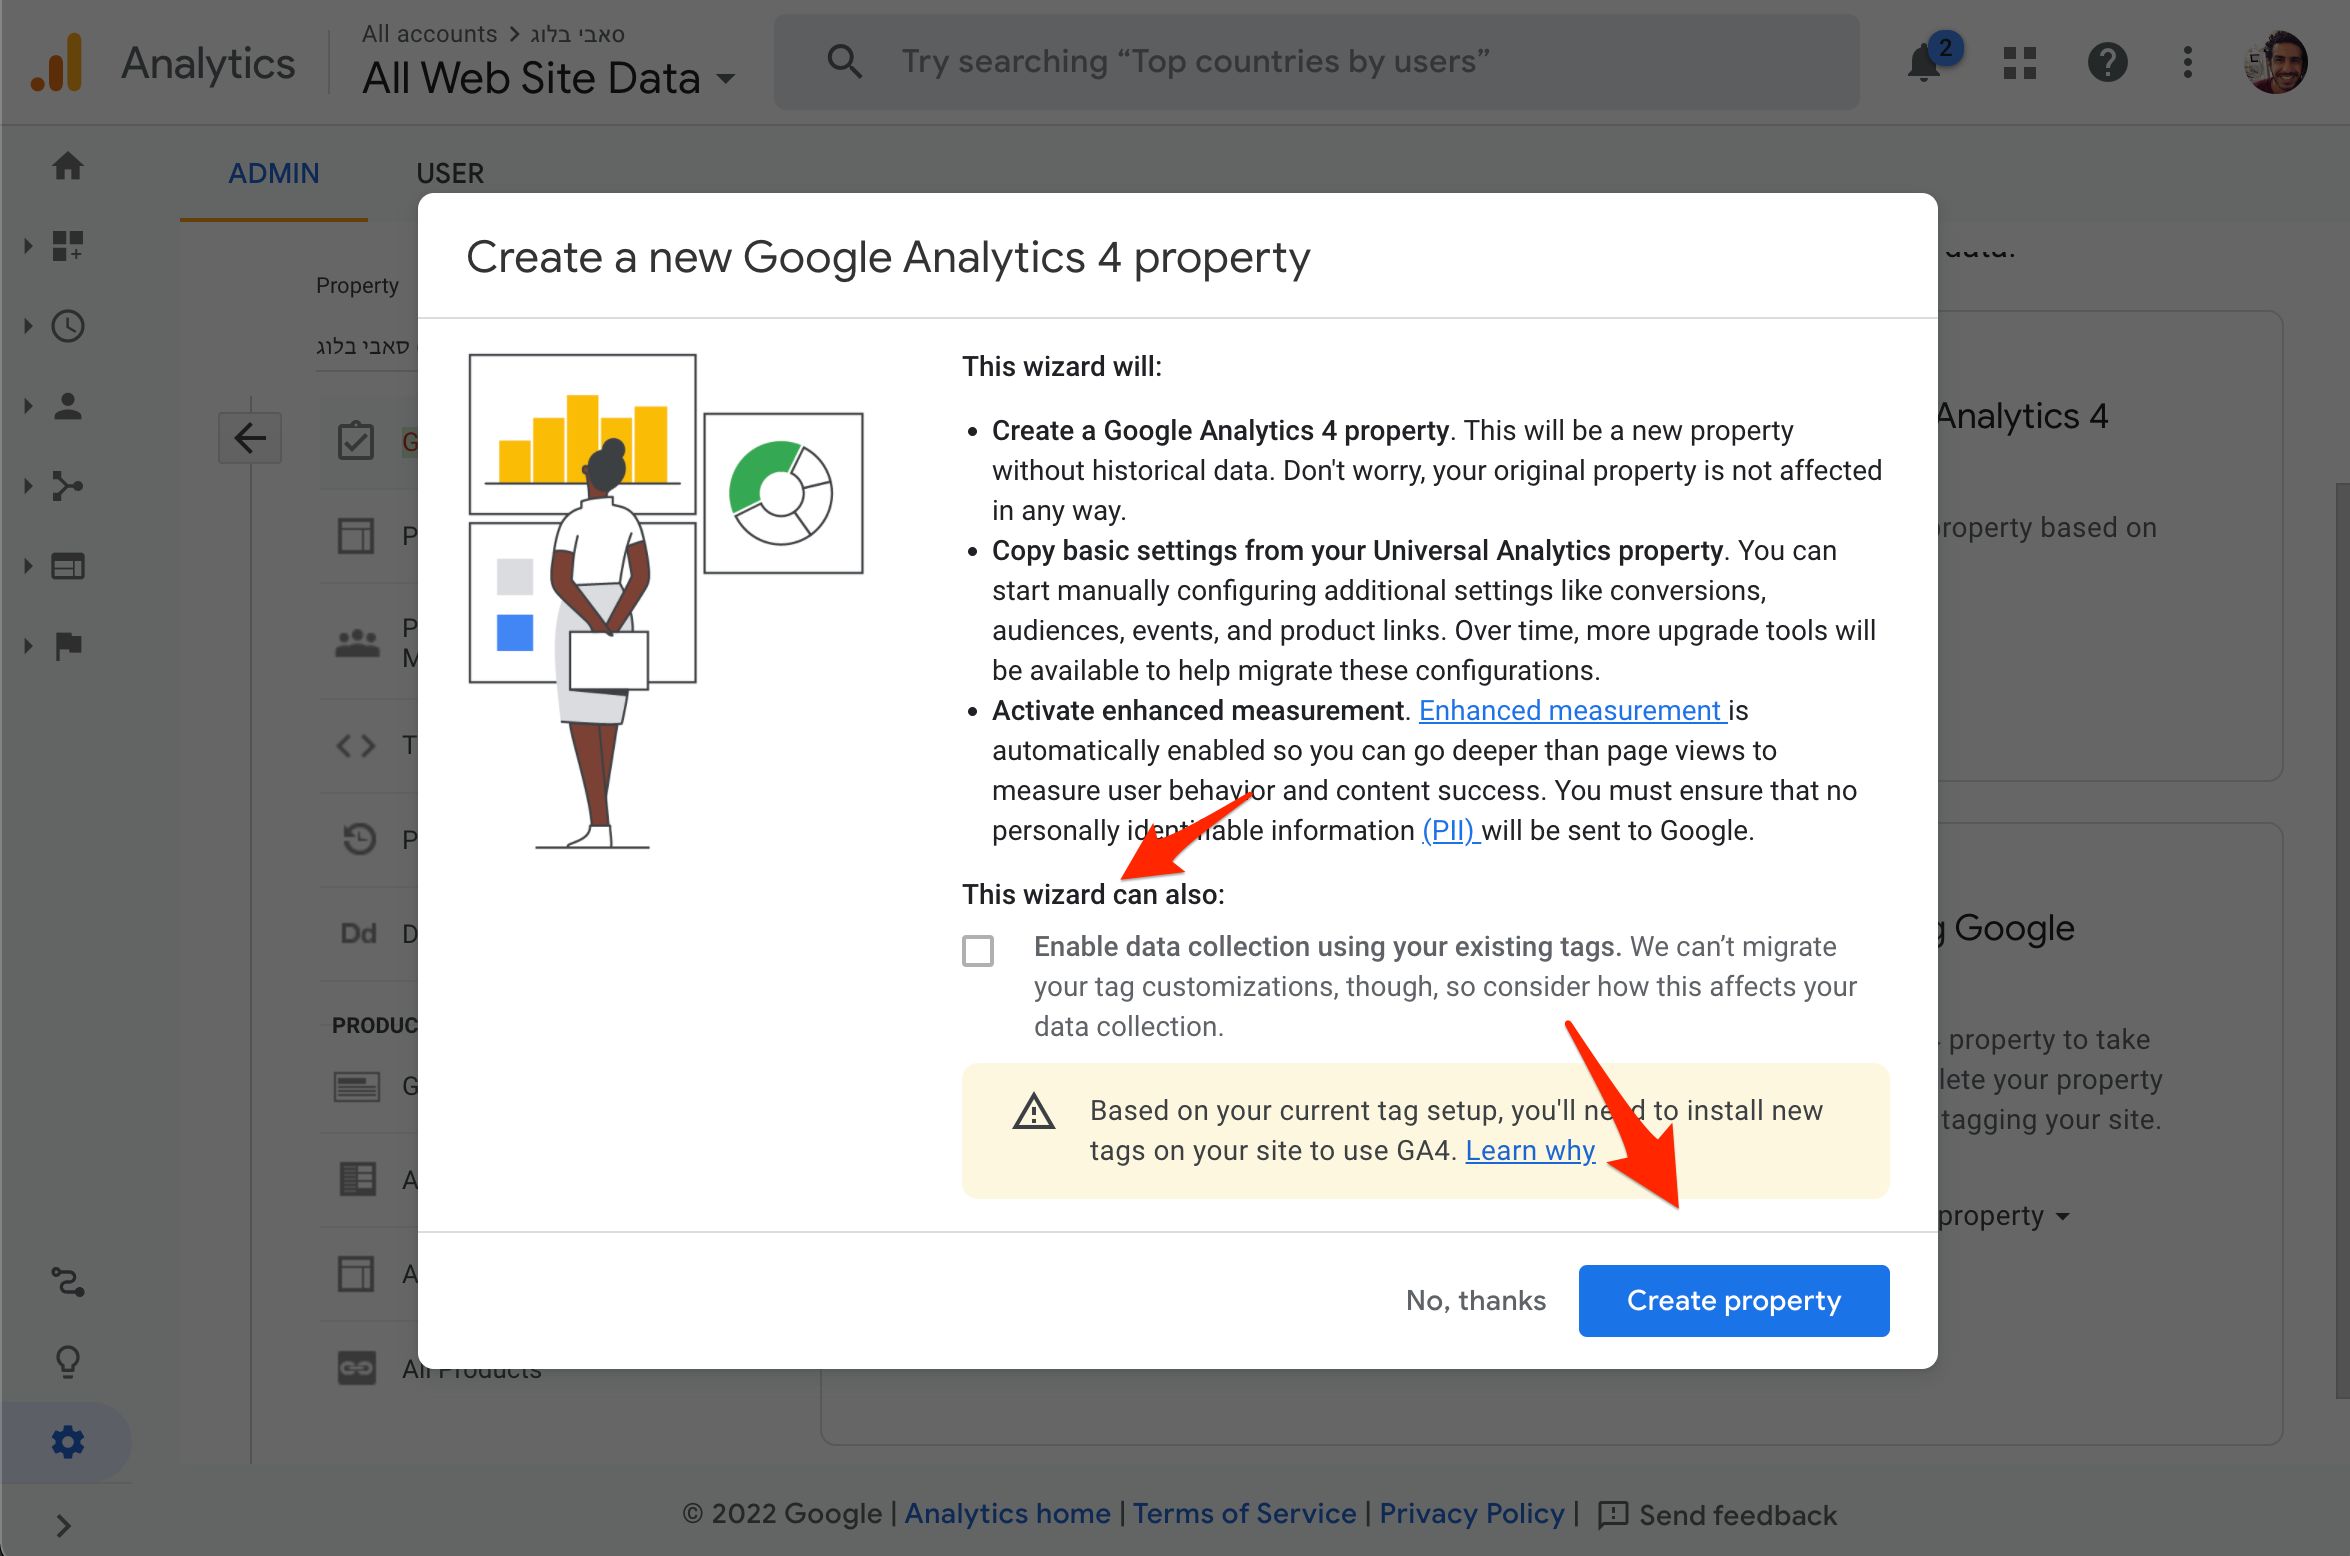
- In the window that appears, click on Create Property. Please note, if you see the option to mark “Enable data collection using existing tags” (and it is marked), when you complete the steps, you can theoretically already see the data in the new GA4 property you created, and you don’t have to add the new Analytics 4 tracking code. But if this option is not marked, you will need to add the tracking code yourself as described in the previous section.

- At this stage, you will receive a message that you have successfully connected the UA property to the new GA4 property. Clicking on See your GA4 property will take you to the GA4 property and its reports.
Please note – creating a Google Analytics 4 property in this way will copy the property name, website address, region and time settings, and even the currency settings from the existing Universal Analytics property.
This concludes it… And to celebrate this – here’s a video (in English) explaining and going over the new interface of Google Analytics 4.
I also mention that I’m aware this topic can be a bit confusing, so questions in the post comments are welcome. Either way, I constantly improve the writing and readability of the post so that the information is easier to understand 🙂
Appendix A – Why should I add a new Google Analytics 4 tracking code to a site with the old Analytics version?
If the Universal Analytics property belonging to the site uses gtag.js, the GA4 setup tool will allow you to reuse the existing tag (i.e., the tracking tag of the Universal Analytics property).
In this situation, you don’t need to add a new tracking tag to your website pages; you just need to ensure that both properties are linked. In this case, you can already see data being received in the new Analytics 4 property without the need for additional action on your part.
However, it’s possible that you may need to wait up to 30 seconds to see the data…
On the contrary, if the existing Universal Analytics property uses analytics.js, the GA4 setup tool will not allow you to reuse the existing tag and connect between the old and new properties. In this situation, you need to add the new tracking tag to all your website pages.
Appendix B – How to Find the Google Analytics 4 Tracking Code
Let’s see how to find and add the new GA4 tracking tag. I remind you that adding this tracking tag will not affect existing data received in the UA property if it exists; it will simply lead to receiving data in both properties simultaneously.
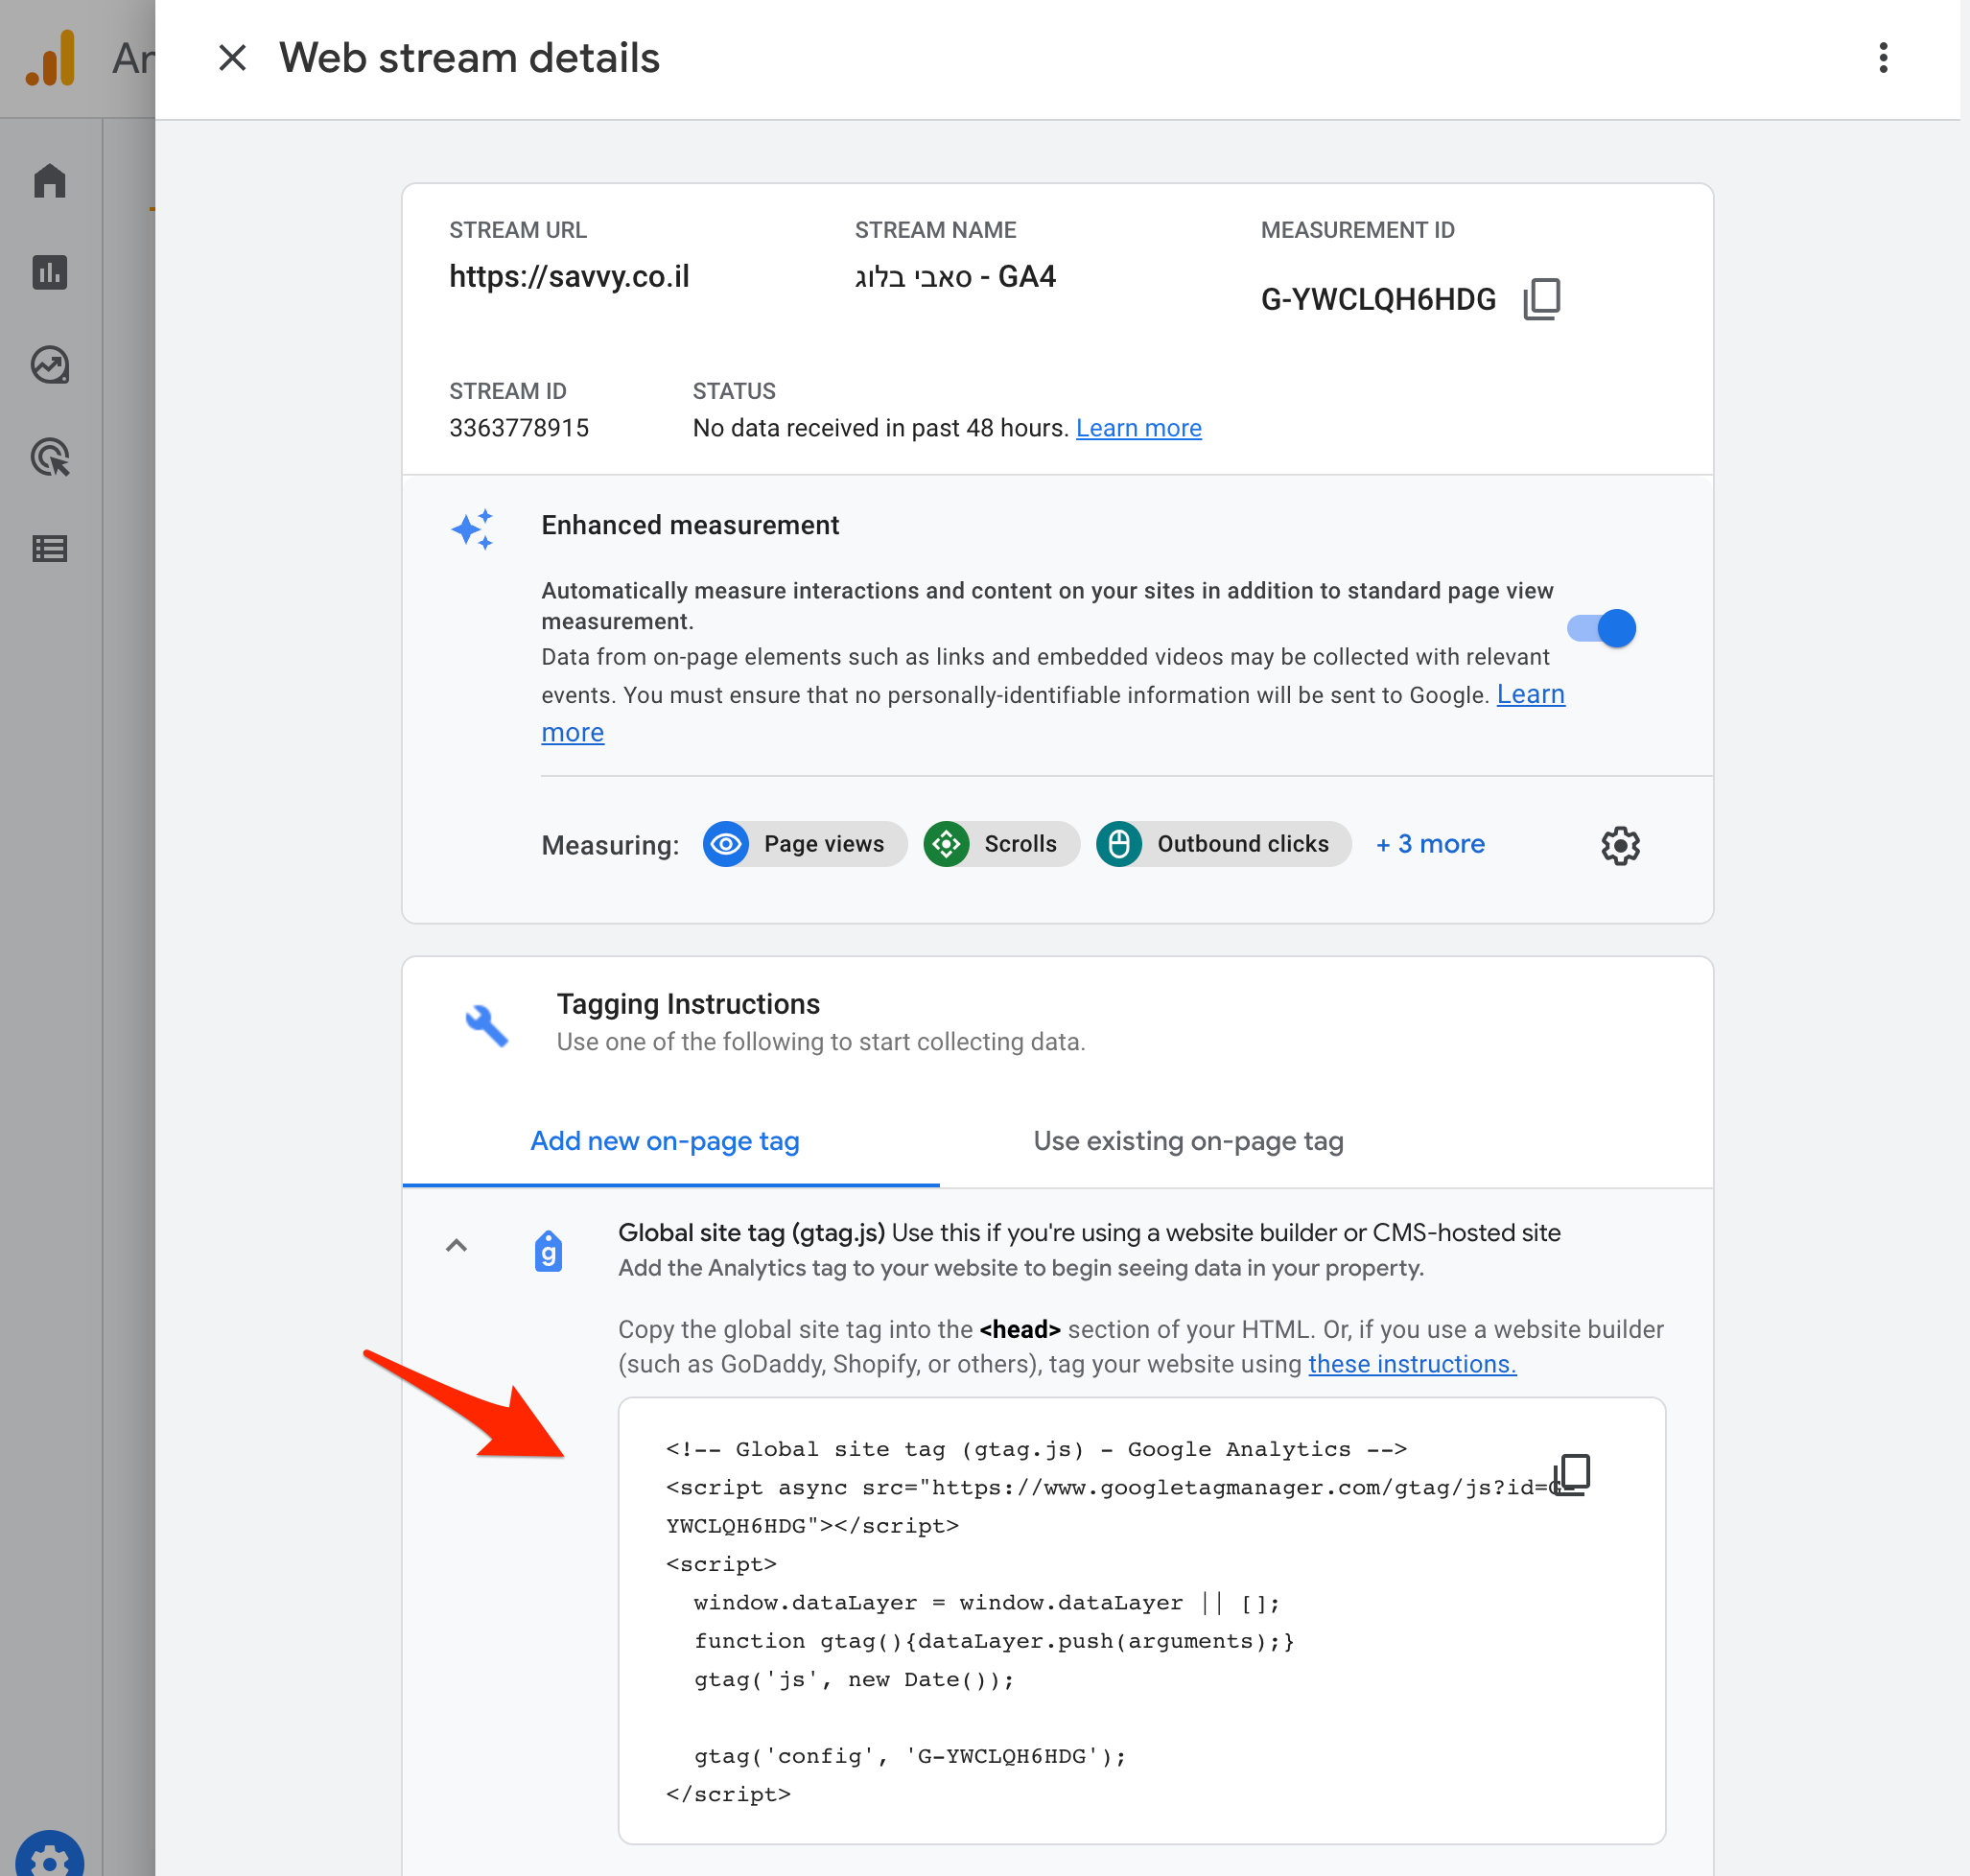
Let’s start: In the settings of the property you created for GA4 under Data Streams under the Property column, as shown in the following image:
If you don’t see the Data Streams option, you are likely currently in the settings of the Universal Analytics property and not the new GA4 property you created.
Now, under the Tagging Instructions option, click on Add new on-page tag and then on Global site tag (gtag.js). The code you need to add to the <head> of the website will appear before you.
Up to here. If you’re interested in the topic, take a look at the post I wrote about tracking conversions in Google Analytics 4.


