Accurate stock management prevents overselling and stockouts. In WooCommerce, built-in inventory tools let you track quantities, set low-stock alerts, and control backorders at the global and per-product level.
This guide walks through the full WooCommerce inventory setup – from global settings and per-product stock, to variable product variations and automated notifications.
Global Inventory Settings
Start by configuring the global inventory settings. These control default stock behavior across your entire store.
If you’re just starting with WooCommerce, check out our guide on setting up a virtual store in WordPress & WooCommerce to build a solid foundation for your e-commerce operations.
Configuring Stock Settings
To enable and configure stock management in WooCommerce:
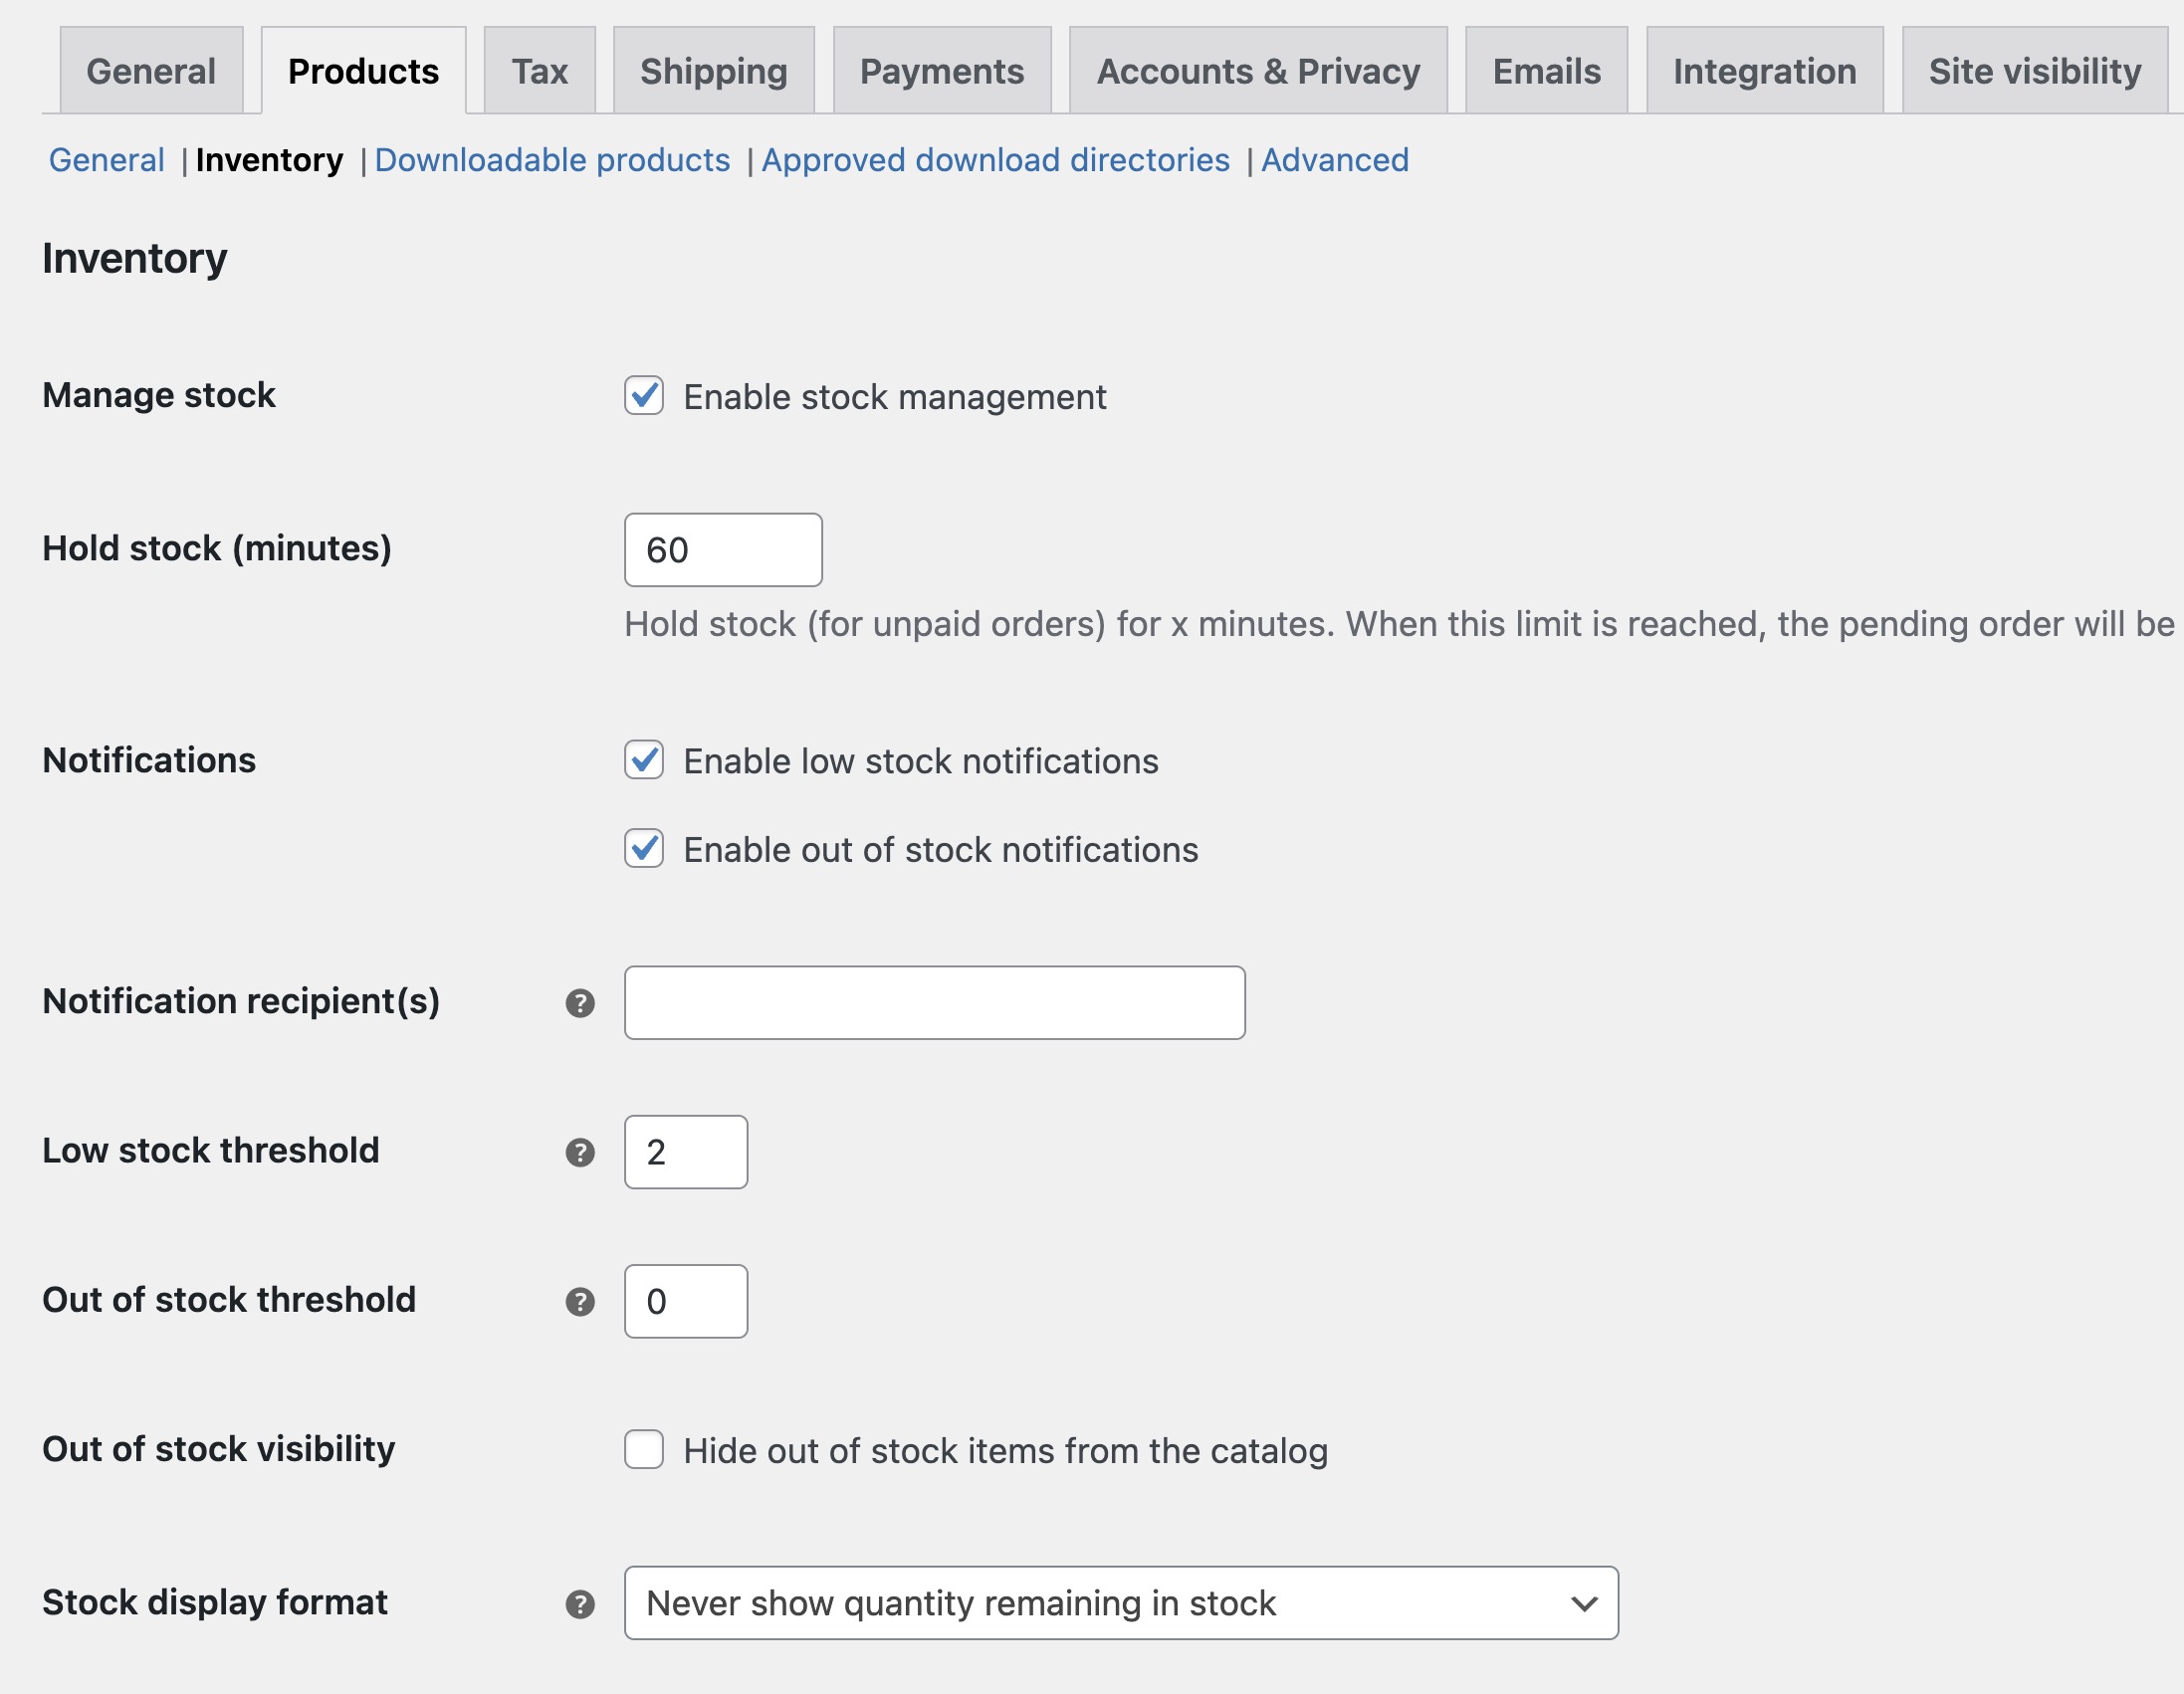
- Navigate to WooCommerce > Settings > Products > Inventory.
- Enable the Manage stock option to activate inventory tracking for your products.
- Customize settings, such as Stock Display Format, Low Stock Threshold, and Out of Stock Visibility.
- Click Save changes to apply your settings.
Inventory Settings Overview
Each option in the inventory settings section is crucial for fine-tuning how stock is managed in WooCommerce:
- Manage stock: Enables WooCommerce to track and reduce stock levels automatically with each order.
- Hold Stock (minutes): Sets how long to hold items in unpaid orders. After this time, items return to inventory. Enter “0” to disable.
- Notifications: Enables email alerts for low or out-of-stock items to keep inventory updated.
- Notification Recipient(s): Specify the email(s) to receive stock notifications, separated by commas.
- Low Stock Threshold: Sets the stock level for triggering low stock alerts, customizable per product.
- Out of Stock Threshold: Sets the level at which products are marked “out of stock” and unavailable, customizable per product.
- Out of Stock Visibility: Hides out-of-stock products from your catalog when enabled.
- Stock Display Format: Controls how stock appears on product pages:
- Always show stock: Displays the available quantity.
- Only show stock when low: Shows quantity only at low stock threshold.
- Never show stock amount: Hides stock quantity entirely.
Per-Product Stock Management
Each simple product can have its own stock quantity, backorder preference, and low-stock threshold. Here is how to configure stock for individual products:
- Go to Products > All Products and select the product you want to manage.
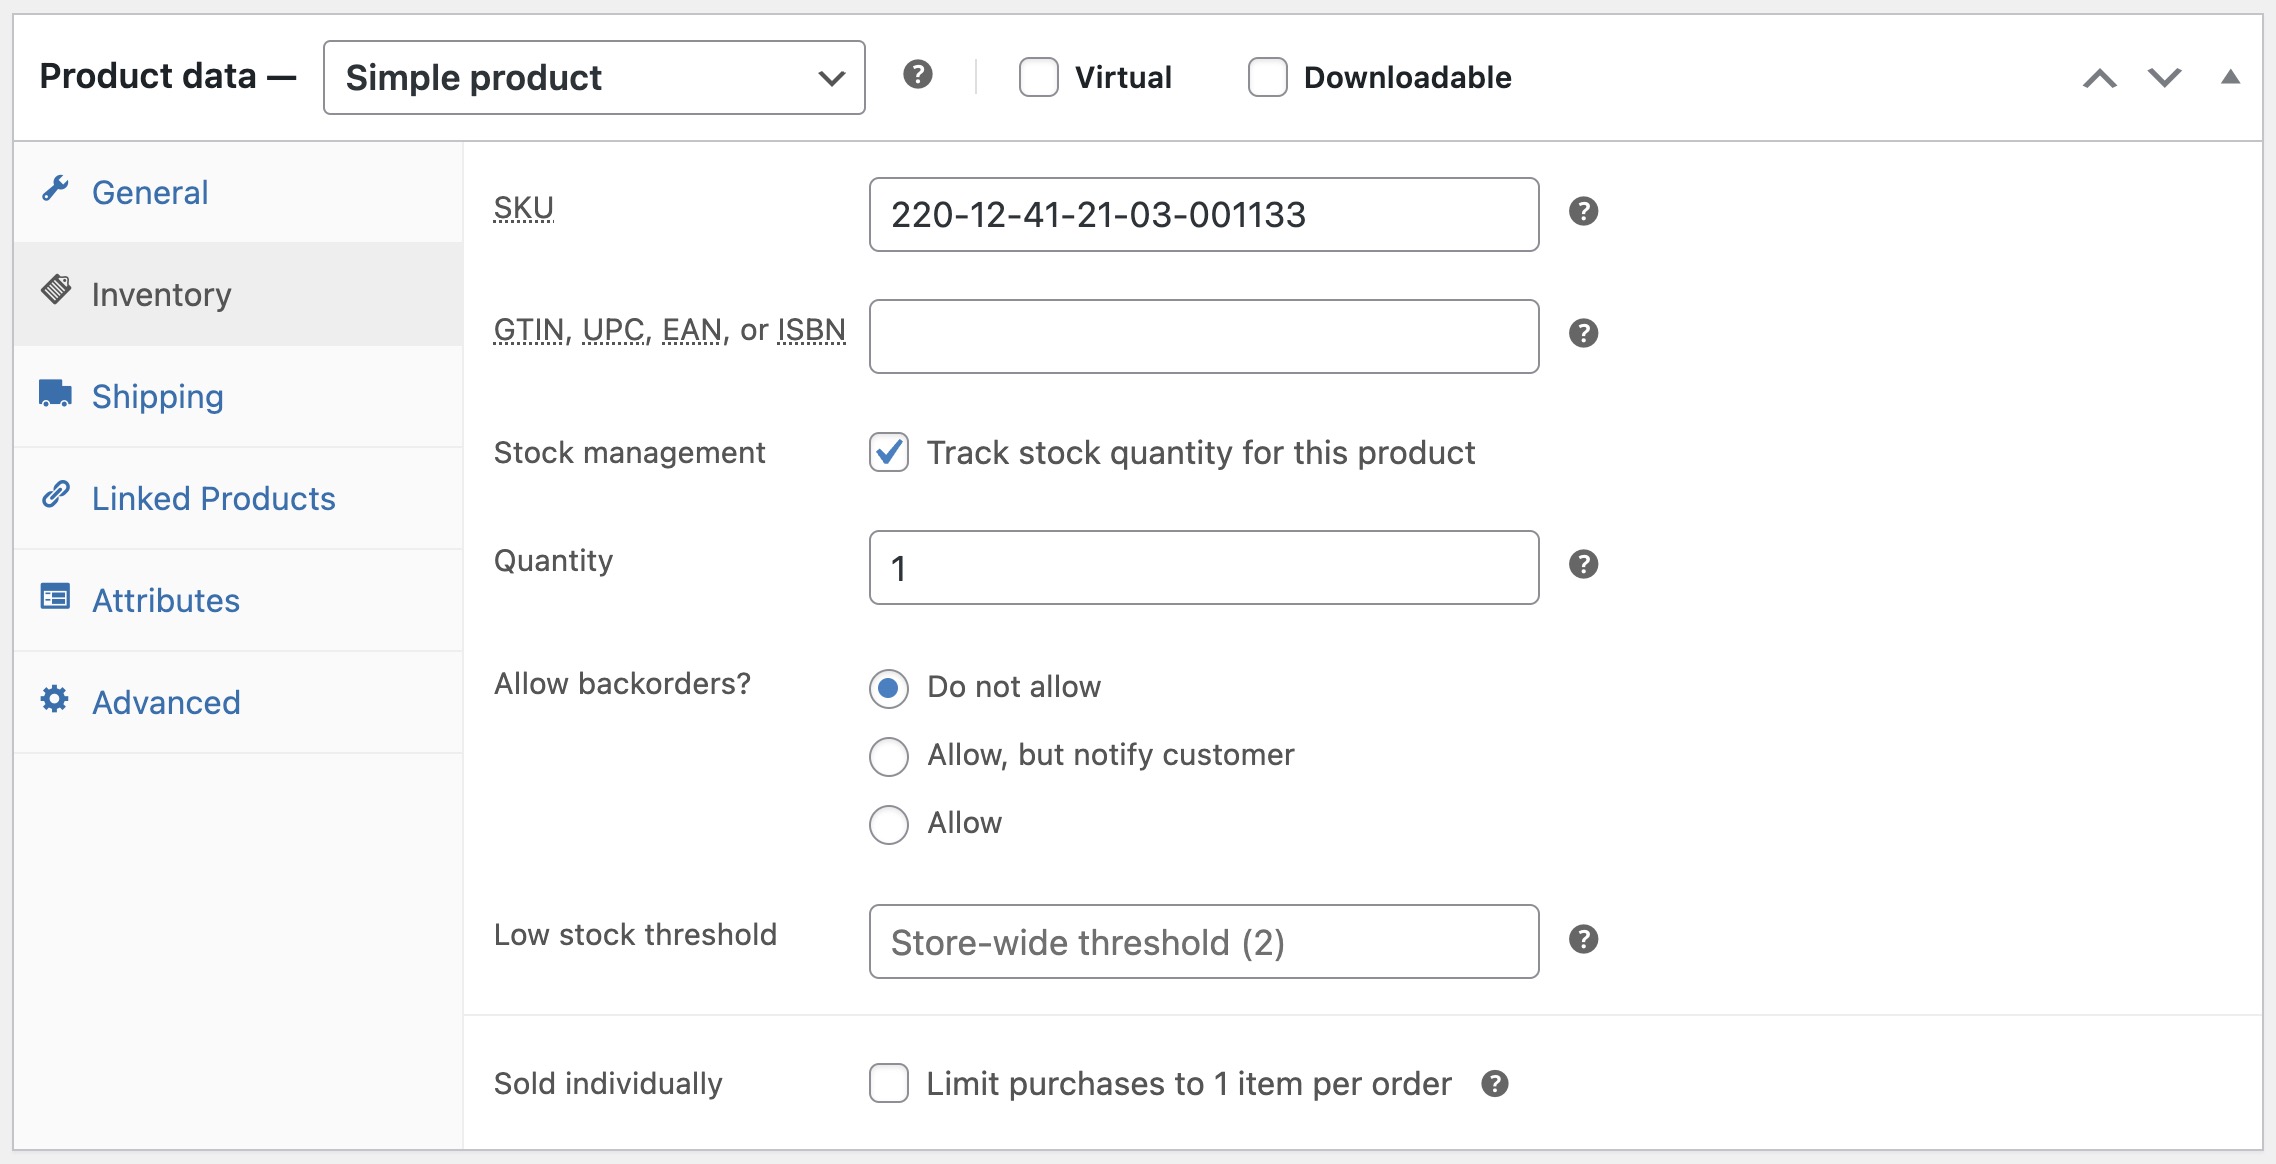
- In the Product Data section, navigate to the Inventory tab.
- Check the Stock management option and enter the stock quantity.
- Set the Allow backorders? option if needed, allowing or restricting orders on out-of-stock items.
- Click Update to save your changes.
You can also update stock quantities for multiple products at once:
- Select multiple products from the products main screen.
- Choose Edit from the Bulk actions dropdown and click Apply.
- Adjust the stock quantities as needed and click Update to apply changes.
If products are unavailable, you can follow best practices for handling unavailable products in terms of SEO to maintain search engine visibility and improve user experience on your site.
Managing Stock for Variable Products
Variable products, which offer different options (e.g., sizes or colors), require specific stock management to track availability for each variation. WooCommerce allows you to set stock levels individually for each variation within a variable product.
- Go to Products > All Products and edit the variable product.
- (Skip steps 2-4 if there are already existing variations for the product). In the Attributes tab, if not already done – add your attributes and check the Used for variations option. Click Save attributes.
- Navigate to the Variations tab.
- Click Add variation to create variations for each attribute combination.
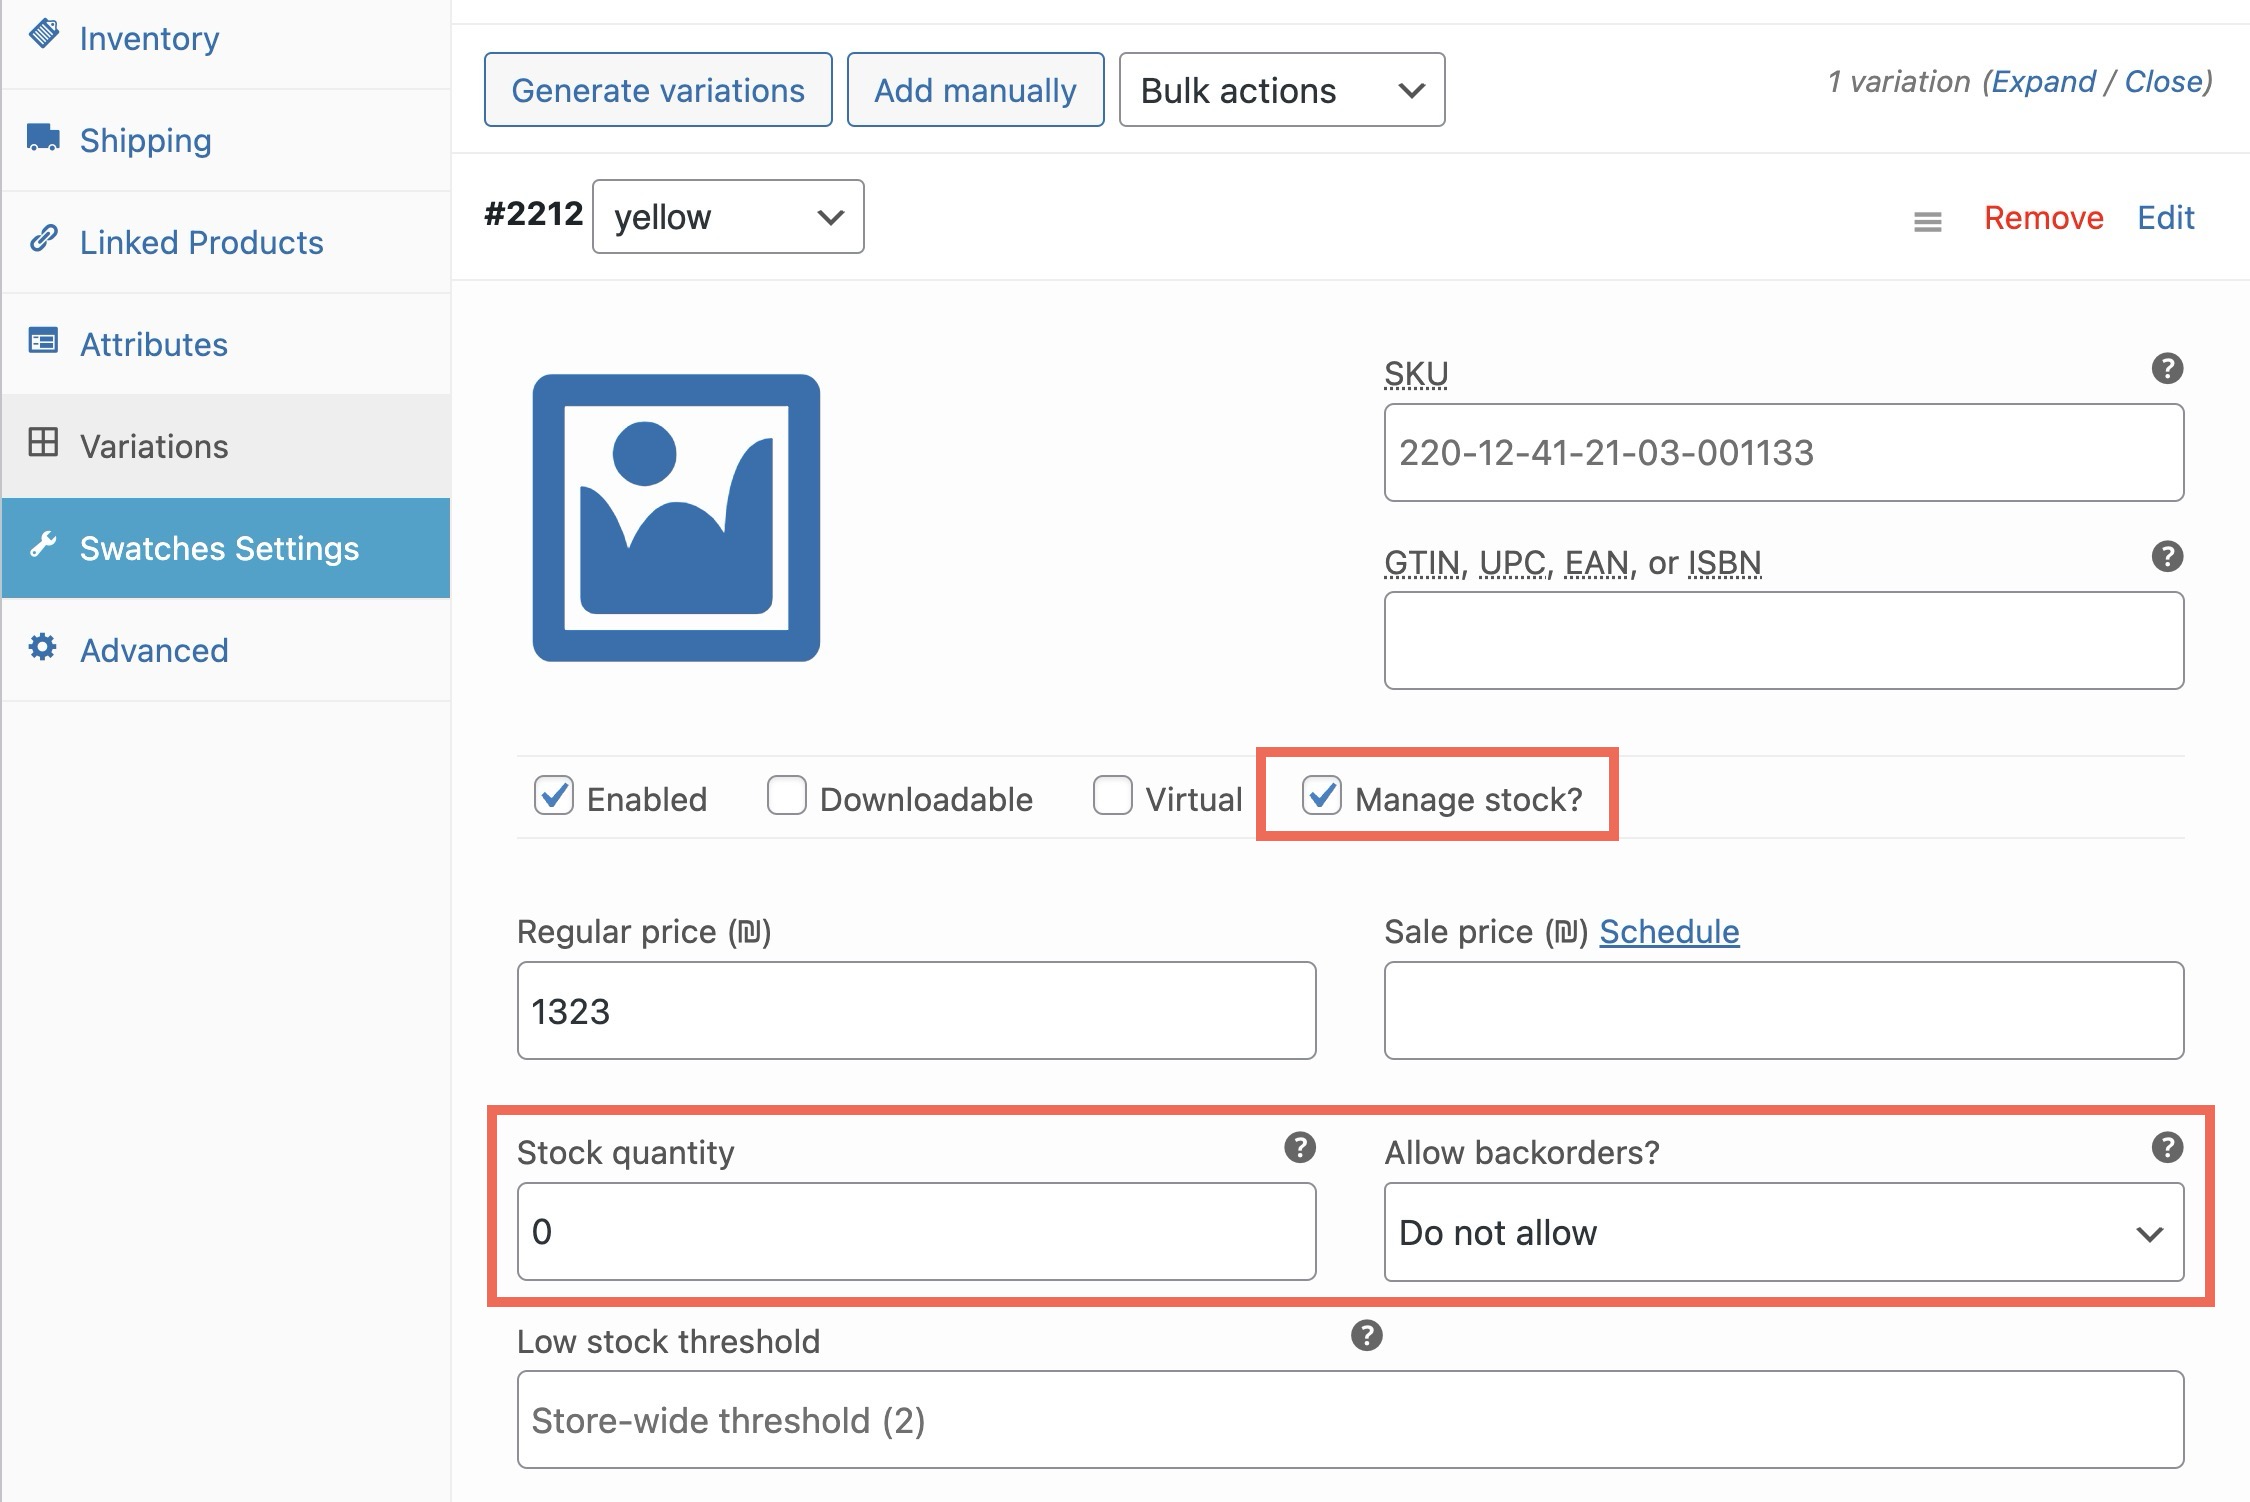
- Expand each variation, check the Manage stock? option, and enter the stock quantity.
- Set the Allow backorders? option as needed.
- Click Save changes to apply your settings.
Stock Quantity: For variable products this applies to all variations unless you specify stock levels for each variation individually.
Stock Notifications and Alerts
Automating stock notifications helps you stay informed about low or out-of-stock items, preventing missed sales and ensuring you’re always prepared to restock as needed.
Stock/Out of Stock Notifications
To set up notifications for low or out-of-stock items:
- Go to WooCommerce > Settings > Products > Inventory.
- Configure the Low stock threshold and Out of stock threshold to receive alerts when stock reaches critical levels.
- Enter the notification recipient(s) in the Notification recipient(s) field.
- Enable the Low stock notifications and Out of stock notifications options.
- Click Save changes to apply your settings.

Stock Reports and Analytics
WooCommerce’s reporting and analytics tools provide valuable insights into inventory performance, allowing you to make informed decisions about stock levels and optimize inventory management. The new analytics dashboard offers detailed stock reports to help you track inventory health and prevent stock issues.
Stock Reports
To access stock reports in WooCommerce:
- Go to WooCommerce > Analytics in your WordPress dashboard.
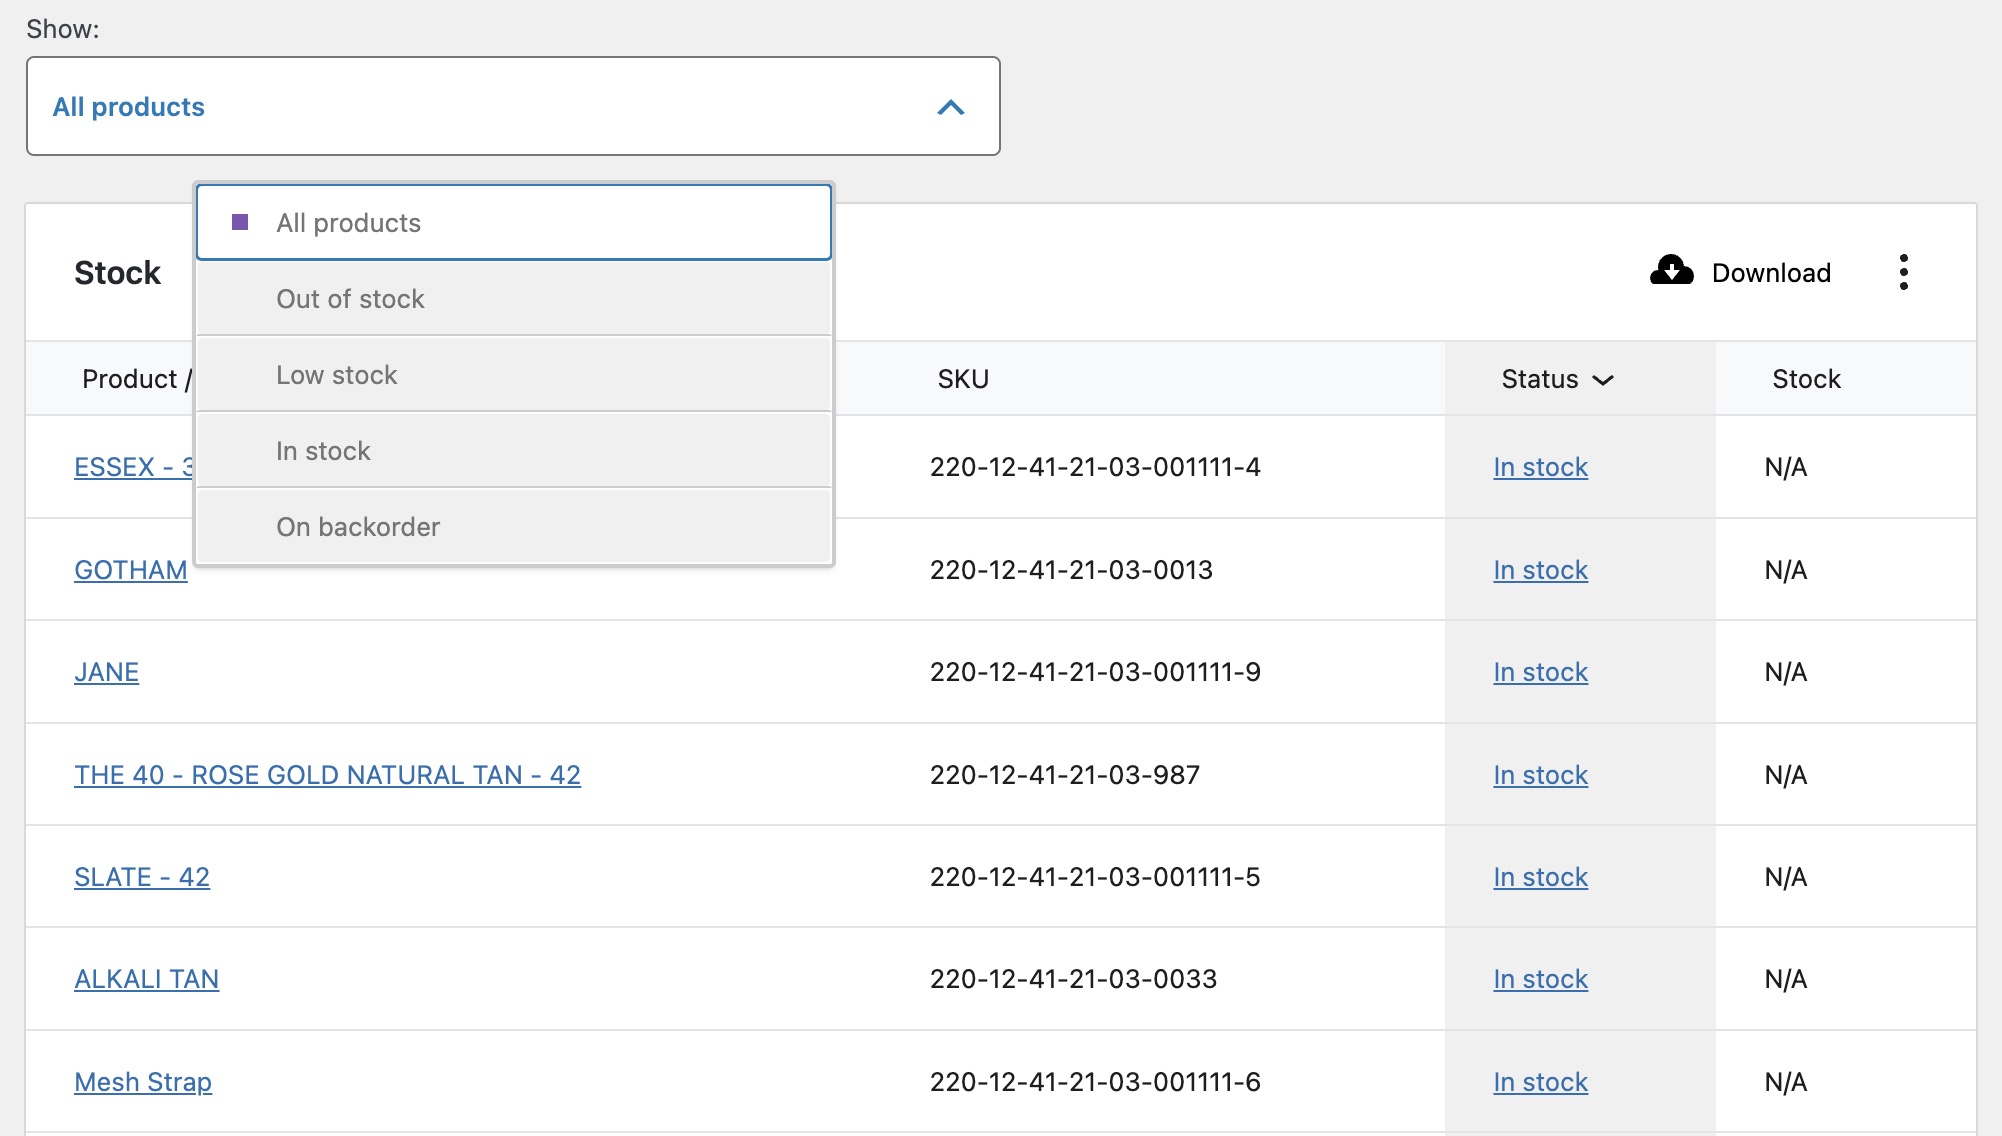
- Select the Stock tab to view reports on stock levels, low stock items, and out-of-stock products.
The Stock Report in WooCommerce Analytics provides real-time data on:
- Low Stock Products: Displays items with low inventory, allowing you to restock proactively.
- Out of Stock Products: Lists items that are currently unavailable, helping you manage stockouts quickly.
- Most Stocked Products: Shows products with high inventory levels, useful for optimizing stock and managing space.
Use these reports to identify which products need restocking, which are overstocked, and where inventory gaps exist.

Backorder Management
Backorders let customers order products that are temporarily out of stock. In the product editor, go to Inventory > Allow backorders and choose between three options: do not allow, allow but notify customer, or allow silently.
For automated restock communication, consider these plugins:
“Allow Backorders” will appear only if the “Stock management” option is checked.
- Back In Stock Notifier for WooCommerce – Sends alerts to customers when items are back in stock.
- WooCommerce Waitlist – Manages waitlists and notifies customers when stock is available.
Setting Up Automated Reorder Points
Automating reorder points helps keep stock levels optimal without manual monitoring. WooCommerce plugins can add this feature:
- ATUM Inventory Management – Provides stock alerts and reorder points.
- WooCommerce Smart Manager – Offers bulk inventory management and reorder settings.
FAQs
Summary
WooCommerce provides a complete set of inventory tools out of the box – global thresholds, per-product stock, variation-level tracking, email alerts, and analytics reports. Configure global settings first, then fine-tune individual products and set up notifications to catch low stock before it becomes a problem.
For stores with large catalogs, consider plugins like ATUM Inventory Management for advanced features like reorder points and warehouse management.


