CSS Containment is a module that describes a CSS property called contain. This property allows developers to isolate a specific element’s subtree in the DOM and treat it as independent and separate from the rest of the elements in the DOM.
The primary goal of CSS Containment is to improve rendering performance and reduce the loading time of a web page by providing certain control over the rendering process performed by the browser.
Let’s imagine an HTML page with a complex DOM structure. Suppose we know that a particular element in this page is entirely independent of the rest and is likely to undergo a change at some point.
When such a change occurs, the browser has to ensure that it does not affect other elements on the page, leading to a complete rerender of each element in the DOM.
Even though browsers try to avoid unnecessary work with certain heuristics, in many situations, they are forced to rerender the entire page due to a minor change in a specific element. In such cases, the contain property can be helpful in preventing these unnecessary browser actions.
But before we delve into this property, let’s take a look at the image that illustrates the process the browser goes through to render pixels on the screen (pixel pipeline). In this post, we will focus on the three middle stages…

CSS Containment is not a new specification, as many may think, and it was introduced in Chrome version 52, released in June 2016.
The Contain Property
The CSS Containment specification talks about a unique CSS property called contain, and it has several values, one for each existing type of containment:
/* Keyword values */
contain: none;
contain: strict;
contain: content;
contain: size;
contain: layout;
contain: style;
contain: paint;

/* Multiple keywords */
contain: size paint;
contain: size layout paint;

/* Global values */
contain: inherit;
contain: initial;
contain: unset;
The property is supported in all major browsers except Safari, as seen in the following table:
Now, let’s explain the values that the contain property can take, which are essentially the types of existing containment for us…
Types of Existing Containment
The contain property can be defined in two ways. The first is by setting a single value from the values none, strict, content, and the second is by setting one or more values from the values size, layout, style & paint.
- The value layout indicates that changes to the content of the specified element will not affect other elements on the page, and vice versa. External elements will not have any impact on this element.
- The value paint indicates that the content of the element will not overflow under any circumstances beyond the element’s boundaries. If the element is outside the viewport, the browser will not perform the paint operation on the content of that element.
- The value style indicates that the effects of certain CSS properties (counters & quotes) will not affect anything beyond the element’s boundaries.
- The value size indicates that the size of the element can be calculated without checking the content of that element.
No importance to the order of the values, and remember that the syntax looks like this:
.item {
    contain: size layout paint;
}
It’s nice to know that the specification provides us with two shortcuts, representing a combination of existing containment types:
- The value content indicates that all rules of containment, except style and size, are applied to the element. Similar to using
contain: layout paint. - The value strict indicates that all rules of containment, except style, are applied to the element. Similar to setting
contain: size layout paint.
In this case, only one value is used, and the code looks like this:
.item {
    contain: strict;
}
Note: I didn’t mention, but there is also the value
none, which specifies that the element will render normally without containment.
Example A
Here is an example that demonstrates the performance improvement when using containment. Imagine a page with a lot of elements, 10,000 to be precise, and the markup for each element looks like this:
<div class="item">
   <div class="content">Lorem Ipsum...</div>
</div>
In this example, we are changing the content of a single element through JavaScript, an action that will lead the browser to rerender all elements in the DOM (which is very large in this case).
To prevent this situation and save unnecessary work, we added the contain: strict property, informing the browser that the element about to change is independent and separate from the rest of the page.
The use of containment led to a significant improvement in performance and the time it takes for the browser to perform the layout operation.
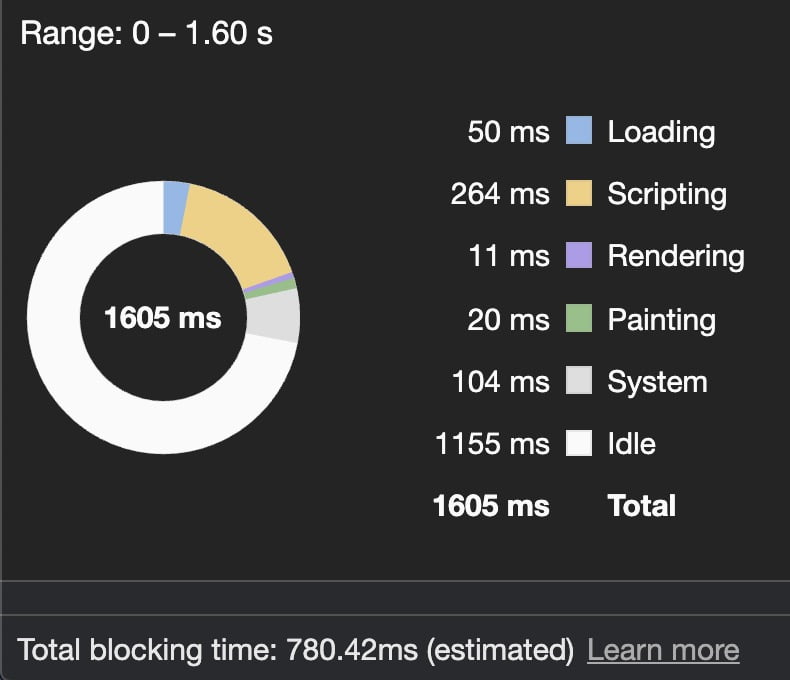
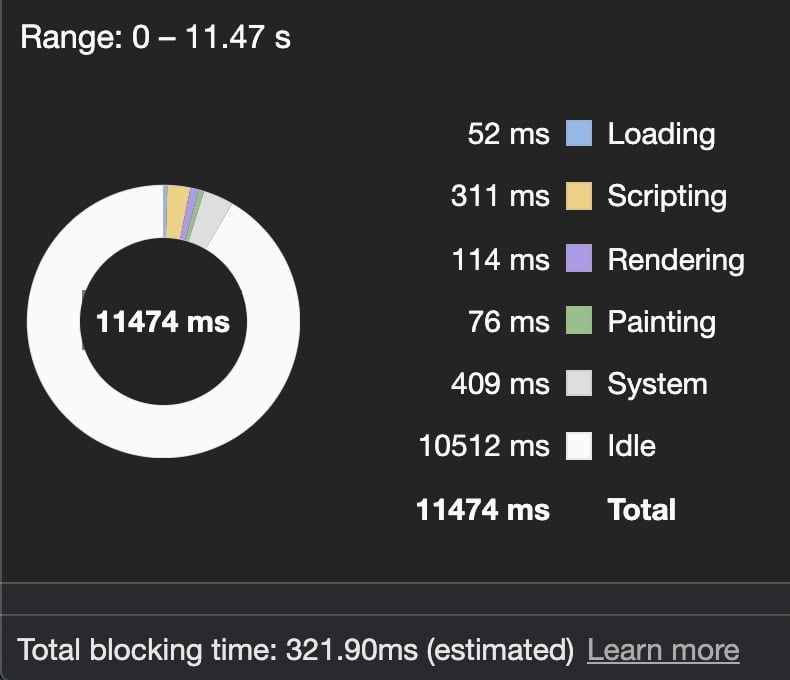
Take a look at the image below showing the average result of the first and second run we performed:

Credit – The example was copied and taken from the website blogs.igalia.com
Although the elements in this example are very simple, we experience a significant decrease from (17ms~) to (0.5ms~) in the time required to perform the action.
But not everything is rosy, my friends. Optimizations that the browser performs come into play only in certain situations and only when a specific set of conditions is met.
It’s possible that the decision on which containment values are suitable for a particular situation will not be straightforward.
Fortunately, there is a new CSS property called content-visibility coming to our aid, eliminating the need for us to make that decision…
The content-visibility Property
The content-visibility property will set the optimal containment properties for us. The property can take the values visible, auto & hidden, but rest assured, the value auto will be the one we usually use.
Adding the content-visibility: auto property to an element is parallel to adding the contain: size layout paint property. So what is the actual difference between them? What is the advantage of this new property?
The difference between them is only noticeable in situations where the element to which the property is added is outside the viewport and is irrelevant to the user.
content-visibility: auto allows the browser to independently check if the element is outside the viewport, and if so, the browser will add size containment to that element.
The existing content in the element will not be rendered at all, and the only action the browser will take is to calculate the necessary size for the container to accommodate the content. The paint operation will occur precisely when there is a need to display the element to the user.
This property is pretty new and has recently been introduced. Not all the browsers support it (but most of them are).
Example B
In the following video, an example page is simulated. The top part of the page contains a primary image, short text, and several small images. Below these, there are several individual posts that also contain text and images.
The video and this example were taken entirely from this post on web.dev.
In the video, you can see the differences in the time it takes to render the page when we add the content-visibility: auto property to those individual posts compared to the time required without this property.
Pay attention to the rendering data displayed at the end of each of the tests.
I prepared a live and precise example of those pages shown in the video so that you can perform the tests yourself. In the first example, we do not use containment, and in the second example, we do. Here are the results:
Notice the significant performance improvement, as you can see. All we did was add the following properties to each of those individual posts located below in the page:
 content-visibility: auto;
  contain-intrinsic-size: 1000px; /* We will explain this property in the next section */
What is the improvement in the time required to render the page?
Using containment properties on all elements outside the viewport led to the browser performing style and layout operations only on the container, not on the content of those elements. In this way, we saved unnecessary work that led to the improvement we saw.
It is essential to clarify that the rendering operation will start and stop according to the scrolling and movement of content outside the viewport and back. However, it should not be inferred that the operation will be repeated over and over during scrolling and the rendering state remains in the browser when the option exists.
The rendering state we mentioned is called the cached rendering state in professional language. That rendering state is stored in the browser’s memory and is accessible to us (in certain situations).
In any case, make sure to note that we used a relatively unfamiliar CSS property in the provided code above. Let’s explain the need and role of the contain-intrinsic-size property.
Setting the Natural Size of an Element with contain-intrinsic-size
contain-intrinsic-size allows us to define a kind of placeholder where the browser will use it when applying containment of type size to an element.
The element will expand (in terms of layout) as if it had a single descendant with the size we set using the property. This is only if the element does not have an explicitly defined height.
Using contain-intrinsic-size ensures that the rendering action (in the future) of any content will not affect the size of the container containing it in any way.
In this way, we prevent sudden and undesirable movement in the page or jumping in scrollbars due to a change in size, a situation that could affect the user experience.
In Example B mentioned earlier, we set a value of 1000px for the contain-intrinsic-size property. This is only the value of the height needed for the content of the element, meaning those posts located “outside the screen” during the initial load.
Hiding Content with content-visibility: hidden
What if we want the content of a specific element not to render at all (even if in the viewport) while still being able to leverage the cached rendering state we mentioned earlier?
In this case, we will use the content-visibility: hidden property, providing the same benefits as content-visibility: auto for elements outside the viewport. However, unlike it, this will prevent the browser from rendering the content even when it is in the viewport.
This property provides us with an additional way to hide an element but allows us to display it later quickly and more efficiently in terms of performance.
Let’s compare this to other CSS properties that allow hiding elements:
Differences between the Three Properties for Hiding Elements
- display: none will hide the element and destroy its rendering state. Displaying the element afterward will be more costly in terms of work for the browser to perform (like creating a new element).
- visibility: hidden will hide the element but preserve its rendering state. In practice, the element will not be removed and still occupy space on the page. Actions can still be performed with this hidden element (e.g., clicking). The browser will update its rendering state when needed even when it is hidden.
- content-visibility: hidden will hide the element but preserve its rendering state. If there is a need to change the rendering state, it will only happen after removing this property.
Summary
CSS Containment can be viewed as a module that allows lazy loading for content. It can help you improve the Time to Interactive metric in Google PageSpeed and essentially reduce the time required for the page to become interactive and respond to user actions during the initial load.
Additional information about the Time To Interactive metric and how to measure it can be found under section 5 in the provided link.
So far, friends – we won’t expand beyond that. Believe it or not, this is the post that took me the longest to write, much longer than any other post on the Savvy blog, and I don’t even know why… Questions and comments are welcome.


Nice and clear