Gutenberg has been the default editor in WordPress since version 5.0, released in December 2018. It replaced the classic TinyMCE editor and introduced a block-based approach to content creation that fundamentally changed how WordPress users build posts and pages.
Whether you are new to WordPress or transitioning from the classic editor, this post covers everything you need to know about how Gutenberg works, what blocks are, and how to make the most of the editor.
What is Gutenberg?
Gutenberg is the block editor of WordPress that replaced the TinyMCE editor in version 5.0. The classic editor required shortcodes, plugins, and custom HTML to achieve even basic layout results.
Gutenberg’s goal is to make writing and editing easier and to enable alignment and design options that were not possible with the classic editor. Before we continue, here is how the classic editor compares to Gutenberg:
The Current (Classic) Editor of WordPress
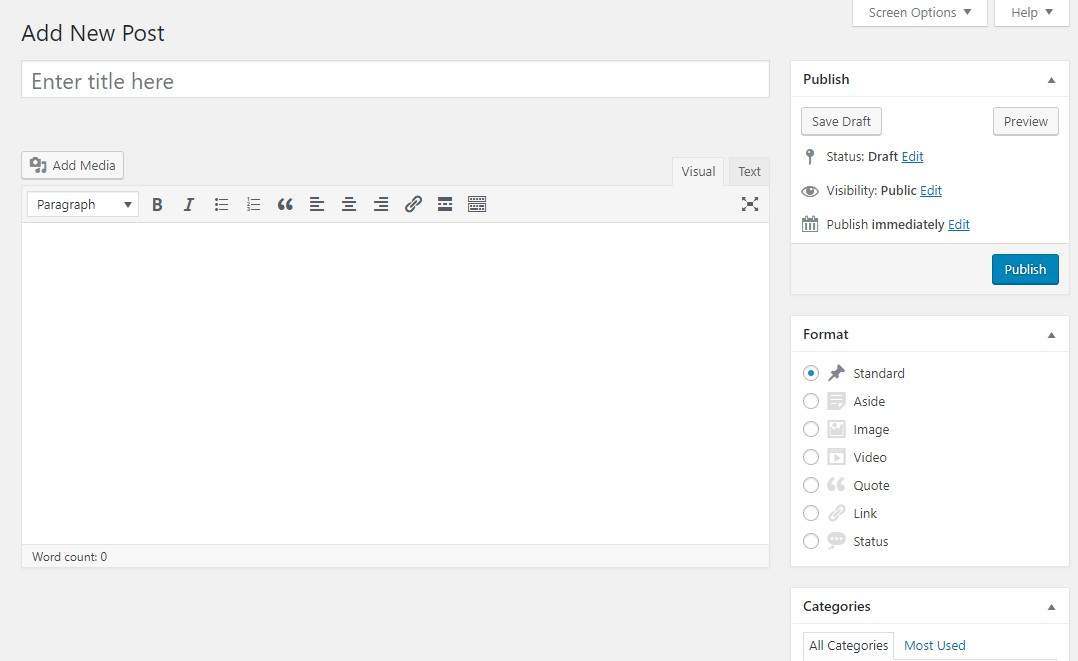
The Classic Editor of WordPress
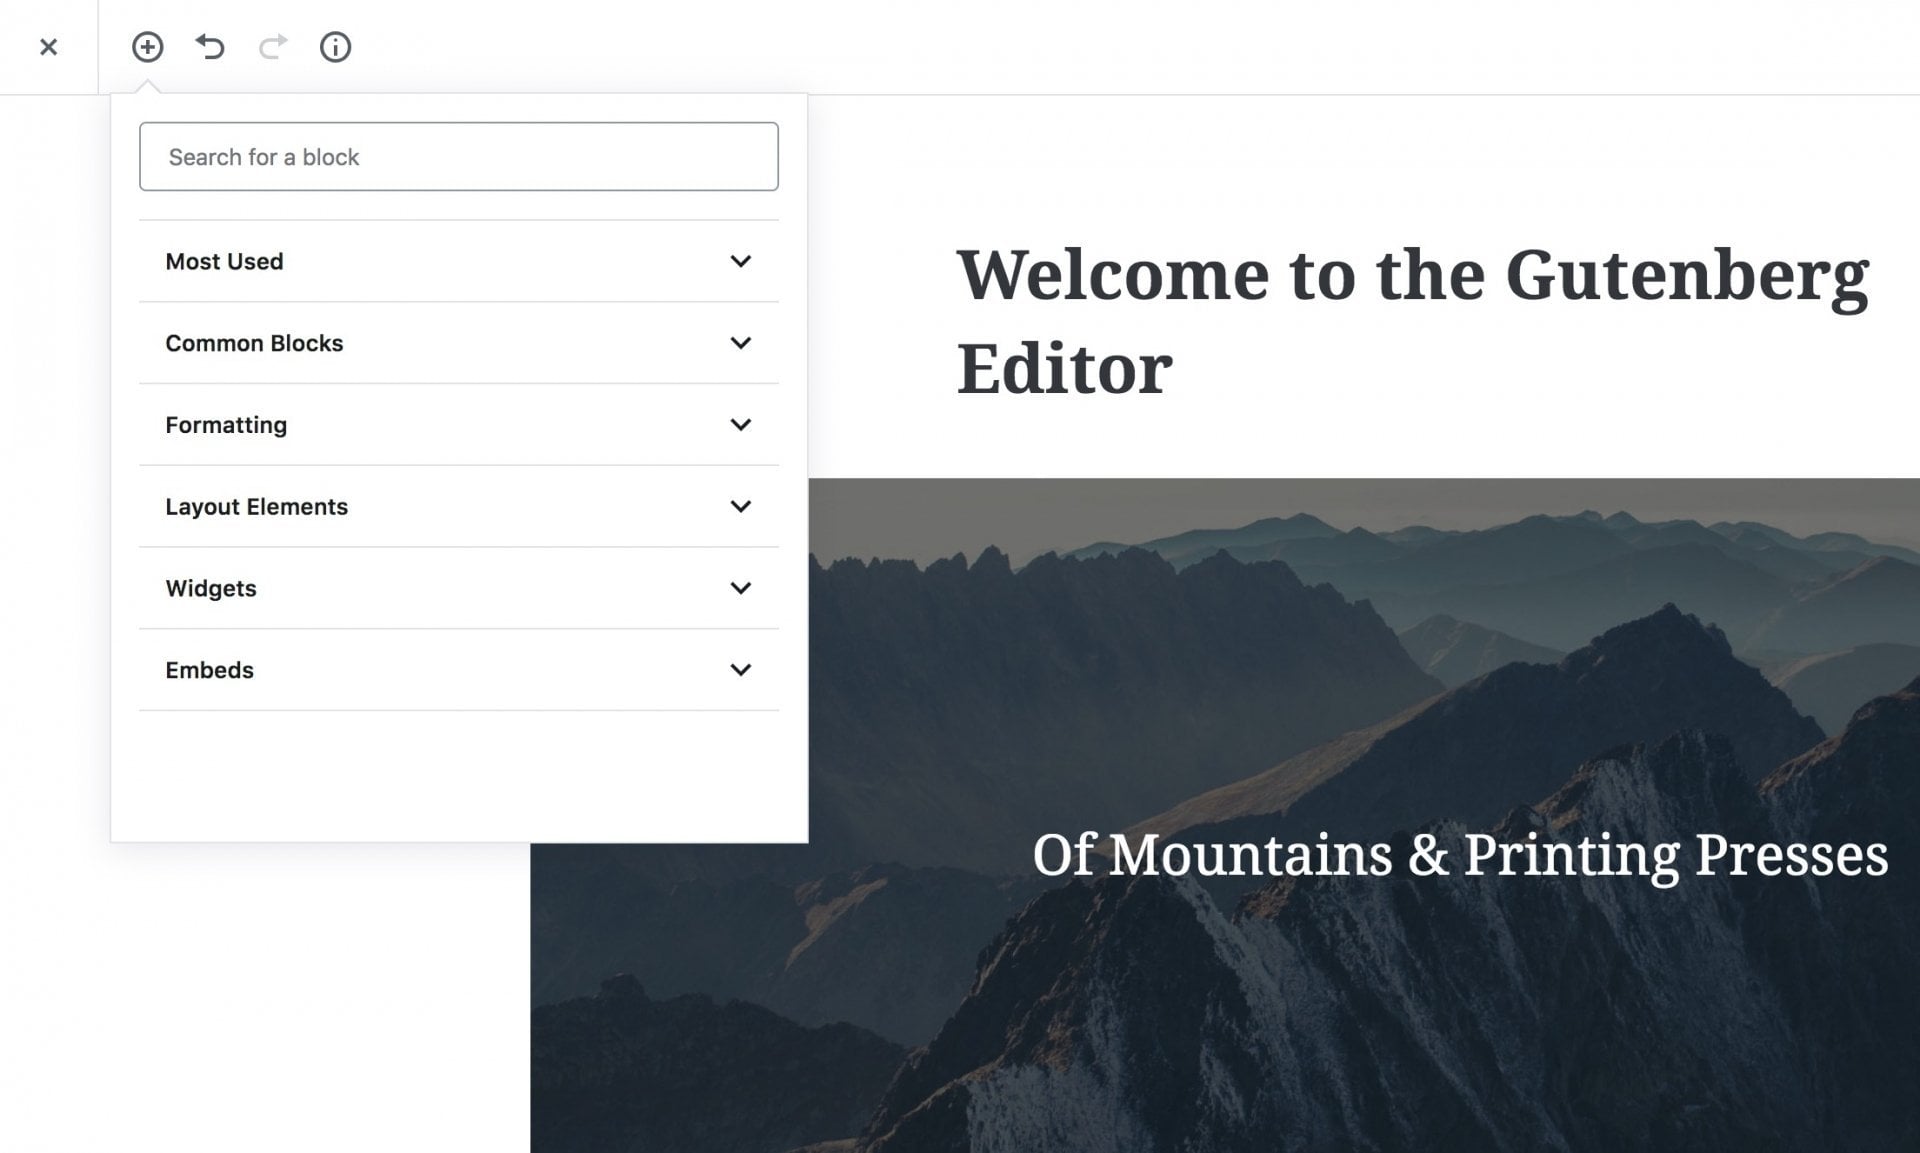
Gutenberg – The New Editor of WordPress
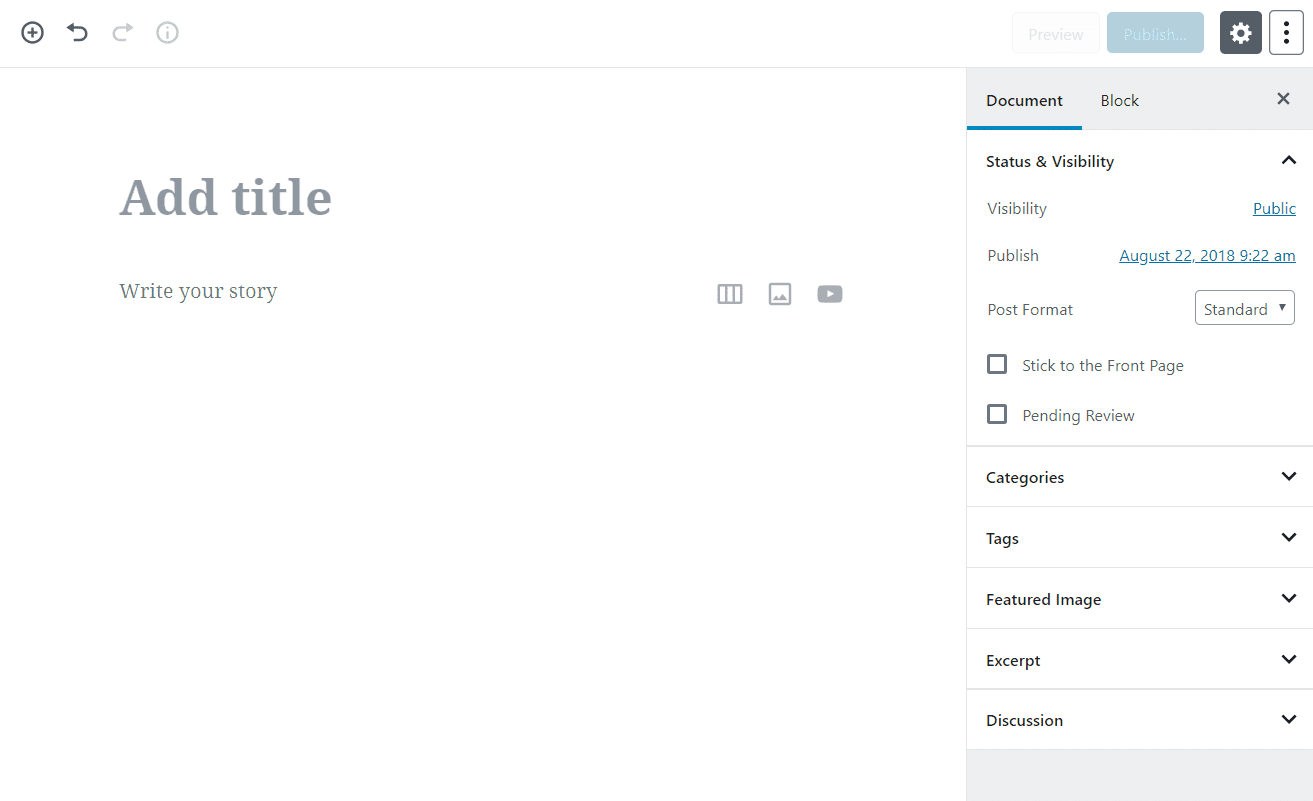
Gutenberg – The New Editor of WordPress
It’s much more than a cosmetic change – Gutenberg completely transforms the editing experience by adopting the block system, so that each part of the content is a specific block with settings that can be customized according to the block’s nature (more on this later). The aspiration is to add more advanced layout options over time to enable a simpler and smoother editing and writing experience, among other things.
Before we continue, here are some interesting points:
- WYSIWYG stands for What You See Is What You Get. 🙂
- The editor Gutenberg is named after Johannes Gutenberg, the inventor of the printing press over 500 years ago.
- Gutenberg is built using React, but you don’t have to learn React to develop blocks (if you are a WordPress developer).
Gutenberg Is More Than Just an Editor
Many overlook this, but Gutenberg is not just WordPress’s block editor – it is the foundation of a much bigger vision. The Gutenberg project follows a four-phase roadmap:
- Phase 1 – Block Editor: Launched with WordPress 5.0 (December 2018). This is the post and page editor covered in this guide.
- Phase 2 – Site Editing: Introduced in WordPress 5.9 and matured in WordPress 6.3. Full Site Editing (FSE) allows you to customize your entire site – headers, footers, navigation, templates – all using blocks.
- Phase 3 – Collaboration: Currently in development. This phase focuses on real-time collaborative editing, publishing workflows, and smoother team-based content creation.
- Phase 4 – Multilingual: Planned for the future, aiming to bring multilingual support directly into WordPress core.
As of 2026, WordPress is at version 7.0 with three major releases planned for the year. Phases 1 and 2 are complete, and Phase 3 is actively being developed.
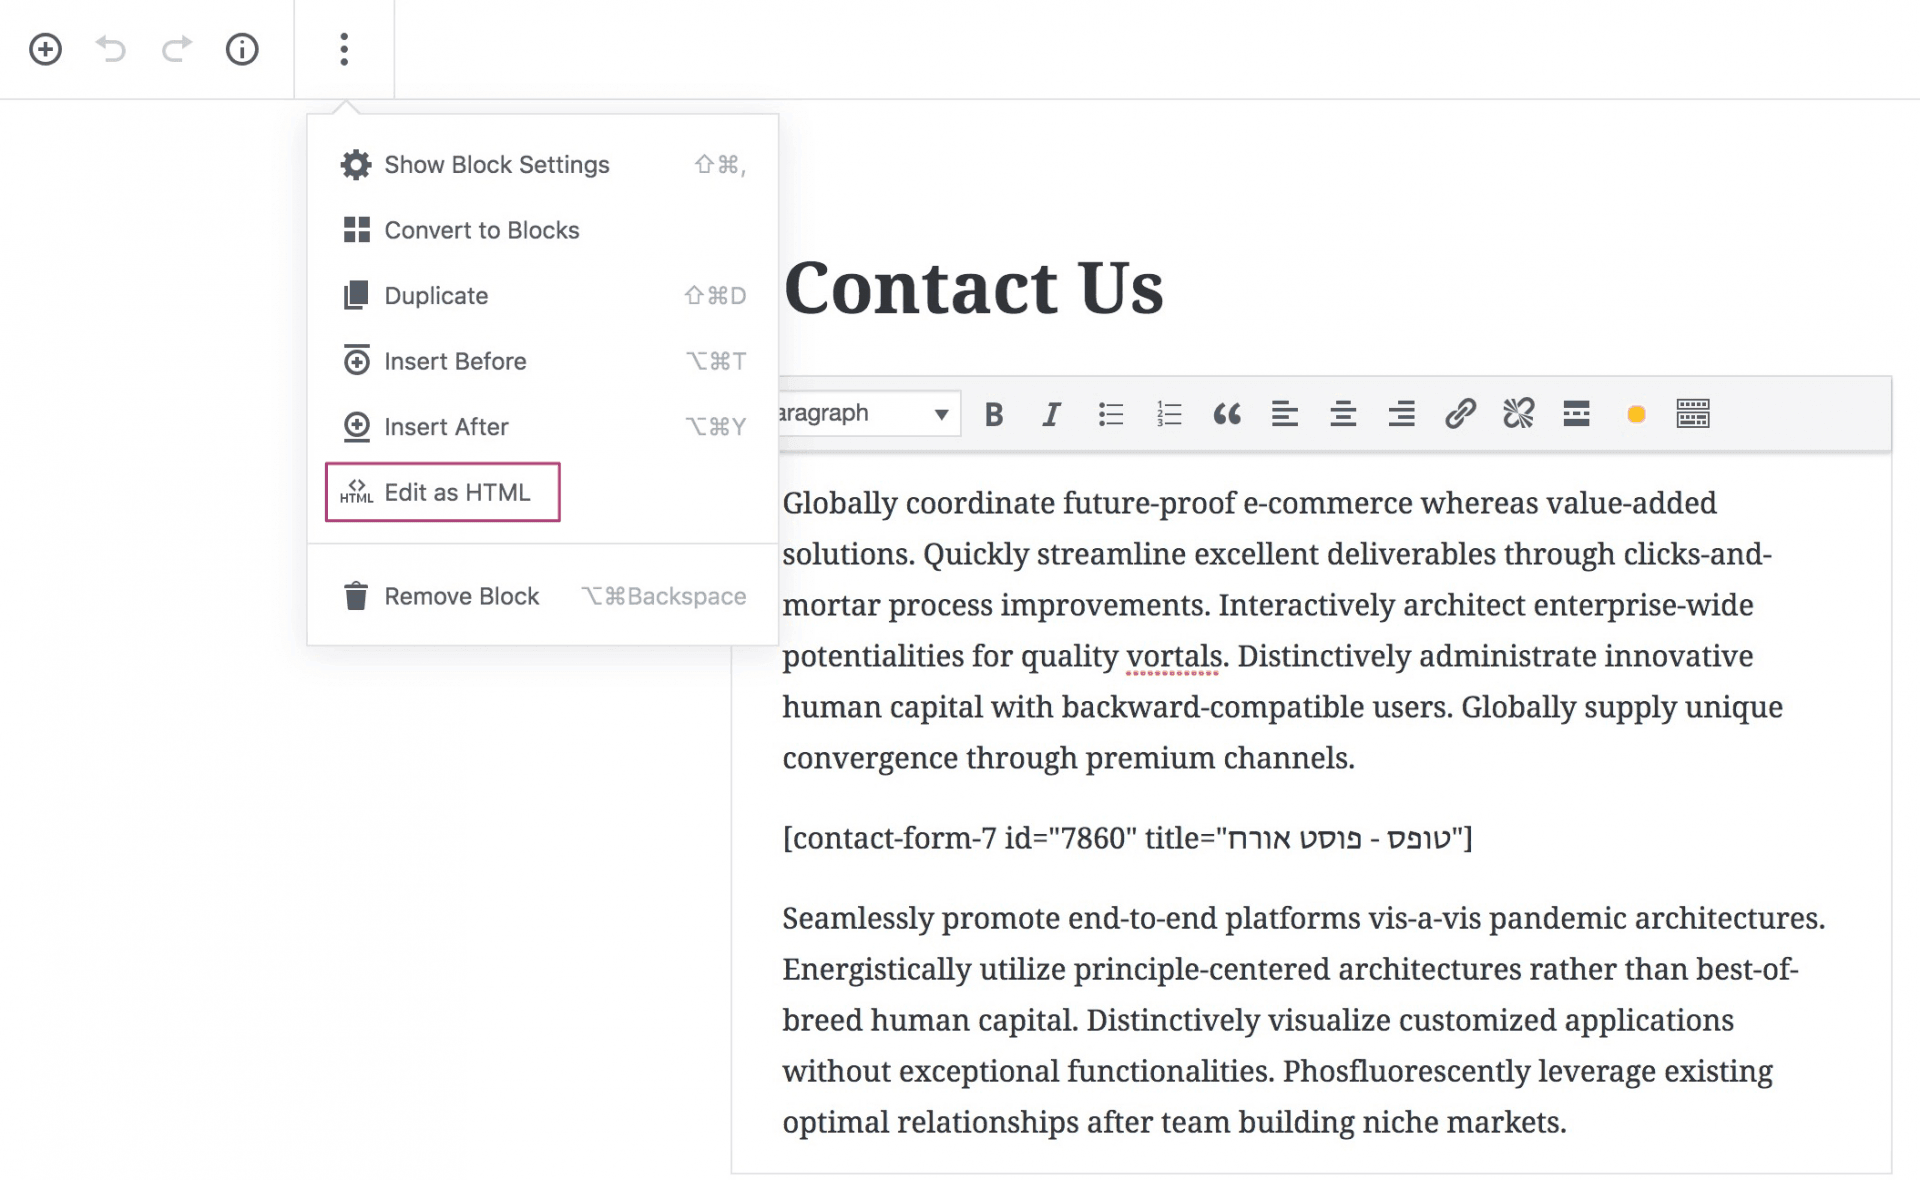
How Gutenberg Handles Legacy Content
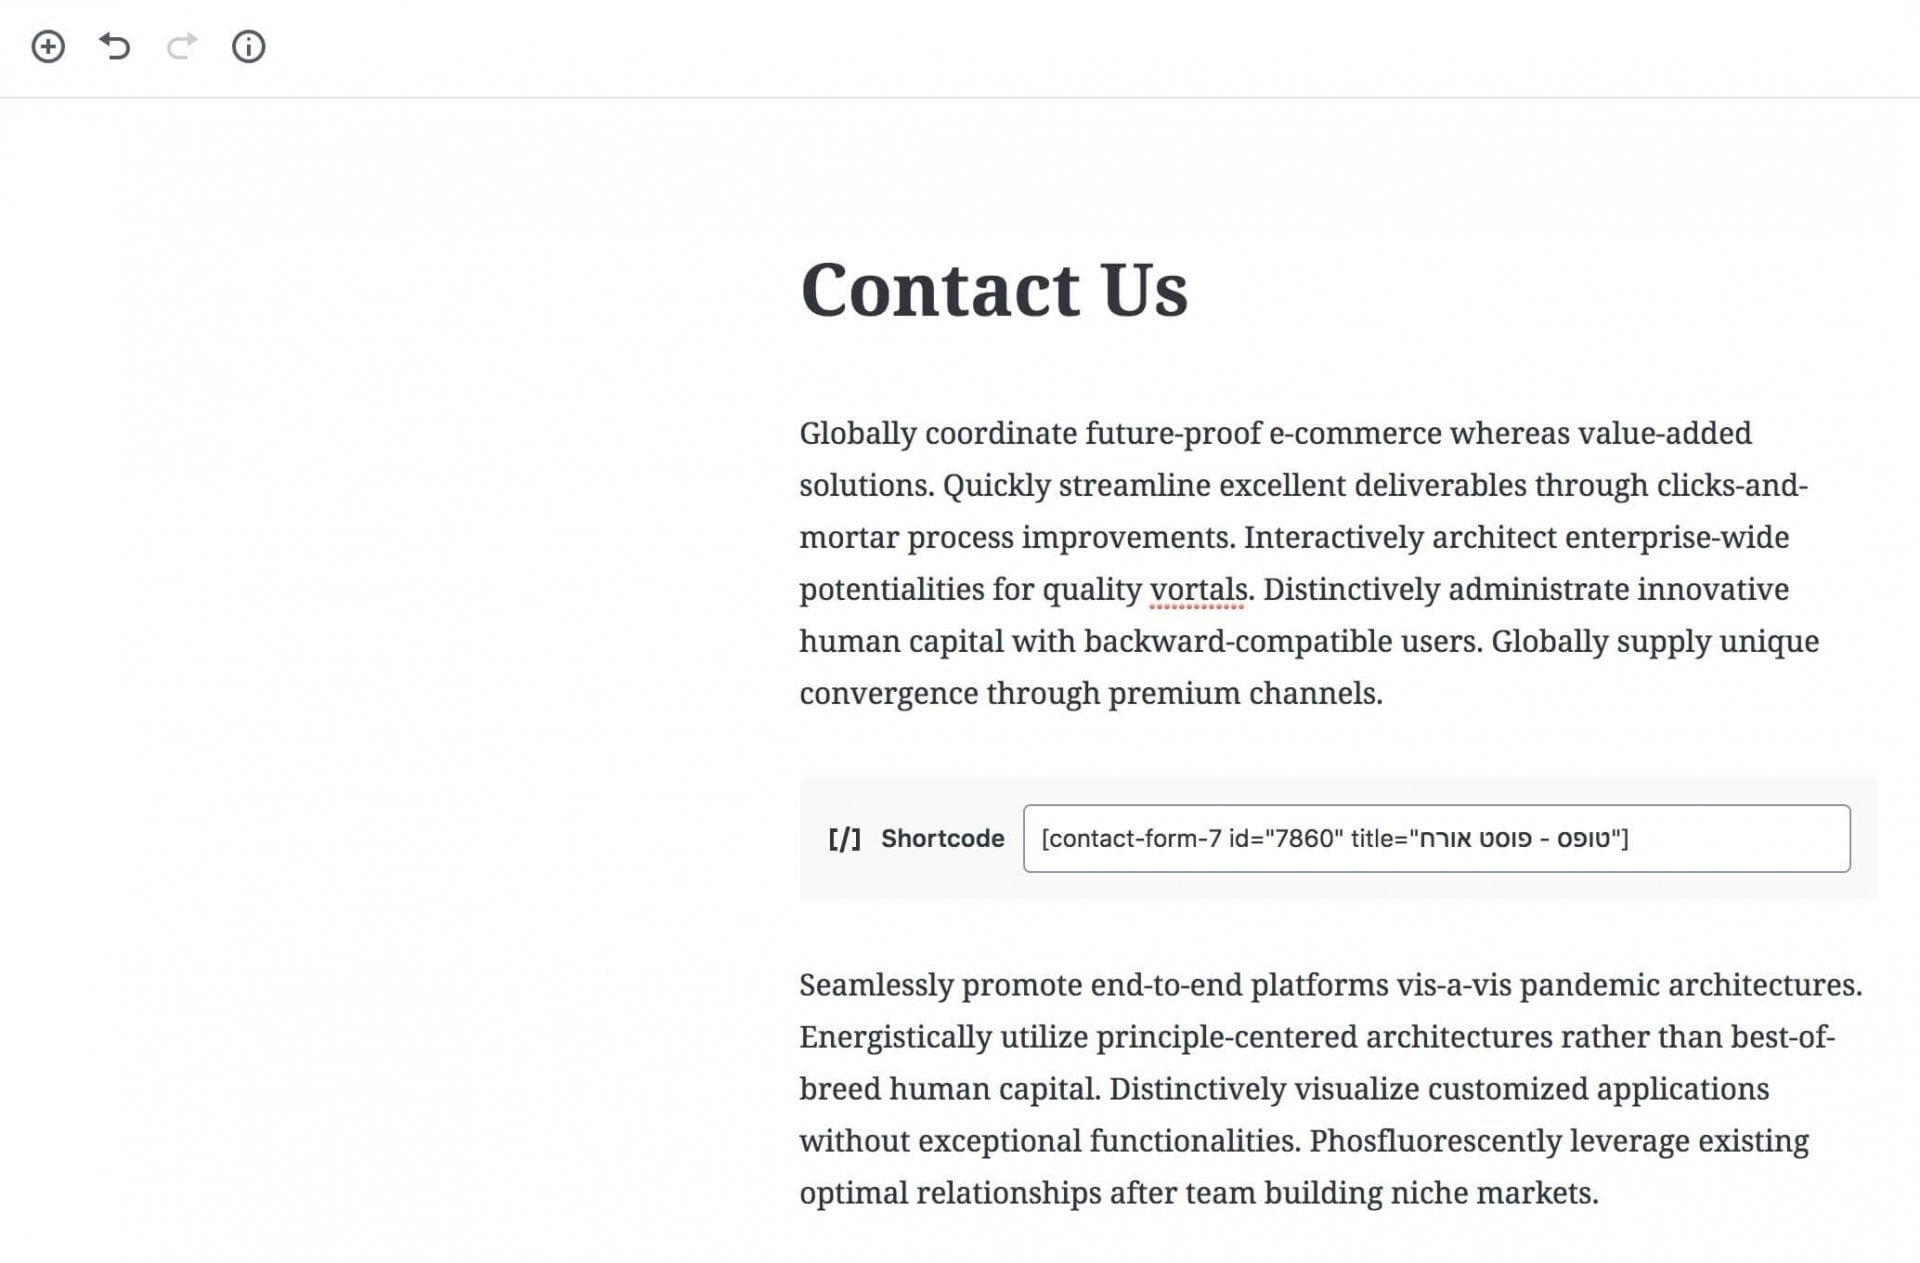
When you open existing content that was created with the classic editor, Gutenberg displays it within a single Classic block. By default, Gutenberg treats the entire page content as a single HTML block. As you can see in the image, you can leave the page as it is and edit it with the HTML editor if you prefer (Edit as HTML).
In the next section, we will explain in detail what those blocks are, so be patient…
It is reasonable to assume that if you do not convert the content to the mentioned blocks, the content will look exactly the same for visitors as it did before installing Gutenberg. However, if you want to use the new editor, you will need to convert the content – that single HTML block – into individual blocks.
To do this, you need to click on the “Convert to blocks” option that appears just below “Edit as HTML.” This action will automatically convert all the content into blocks, allowing you to start working with the new editor as intended. Note that you might see a change in the appearance of the content after performing this action, especially if there are non-standard elements or special functionality in the page content.
Therefore, it is necessary to perform the necessary checks before saving the post and see how it looks in the preview. In general, it is advisable to make all changes and checks in a local environment or staging environment and not try this on the live site. As always, it is recommended to back up your WordPress site before such checks and changes.
Let’s move on and explain what blocks are and how the new editor works…
How Gutenberg Editor Works
As mentioned earlier, Gutenberg is an editor built on the block system, but what does that actually mean? Essentially, Gutenberg allows you to edit content using many individual blocks, and these blocks will enable you to create more complex designs than the classic WordPress editor.
What is a Block?
A block can be almost anything. For example, you can have a block for:
- Regular text
- Images
- Videos
- Buttons
- Widgets (yes, those you used in the sidebar)
- Tables
- And more…
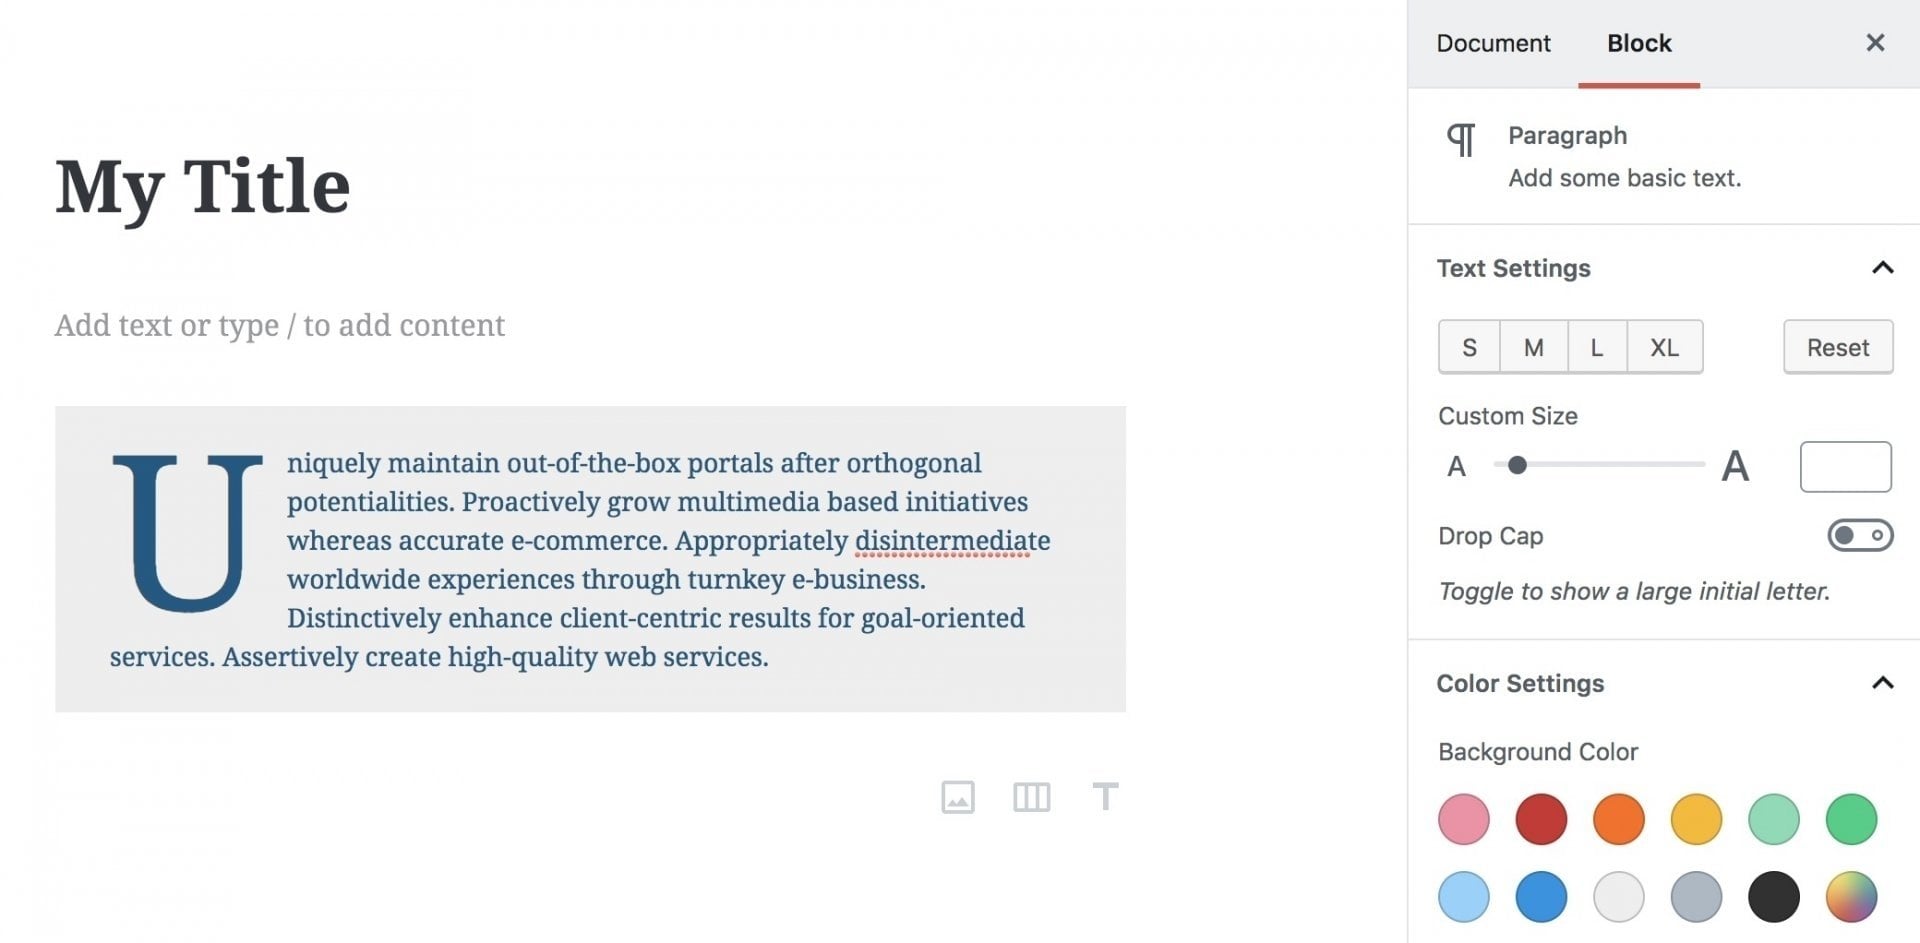
Each block is a separate entity that you can customize individually. For example, consider a Paragraph block – you can change its background, text color, and make the first letter large (Drop Cap).
In addition, you can easily duplicate it, add a class to each block, and even add it to the list of blocks that you can reuse in other posts (Reusable Blocks), which is a very useful option.
Gutenberg, in its latest version, also allows you to change the position of elements using Drag & Drop, making your work much easier. You can also change the position of elements with a button click.
For example, here’s a post in the Gutenberg editor containing two blocks, one for text and the other for an image. Notice how quickly you can change their order by clicking a button:
So, Is Gutenberg a Type of Page Builder?
Gutenberg has evolved significantly since its initial release. It now includes a mature Columns block, a Group block, and Full Site Editing (FSE) capabilities that let you design entire site templates using blocks. For standard content like blog posts and basic pages, Gutenberg is more than sufficient.
However, dedicated Page Builders like Elementor, Divi, and Beaver Builder still offer more granular control over complex page layouts, especially for landing pages and marketing-focused designs. The gap has narrowed considerably, and many users find that Gutenberg – combined with block patterns and third-party block libraries – covers their needs without an additional Page Builder.
How to Use Gutenberg – The New WordPress Editor
Let’s see how to use the block editor in practice.
Quick Overview of the Interface
Before we start adding blocks, let’s go over the interface of Gutenberg and the elements that appear in it:
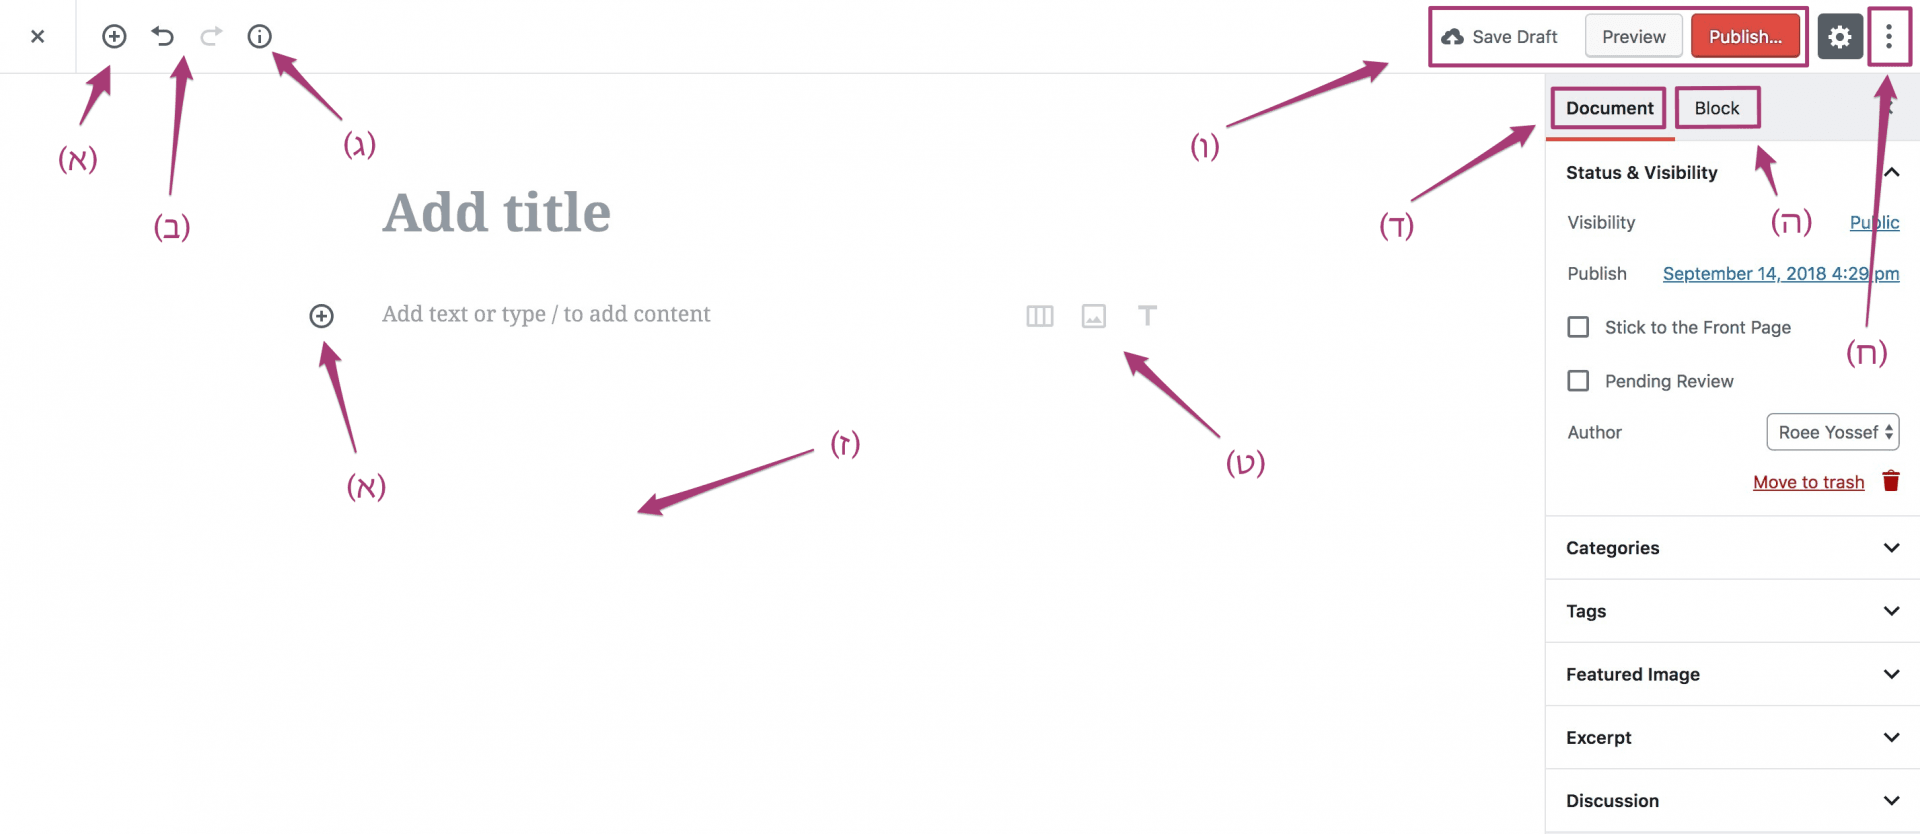
Gutenberg – Interface and Buttons
- (A) – Allows you to add new blocks.
- (B) – Undo/Redo buttons.
- (C) – Information about the post – word count, heading count, block count, etc.
- (D) – Provides access to page settings, including categories, tags, date, display mode, etc. Similar to the sidebar in the classic WordPress editor.
- (E) – When hovering over an individual block, this section shows specific settings for that block.
- (F) – Allows you to preview the post and update or publish it.
- (G) – After adding multiple blocks, this is the area where you will edit the content of the blocks/post.
- (H) – Additional options – besides the HTML editor, alternative views (such as full-screen), and more.
- (I) – Quick shortcuts for adding blocks.
Adding Blocks
As mentioned, you will use individual blocks to build your page. To add a new block, you need to click on the plus button and choose the type of block (content type) you want to add. For example, in the image below:

In the image above, you can imagine that we added a block of type Paragraph. But Gutenberg has many more block options, and some may be a bit hidden at first glance.
Beyond the block search option, note that when you click on that plus button, you’ll see the blocks that are most commonly used. However, if you scroll down a bit, you’ll find many more options categorized.
These categories include blocks of various types – Formatting, Layout Elements, Widgets, and more. These include tables, quotes, buttons, widgets, shortcodes, and embedding options from external sources like Facebook, Twitter, and more. I won’t elaborate on each category (maybe in the future), but go through them and see the options available to you.
HTML Editor in Gutenberg – Code Editor
As you know from the classic editor, in Gutenberg, you can switch to the HTML editor at any time to edit the code directly. The way to do this is by clicking on those 3 dots at the top right of the editor and choosing the Code Editor option. What might surprise you is that you’ll see a lot of unclear comments in the code…

What are those comments, you ask? These are actually the blocks you added one by one. In the image above, you can notice there are several block names. For example, wp:paragraph accompanied by JSON code is a block of type Paragraph.
When you change or add settings to a specific block, they are saved along with the block itself in JSON format. For example, text color, background color, text alignment, and the like.
<!-- wp:paragraph {"align":"center","customBackgroundColor":"#f6d068"} -->
<p style="background-color:#f6d068;text-align:center" class="has-background">The goal of this new editor is to make adding rich content to WordPress simple and enjoyable. This whole post is composed of <em>pieces of content</em>—somewhat similar to LEGO bricks—that you can move around and interact with. Move your cursor around and you’ll notice the different blocks light up with outlines and arrows. Press the arrows to reposition blocks quickly, without fearing about losing things in the process of copying and pasting.</p>
<!-- /wp:paragraph -->
If you deactivate Gutenberg and then activate it again, the block settings will be preserved. However, the classic editor will not interpret them, as they are in the form of HTML comments.
If you inspect an element with specific settings using Chrome’s Developer Tools, you’ll find that they were added as Inline CSS in the frontend.
Keyboard Shortcuts in the New Editor
For your convenience, here are the latest keyboard shortcuts you can use in Gutenberg to enhance your writing and post/page creation experience:
Full Site Editing (FSE)
With Full Site Editing, Gutenberg goes beyond post and page content. You can now use blocks to customize your entire site structure – headers, footers, navigation menus, sidebars, and page templates – all from the WordPress admin panel.
FSE was introduced in WordPress 5.9 and has matured through subsequent releases. To use it, you need a block theme (such as Twenty Twenty-Four or Twenty Twenty-Five). Block themes replace traditional PHP template files with HTML templates built from blocks.
If you are using a classic PHP theme, you can still use Gutenberg for post and page editing. Full Site Editing requires switching to a block theme, which is a separate decision from using the block editor for content.
Key FSE features include:
- Site Editor: A dedicated interface for editing your site’s structure, accessible from Appearance > Editor.
- Block Patterns: Pre-designed block layouts that you can insert and customize. You can also create and register your own patterns.
- Global Styles: A centralized panel for controlling typography, colors, spacing, and layout across your entire site.
- Template Parts: Reusable sections like headers and footers that can be shared across multiple templates.
FAQs
Common questions about the Gutenberg block editor:
Summary
Gutenberg is not just an editor – it is the foundation of WordPress’s future. From the block-based content editor introduced in version 5.0 to Full Site Editing and the upcoming collaboration features, Gutenberg has transformed how WordPress sites are built and managed.
For content creators, the block editor offers a more visual, flexible way to write and design posts. For developers and site owners, Full Site Editing opens up the ability to customize every aspect of a site without writing PHP template code. Whether you are just getting started or looking to leverage advanced features like block patterns and global styles, Gutenberg is where WordPress is headed.