If you’ve just started dealing with WordPress, you’re likely to encounter a number of issues. Some of them are severe, and some are less critical, but encountering them is unavoidable, and you’ll probably run into them more than once.
However, out of all the common errors you might encounter, the most perplexing one is “Error Establishing Database Connection.”
This is because it doesn’t provide any information about the error or its source, despite the fact that it can be caused by a number of reasons. To be precise, when you try to access the website, the only thing you’ll see on the screen is the following message:
Error Establishing Database Connection
In this post, we will delve into this error that WordPress presents and provide several solutions you can use to restore the proper functioning of your WordPress site.
What Does “Error Establishing Database Connection” Mean?
In order to provide a clear explanation of the nature of the “Database Connection Error,” we need to break down WordPress into its two main components.
WordPress, if you’re not aware, is built using PHP and MySQL. The code written in PHP is responsible for all the functionality on the site (such as adding comments, displaying posts, and more), while MySQL is responsible for storing the actual data (control panel settings, post content, and more).
For example, when you enter your website’s address in the browser and hit Enter, PHP springs into action and retrieves the content of your homepage from the MySQL database.
On the other hand, images, videos, and other media are stored in the “wp-content” directory and are accessed through PHP.
The MySQL database contains all the essential information for displaying the website. When PHP fails to access this database, regardless of the reason, you will receive the message “Database Connection Error.”
In other words, PHP indicates that it’s unable to find the necessary information to display the requested site.
Possible Causes of the “Error Establishing Database Connection”
The “Database Connection Error” can be caused by several reasons, including the following:
- Incorrect access details (permissions), typos, unnecessary spaces, and more. Incorrect details in the access information in the
wp-config.phpfile will block the site’s access to the database. - The server hosting the database is down or unavailable for some reason.
- Any issues with the core files of WordPress (Corrupted Files).
- Any issues with the database itself (Corrupted Database) – faulty plugins or a problem with the theme can corrupt the database and affect the tables.
In the following section, we will describe the most common solutions for these situations…
If you want to troubleshoot the problem yourself, this post is what you’re looking for. Keep in mind that there’s always the option to contact your hosting provider’s technical support for assistance…
Monitoring and Resolving the “Error Establishing Database Connection”
It’s clear that trying to solve this issue without understanding its source is not logical. When we understand the root cause of the problem, the solution is usually straightforward and simple. In most cases, the problem lies in the database permissions.
A. Checking Database Access Details on wp-config.php
Open the wp-config.php file and look at the following lines:
// ** MySQL settings - You can get this info from your web host ** //
/** The name of the database for WordPress */
define('DB_NAME', 'database_name');

/** MySQL database username */
define('DB_USER', 'database_user');

/** MySQL database password */
define('DB_PASSWORD', 'database_password');

/** MySQL hostname */
define('DB_HOST', 'localhost');
If you don’t know how to edit this file, take a look at this beginner’s guide to FTP for WordPress users. The wp-config.php file is located in the main directory of your WordPress installation, often under the public_html folder. You can also edit this file via the File Manager in cPanel.
Of course, the access details for your site will be different, meaning that database_name, database_user, etc. are specific to your database. These four lines represent:
- database_name – The name of the database.
- database_user – Where you need to set the database user’s name.
- database_password – Where you need to set the database user’s password.
- localhost – Describing where the database is located. In special cases only, should you change this setting, when the database is on a different machine from the PHP files of your WordPress site.
If any of these details is incorrect, you’ll receive the “Database Connection Error.” In this case, the first thing you should do is check the permissions you set against the correct permissions – here’s how you can do that:
It should be noted that there’s an additional possibility, which is a wrong definition of the table prefix. However, we’ll touch on that later in the guide…
1. Checking the Database Name and User Name using cPanel
In this guide, we’ll describe how to check database permissions using cPanel. Log in to your hosting account’s admin interface (cPanel) and click on MySQL® Databases.

On this page, under Current Databases, you’ll find a list of all the databases you have on the server. You might have only one database, but if not, you need to identify which database contains the specific data for the WordPress site where you’re encountering the connection error.
The database name you should use is under the Database section, and the database user’s name will appear on the same row under Privileged Users.

Copy and paste these details into the appropriate places in the wp-config.php file and check if the “Database Connection Error” is resolved. If it is, great! If not, then we need to theoretically determine the correct password for the database.
However, to streamline the process (and that’s why I mentioned theoretically), it might be simpler to create a new user with a new password and the relevant permissions for your WordPress site’s database.
2. Creating a New User with Database Permissions
To do this, go to Add new User on the same screen. Choose a username and password and create a new user by clicking on Create User.
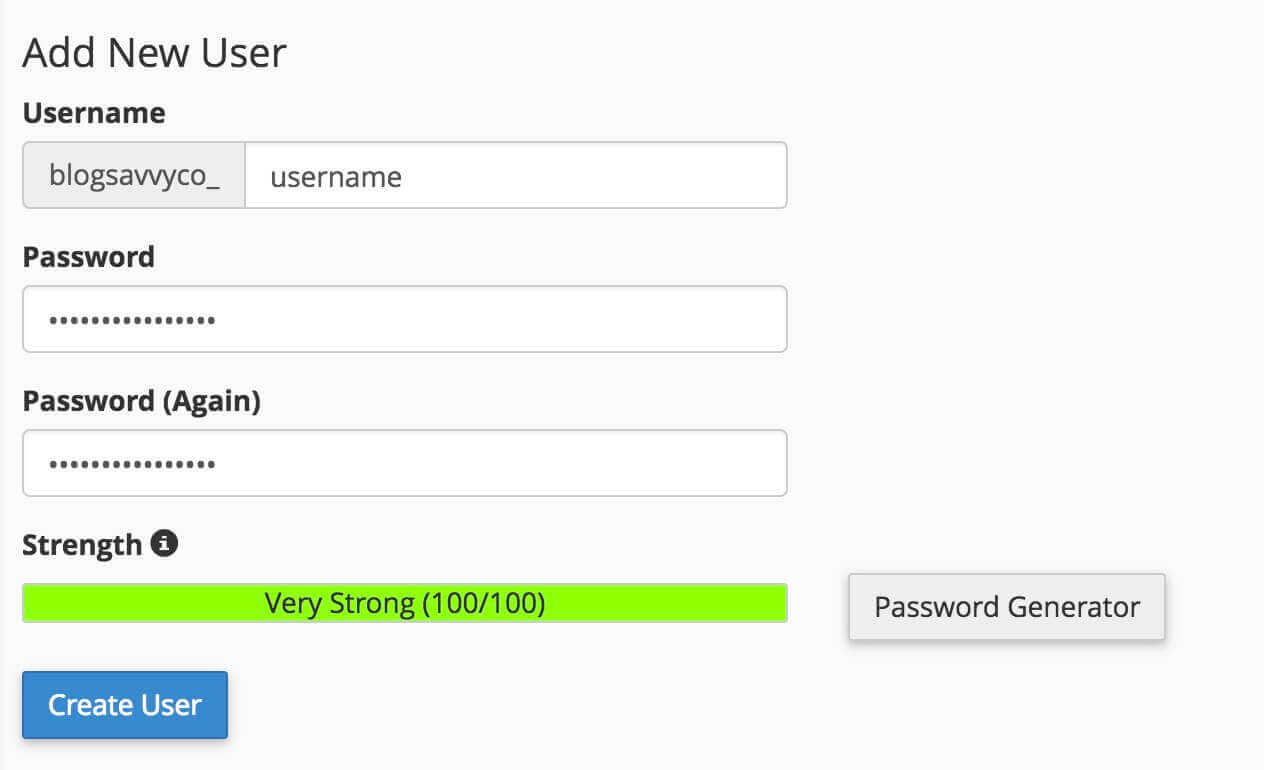
Next, scroll down to the section labeled Add User to Database, choose the username and the relevant database for the specific site in question, and click Add.
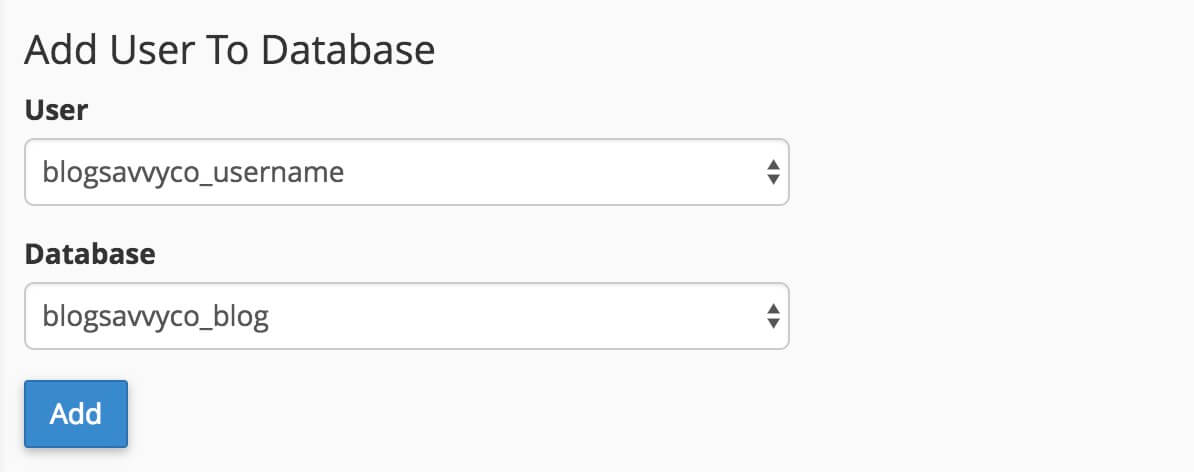
In the next screen, click on All Privileges to grant all necessary permissions to the user and make the changes by clicking the Make Changes button.
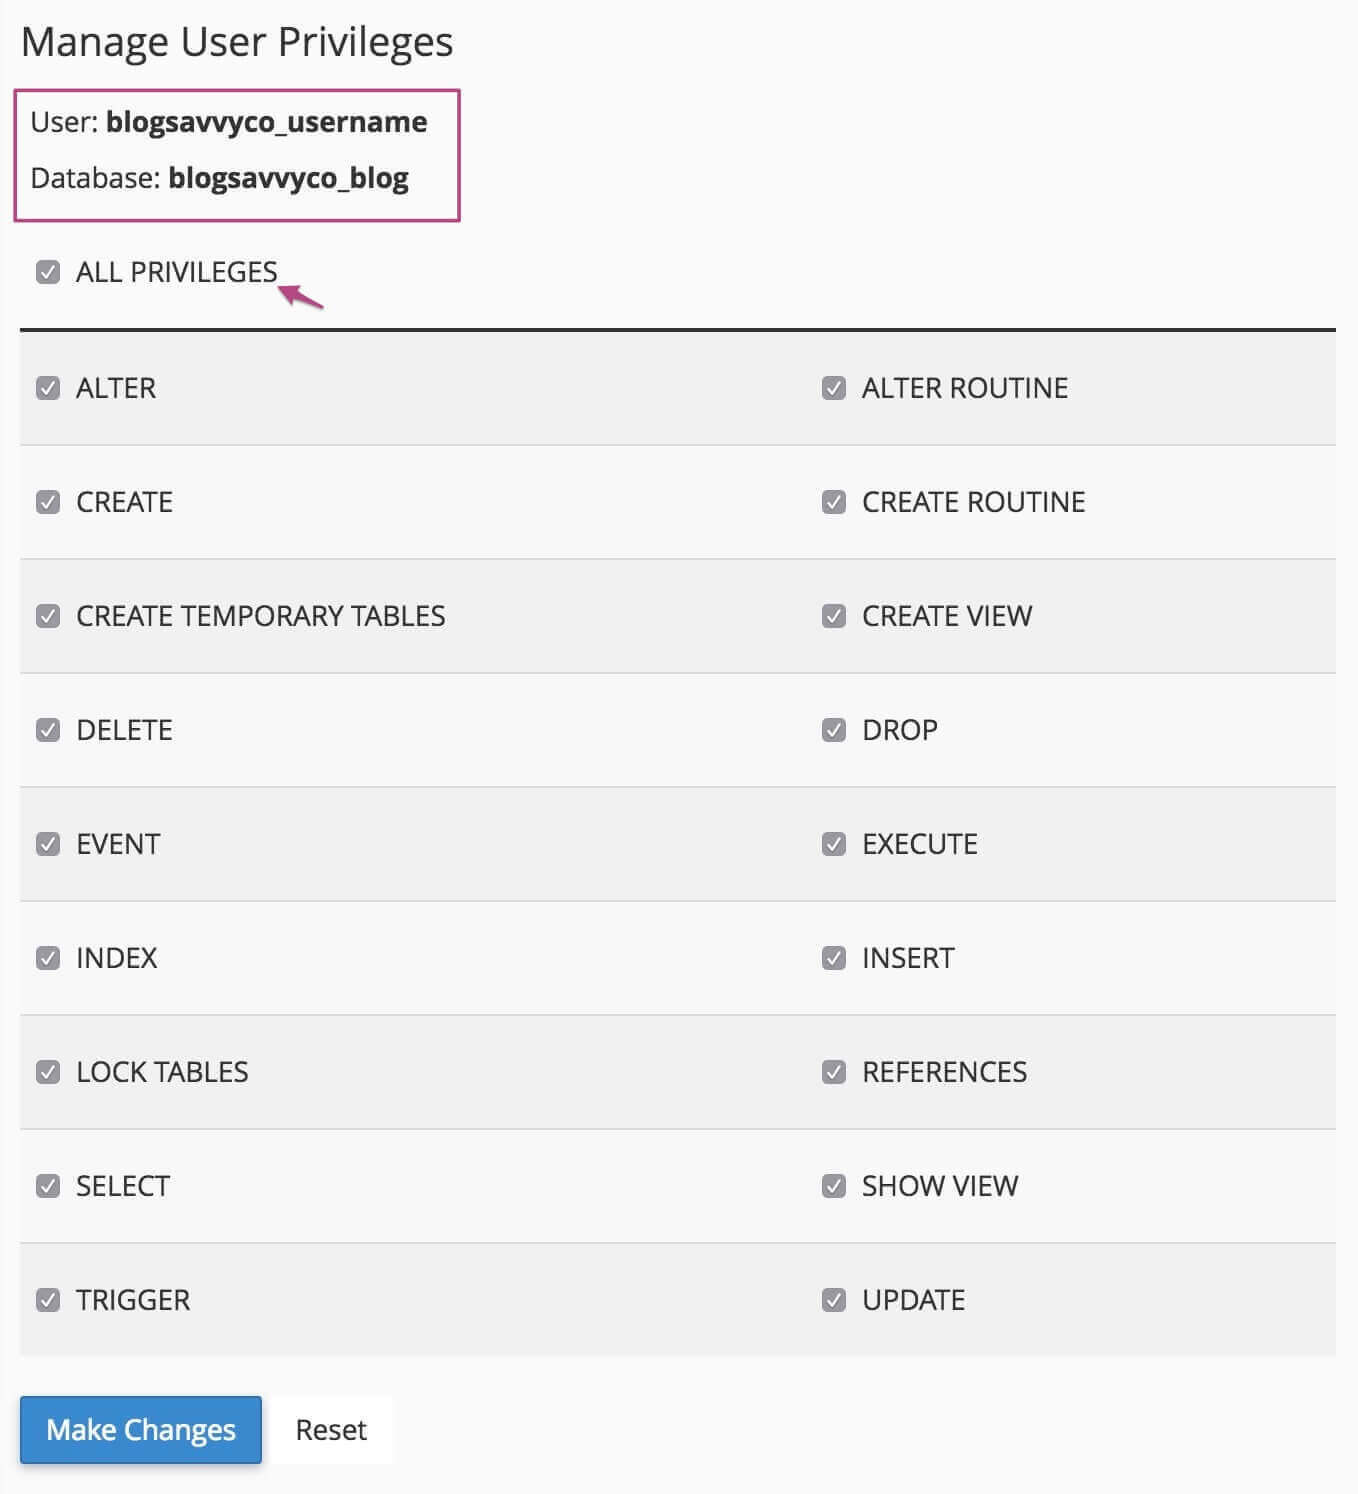
Note that at the top of this page, the username and the database name to which you provided permissions will appear.
Edit the wp-config.php file again and replace the existing username and password with the ones you just created. Now, check if access to the site is possible. If it is, you’re done; if not, proceed to the next step.
3. Checking the Table Prefix of the Database
As previously mentioned, it’s possible that all your database settings are correct except for one thing: the table prefix. To check the table prefix of your database, go to the main cPanel screen.
Click on phpMyAdmin and you will arrive at a new screen (note that this step might require providing a username and password to access phpMyAdmin, you may need to contact your hosting support).
Assuming you’ve reached the new screen, on the left side, you’ll find all the existing databases on your server. Look for the database name of your WordPress site and click on it.
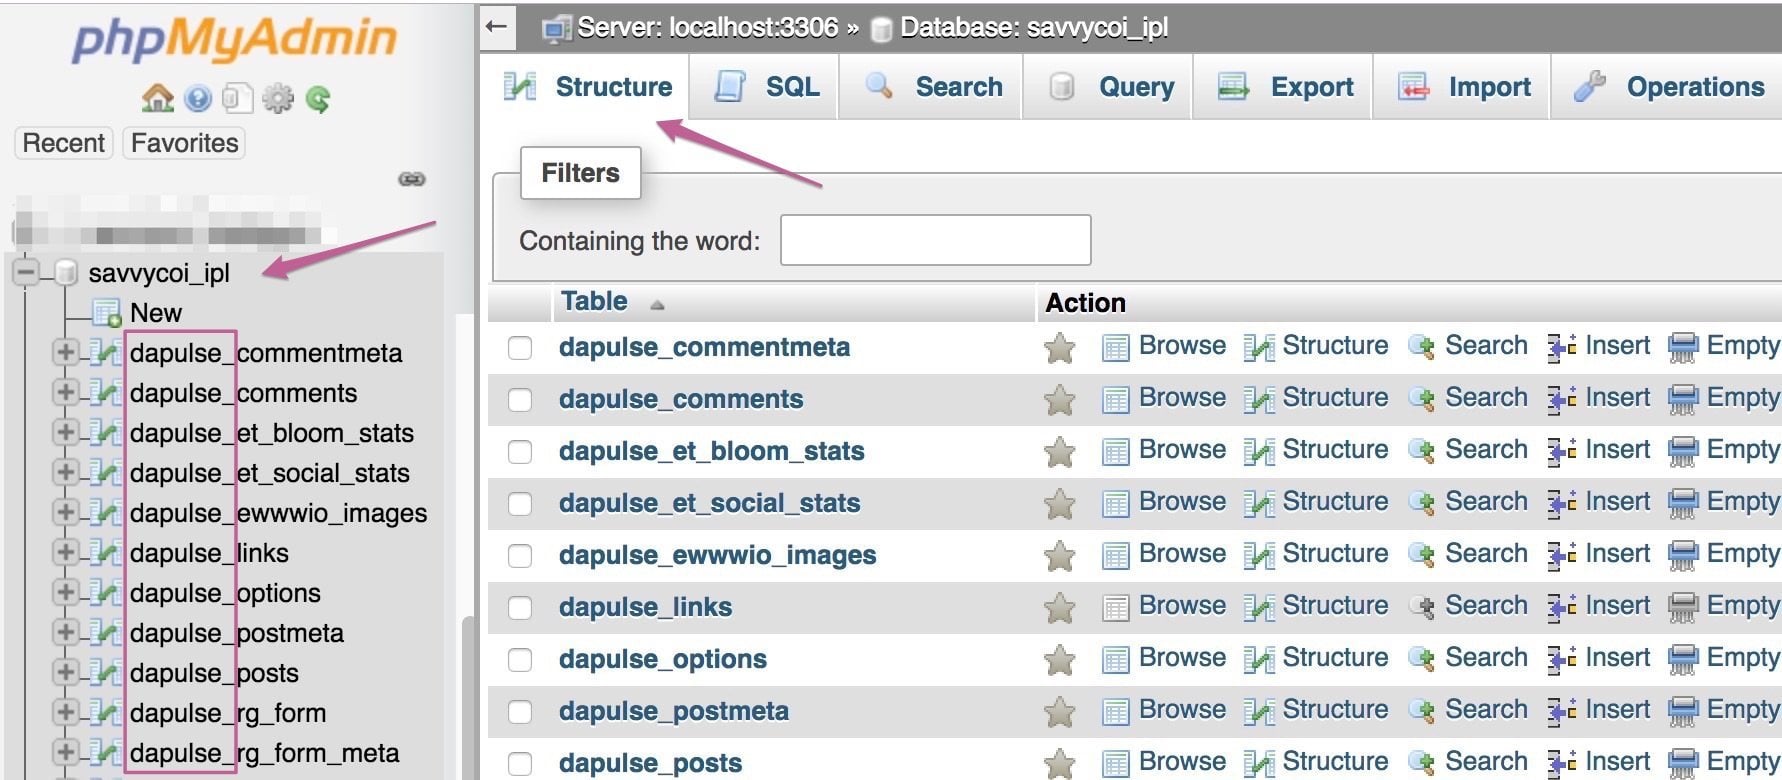
Make sure you’re under the Structure tab, and you’ll see all the tables of the database you selected. At this point, pay attention to the prefix of each table (repeating itself).
The table prefix is what you need to add in the wp-config.php file. In the example provided, the prefix is dapulse_.
This is also the place to check if there are any tables at all for the database. If there are no tables, you might need to restore the database (if you have a proper backup).
By default, WordPress uses the table prefix wp_[TABLE_NAME], with the relevant part being wp_. However, you need to define this prefix in the bottom part of the wp-config.php file, like this:
$table_prefix = 'xxxxx_';Replace xxxxx_ with the relevant prefix, and ensure that this line already exists in the wp-config.php file, with the correct prefix.
Regardless, after confirming the correct table prefix, check if you have access to the site. If you’re still encountering database connection errors, proceed to the next step…
B. Is the Database Corrupted?
If you have tables in the database and all the permissions in the wp-config.php file are correct, your database might be corrupted. Try accessing the WordPress admin interface at the following URL (replace “yourdomain” with your actual domain):
http://yourdomain.com/wp-admin/If you get a database connection error for both the website itself and the WordPress admin dashboard, this step might not be relevant for you in most cases. However, if you receive an error like “One or more database tables are unavailable,” there might be an issue with your database and you need to fix it.
Repairing the WordPress Database
Repairing the database (or at least attempting to) doesn’t require much effort. In this case, locate the wp-config.php file in your WordPress root directory, edit it, and add the following line:
define ( 'WP_ALLOW_REPAIR' , true);This code allows you to repair the database without needing to access phpMyAdmin. In other words, you can perform database repair through phpMyAdmin, but we won’t explain how in this post.
The second step is to open a browser and enter the following URL (replace “yourdomain” as needed):
http://yourdomain.com/wp-admin/maint/repair.phpAt this point, you should see the following screen:
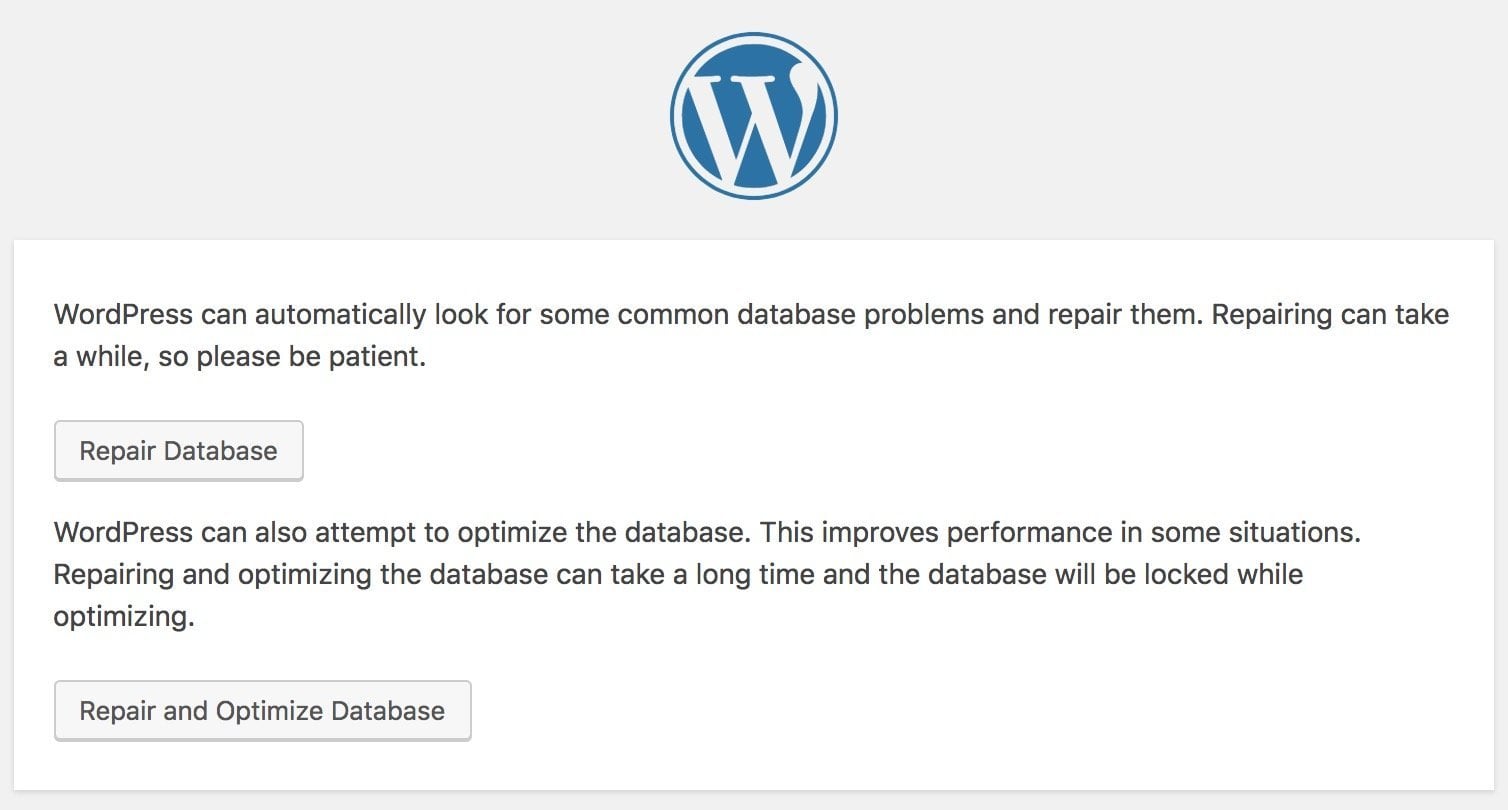
You can choose whether to Repair Database or to Repair & Optimize Database. Clicking either of these options will attempt to fix the database of your WordPress site.
After completing the action, make sure to remove the line you added to the wp-config.php file, as it can be exploited to access your database.
Try accessing your site again to see if the issue is resolved. If you still encounter database connection errors after all the attempted fixes, there might be an issue with either corrupted core files of WordPress or a server-level problem related to your site’s database.
If this is the situation even after all the attempts to fix the database, I recommend consulting your hosting support to clarify if the issue lies on their end. If they confirm that everything is fine on their side, you might need to restore the core files of WordPress.
To do this, refer to the guide on “Downgrading WordPress to a Previous Version.” The process described in that guide is exactly what you need to restore core files.
Keep in mind that in this case, you’re not downgrading the version, so follow the guide while downloading and restoring the exact current version of WordPress you’re using.
In Conclusion
Encountering the “error establishing a database connection” issue is never pleasant, but as you’ve seen in this post, the methods to fix this error are quite straightforward.
In any case, always remember that you can communicate with your hosting provider to get assistance in resolving the issue.
We’re here to help as well, so if you’re stuck and facing a problem, feel free to let us know in the comments, and we’ll do our best to assist you.
We hope that this guide has helped you learn how to fix the “error establishing a database connection” issue in your WordPress sites.

