Performing a backup for your WordPress website will allow you to preserve it in case you encounter any issues and gives you the option to restore the site to its previous state.
WordPress, like any content management system, can be vulnerable to hacking, security vulnerabilities, problematic plugins, or even hosting companies that aren’t secure.
In the unfortunate event that something happens to your website, it could cost you money, a lot of time, and damage your reputation or your company’s reputation.
The day might come when your website gets compromised, something might go wrong with a site update, the server could crash, or you could experience issues with the hosting company.
Without a proper backup, there’s a risk of losing all the effort you’ve put into your site.
Backup doesn’t contradict taking steps to secure your site. However, backups are the ultimate insurance – if the worst happens, your WordPress site remains safe and can be quickly restored.
Follow the 3-2-1 backup rule: keep at least 3 copies of your data, on 2 different storage types, with 1 copy stored offsite (such as Google Drive or Dropbox). Never rely solely on your hosting provider’s backups.
In this guide, we’ll show you two ways to backup WordPress sites, using cPanel and using a plugin named UpdraftPlus.
How to Backup a WordPress Site Using cPanel
If you have access to cPanel, performing a full backup of your site is very straightforward:
- Log in to the cPanel account of the relevant site.
- Scroll down to the section called Files and find the link to the Backup Wizard.

Click the Backup button.
- Choose whether to perform a full backup or a partial backup.

Some Points to Note:
- A full backup backs up all files, the database, and even email settings in cPanel. If you’re considering switching to a different hosting server, this is the backup you need to perform.
If you choose a partial backup, you can decide what to include – files, database, or email settings.
- If you choose a partial backup, you’ll need to perform a backup and then download the file created for files and the database separately. The same applies to email settings.
- Regardless of the backup method you choose, make sure you have enough storage space on the server for the backup.
- Keep the backup file in a safe place, preferably on a remote server such as Google Drive or Dropbox.
Restoring a WordPress Site Using cPanel
If you successfully backed up, restoring your WordPress site becomes even easier. Access the Backup Wizard in cPanel again and click on Restore. Choose what you want to restore and upload the relevant file accordingly.
For a full restore, repeat the process once for the database and once for the files of your WordPress site that you backed up.
That’s it! Now, let’s look at a method for performing backups to a remote server (Dropbox, Google Drive, etc.) using the UpdraftPlus plugin.
If you need to clone or migrate your WordPress site to another server, check out our guide on using the Duplicator plugin.
Backing Up a WordPress Site Using the UpdraftPlus Plugin
If you’re looking for a way to back up your WordPress site using a plugin, UpdraftPlus is one of the most popular options on the market, with over a million active installations.
It allows you to manually back up the site, schedule automatic backups to the cloud at your chosen interval, and restore the site with just a few clicks.
In this guide, we’ll explain step by step how to use the UpdraftPlus plugin and explore its different options and settings.
Installing UpdraftPlus in WordPress is straightforward. Go to Plugins > Add New and search for UpdraftPlus. Choose UpdraftPlus WordPress Backup Plugin, install it, and activate the plugin.
After activating the plugin, navigate to Settings > UpdraftPlus Backups in the WordPress admin interface. You’ll see the main settings screen with five tabs.
Manual Backup
In the first tab, labeled Current Status, click on the Backup Now button. A small window will open, allowing you to choose what to include in the current backup – the database, the site’s files, or both.
Select both options and click Backup Now.
If you’ve set up a connection to one of the cloud services, you’ll also see the option to upload the backup to the cloud.
After the backup is completed, which will vary based on the number of files and the size of your database, you’ll receive an email confirming the backup completion.
At this point, the backup is stored on the server itself (if you didn’t configure cloud services). It’s advisable to download the backup to your computer and keep it in a safe place.
To do this, go to the second tab, Existing Backups, and you’ll see the following screen showing the backups created so far:
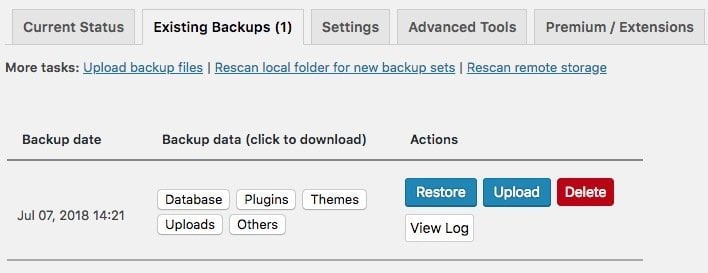
Under the Actions column on this screen, you have the following options:
- Restore one of the backups you’ve created by clicking Restore next to the desired backup.
- Upload the backup to one of the remote storage services you’ve configured by clicking Upload.
- Delete the backup by clicking Delete next to the desired backup.
- View the log files of one of the backups, which you can do by clicking the View Log button next to the desired backup.
Saving the Backup on Your Computer
If you want to download the backup to your computer, you can do so under the Backup Data column. You can separately download the themes, plugins, database, and Uploads folder backups.
It’s recommended to save the files on your computer if you haven’t configured remote storage. But why not set up a cloud service? It will save you time and be much more convenient.
Choosing and Saving Backups to Remote Storage
The UpdraftPlus plugin integrates with various remote storage solutions. In the third tab, labeled Settings, you can set up scheduled backups (explained below) and choose one of the cloud services.
Let’s take Google Drive as an example for remote storage. Choose Google Drive and the integration settings will appear below.

Each remote storage solution has a different integration process, so just follow the instructions you receive.
The settings include the option to choose the backup folder, select which files to back up, and exclude certain files or directories.
For this guide, we’ll leave the default settings. Click Save Changes at the bottom of the screen:

Click on the provided link to authorize the plugin to interface with Google, choose your account, and click approve.

After approval, click Complete Setup to finish the integration.
Now, when you click Backup Now, you’ll also have the option to save the backup to remote storage.

By the way, you can save your backups to more than one remote storage, but to do so, you’ll need to upgrade to the premium version of UpdraftPlus…
Setting Up Automatic Backups – Scheduled Backups
Setting up automatic backups is also done from the Settings tab and is very straightforward.

Instead of the Manual option, choose the timing for automatic backups and how often they will run for files and the database. The backups will be performed automatically according to your settings.
Restoring Backups
If you find yourself needing to restore a backup, it’s a straightforward process with UpdraftPlus. All you’ll need is a few minutes and a few clicks.
To start, click on the Existing Backups tab where you’ll find the backups you’ve created. To restore a backup, click Restore.
You can also upload a backup that you’ve saved on your computer by clicking the Upload Backup Files link.
You’ll then be prompted to choose which components you want to restore, including plugins, themes, the Uploads folder containing images, the database, and more.

The choice is based on your restoration needs, but if you want to restore the entire site, simply select all five options.
Once the data is received from remote storage, follow the on-screen messages. The process concludes with clicking the Restore button a few more times.
When the restoration is complete, you’ll receive a message indicating the successful completion.
FAQs
Summary
In this guide, we covered two ways to back up a WordPress site: using cPanel for a straightforward server-level backup, and using the UpdraftPlus plugin for automated cloud backups with easy restoration.
Whichever method you choose, the key is to back up regularly, store copies offsite, and test your backups periodically to make sure they work when you need them. Backups are a critical part of maintaining a WordPress website.