Google Maps is a powerful tool for displaying locations and directions on your WordPress website. While plugins make this easy, you can also embed Google Maps manually without adding extra bloat to your site.
This guide shows you how to achieve this with step-by-step instructions, including how to use the Google Maps API, add custom markers, and change the map design to fit your website’s style. Here’s an example of a live map:
Just getting started with Google Maps? Don’t want to deal with the API and looking for a quick way to embed a map? Check out the post How to Easily Embed Google Maps on Your Website, which includes a simple and fast explanation for beginners.
Step 1: Get a Google Maps API Key
To use Google Maps on your website, you need an API key. Follow these steps to generate one:
- Visit the Google Cloud Console: Open the Google Cloud Console and sign in using your Google account.
- Create or Select a Project:
- Locate the project dropdown at the top of the page.
- Select an existing project, or click New Project to create a new one.
- Give the new project a name (e.g., “My Website Project”) and click Create.

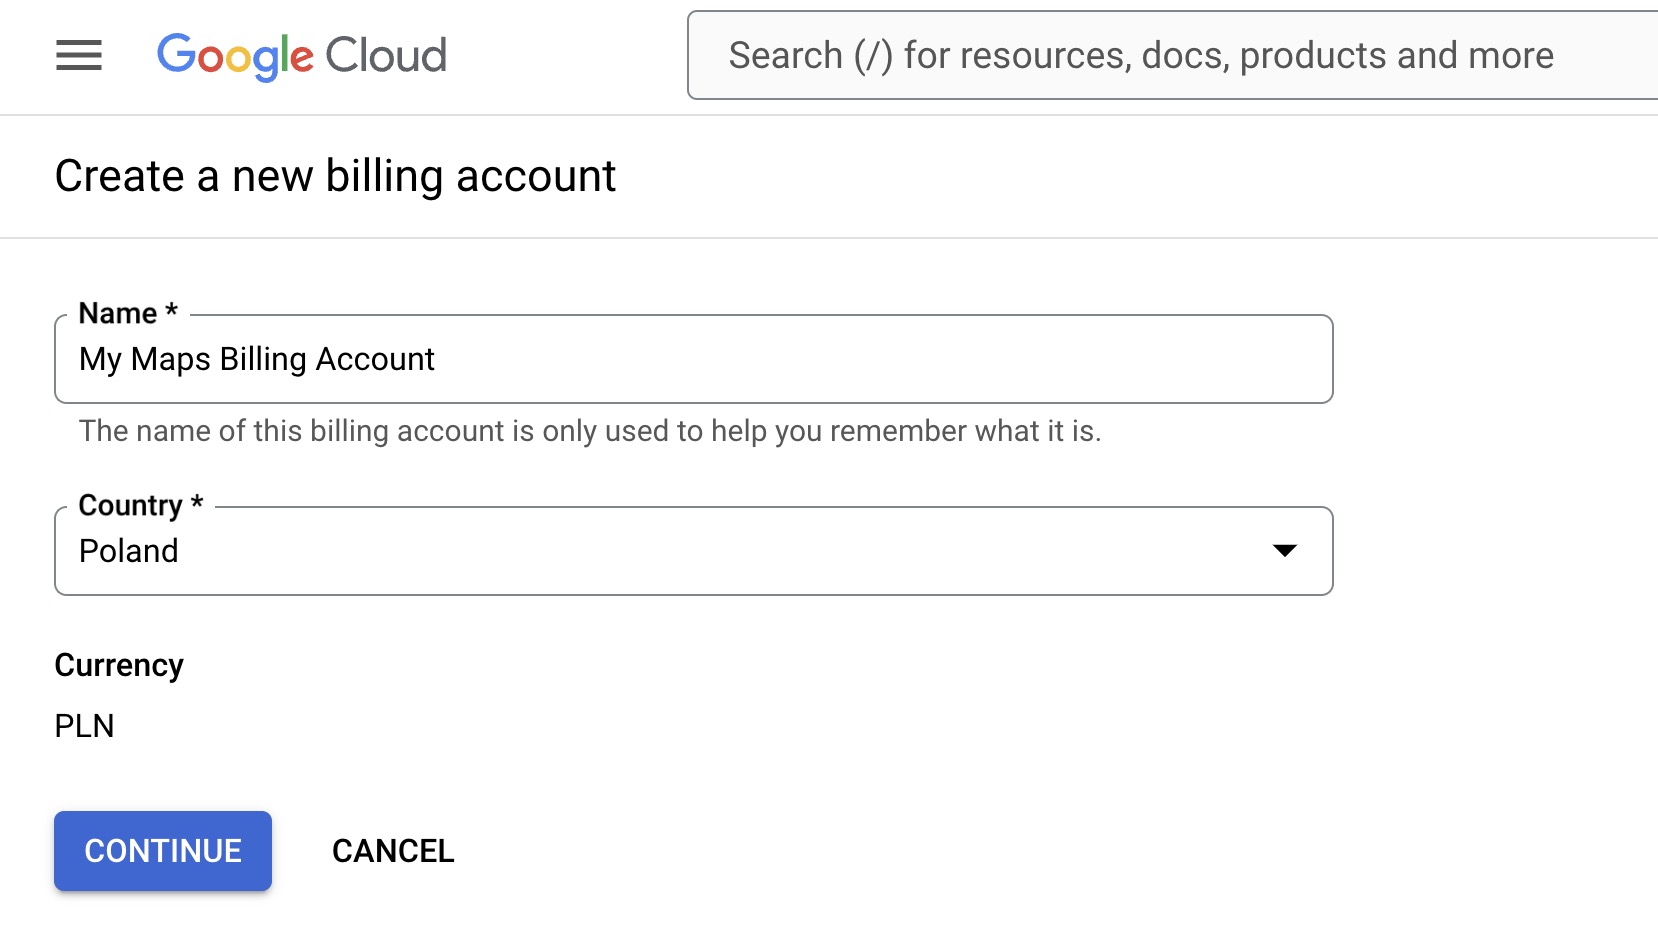
- Set Up Billing:
- Google Maps API requires an active billing account. Navigate to
Billing in the Cloud Console. - Follow the instructions to set up your billing account by adding your payment method.
- Note: As of March 2025, Google Maps Platform uses a subscription-based pricing model. The Starter plan ($100/month) includes 50,000 API calls and covers most small websites. New customers also receive a $300 trial credit to get started. A pay-as-you-go option is also available without a subscription.
- Google Maps API requires an active billing account. Navigate to
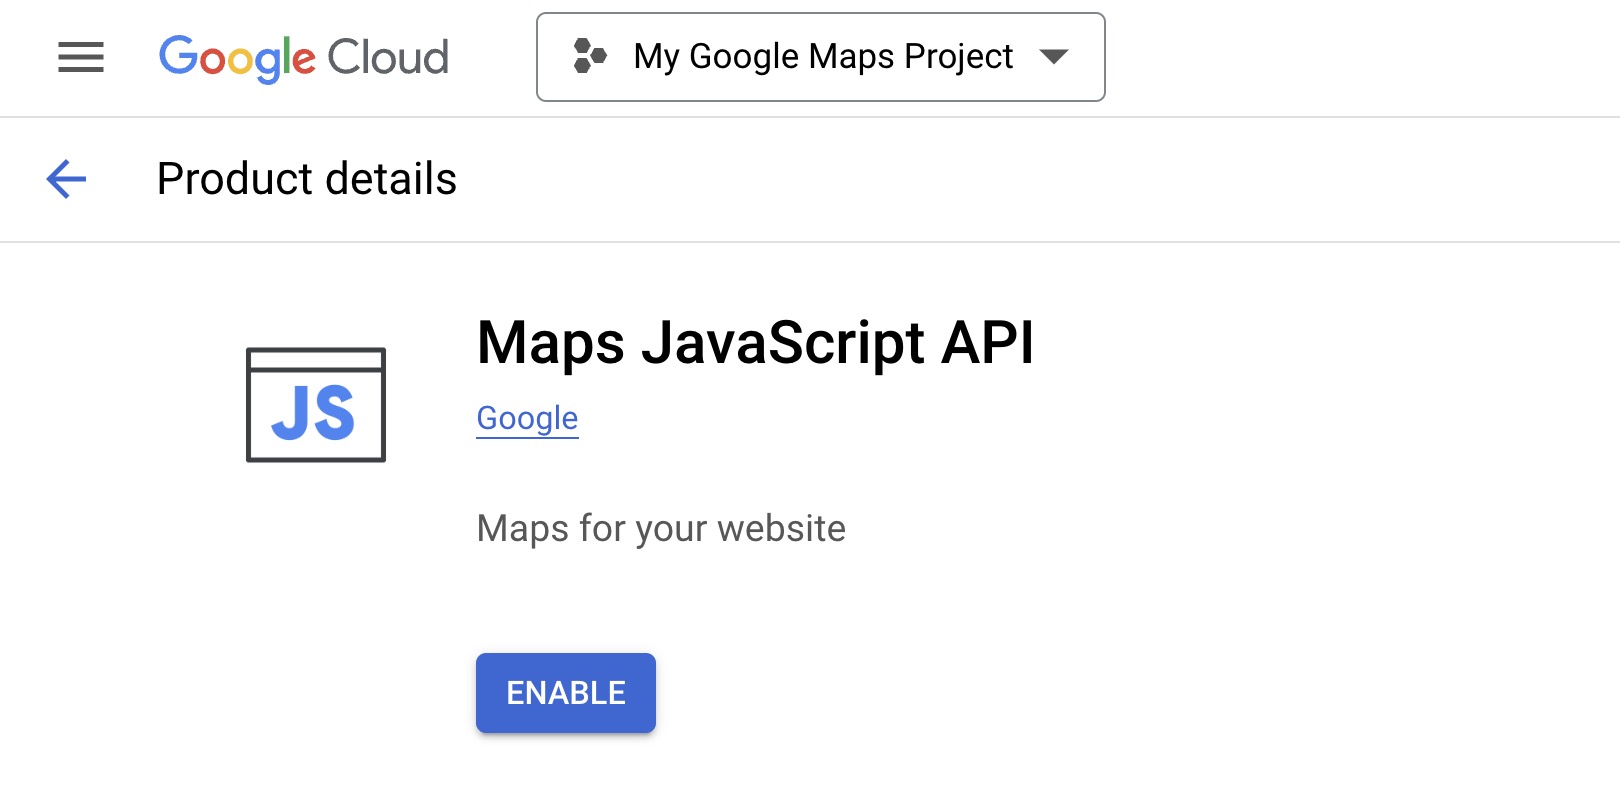
- Enable the Maps JavaScript API:
- Go to APIs & Services > Library in the left-hand menu.
- Search for Maps JavaScript API and click on it.
- Click Enable to activate the API for your selected project.
- Go to Credentials:
- Select APIs & Services > Credentials from the left-hand menu.
- Click Create Credentials and choose API Key from the dropdown.
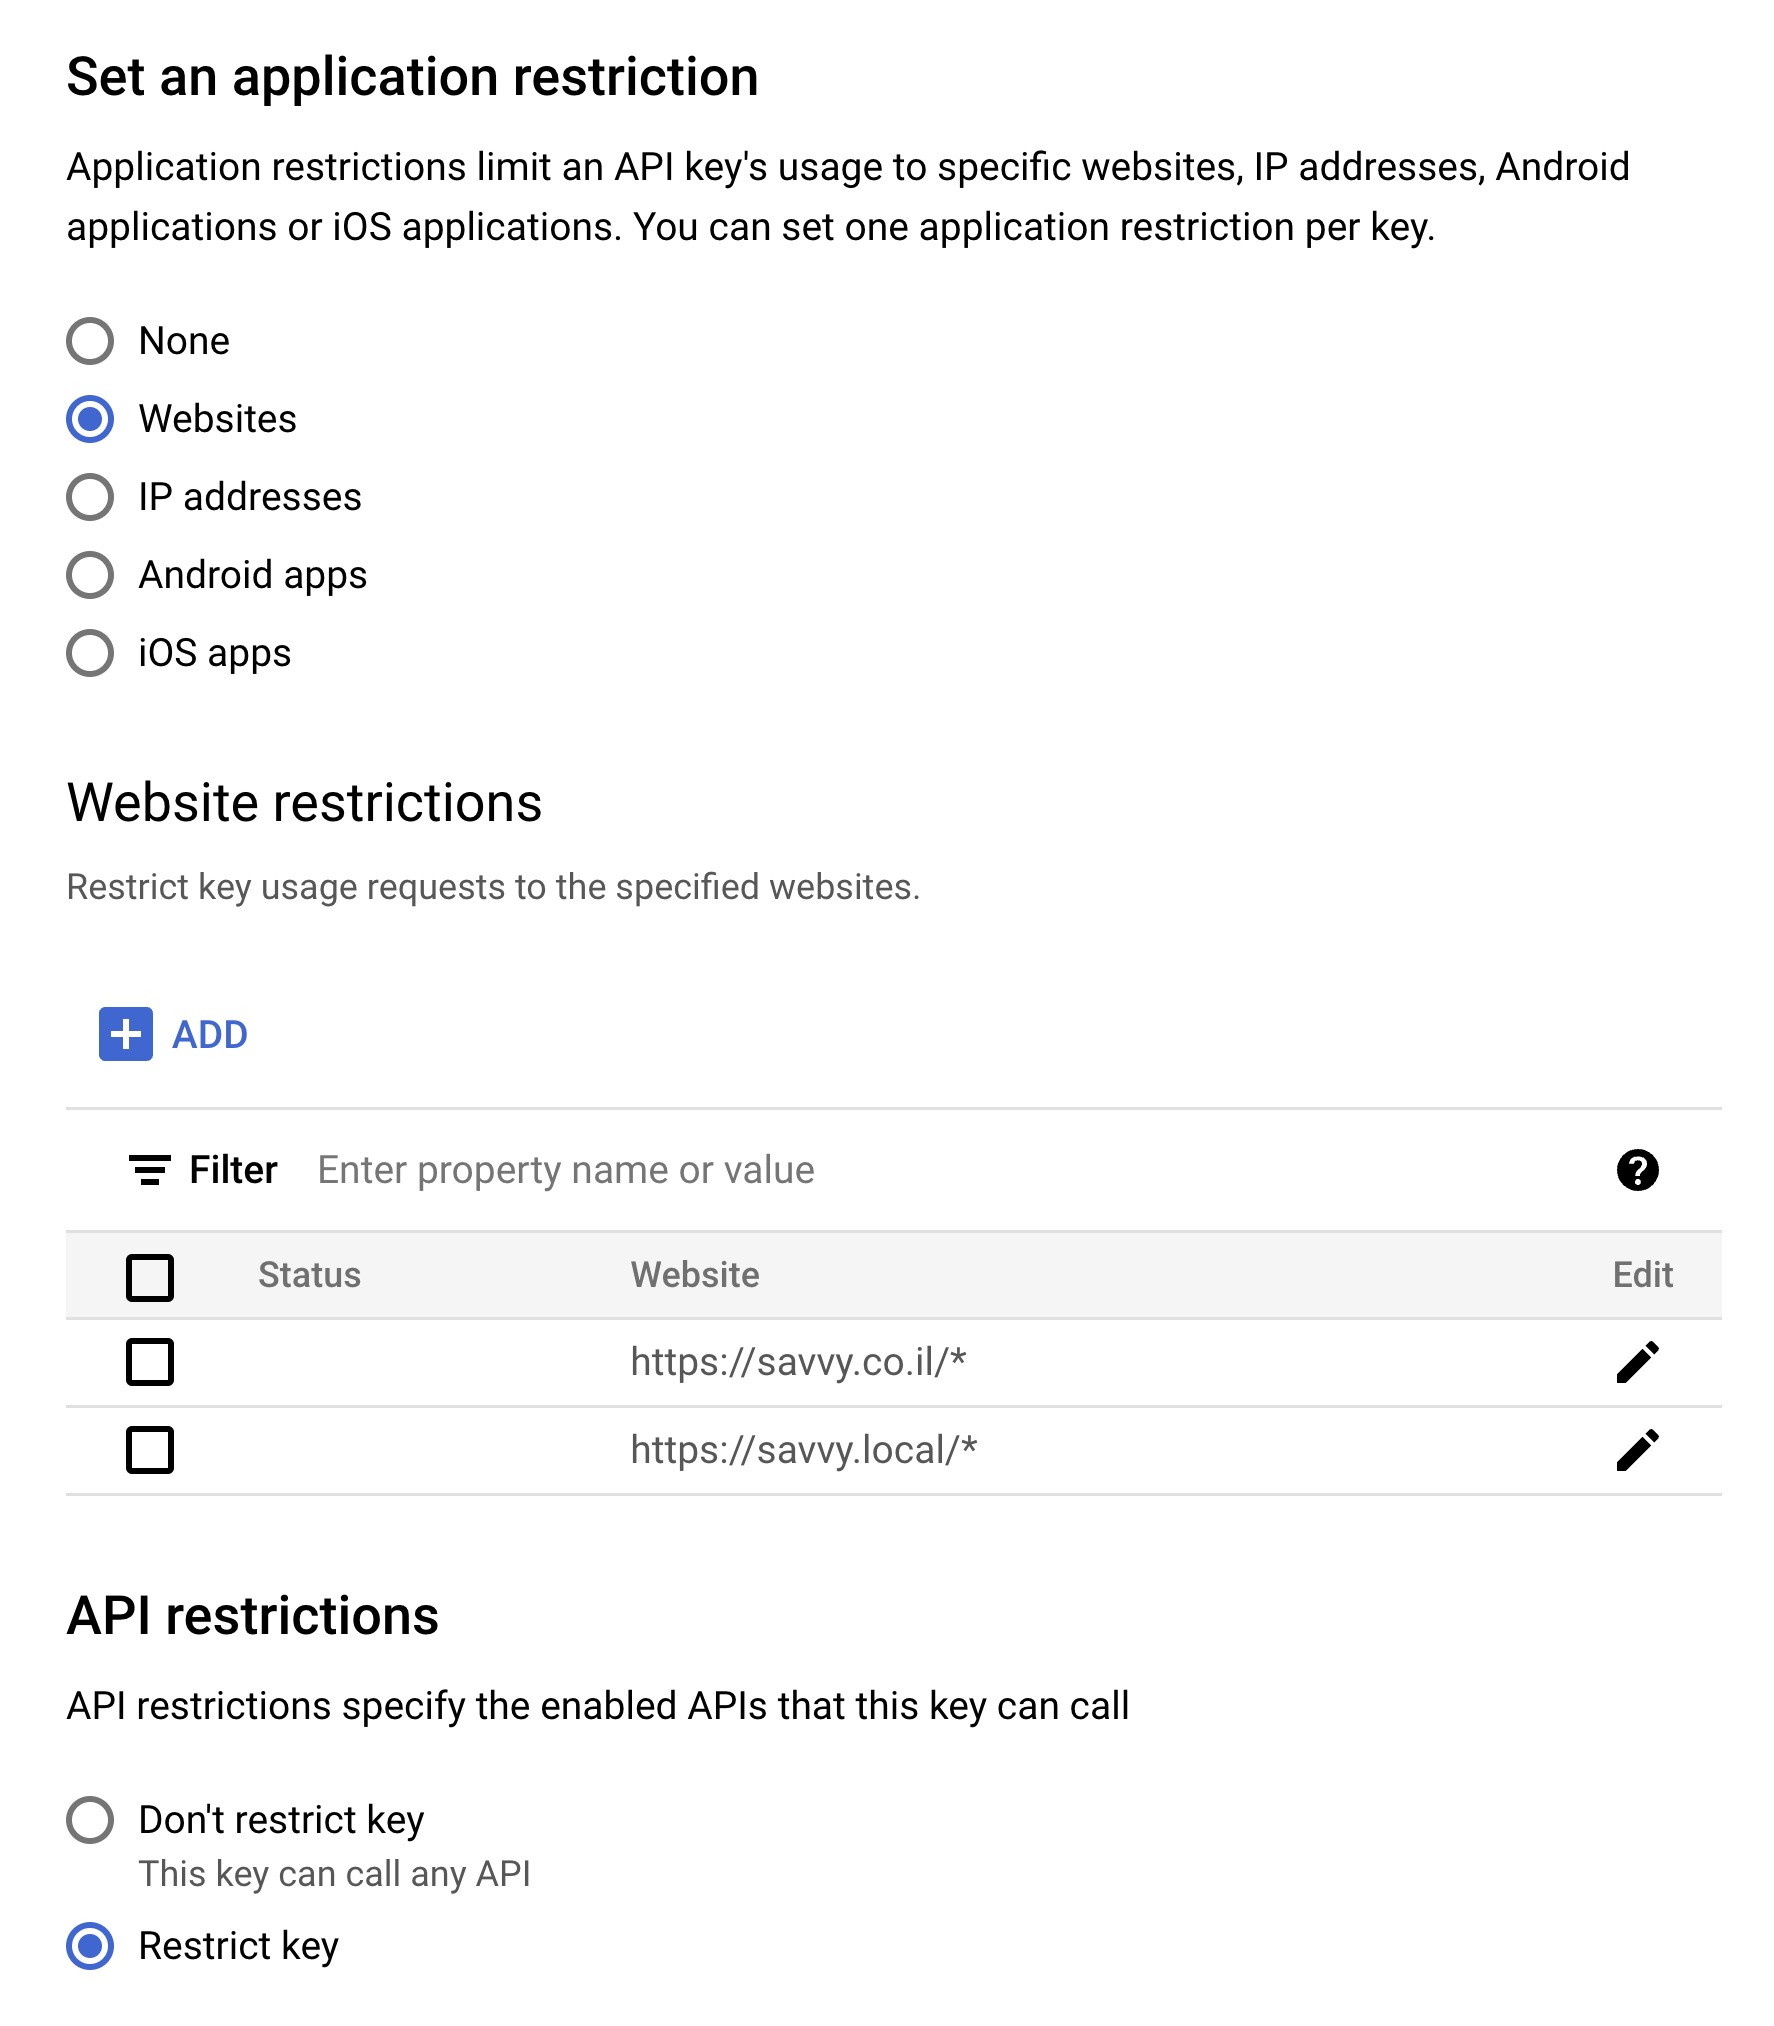
- Restrict the API Key for Security:
- Click the Edit icon next to your API key.
- Under Application Restrictions, choose HTTP Referrers (Websites).
- Add your website’s domain(s) in the format
https://yourwebsite.com/*. For local testing, addhttps://localhost/*. - Under API Restrictions, select Restrict Key and choose Maps JavaScript API from the dropdown.
- Click Save to apply the restrictions.
- Copy Your API Key:
Once you’ve set up and secured your API key, copy it. You’ll use this in the next steps to integrate Google Maps into your WordPress site.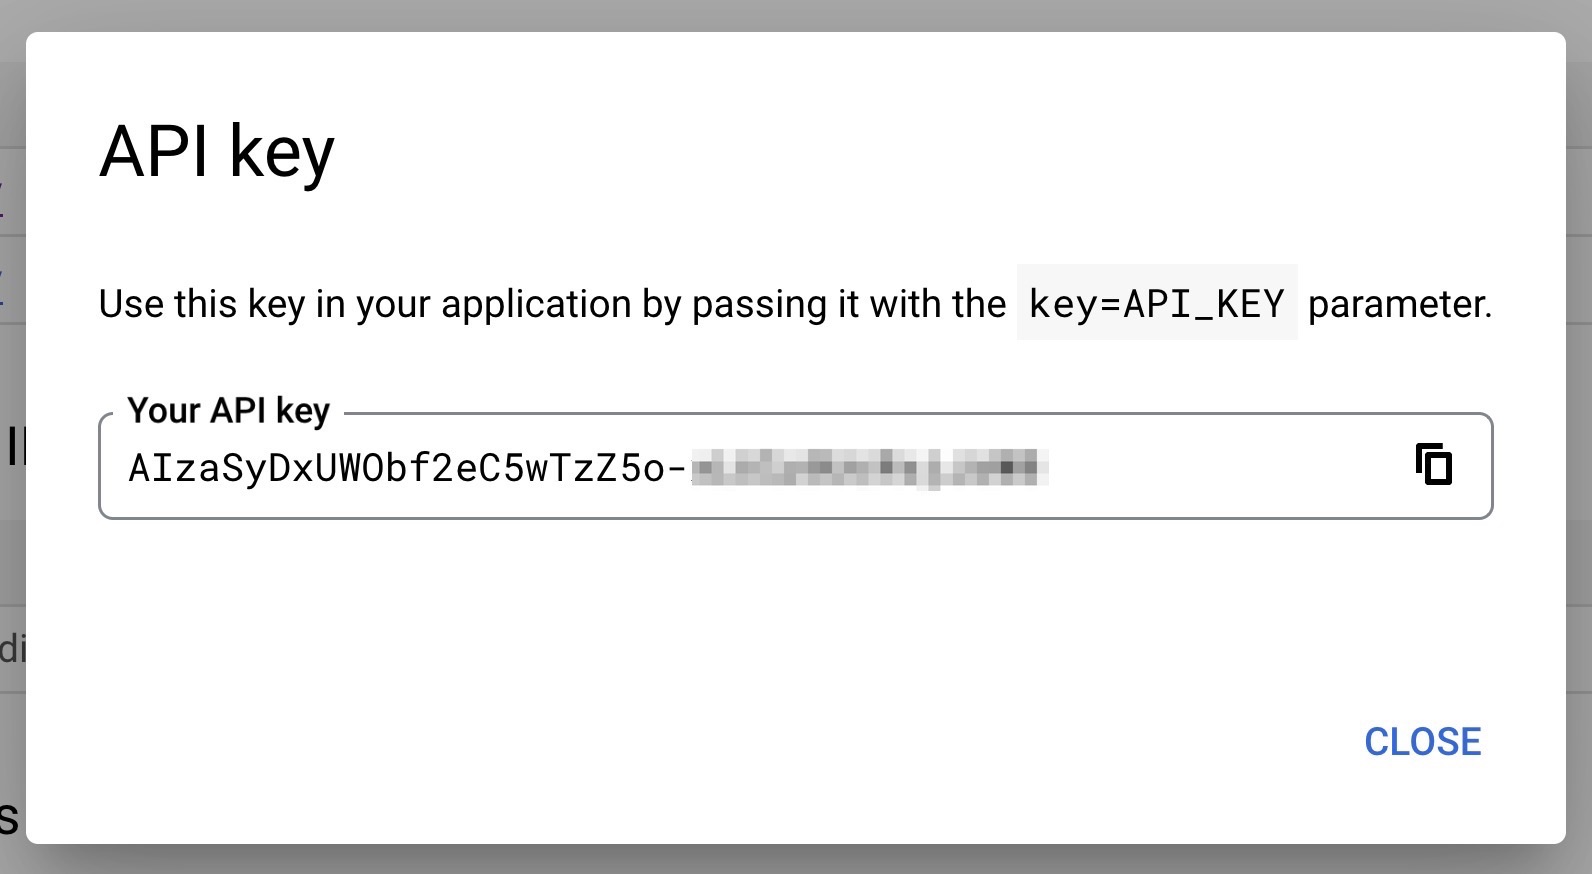
Important: Always restrict your API key to prevent unauthorized usage and unexpected charges. You are financially responsible for any usage on an unrestricted key. Use separate API keys for different applications, and delete any keys you no longer need.
Step 2: Add Google Maps to WordPress
Integrating Google Maps directly into your WordPress theme or page template involves embedding the code and ensuring it works seamlessly with your site design.
1. Enqueue the Google Maps Script
Add the following code to your theme’s functions.php file to load the Google Maps API using wp_enqueue_script:
function enqueue_google_maps() {
    wp_enqueue_script( 'google-maps', 'https://maps.googleapis.com/maps/api/js?key=YOUR_API_KEY&callback=initMap', null, null, true );
}
add_action( 'wp_enqueue_scripts', 'enqueue_google_maps' );
Replace YOUR_API_KEY with the API key you generated earlier.
2. Add the HTML for the Map
Insert the following HTML into your page or post using the WordPress editor:
<div id="map" style="width: 100%; height: 400px;"></div>3. Initialize the Map with JavaScript
Create a new JavaScript file (e.g., maps.js) and include the following code to initialize the map:
function initMap() {
    let mapOptions = {
        center: { lat: 32.0853, lng: 34.7818 }, // Coordinates for Tel Aviv
        zoom: 12
    };
    let map = new google.maps.Map(document.getElementById('map'), mapOptions);
}
It is better to use let instead of var. For more information, check out the post on JavaScript Variables and Constants.
Link this JavaScript file in your theme by adding it to your functions.php file:
function enqueue_map_script() {
    wp_enqueue_script( 'custom-map', get_template_directory_uri() . '/js/maps.js', array( 'google-maps' ), null, true );
}
add_action( 'wp_enqueue_scripts', 'enqueue_map_script' );
Update the path to maps.js based on your theme’s file structure.
At this point, you should already see the map displayed on your site. If the map is not appearing, refer to the Troubleshooting Common Issues section. Now, let’s explore how to customize the map to better fit your design and user experience needs.
Add Markers to the Map
To add custom markers to your map, update the initMap function as follows:
function initMap() {
    let mapOptions = {
        center: { lat: 32.0853, lng: 34.7818 }, // Coordinates for Tel Aviv
        zoom: 12
    };
    let map = new google.maps.Map(document.getElementById('map'), mapOptions);

    // Add multiple markers
    let locations = [
        { lat: 32.0853, lng: 34.7818, title: 'Tel Aviv' },
        { lat: 32.0623, lng: 34.7691, title: 'Ramat Gan' }
    ];

    locations.forEach(function(location) {
        new google.maps.Marker({
            position: { lat: location.lat, lng: location.lng },
            map: map,
            title: location.title
        });
    });
}
The code above demonstrates how to add multiple custom markers to your Google Map. Each marker represents a specific location, defined by its latitude, longitude, and an optional title. In this example, markers are added for Tel Aviv and Ramat Gan.
Note: As of February 2024, google.maps.Marker is deprecated. Google recommends migrating to google.maps.marker.AdvancedMarkerElement, which requires a Map ID and offers better performance, accessibility, and customization. The legacy Marker class still works and will continue to receive critical bug fixes, but new projects should use AdvancedMarkerElement instead. See the migration guide for details.
Customizing Markers:
You can further customize your markers by adding properties such as icon to use custom images for markers, or animation to add visual effects like a bounce animation.
new google.maps.Marker({
    position: { lat: 32.0853, lng: 34.7818 },
    map: map,
    title: 'Tel Aviv',
    icon: 'https://example.com/custom-icon.png', // Custom icon URL
    animation: google.maps.Animation.DROP // Drop animation effect
});
Tip: Use descriptive titles and custom icons to make your markers more informative and visually appealing for users.
Change the Map Design
You can customize the map’s appearance by applying styles. Below are two complete design options for your map using JSON-based styling.
Google also offers cloud-based map styling through the Google Cloud Console, which lets you update styles without changing your code. Cloud-based styling requires a Map ID and is managed server-side. The JSON approach shown below works without a Map ID and is applied directly in your code.
Night Style
let nightStyle = [
    { elementType: "geometry", stylers: [{ color: "#242f3e" }] },
    { elementType: "labels.text.stroke", stylers: [{ color: "#242f3e" }] },
    { elementType: "labels.text.fill", stylers: [{ color: "#746855" }] },
    { featureType: "administrative.locality", elementType: "labels.text.fill", stylers: [{ color: "#d59563" }] },
    { featureType: "poi", elementType: "labels.text.fill", stylers: [{ color: "#d59563" }] },
    { featureType: "poi.park", elementType: "geometry", stylers: [{ color: "#263c3f" }] },
    { featureType: "poi.park", elementType: "labels.text.fill", stylers: [{ color: "#6b9a76" }] },
    { featureType: "road", elementType: "geometry", stylers: [{ color: "#38414e" }] },
    { featureType: "road", elementType: "geometry.stroke", stylers: [{ color: "#212a37" }] },
    { featureType: "road", elementType: "labels.text.fill", stylers: [{ color: "#9ca5b3" }] },
    { featureType: "road.highway", elementType: "geometry", stylers: [{ color: "#746855" }] },
    { featureType: "road.highway", elementType: "geometry.stroke", stylers: [{ color: "#1f2835" }] },
    { featureType: "road.highway", elementType: "labels.text.fill", stylers: [{ color: "#f3d19c" }] },
    { featureType: "transit", elementType: "geometry", stylers: [{ color: "#2f3948" }] },
    { featureType: "transit.station", elementType: "labels.text.fill", stylers: [{ color: "#d59563" }] },
    { featureType: "water", elementType: "geometry", stylers: [{ color: "#17263c" }] },
    { featureType: "water", elementType: "labels.text.fill", stylers: [{ color: "#515c6d" }] },
    { featureType: "water", elementType: "labels.text.stroke", stylers: [{ color: "#17263c" }] }
];
Retro Style
let retroStyle = [
    { elementType: "geometry", stylers: [{ color: "#ebe3cd" }] },
    { elementType: "labels.text.fill", stylers: [{ color: "#523735" }] },
    { elementType: "labels.text.stroke", stylers: [{ color: "#f5f1e6" }] },
    { featureType: "administrative", elementType: "geometry.stroke", stylers: [{ color: "#c9b2a6" }] },
    { featureType: "administrative.land_parcel", elementType: "geometry.stroke", stylers: [{ color: "#dcd2be" }] },
    { featureType: "administrative.land_parcel", elementType: "labels.text.fill", stylers: [{ color: "#ae9e90" }] },
    { featureType: "landscape.natural", elementType: "geometry", stylers: [{ color: "#dfd2ae" }] },
    { featureType: "poi", elementType: "geometry", stylers: [{ color: "#dfd2ae" }] },
    { featureType: "poi", elementType: "labels.text.fill", stylers: [{ color: "#93817c" }] },
    { featureType: "poi.park", elementType: "geometry.fill", stylers: [{ color: "#a5b076" }] },
    { featureType: "poi.park", elementType: "labels.text.fill", stylers: [{ color: "#447530" }] },
    { featureType: "road", elementType: "geometry", stylers: [{ color: "#f5f1e6" }] },
    { featureType: "road.arterial", elementType: "geometry", stylers: [{ color: "#fdfcf8" }] },
    { featureType: "road.highway", elementType: "geometry", stylers: [{ color: "#f8c967" }] },
    { featureType: "road.highway", elementType: "geometry.stroke", stylers: [{ color: "#e9bc62" }] },
    { featureType: "road.highway.controlled_access", elementType: "geometry", stylers: [{ color: "#e98d58" }] },
    { featureType: "road.highway.controlled_access", elementType: "geometry.stroke", stylers: [{ color: "#db8555" }] },
    { featureType: "road.local", elementType: "labels.text.fill", stylers: [{ color: "#806b63" }] },
    { featureType: "transit.line", elementType: "geometry", stylers: [{ color: "#dfd2ae" }] },
    { featureType: "transit.line", elementType: "labels.text.fill", stylers: [{ color: "#8f7d77" }] },
    { featureType: "transit.line", elementType: "labels.text.stroke", stylers: [{ color: "#ebe3cd" }] },
    { featureType: "water", elementType: "geometry.fill", stylers: [{ color: "#b9d3c2" }] },
    { featureType: "water", elementType: "labels.text.fill", stylers: [{ color: "#92998d" }] }
];
To apply any style, use the styles property in the mapOptions object:
let mapOptions = {
    center: { lat: 32.0853, lng: 34.7818 },
    zoom: 12,
    styles: nightStyle // Change to retroStyle or any custom style array
};
Tip: Experiment with different styles to align the map’s appearance with your website’s design.
Remove Map Controls
To further customize the user experience, you may want to remove map controls like zoom buttons, the fullscreen button, and others. Google Maps provides an easy way to do this using the disableDefaultUI property or by disabling specific controls individually.
Disabling All Controls
To remove all map controls, add the disableDefaultUI property to your mapOptions object and set it to true:
let mapOptions = {
    center: { lat: 32.0853, lng: 34.7818 },
    zoom: 12,
    styles: silverStyle, // Example: Apply the silver style
    disableDefaultUI: true // Removes all map controls
};
This will hide all buttons and UI elements, giving you a minimalistic map design.
Disabling Specific Controls
If you’d like to remove specific buttons instead of all controls, you can disable them individually by setting their corresponding properties to false:
let mapOptions = {
    center: { lat: 32.0853, lng: 34.7818 },
    zoom: 12,
    styles: silverStyle, // Example: Apply the silver style
    mapTypeControl: false, // Removes the Map/Satellite toggle
    zoomControl: false, // Removes zoom buttons
    fullscreenControl: false, // Removes the fullscreen button
    streetViewControl: false, // Removes the Street View Pegman
    scaleControl: false // Removes the scale bar
};
Tip: Always test your map design on different devices to ensure it provides an optimal user experience.
Changing the Language of Google Maps
You can customize the language of your Google Maps interface by adding the language parameter to the API URL. This parameter sets the language for labels, buttons, and other map interface elements.
<script src="https://maps.googleapis.com/maps/api/js?key=YOUR_API_KEY&callback=initMap&language=fr"></script>In this example, the language=fr parameter sets the map’s interface to French. Replace fr with the desired language code (e.g., en for English, es for Spanish, or he for Hebrew).
For further localization, you can also add the region parameter:
<script src="https://maps.googleapis.com/maps/api/js?key=YOUR_API_KEY&callback=initMap&language=es®ion=ES"></script>Here, region=ES suggests Spanish region-specific details for the map.
Refer to the Google Maps documentation for a full list of supported language codes.
Optimizing Google Maps for Performance
Loading the Maps JavaScript API adds external scripts that can affect your page speed. Here are a few ways to keep your map fast:
Load the script only where needed. Instead of enqueuing the Google Maps script on every page, use a conditional check in your functions.php to load it only on pages that actually display a map:
function enqueue_google_maps() {
    if ( is_page( 'contact' ) || is_singular( 'location' ) ) {
        wp_enqueue_script( 'google-maps', 'https://maps.googleapis.com/maps/api/js?key=YOUR_API_KEY&callback=initMap', null, null, true );
        wp_enqueue_script( 'custom-map', get_template_directory_uri() . '/js/maps.js', array( 'google-maps' ), null, true );
    }
}
add_action( 'wp_enqueue_scripts', 'enqueue_google_maps' );
Use the defer strategy. WordPress 6.3 and later supports a strategy parameter for optimized script loading. This tells the browser to download the script without blocking rendering:
wp_enqueue_script( 'google-maps', 'https://maps.googleapis.com/maps/api/js?key=YOUR_API_KEY&callback=initMap', array(), null, array(
    'in_footer' => true,
    'strategy'  => 'defer',
) );
Consider a static map for non-interactive use. If you only need to show a location without user interaction, the Maps Static API returns a plain image and requires no JavaScript at all. This is the lightest option for simple “here’s where we are” maps.
Troubleshooting Common Issues
Addressing these common issues ensures a seamless integration of Google Maps into your WordPress site.
- Map Not Displaying: Ensure your API key is correct and the Maps JavaScript API is enabled in the Google Cloud Console.
- API Key Errors: Check if your key is restricted correctly. Add
https://yourwebsite.com/*orhttp://localhost/*for local development. Note that wildcards may not always function as expected, so specify your domains carefully. - RefererNotAllowedMapError: Verify that the referrers in your API restrictions include the exact domain you’re using during development or production.
- Mixed Content Warning: Ensure your website and the Google Maps script are both served over HTTPS.
- Map Not Loading After Changes: Clear your browser cache or use an incognito window to test the latest updates.
- Marker Not Appearing: Double-check the coordinates and syntax in your
maps.jsfile. - BillingNotEnabledMapError: This error means billing is not set up for your Google Cloud project. Even on the Starter plan, an active billing account is required before the API will serve map tiles.
Tip: Use your browser’s developer tools (console and network tabs) to debug API errors and missing resources.
FAQs
Common questions about adding Google Maps to WordPress:
BillingNotEnabledMapError and the map will not render.
google.maps.Marker class was deprecated in February 2024 but still works and receives critical bug fixes. Google recommends migrating to google.maps.marker.AdvancedMarkerElement, which requires a Map ID and offers better performance, accessibility, and customization options. Google will provide at least 12 months notice before fully removing the legacy class.
https://yourwebsite.com/*). Under API Restrictions, select Restrict Key and choose only the APIs you need (e.g., Maps JavaScript API). Use separate keys for different applications and delete unused keys.
Conclusion
Adding Google Maps without a plugin gives you complete control over its functionality and appearance, reduces reliance on third-party tools, and improves your site’s performance by minimizing unnecessary code overhead.
- Better Performance: Plugins can sometimes slow down your website.
- Full Control: You can customize the map exactly how you want it.
- Learning Opportunity: You’ll gain valuable knowledge about using APIs and JavaScript.
By following the steps above, you can embed a responsive, customizable map that enhances user experience. Let us know in the comments if you have any questions or suggestions for further enhancements!