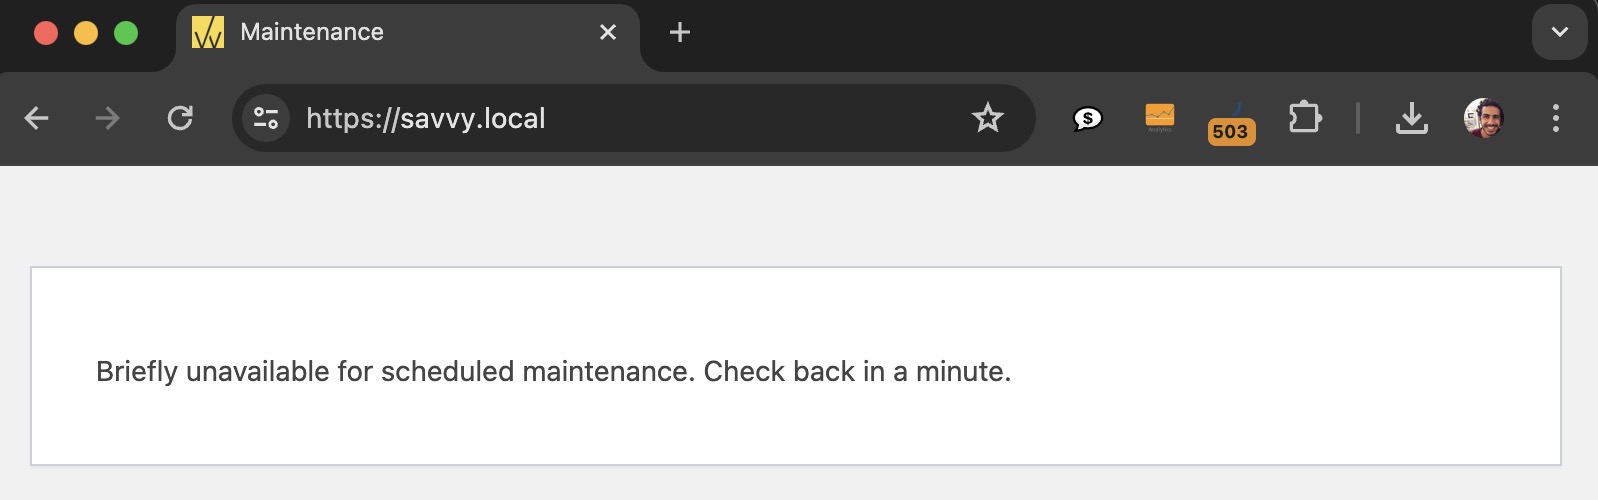
Occasionally, WordPress can get stuck in maintenance mode, leaving your site inaccessible to visitors. This typically happens during updates to the core, themes, or plugins, and it can be frustrating when your site displays “Briefly unavailable for scheduled maintenance. Check back in a minute.”
In this post, you’ll learn exactly what causes this, how to fix it in under a minute, and how to prevent it from happening again.
What Causes WordPress to Get Stuck in Maintenance Mode?
When WordPress runs an update, it creates a temporary file called .maintenance in your site’s root directory. This file contains a single line of PHP:
<?php $upgrading = time(); ?>As long as this file exists, WordPress displays the maintenance message and blocks access to your site. Once the update completes, WordPress automatically deletes the file.
The problem occurs when the update process is interrupted before it can clean up. Common causes include:
- Closing the browser tab or navigating away during an update
- Server timeout due to PHP
max_execution_timebeing too low - Insufficient PHP memory (
memory_limit) to complete the update - Plugin or theme conflicts that crash during the update process
- Updating multiple plugins or themes simultaneously on a slow server
- A dropped internet connection during the update
WordPress checks the
$upgradingtimestamp in the.maintenancefile. If the file is older than 10 minutes, WordPress automatically ignores it and loads the site normally. If your site is still stuck after 10 minutes, it may indicate a deeper issue with the update itself.
How to Fix WordPress Stuck in Maintenance Mode
The fix is straightforward – you need to delete the .maintenance file from your WordPress root directory. Here are several ways to do it:
Method 1 – Using FTP
Connect to your site via an FTP client (like FileZilla) and navigate to the root directory – the same folder that contains wp-config.php.
Locate the .maintenance file and delete it. Note that files starting with a dot may be hidden by default. In FileZilla, go to Server > Force showing hidden files to reveal them.
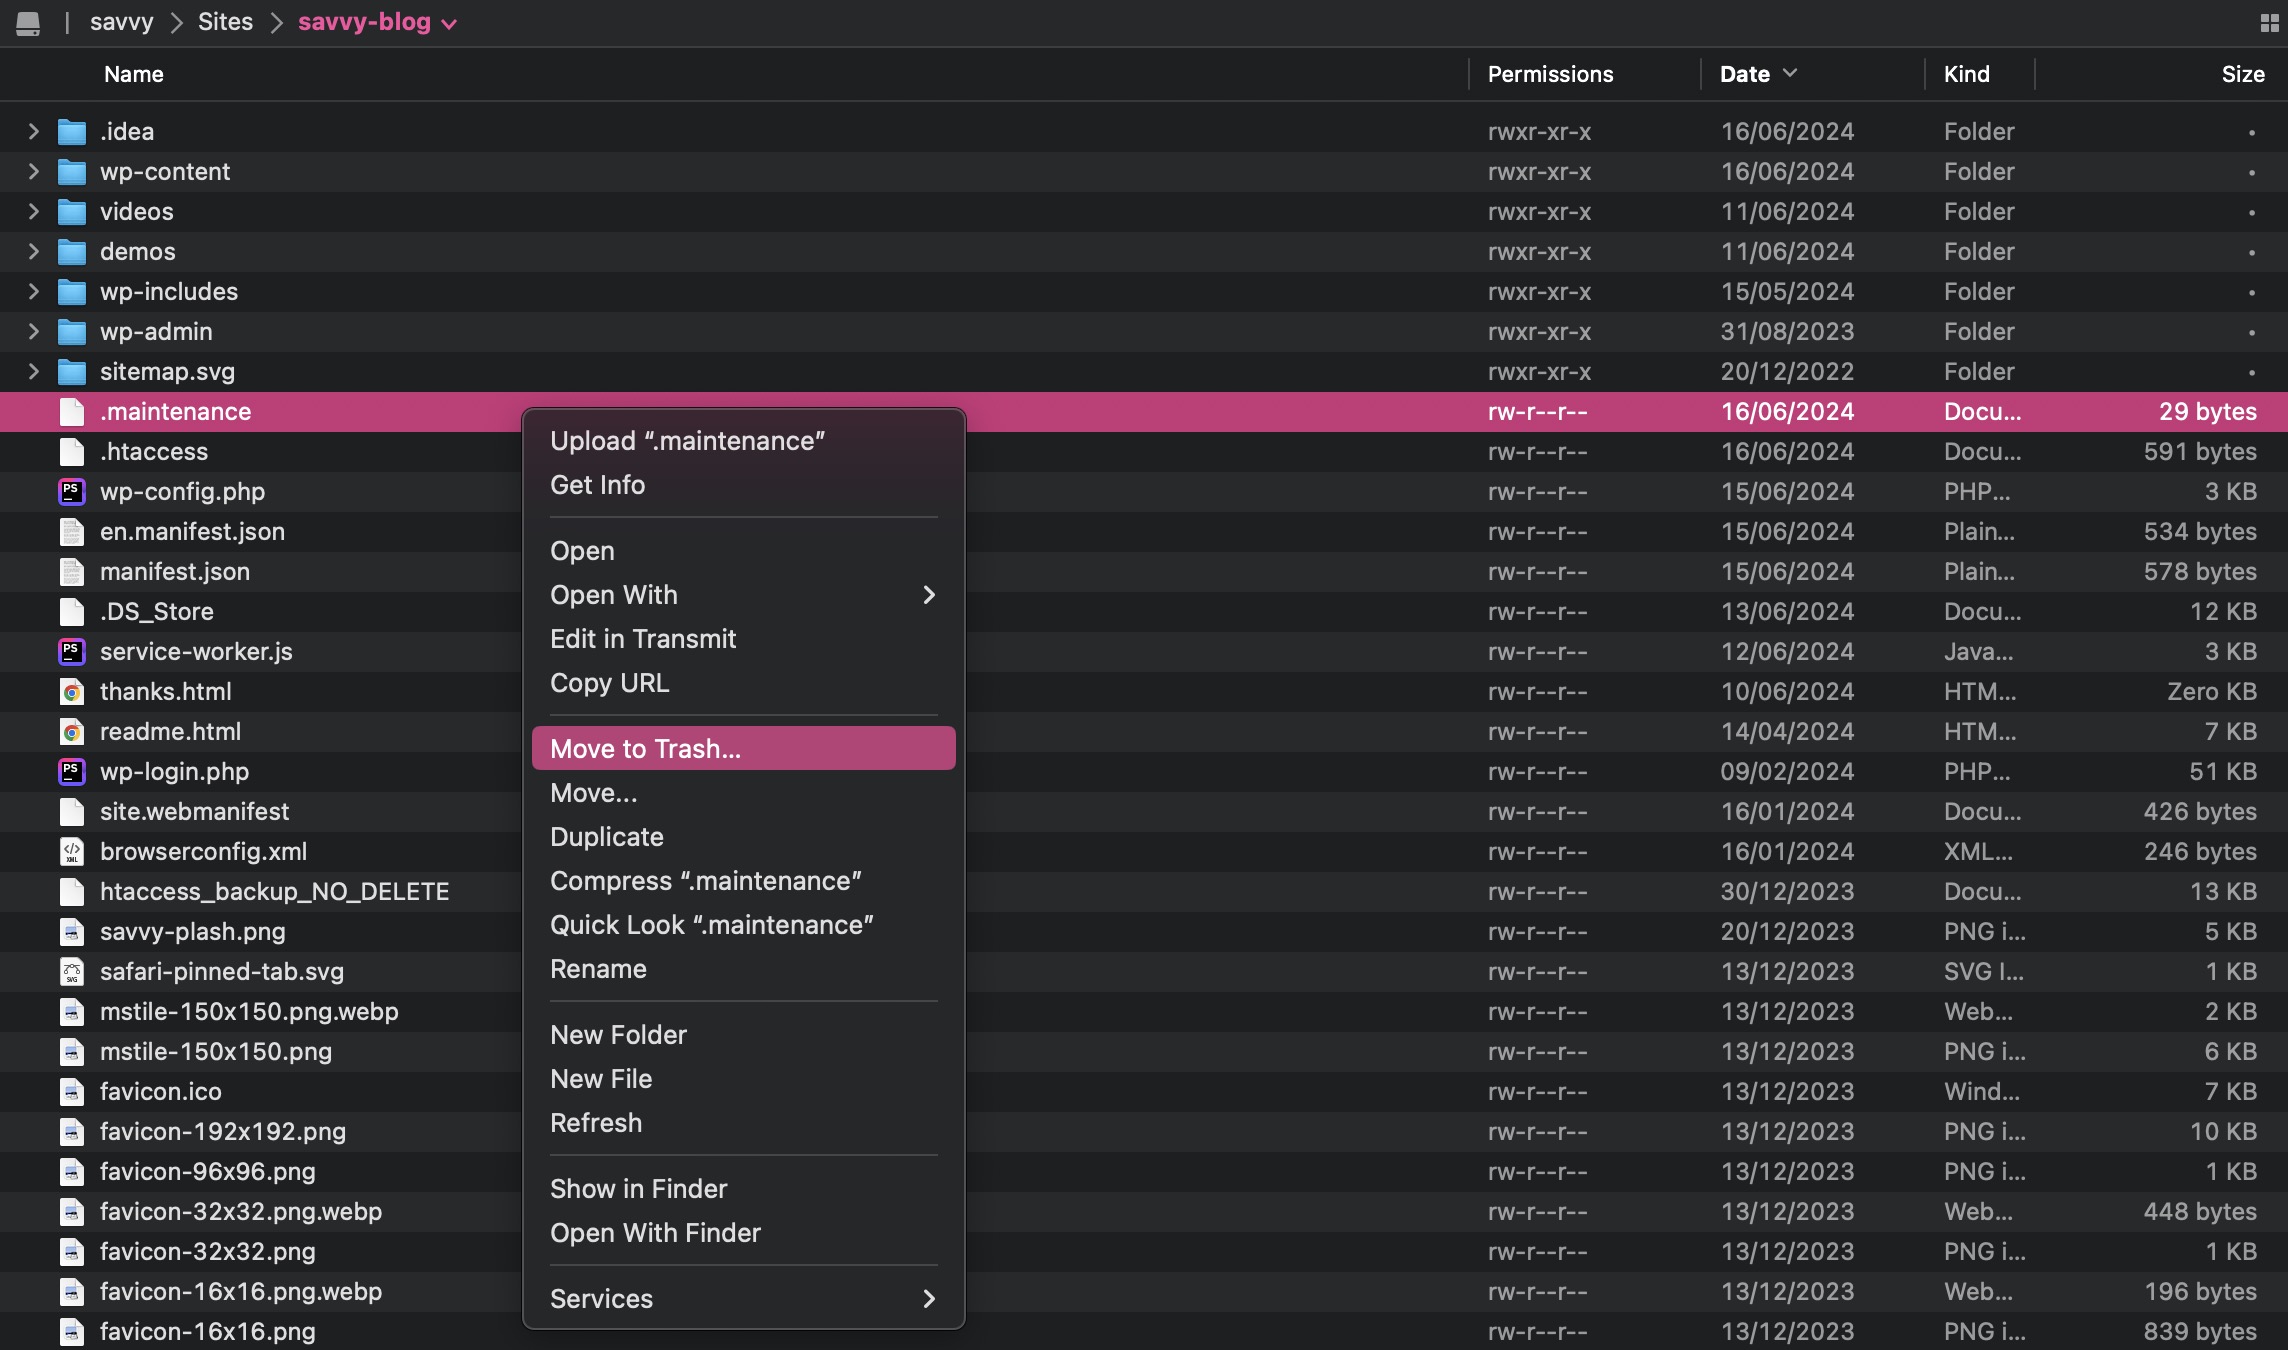
Method 2 – Using Your Hosting File Manager
Log into your hosting control panel (cPanel, Plesk, or similar) and open the File Manager. Navigate to your site’s root directory (public_html or similar), enable “Show hidden files” if needed, and delete .maintenance.
Method 3 – Using SSH or WP-CLI
If you have SSH access to your server, this is the fastest method:
rm /path/to/wordpress/.maintenanceOr if you have WP-CLI installed:
wp maintenance-mode deactivateAfter Deleting the File
Once you delete .maintenance, your site should load immediately. Then take these steps:
- Log into your WordPress admin and go to Dashboard > Updates
- Check if any updates failed and re-run them one at a time
- Clear your caching plugin’s cache (if you use one) to ensure the maintenance message is fully gone
- Clear your browser cache as well
If the .maintenance file keeps reappearing after you delete it, the update is likely failing repeatedly. Check your server’s PHP error log for details. Common culprits are insufficient memory, a corrupted plugin, or a PHP version incompatibility.
Increasing Update Timeout to Prevent Failures
If updates fail because of server timeouts, you can increase the time WordPress allows for updates by adding this line to your wp-config.php file:
define( 'WP_MAX_EXECUTION_TIME', 300 );You should also ensure your PHP settings are adequate. Add these to your .htaccess file or ask your hosting provider to adjust them:
php_value max_execution_time 300
php_value memory_limit 256M
These settings give WordPress up to 5 minutes and 256MB of memory to complete updates, which is enough for most situations.
How to Prevent WordPress from Getting Stuck in Maintenance Mode
Follow these practices to minimize the risk:
Update Plugins One at a Time
Avoid clicking “Update All” on the plugins page, especially on shared hosting. Update each plugin individually and wait for it to complete before starting the next one.
Don’t Close Your Browser During Updates
When WordPress is running an update, let it finish. Closing the tab or navigating away interrupts the process and leaves the .maintenance file behind.
Check Plugin Compatibility Before Updating
Before updating WordPress core, check that your active plugins and theme are compatible with the new version. The WordPress plugin directory shows the “Tested up to” version for each plugin.
Use a Staging Environment
For major updates, test them on a staging copy of your site first. Most hosting providers offer one-click staging environments. This way you can catch conflicts before they affect your live site.
Keep Server Resources Adequate
Make sure your hosting plan provides at least 256MB of PHP memory and a max_execution_time of 300 seconds. Sites on basic shared hosting plans with low resources are more likely to experience timeout-related failures.
FAQs
Common questions about WordPress maintenance mode:
.maintenance file is a temporary file that WordPress creates in your site's root directory during updates. It contains a PHP timestamp ($upgrading = time();) that tells WordPress to display the maintenance message instead of loading the site. WordPress deletes it automatically when the update completes successfully..maintenance file. If the file is older than 10 minutes, WordPress ignores it and loads the site normally. However, if the update process is actively looping or the server clock is misconfigured, this automatic recovery may not work, and you will need to delete the file manually..maintenance file is in the same directory as your wp-config.php.wp-content/plugins folder to plugins-disabled via FTP. Log into WordPress, rename the folder back, and reactivate plugins one by one to identify the conflict. Also check your PHP error log for specific error messages.Summary
WordPress maintenance mode is caused by a .maintenance file left behind when an update is interrupted. The fix is simple – delete the file via FTP, your hosting file manager, or WP-CLI.
To prevent it from recurring, update plugins one at a time, keep your server resources adequate, and never close your browser during an update. If the file keeps reappearing, check your PHP error log for the underlying cause.
Always back up your site before running major updates. A backup gives you a safe rollback point if anything goes wrong.