The ACF Repeater Field lets users add unlimited rows of content to any post or page in WordPress. It is a powerful tool for building dynamic, editable sections without touching the template code.
In this guide, we will use the Repeater Field to create a FAQ page in WordPress – a questions and answers section that the client can manage directly from the admin. Here is what the final result looks like:
Set Up the ACF Repeater Field
Install and activate ACF Pro (the Repeater field requires the Pro version). Then create a page named Questions and Answers in WordPress.
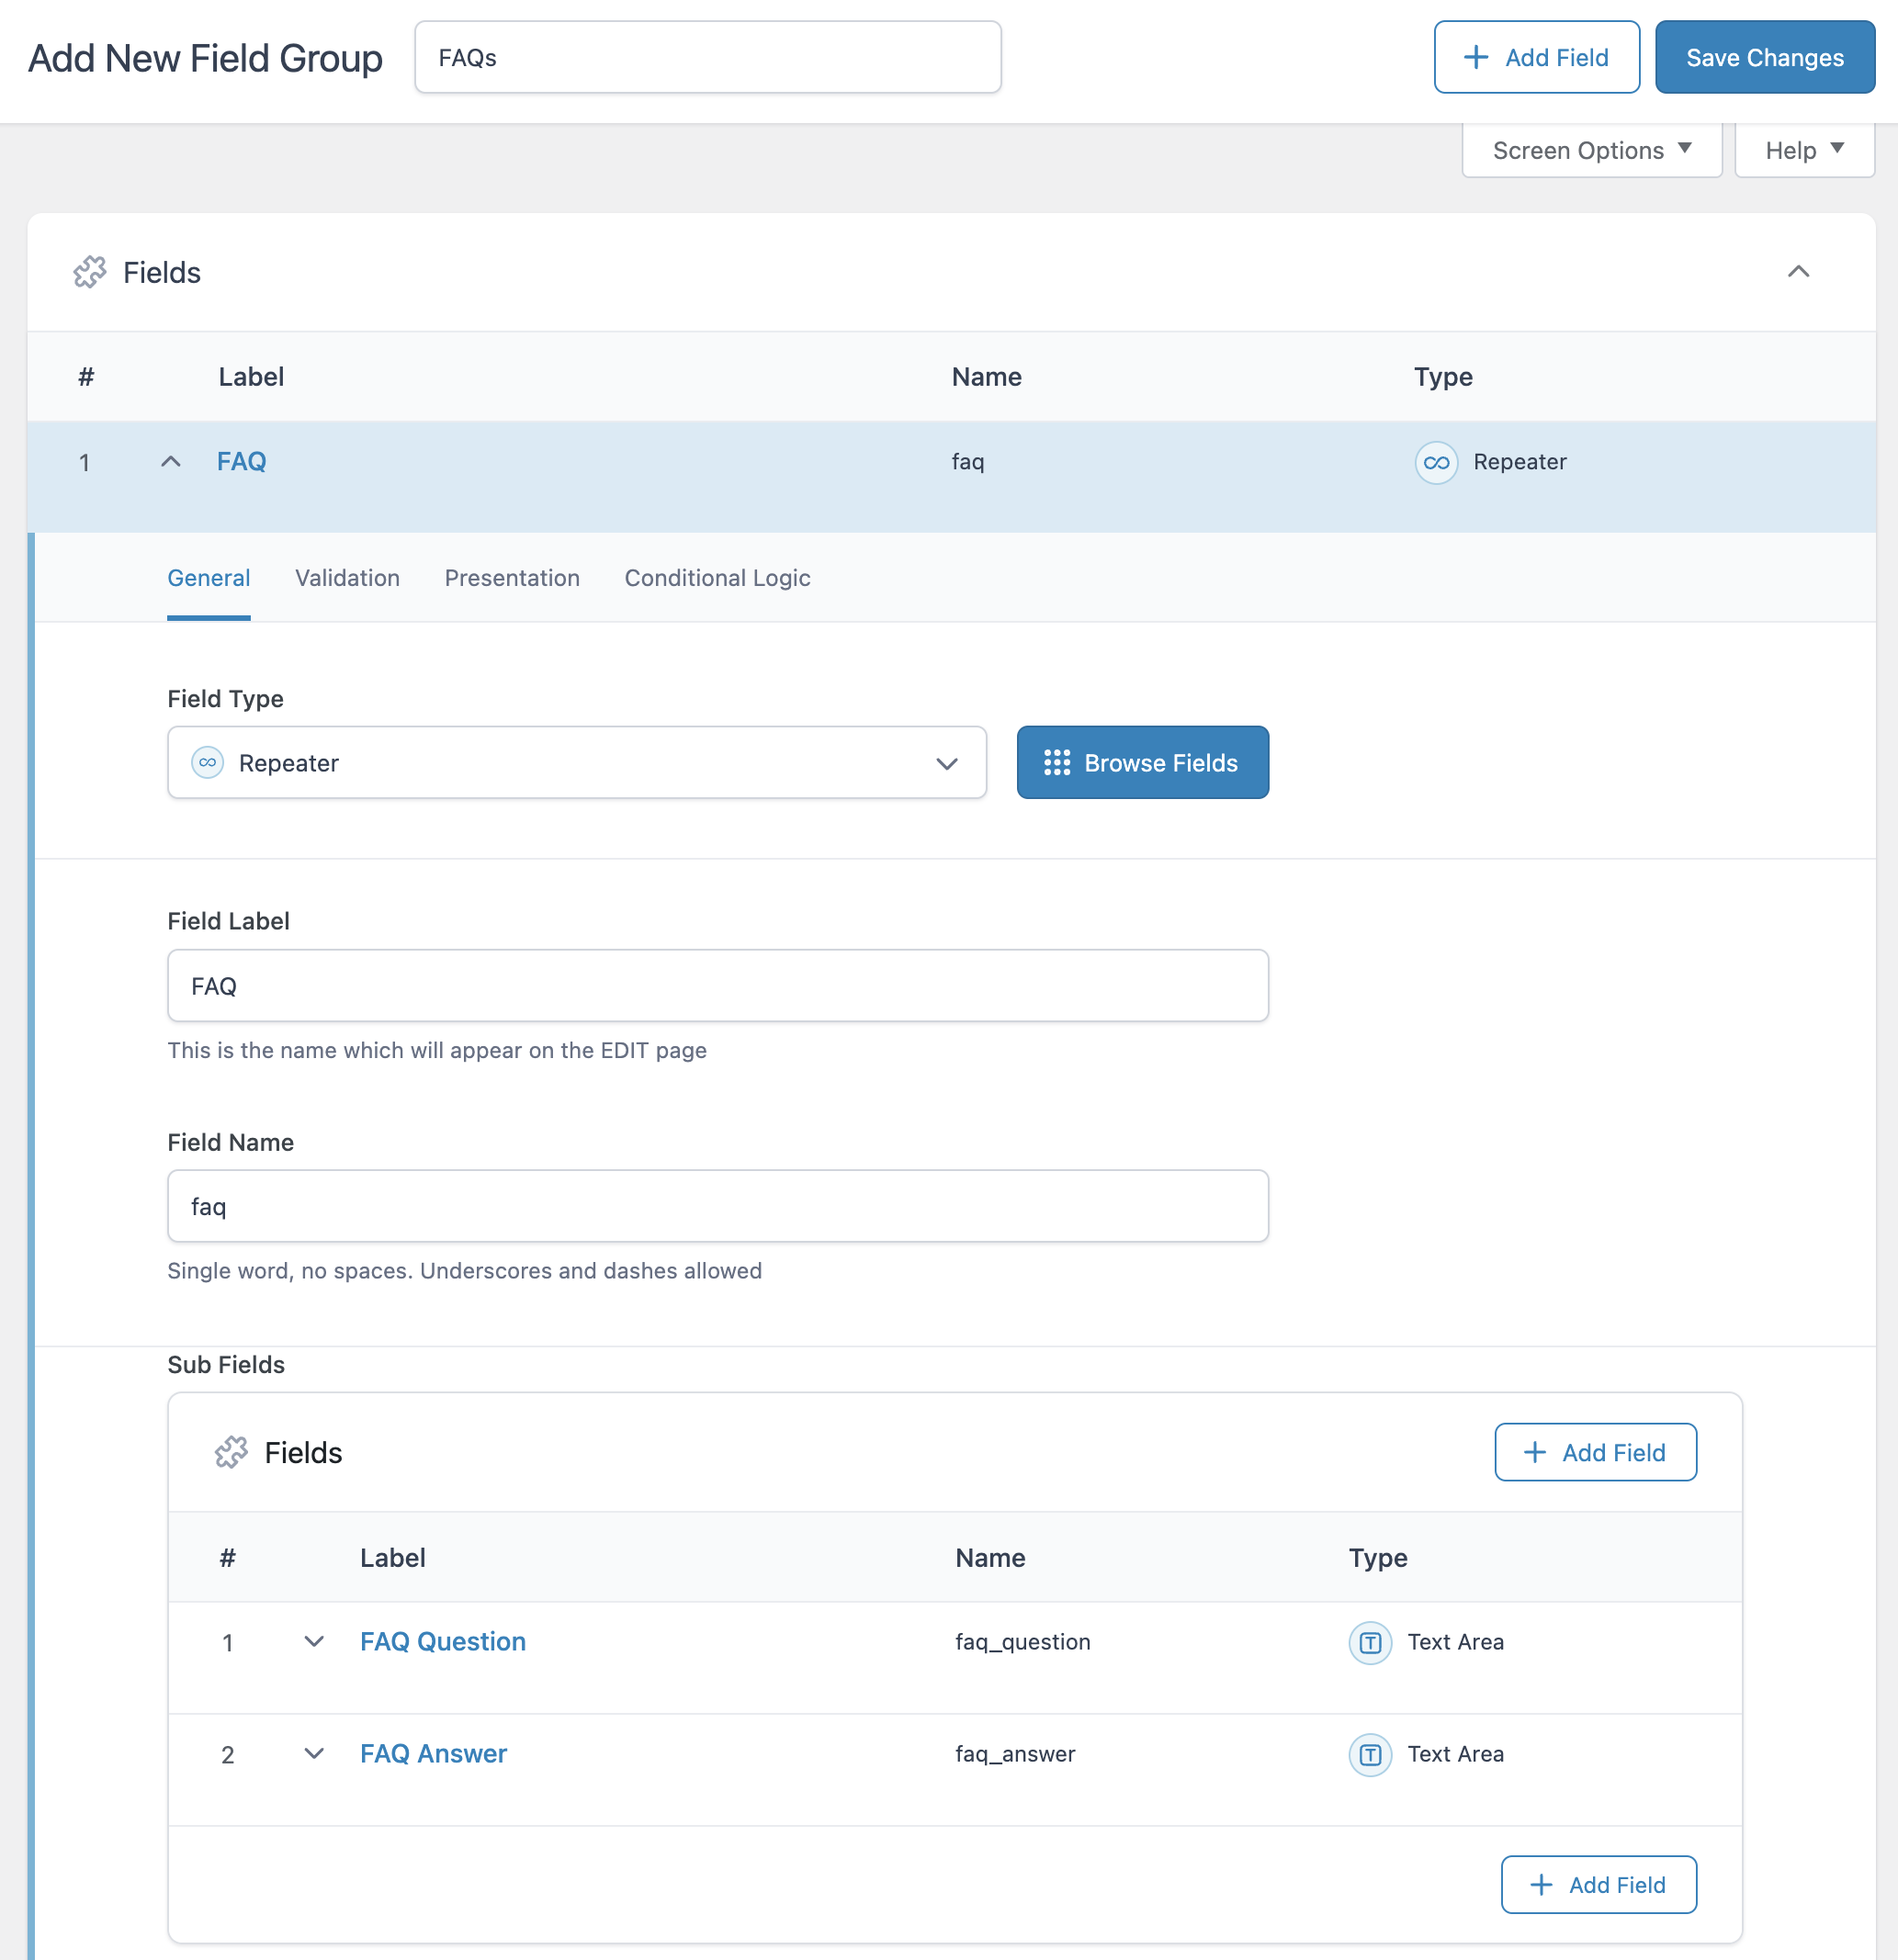
Go to ACF and create a new field group named FAQs. Add a Repeater Field named faqs with two sub-fields: faq_question and faq_answer.
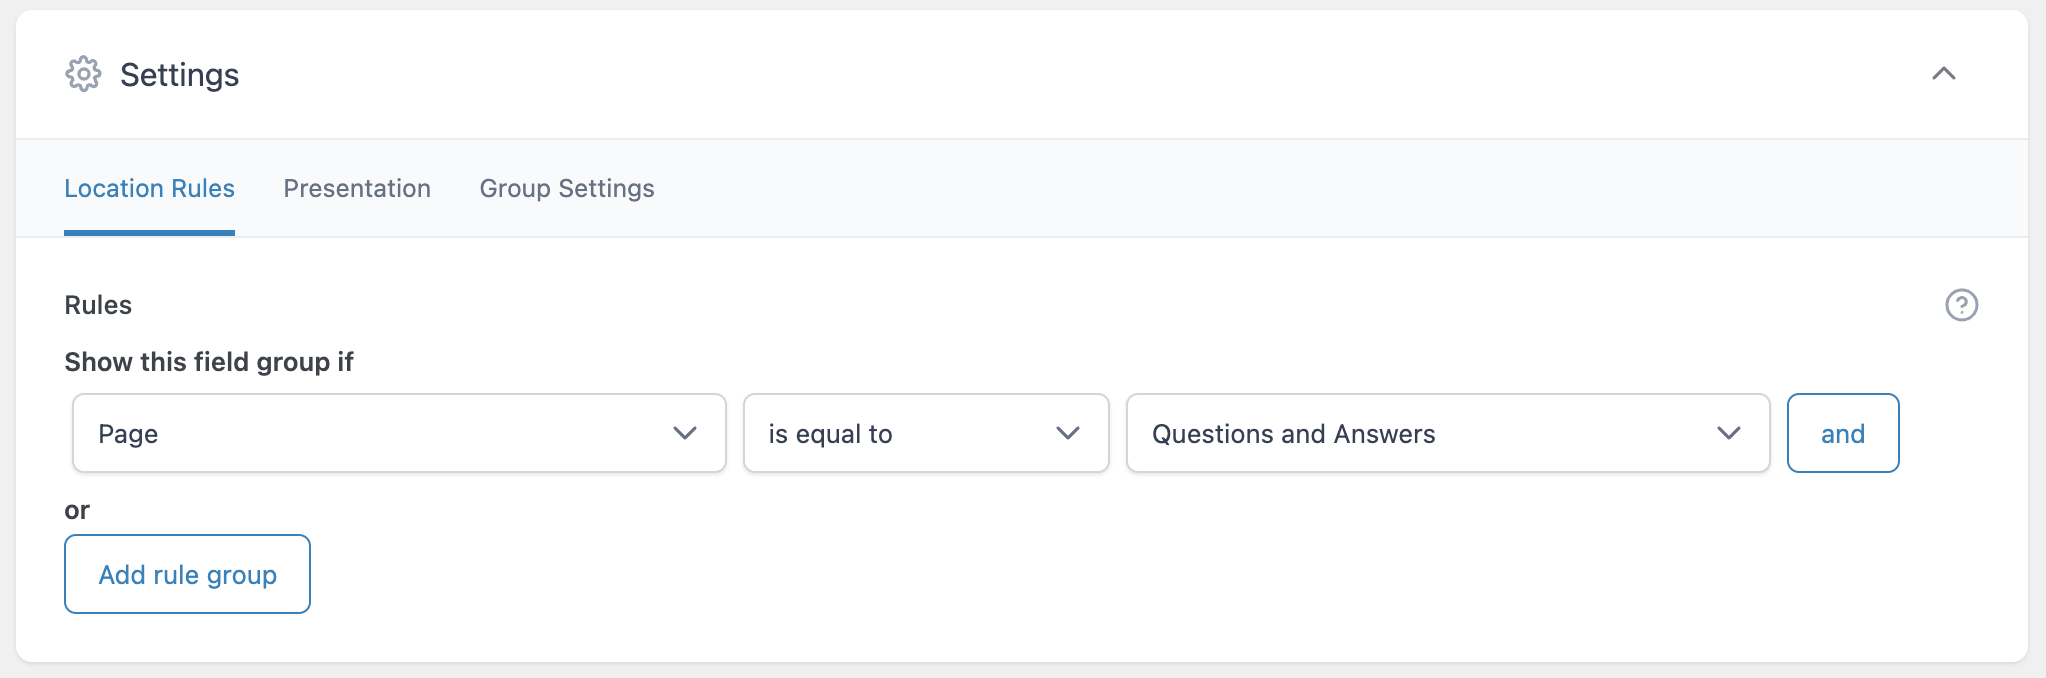
In the Location section, assign this field group to the Questions and Answers page you created.
Create the Page Template
Create a new page template for the FAQ page. Add a file named faq.php in the root directory of your theme with the following code:
<?php /* Template Name: Frequently Asked Questions */ ?>You can, of course, edit the page template as you wish later. In our case, the only thing it will display is the page title and the questions and answers we are talking about in this post.
Now add the loop that iterates over all the FAQ entries and renders them. The complete faq.php file looks like this:
<?php /* Template Name: Frequently Asked Questions */ ?>

<?php get_header(); ?>
    <div id="primary" class="content-area">
        <main id="main" class="site-main" role="main">
			<?php
			//My ACF Fields for reference
			//faqs - field group
			//faq_question - sub-field
			//faq_answer - sub-field


			// check if the repeater field has rows of data
			if ( have_rows( 'faq' ) ):
				?>
                <div id="faq_container">

					<?php
					// loop through the rows of data
					while ( have_rows( 'faq' ) ) : the_row();
						?>
                        <div class="faq">
                            <div class="faq_question">
                                <span class="question"><?php echo get_sub_field( 'faq_question' ); ?></span>
                                <span class="accordion-button-icon fa fa-plus"></span>
                            </div>
                            <div class="faq_answer_container">
                                <div class="faq_answer"><?php echo get_sub_field( 'faq_answer' ); ?></div>
                            </div>
                        </div>
					<?php
					endwhile;
					?>
                </div>

			<?php
			endif;
			?>
        </main><!-- .site-main -->
    </div><!-- .content-area -->
<?php get_footer(); ?>
Each FAQ entry is wrapped in a container div, which allows the jQuery accordion behavior we will add next.
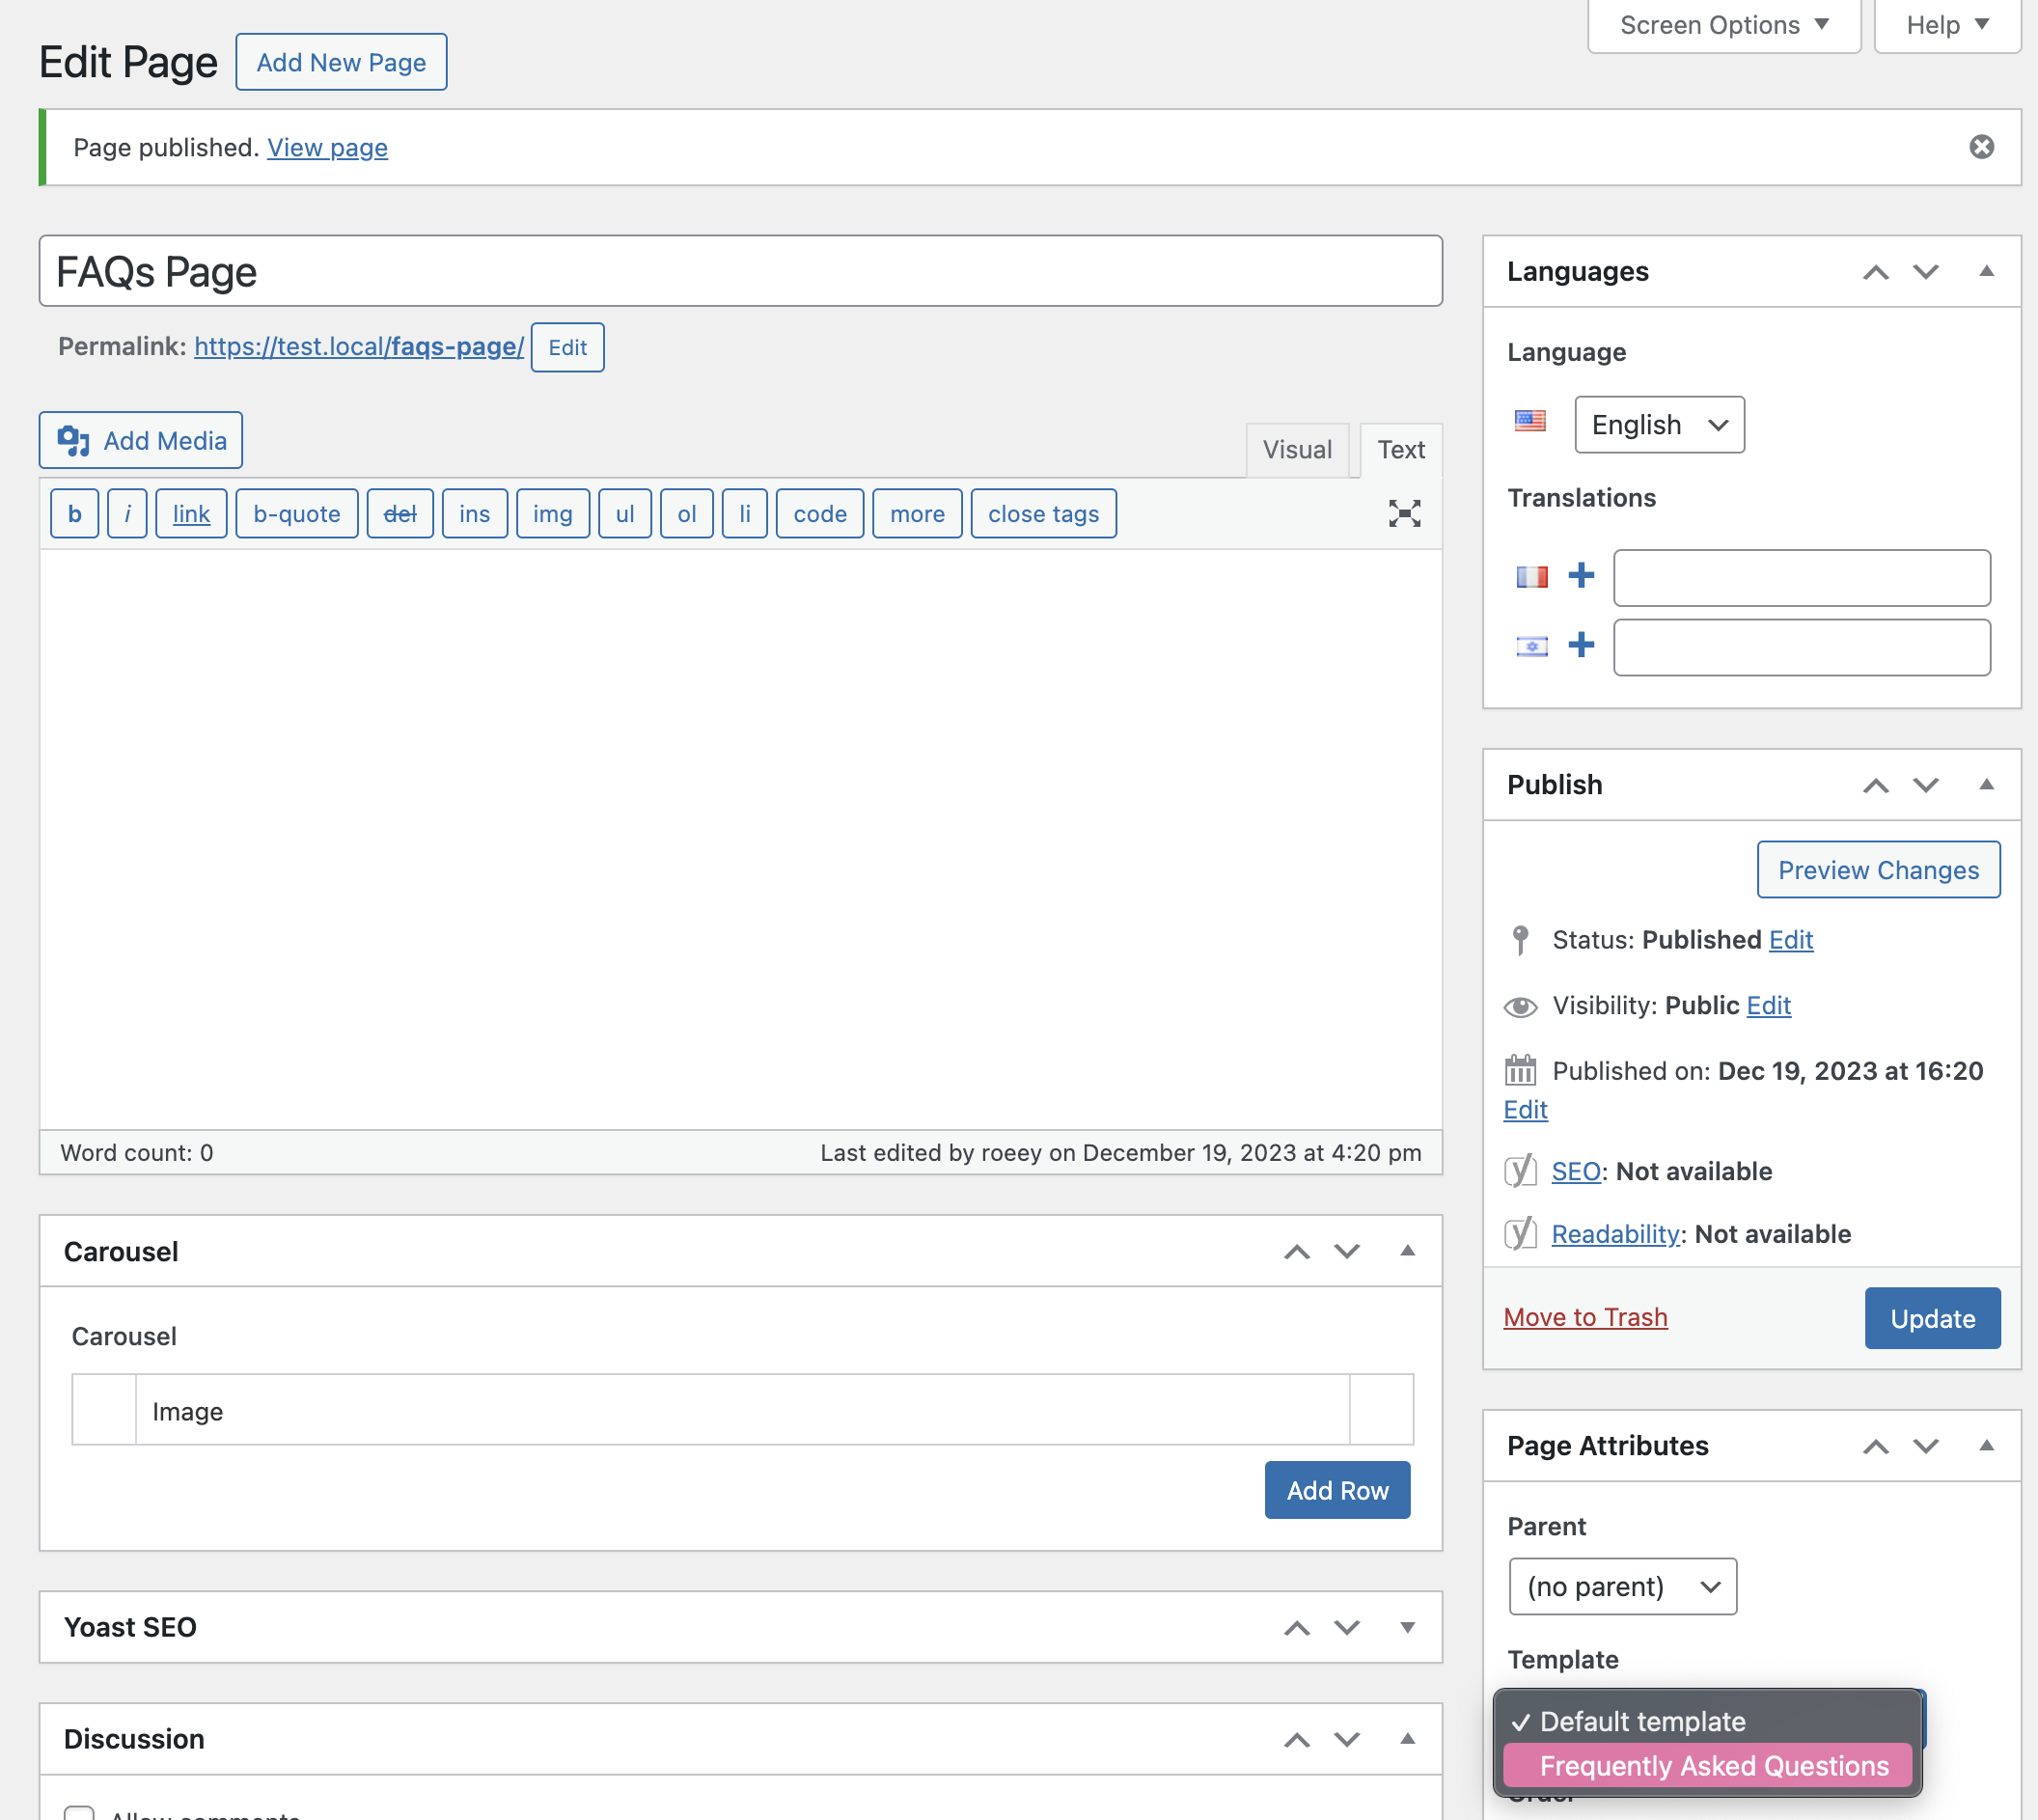
Assign the Page Template
In the WordPress editor, open the FAQ page and assign the new template to it from the page attributes panel.
Add the jQuery Accordion and CSS
The accordion behavior uses jQuery to toggle the answer container on click. Create a file named faq.js in the js folder of your theme:
jQuery(document).ready(function($)  {
    $('.faq_question').click(function() {
        if ($(this).parent().is('.open')){
            $(this).closest('.faq').find('.faq_answer_container').animate({'height':'0'},300);
            $(this).closest('.faq').removeClass('open');
            $(this).parent().find('.accordion-button-icon').removeClass('fa-minus').addClass('fa-plus');
        }
        else{
            var newHeight =$(this).closest('.faq').find('.faq_answer').height() + 30 +'px';
            $(this).closest('.faq').find('.faq_answer_container').animate({'height':newHeight},300);
            $(this).closest('.faq').addClass('open');
            $(this).parent().find('.accordion-button-icon').removeClass('fa-plus').addClass('fa-minus');
        }
    });
});
Next, create faq.css in the css folder of your theme:
#faq_container {
    border: 1px solid #e5e5e5;
    margin-bottom: 10px;
    padding: 0;
}

.faq {
    border-bottom: 1px solid #eee;
}

.faq:last-child {
    border: 0;
}

.faq_answer {
    padding: 15px;
}

.faq_question {
    margin: 0;
    cursor: pointer;
    font-weight: bold;
    display: flex;
    padding: 15px;
    align-items: center;
    transition: background .3s;
}

.faq_question:hover {
    background: #e4e4fd;
}

.question {
    margin-bottom: 5px;
    display: table-cell;
    width: 100%;
}

.faq_answer_container {
    height: 0;
    overflow: hidden;
}

.accordion-button-icon {
    display: table-cell;
    line-height: inherit;
    opacity: .5;
    filter: alpha(opacity=50);
    vertical-align: middle;
}
Load these assets using WordPress enqueuing. Add the following to your functions.php file (do not copy the opening PHP tag):
<?php // DO NOT COPY THE OPENING PHP TAG


function faq_page()
{
    if (is_page_template('faq.php')) {
        wp_register_style('my-css', get_template_directory_uri() . '/css/faq.css', array(''), 1.01);
        wp_enqueue_style('my-css');
        wp_register_script('my-js', get_template_directory_uri() . '/js/faq.js', array('jquery'));
        wp_enqueue_script('my-js');
        wp_enqueue_style( 'fontawesome', 'https://cdnjs.cloudflare.com/ajax/libs/font-awesome/6.5.0/css/all.min.css', array(), '6.5.0', 'all' );

    }
}
add_action('wp_enqueue_scripts', 'faq_page');
If you are using a child theme, change
get_template_directory_uri()toget_stylesheet_directory_uri(). The Font Awesome library is used for the plus/minus icons, but you can replace them with SVGs or CSS-based icons if you prefer.
Add some questions and answers using the ACF Repeater field on the page. When you preview it, you should see an accordion like this:
Add FAQPage Schema Markup
Once your FAQ page is working, consider adding Schema.org structured data to it. Google supports the FAQPage schema type, which can display your questions and answers directly in search results as rich snippets.
Here is how the FAQ container markup looks with Schema.org attributes added:
<div id="faq_container" itemscope itemtype="https://schema.org/FAQPage">
    <div class="faq" itemscope itemprop="mainEntity" itemtype="https://schema.org/Question">
        <div class="faq_question">
            <span class="question" itemprop="name">Question text</span>
        </div>
        <div class="faq_answer_container" itemscope itemprop="acceptedAnswer" itemtype="https://schema.org/Answer">
            <div class="faq_answer">
                <span itemprop="text">Answer text</span>
            </div>
        </div>
    </div>
</div>
You can add these attributes directly in the page template loop, so every FAQ entry automatically gets the correct schema markup without any manual effort from the content editor.
FAQs
Common questions about building FAQ pages with ACF:
have_rows() loop as a reusable template part via get_template_part().get_sub_field()?
the_sub_field() auto-escapes HTML output, but get_sub_field() does not. If you use get_sub_field(), wrap the output with wp_kses_post() for answers (which may contain HTML) and esc_html() for questions (plain text).itemscope itemtype="https://schema.org/FAQPage" to the FAQ container, then add itemscope itemprop="mainEntity" itemtype="https://schema.org/Question" and itemscope itemprop="acceptedAnswer" itemtype="https://schema.org/Answer" to each question/answer wrapper in your page template loop. Google will then recognize your FAQs as structured data.Summary
Building a FAQ page with the ACF Repeater Field gives your client full control over questions and answers without touching code. Pair it with a custom page template, a simple jQuery accordion, and FAQPage schema markup for a solution that is both user-friendly and SEO-optimized.


Good work, mate! Thank you.
Thanks )