Gutenberg, WordPress’s block editor, simplifies the process of visually creating and managing content. By using Advanced Custom Fields (ACF), you can easily build custom blocks for Gutenberg without extensive knowledge of JavaScript.
Since WordPress 5.8, it is recommended to register blocks using the block.json file instead of PHP functions. The older acf_register_block_type() function is now considered legacy, and ACF 6.0+ officially recommends block.json for all new blocks.
In this guide, you’ll learn how to create a custom Call to Action (CTA) block using ACF and the block.json method. Let’s get started!
Step 1: Create the Block Configuration (block.json)
In your theme directory, navigate to /template-parts/blocks/custom-cta/ and create a file named block.json. This file defines the block’s properties and settings:
{
  "apiVersion": 3,
  "name": "acf/custom-cta",
  "title": "Custom CTA Block",
  "description": "A custom call to action block with an image, title, description, and button.",
  "category": "design",
  "icon": "megaphone",
  "keywords": ["cta", "call to action", "button"],
  "supports": {
    "align": ["wide", "full"],
    "html": false
  },
  "acf": {
    "blockVersion": 3,
    "mode": "preview",
    "renderTemplate": "custom-cta.php"
  },
  "style": ["file:./custom-cta.css"]
}
Important: Since ACF PRO 6.6, you can set "blockVersion": 3 inside the acf key to enable ACF Blocks V3. This gives you an improved editing experience where the block always shows its preview, and fields appear in a sidebar panel instead of replacing the preview inline.
Explanation of Key Properties
Here is what each property in the configuration does:
apiVersion: Set to3for WordPress 6.3+ to enable iframe editor support. In WordPress 7.0, version 3 will become mandatory.name: The block’s unique identifier. Must be prefixed withacf/.title: The block’s display name in the block inserter.description: A brief explanation of the block shown in the editor.category: Defines where the block appears in Gutenberg (e.g.,design,text,media,widgets).icon: The WordPress Dashicon representing the block.supports: Controls block settings like alignment, anchor, and HTML editing.acf.renderTemplate: Specifies the PHP file used to render the block.acf.blockVersion: Set to3to enable the latest ACF Blocks V3 editing experience (requires ACF PRO 6.6+).style: An array of CSS files loaded on both the editor and frontend. Use thefile:./prefix for relative paths.
Note: The
styleproperty loads CSS in both the editor and the frontend. If you need styles only in the editor, useeditorStyle. For frontend-only styles (available since WordPress 6.5), useviewStyle.
Step 2: Register the Block in functions.php
Although block.json handles the block definition, you still need to tell WordPress where to find it. Add this snippet to your functions.php file:
function register_acf_blocks() {
    register_block_type(get_template_directory() . '/template-parts/blocks/custom-cta/block.json');
}
add_action('init', 'register_acf_blocks');
If you have multiple ACF blocks, you can register them all in one function by scanning a directory:
function register_acf_blocks() {
    $block_dirs = glob(get_template_directory() . '/template-parts/blocks/*/block.json');
    foreach ($block_dirs as $block_json) {
        register_block_type($block_json);
    }
}
add_action('init', 'register_acf_blocks');
This approach automatically picks up any new block you add to the blocks directory without editing functions.php again.
Step 3: Create the ACF Field Group for the Block
1. In your WordPress dashboard, go to ACF > Field Groups.
2. Click Add New to create a new field group.
3. Name the field group Custom CTA Block Fields.
Add the following fields:
- Title: Add a
Textfield for the CTA title. - Description: Add a
Text Areafield for the CTA description. - Image: Add an
Imagefield for the CTA image. - Button Text: Add a
Textfield for the button label. - Button URL: Add a
URLfield for the button link. - Background Color: Add a
Color Pickerfield for setting the block’s background color.
It looks like this:
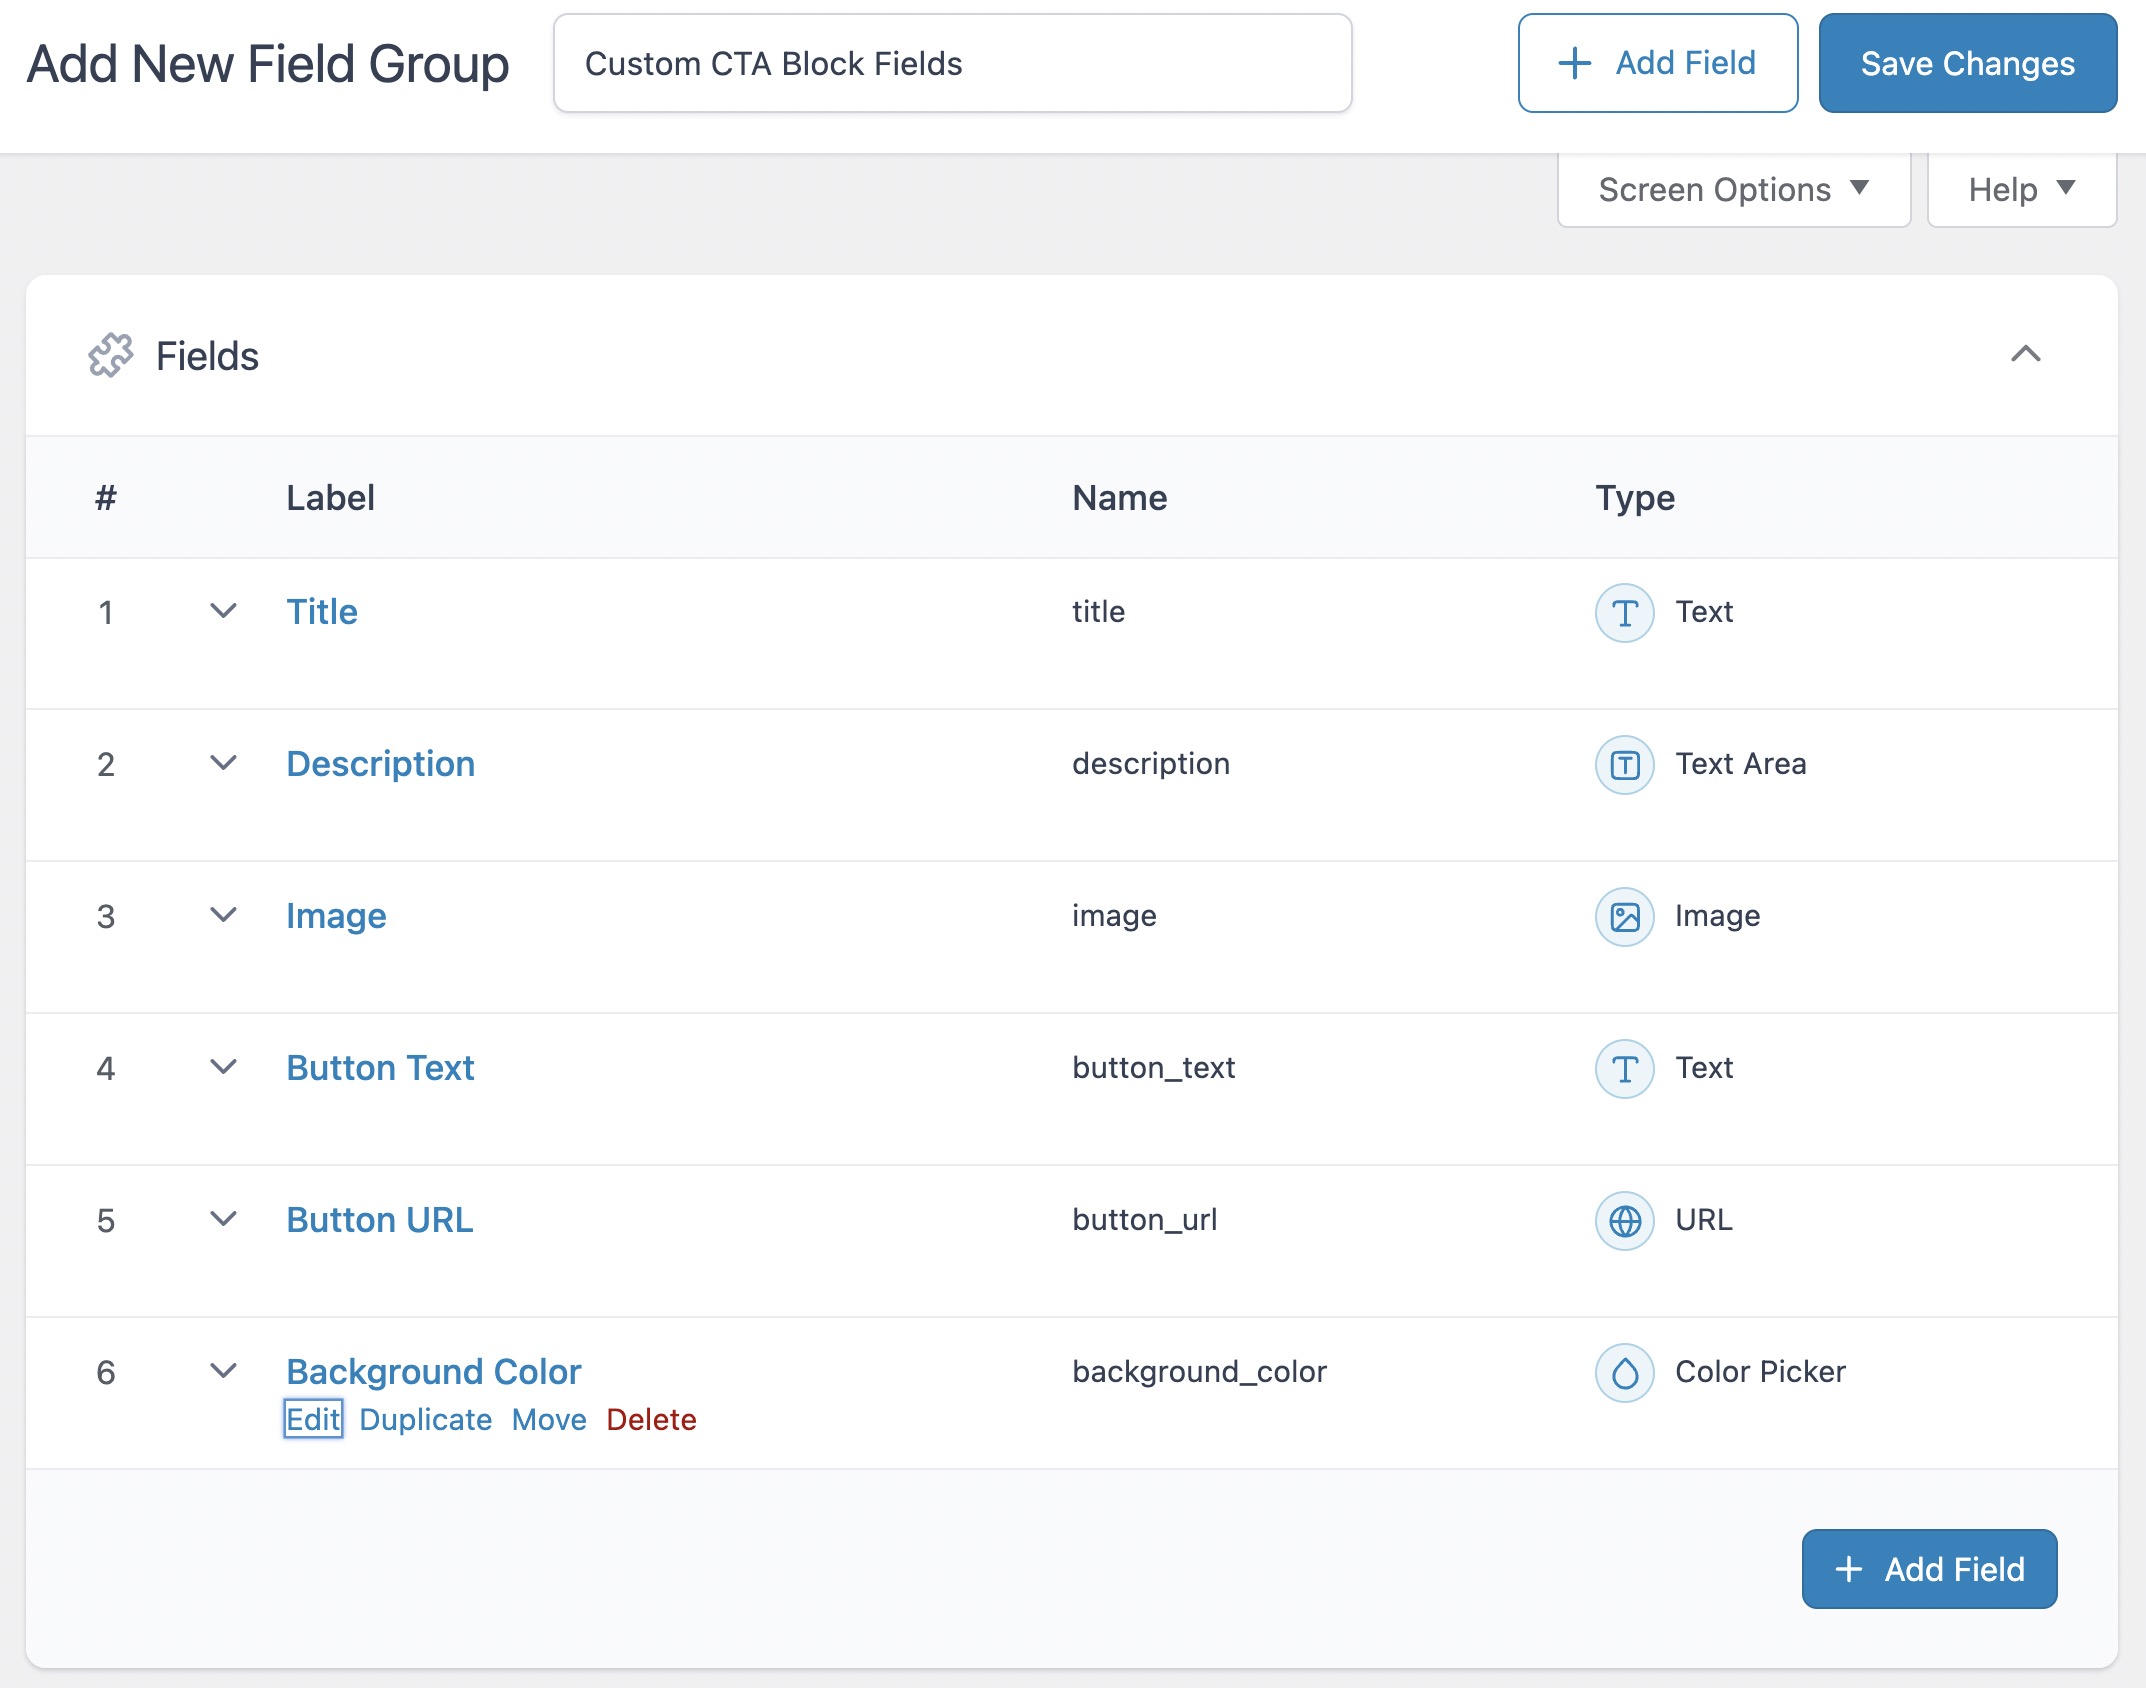
Create the ACF Field Group for the Block
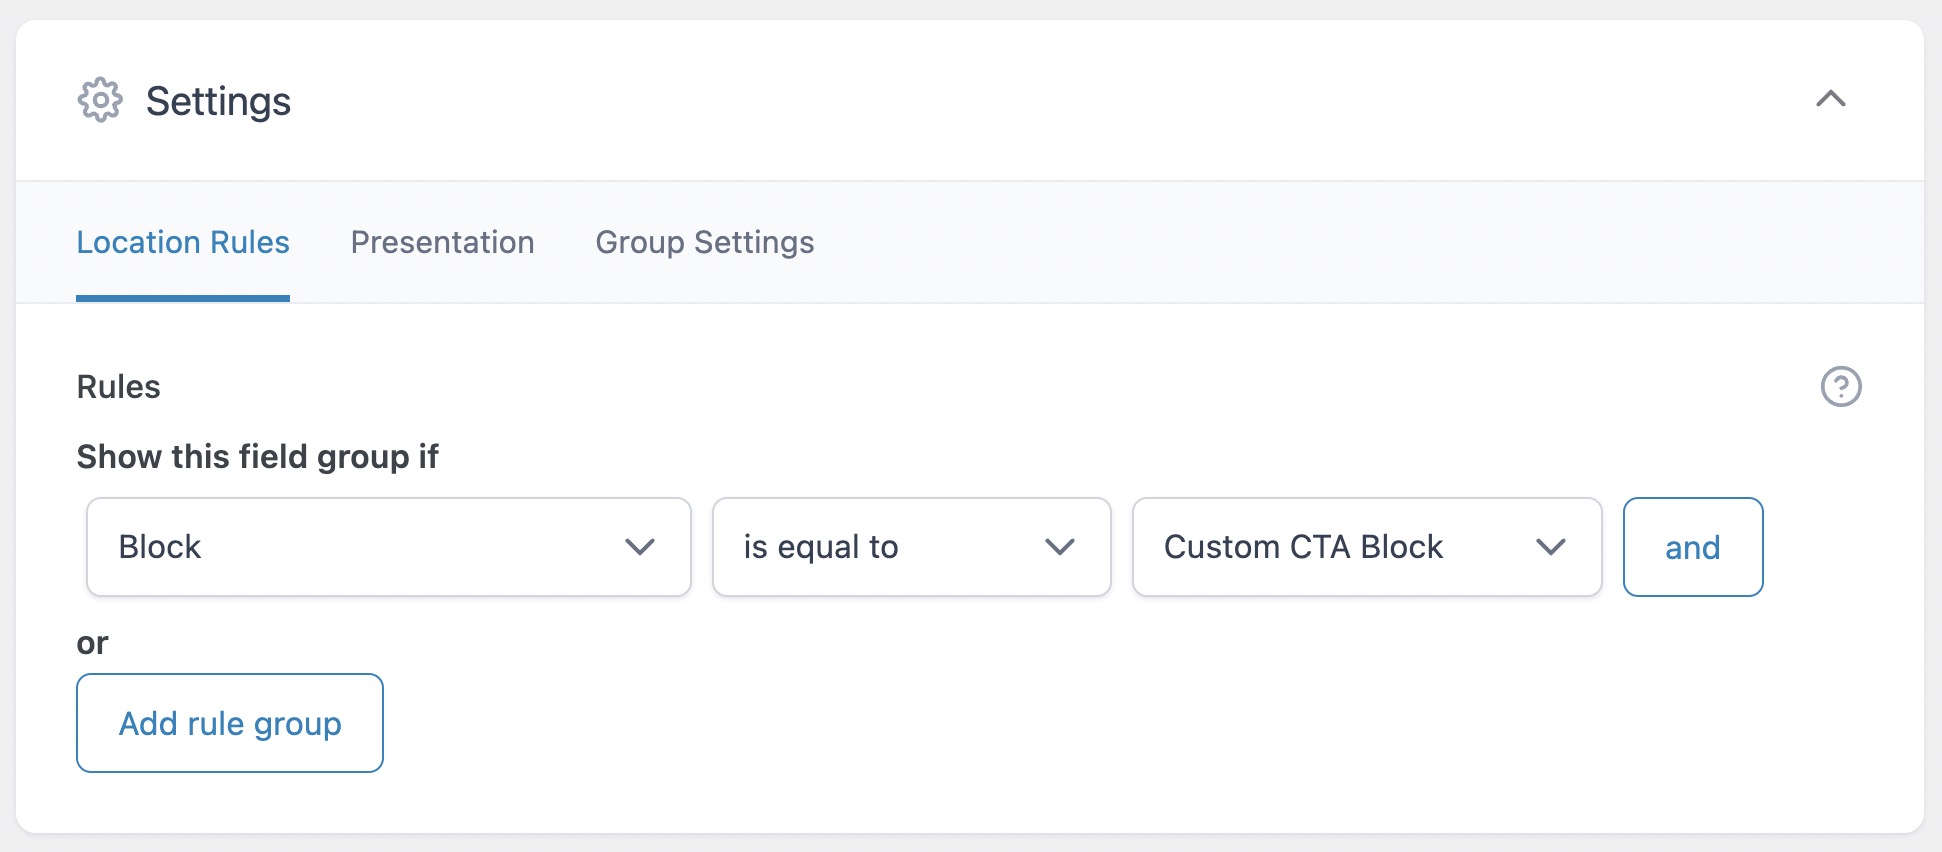
When you’ve finished adding the fields, go to the “Location Rules” settings in the ACF field group editor. Set the rule to Block is equal to Custom CTA Block.
Step 4: Create the Block Template
In your theme directory, navigate to template-parts/blocks/custom-cta/ and create a file named custom-cta.php. This file controls the block’s HTML output on both the frontend and the editor preview.
<?php
$title = get_field('title');
$description = get_field('description');
$image = get_field('image');
$button_text = get_field('button_text');
$button_url = get_field('button_url');
$background_color = get_field('background_color');
?>

<div class="custom-cta-block" style="background-color: <?php echo esc_attr($background_color); ?>">
    <?php if ($image): ?>
        <img src="<?php echo esc_url($image['url']); ?>" alt="<?php echo esc_attr($image['alt']); ?>" class="cta-image" />
    <?php endif; ?>

    <div class="cta-content">
        <?php if ($title): ?>
            <h3 class="cta-title"><?php echo esc_html($title); ?></h3>
        <?php endif; ?>

        <?php if ($description): ?>
            <p class="cta-description"><?php echo esc_html($description); ?></p>
        <?php endif; ?>

        <?php if ($button_text && $button_url): ?>
            <a href="<?php echo esc_url($button_url); ?>" class="cta-button">
                <?php echo esc_html($button_text); ?>
            </a>
        <?php endif; ?>
    </div>
</div>
Step 5: Add Custom CSS
Create a file at template-parts/blocks/custom-cta/custom-cta.css and add your styles. Because we used the style property in block.json, WordPress will automatically enqueue this file when the block is used.
.custom-cta-block {
    padding: 40px;
    border-radius: 15px;
    text-align: center;
    color: #fff;
    max-width: 700px;
    margin: 30px auto;
    box-shadow: 0 4px 20px rgba(0, 0, 0, 0.1);
}

.custom-cta-block:hover {
    transform: translateY(-5px);
}

.cta-image {
    max-width: 120px;
    margin-bottom: 20px;
    border-radius: 50%;
    border: 4px solid #fff;
}

.cta-title {
    font-size: 28px;
    margin: 15px 0;
    font-weight: 700;
}

.cta-description {
    font-size: 18px;
    margin-bottom: 20px;
    line-height: 1.5;
}

.cta-button {
    display: inline-block;
    padding: 12px 25px;
    background-color: #ff6b6b;
    color: #fff;
    text-decoration: none;
    border-radius: 25px;
    font-weight: bold;
}

.cta-button:hover {
    background-color: #e05656;
}
Understanding ACF Block Modes
ACF blocks support three display modes that control how the block appears in the editor. You set the mode in the acf key of your block.json:
- preview (default): The block always shows its rendered preview. Fields appear in the sidebar when the block is selected.
- edit: The edit form is always shown inline. Useful for blocks where you want fields front and center.
- auto: Shows the preview by default, but switches to the edit form when the block is selected.
In both “preview” and “edit” modes, a toggle icon appears in the block toolbar so editors can switch between views manually.
With ACF Blocks V3 ("blockVersion": 3), the experience improves further. The block always displays its preview, and fields appear in a collapsible sidebar panel. This eliminates the jarring switch between preview and edit that older versions had.
Adding InnerBlocks Support
ACF blocks fully support InnerBlocks, which lets you nest other Gutenberg blocks inside your custom block. This is useful for blocks that need flexible content areas, like a layout block with a text column and a media column.
To add InnerBlocks, include the <InnerBlocks /> component in your render template:
<div class="my-block-wrapper">
    <!-- ACF field output -->
    <h3><?php echo esc_html(get_field('heading')); ?></h3>

    <!-- InnerBlocks area -->
    <div class="inner-content">
        <InnerBlocks />
    </div>
</div>
Each block can only contain a single <InnerBlocks /> component. You can also define parent/child relationships in block.json to restrict which blocks can be nested inside your block.
Tip: If you need to pre-populate the InnerBlocks area with specific blocks, you can pass a template array. Build your desired layout in the editor first, then convert it to PHP markup using the WPHTML Converter or Theme Code Pro.
FAQs
Common questions about creating custom Gutenberg blocks with ACF and block.json:
block.json support.acf_register_block_type() and block.json registration?
acf_register_block_type() function is the legacy PHP-based method for registering ACF blocks. Since ACF 6.0, the recommended approach is to use a block.json file with the standard register_block_type() function. The block.json method aligns with WordPress core standards, enables features like automatic asset loading, and ensures better compatibility with future WordPress releases."blockVersion": 3 do in the ACF configuration?
"blockVersion": 3 in the acf key of your block.json enables ACF Blocks V3, available since ACF PRO 6.6. V3 blocks always display their rendered preview in the editor, with fields appearing in a sidebar panel. This provides a smoother editing experience and better compatibility with the WordPress iframe editor architecture.<InnerBlocks /> component to your render template. Note that each block can only contain a single <InnerBlocks /> component. You can also define parent/child relationships in block.json to control nesting.apiVersion 2 or 3 in my block.json?
apiVersion 3 if your site runs WordPress 6.3 or later. Version 3 enables iframe editor support, which isolates block styles from admin CSS and prevents style conflicts. In WordPress 7.0, the iframe editor will become mandatory, so adopting version 3 now ensures forward compatibility.Summary
Using block.json to register ACF blocks is the modern, recommended approach since ACF 6.0. It aligns with WordPress core standards and unlocks features like automatic asset loading, iframe editor support, and ACF Blocks V3.
By following these steps, you’ve built a fully functional custom Gutenberg block using ACF – from the block.json configuration and PHP registration, through the field group setup, to the render template and CSS. For more advanced use cases, explore registering ACF fields via PHP to keep your block definitions entirely in code.
If you encounter any issues or have questions, feel free to leave a comment below!


Great tutorial, thank you!
The only thing I would have expected is that you would have written it with `Blocks.json` support in mind:
> Since WordPress 5.8, WordPress has supported – and recommended – that blocks are registered through a JSON configuration file.
Source: https://www.advancedcustomfields.com/resources/whats-new-with-acf-blocks-in-acf-6/#blockjson-support
Maybe an idea for a follow-up post?
Cheers,
Pieter
Hi Pieter,
I appreciate the comment…
You are correct, i’ve modified the post to reflect the update. Thanks again! 🙂
Hi Roee,
Amazing how quick you have adapted your post following my suggestion! Many thanks, truly surprised!
Pieter