אם אתם מעוניינים לשנות את התנהגות המגניפיקציה (Zoom) במעבר עכבר על מוצר בעמוד המוצר של ווקומרס, תוכלו לעשות זאת באמצעות הפילטר woocommerce_single_product_zoom_options:
add_filter( 'woocommerce_single_product_zoom_options', 'custom_single_product_zoom_options' );
function custom_single_product_zoom_options( $zoom_options ) {
    // Changing the magnification level:
    $zoom_options['magnify'] = 0.7;

    return $zoom_options;
}
ואלו הפרמטרים שבאפשרותכם לשנות:
$zoom_options = array (
    'url' => false,
    'callback' => false,
    'target' => false,
    'duration' => 120, // Transition in milli seconds (default is 120)
    'on' => 'mouseover', // other options: grab, click, toggle (default is mouseover)
    'touch' => true, // enables a touch fallback
    'onZoomIn' => false,
    'onZoomOut' => false,
    'magnify' => 1, // Zoom magnification: (default is 1  |  float number between 0 and 1)
);
כשרושמים את הטקסונומיה (register_taxonomy) ניתן פשוט להשתמש במערך באופן הבא:
register_taxonomy( 'artist', array( 'profile', 'cd' ), $args );
אולי אתם יודעים ואולי לא, אך ניתן לשנות או לקבוע את אורך התקציר (excerpt) בוורדפרס באמצעות הפילטר הבא:
function sv_excerpt_length( $length ) {
    return 15;
}
add_filter( 'excerpt_length', 'sv_excerpt_length' );
אך זה יקבע אורך תקציר מסויים כל פעם שתשתמשו בפונקציה the_excerpt. ומה אתם מעוניינים להשתמש באורך תקציר שונה במקומות שונים בתבנית שלכם? במקרה זה תוכלו להשתמש בקוד הבא (functions.php):
function excerpt($limit) {
      $excerpt = explode(' ', get_the_excerpt(), $limit);

      if (count($excerpt) >= $limit) {
          array_pop($excerpt);
          $excerpt = implode(" ", $excerpt) . '...';
      } else {
          $excerpt = implode(" ", $excerpt);
      }

      $excerpt = preg_replace('`\[[^\]]*\]`', '', $excerpt);

      return $excerpt;
}
לאחר מכן תוכלו לקבוע את אורך התקציר בתבנית שלכם באופן הבא:
<?php echo excerpt(25); ?>
ניתן במקרה זה להשתמש בפילטר הבא לטובת העניין:
add_filter( 'get_the_archive_title', function ($title) {
    if ( is_category() ) {
        $title = single_cat_title( '', false );
    } elseif ( is_tag() ) {
        $title = single_tag_title( '', false );
    } elseif ( is_author() ) {
        $title = '<span class="vcard">' . get_the_author() . '</span>' ;
    } elseif ( is_tax() ) { //for custom post types
        $title = sprintf( __( '%1$s' ), single_term_title( '', false ) );
    } elseif (is_post_type_archive()) {
        $title = post_type_archive_title( '', false );
    }
    return $title;
});
הסניפט הבא יאפשר לכם לבדוק האם בפוסט מסויים יש ״תוכן מוטמע״ (Embedded Content). עובד בתוך הלולאה תוך שימוש במזהה הפוסט (Post ID). לחילופין ניתן להעביר ID כלשהו ולבדוק אם בפוסט זה קיים אותו תוכן מוטמע.
<?php

function has_embed( $post_id = false ) {
	if( !$post_id ) $post_id = get_the_ID();
	else $post_id = absint( $post_id );
	if( !$post_id ) return false;

	$post_meta = get_post_custom_keys( $post_id );
	$post_meta = array_map( 'trim' , $post_meta );

	foreach( $post_meta as $meta ) {
		if( '_oembed' != substr( $meta , 0 , 7 ) )
			continue;
		return true;
	}
	return false;
}
והשימוש בו מתבצע כך:
if( has_embed() ) {
   // do whatever
}
הסניפט הבא מאפשר לכם להכניס תוכן אוטומטי לכל פוסט טייפ (לכל סוג תוכן) חדש שתיצרו. הוסיפו לקובץ functions.php:
<?php
////////////////////////////////////////////////////////////////////////////////////
// This auto populates post types and posts.
///////////////////////////////////////////////////////////////////////////////////


function my_editor_content( $content ) {

	global $post_type;

	switch( $post_type ) {
		case 'your_post_type_here': //auto populate
			$content = 'The content you want to pre-populate the post type with.';
			break;
	}

	return $content;
}
add_filter( 'default_content', 'my_editor_content' );
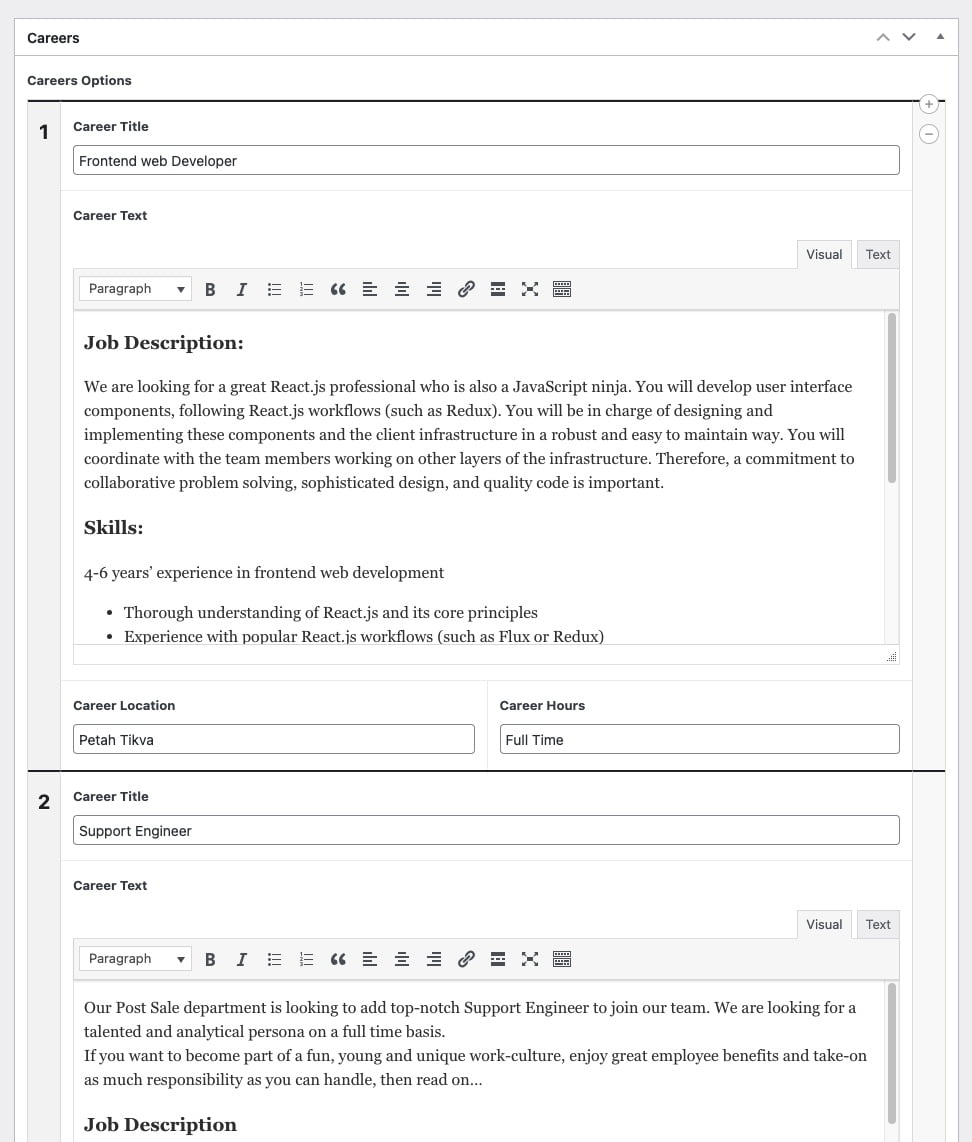
הנה כיצד להוסיף CSS ל ACF בממשק הניהול. במקרה זה, גרמנו ל Repeater Fields להיות בעלי הפרדה ברורה יותר. בוצעו גם מספר שינויים נוספים בכדי שההבנה של הממשק תהיה נוחה יותר:
שימו לב שאתם מסירים מהקוד את תגית ה PHP הפותחת…
<?php
function my_acf_admin_head() {	?>
    <style type="text/css">

        .acf-flexible-content .layout .acf-fc-layout-handle {
            background-color: #202428;
            color: #eee;
        }

        .acf-repeater.-row > table > tbody > tr > td,
        .acf-repeater.-block > table > tbody > tr > td {
            border-top: 2px solid #202428;
        }

        .acf-repeater .acf-row-handle {
            vertical-align: top !important;
            padding-top: 16px;
        }

        .acf-repeater .acf-row-handle span {
            font-size: 20px;
            font-weight: bold;
            color: #202428;
        }

        .imageUpload img {
            width: 75px;
        }

        .acf-repeater .acf-row-handle .acf-icon.-minus {
            top: 30px;
        }

    </style>
	<?php
}

add_action( 'acf/input/admin_head', 'my_acf_admin_head' );
ובמקרה של ה Repeater זו התוצאה.. שמים לב לקו המפריד?
%22%20transform%3D%22translate(2.2%202.2)%20scale(4.46094)%22%20fill-opacity%3D%22.5%22%3E%3Cpath%20fill%3D%22%23cbcbcb%22%20d%3D%22M5%2068l128%2022-97%2049z%22%2F%3E%3Cellipse%20fill%3D%22%23c8c8c8%22%20cx%3D%2245%22%20cy%3D%22248%22%20rx%3D%2238%22%20ry%3D%2234%22%2F%3E%3Cellipse%20fill%3D%22%23fff%22%20cx%3D%22140%22%20cy%3D%22172%22%20rx%3D%22184%22%20ry%3D%2251%22%2F%3E%3Cellipse%20fill%3D%22%23fff%22%20rx%3D%221%22%20ry%3D%221%22%20transform%3D%22matrix(126.71922%201.99066%20-.7592%2048.32783%20143.7%2042.1)%22%2F%3E%3C%2Fg%3E%3C%2Fsvg%3E)
בכדי לשנות את העיצוב של האימיילים שווקומרס שולחת, ניתן להוסיף Inline CSS על ידי שימוש בהוק woocommerce_email_header. ניתן לעשות זאת בצורה הבאה, הוסיפו את הקוד הבא לקובץ functions.php:
<?php
/**
 * WooCommerce
 * Add inline CSS to emails sent out
 */
function sv_add_css_to_woo_email() {
    echo '<style type="text/css">
             h1 {
                 text-align: center !important;
                 color: #DDD;
             }
         </style></pre>';
}
add_action( 'woocommerce_email_header', 'sv_add_css_to_woo_email' );
בכדי להחליף את הקו המפריד (delimiter) בפירורי הלחם (breadcrumbs) של ווקומרס השתמשו בפילטר הבא:
function in_woocommerce_breadcrumb_defaults($args){
    $args['delimiter']   = ' | ';
    return $args;
}
add_filter('woocommerce_breadcrumb_defaults','in_woocommerce_breadcrumb_defaults');
במקרה זה החלפנו את הסלאש בקו ורטיקלי. הנה כל הערכים שניתן לשנות באמצעות הפילטר המדובר:
array(
   'delimiter'   => ' / ',
   'wrap_before' => '<nav class="woocommerce-breadcrumb">',
   'wrap_after'  => '</nav>',
   'before'      => '',
   'after'       => '',
   'home'        => _x( 'Home', 'breadcrumb', 'woocommerce' ),
)
וורדפרס מספקת את האפשרות ליצור תקציר (excerpt) לפוסטים על ידי הכנסת טקסט בתיבת בתקציר בעמוד עריכת הפוסט. אך תקצירים אלו אינם מופיעים עבור עמודים (pages post type) ואין אפשרות להוסיף או להפעיל אפשרות זו דרך ממשק הניהול של וורדפרס.
אם אתם מעוניינים לאפשר תיבת תקציר זו גם עבור עמודים, עליכם להוסיף את הקוד הבא לקובץ functions.php של התבנית שלכם:
<?php

// START COPY FROM HERE
function add_excerpt_pages() {
    add_post_type_support('page', 'excerpt');
}
add_action('init', 'add_excerpt_pages');
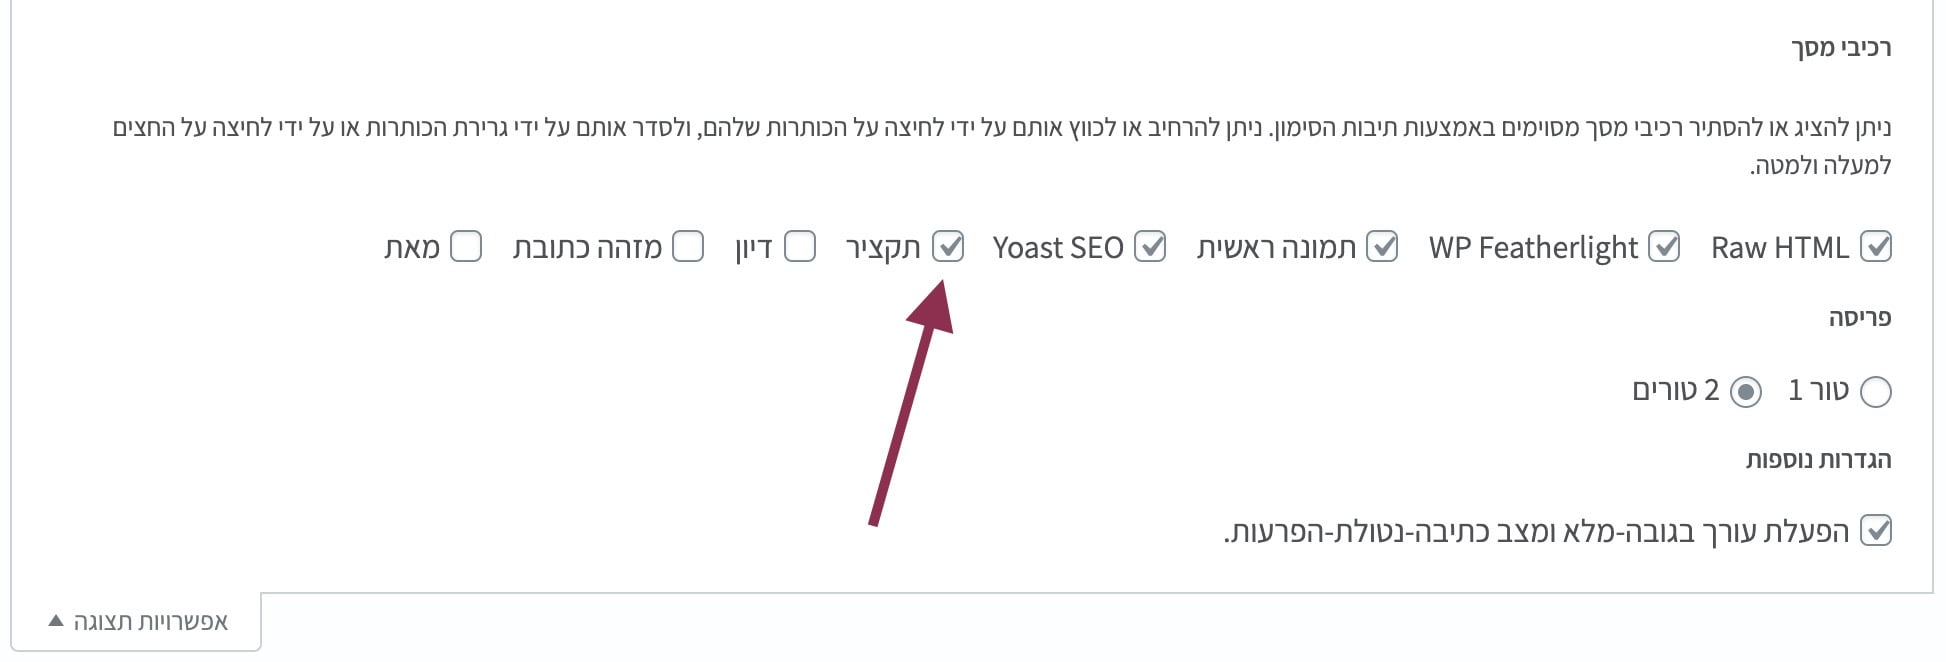
לאחר שהוספתם את הקוד המצורף, ערכו עמוד מסויים ולחצו על "אפשרויות תצוגה״ בחלקו העליון השמאלי של המסך.
%27%20fill-opacity%3D%27.5%27%3E%3Cpath%20fill%3D%22%23fff%22%20fill-opacity%3D%22.5%22%20d%3D%22M523.8%20245.5l72.4-100.4%20247.5%2067.4-266-31.5zm-10-181.1L294%2079.7l-9.5-136.5L504.3-72zm-472%20213.1h98.8v136.8H41.8zM1562.1%20650l-296.4%2091.2%20228-205.3z%22%2F%3E%3C%2Fg%3E%3C%2Fsvg%3E)
כיצד לאפשר תקציר (excerpt) לעמודים בוורדפרס
סמנו את תיבת התקציר ובזה סיימתם. כעת תגלו כי נוספה תיבת תקציר עבור כל העמודים באתר…


