Since CSS3 came into the world, we’ve encountered web fonts (also known as Web Fonts) on almost every website, whether it’s a WordPress site or not.
Instead of relying on a set of system fonts that load on the user’s computer, designers and developers can now choose, embed, and use thousands of fonts hosted on remote servers, loading them in the user’s browser as needed.
Google, as you probably know, is one of the major players in font rendering and provides most of the web fonts we use. Google offers hundreds of completely free fonts that you can use or download through their site, google.com/fonts, and they are all open source.
Here are a few words from Google on the subject:
All of the Google Fonts web fonts are open source. This means you can share them with friends, modify them to suit your needs, or even collaborate with the font creators to improve them. You’re free to use these fonts in any way you want, privately or commercially, in print, on your computer, in applications, and on websites.
In this guide, we’ll show you how to use Google Fonts without relying on their servers. we will show you how to host & load google fonts locally (from your own server).
Before we dive into how to do this, let’s briefly go over the advantages and disadvantages of using web fonts. Let’s start with an explanation of how web fonts work…
How Web Fonts Work
Web fonts come with advantages and disadvantages for your websites.
Advantages
Web fonts load on your site during the rendering of a specific page and are applied to text only after that.
One significant advantage of web fonts is that businesses and companies can integrate these fonts to achieve a consistent appearance across all media in their possession.
Web fonts also add a certain personality to your site, especially when used with heading tags and subheadings. These fonts are displayed on your site even when it’s viewed on tablets and smartphones.
Perhaps needless to mention, but using web fonts eliminates the need to use images for titles on your site, a practice that was more common in the past and affected SEO and content interpretation.
With web fonts, all words on your page are searchable and indexable by search engines, eliminating the need for alternative text for images (alt text).
This also contributes to cleaner and better-managed code.
A Few Drawbacks
The main drawback of using web fonts is slow or inconsistent performance. They can slow down your site’s loading time as they require requests to remote servers that are not under your control.
They can also create caching validation errors when testing your site with speed testing tools like Pingdom or GTmetrix.
These errors usually appear under headings like Leverage Browser Caching or Add Expire Headers in various tools.
The Expiry Date given by Google for those fonts is only 24 hours. This means the cached fonts in the browser’s memory expire daily, and your site will fetch them again from Google’s CDN.
You can see an example in the image below of a note in this blog (before local font loading) in Pingdom’s test, and in the lower image under the YSlow tab in GTmetrix’s test:

Note in Pingdom’s speed testing tool

Note in GTmetrix’s speed testing tool
Let’s see how to load Google Fonts locally from your server.
I highly recommend that when you finish reading this post, take a look at the guide on the font-display property. There is a direct connection between the two posts.
Beyond performance, self-hosting Google Fonts is important for GDPR compliance. In 2022, a German court ruled that loading Google Fonts from Google’s servers violates GDPR because it transmits the user’s IP address to Google without consent. Self-hosting eliminates this privacy concern entirely.
For analyzing and assessing your site’s performance, WebPageTest is a highly recommended tool.
How to Locally Load Google Fonts
Before we start, note that if your server is particularly slow and you can’t rely on its stability, it might be better to keep using Google’s CDN.
Regardless, as with any action related to optimizing your site’s speed and load time, you need to test and see if any changes you make contribute to or hinder your site’s performance using the right speed testing tools.
Since Google Fonts are open source, you can download them and serve them directly from your server to the end-user’s browser.
Serving the same fonts directly from your server will improve your site’s load time and prevent problems arising from loading assets from servers you don’t own.
There are a few simple steps required to load Google Fonts from your website. The necessary steps are as follows:
- Downloading the Google Fonts.
- Obtaining the necessary CSS for the Google Fonts.
- Uploading the fonts to your server.
- Adding the necessary CSS for font loading.
The rest of the article will explain the steps for loading Google Fonts from a local server.
Downloading Google Fonts
First option (less recommended) – Download all Google Fonts in a single file from the Google repository on Github and obtain the CSS manually.
For example, if you want the CSS for the Assistant font, copy the following address to your address bar to get the necessary CSS based on the weights you need:
https://fonts.googleapis.com/css?family=Assistant:300,400,600However, this method requires changing paths and can be a bit frustrating, so we won’t go into detail on it. There’s a simpler method available.
Second option (recommended) – Use the Google Webfonts Helper tool, which allows you to download the specific font(s) you need and generates the necessary CSS for you.
Using Google Webfont Loader
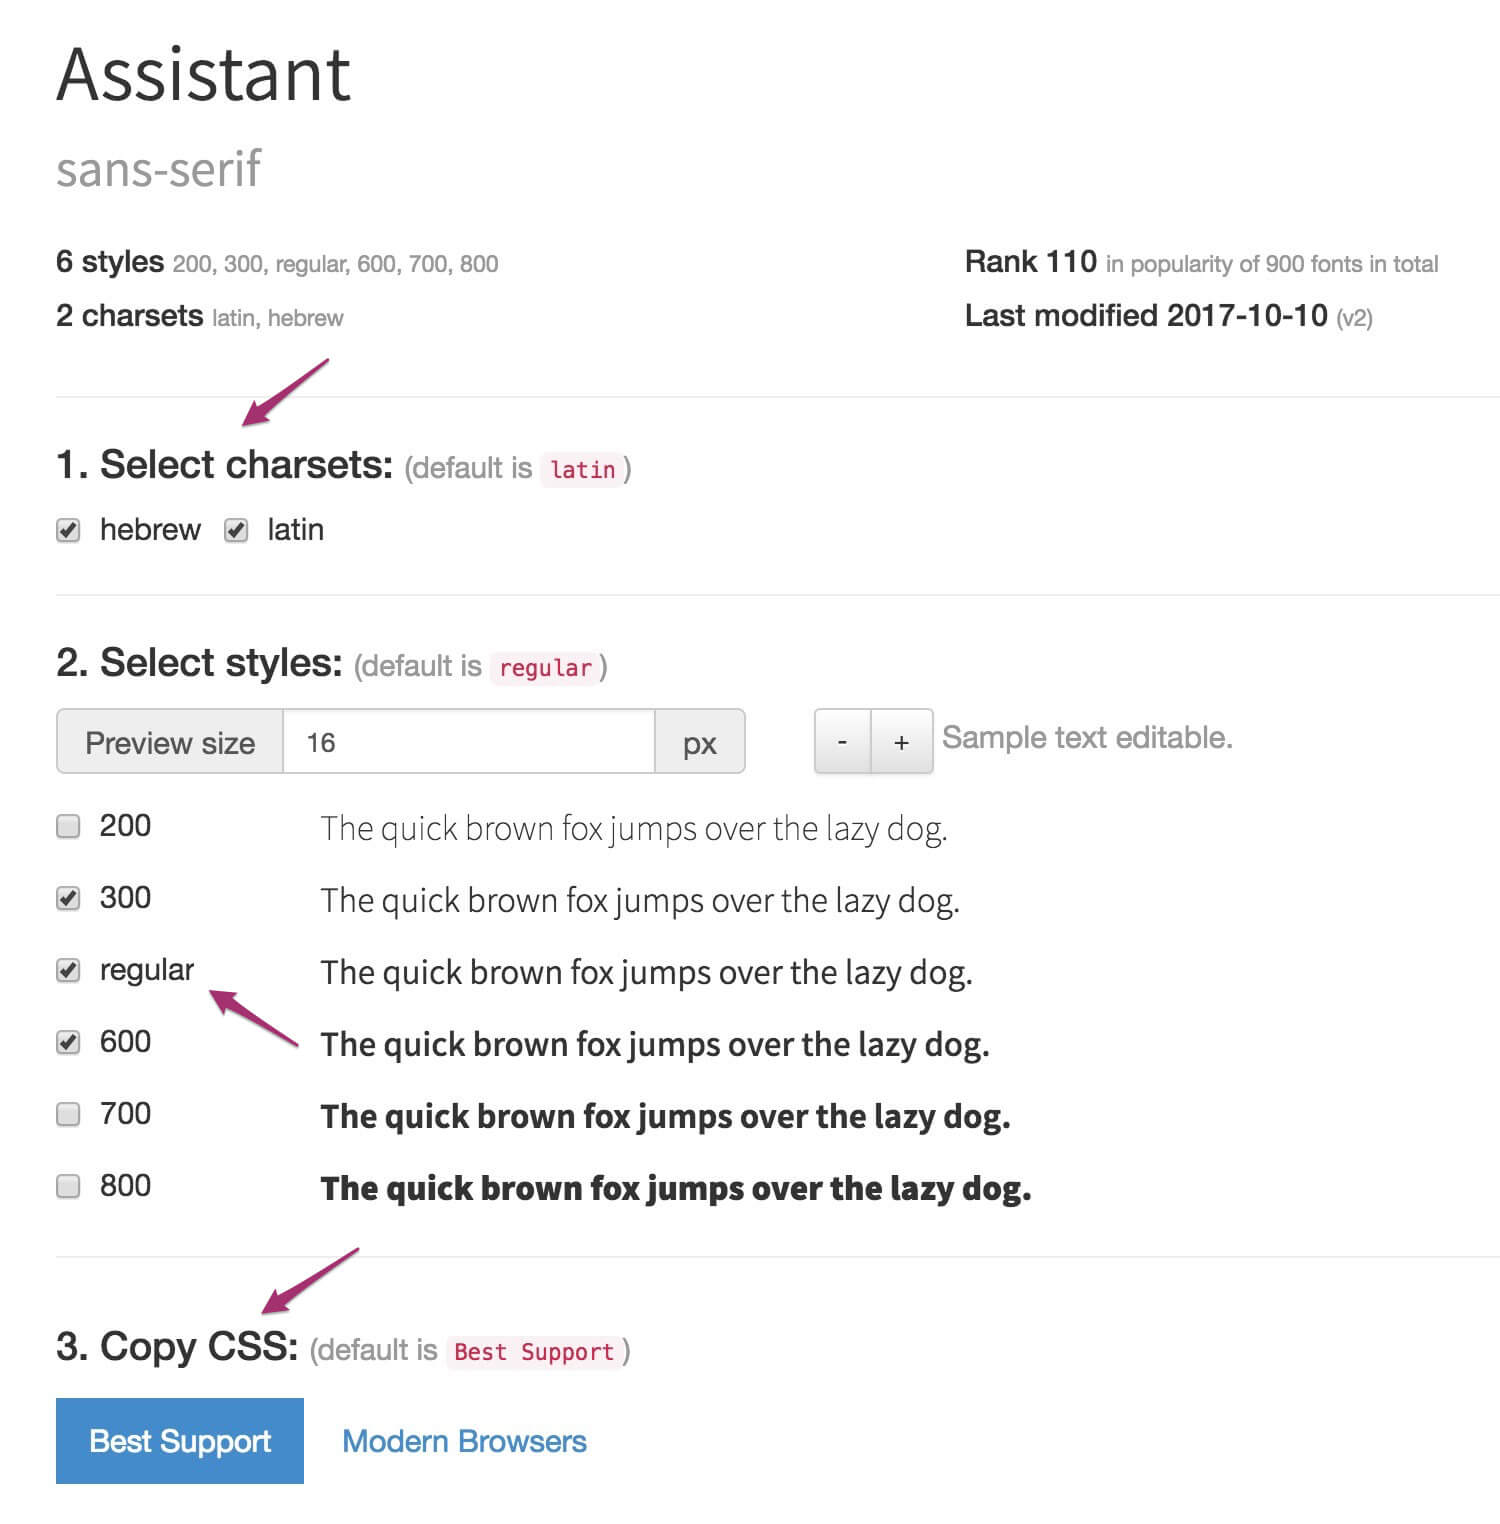
To use Google Webfont Loader, go to the link I mentioned, select the font you want to embed in the left search box, and follow these instructions:
- Select the CHARSET – in the case of this blog, I use Assistant for both Hebrew and English texts, so both options are marked.
- Select the font weights you’re using.
- Choose whether to support older browsers or not (I chose not to).
- Copy the CSS and add it to the CSS file in your child theme template.
- Download the fonts by clicking the Download button.
- Copy the fonts you received to the appropriate directory on your server (usually
/wp-content/child-theme/fonts/). - Clear your site’s cache.
You can even set the font directory in your template under the part that displays the CSS in this tool.
The tool will generate the necessary CSS for you according to the settings you chose. Here’s an image of the settings I used for the Assistant font in this blog:
In my case, the CSS for the Assistant font with weights 300, 400, and 600 looks like this:
/* assistant-300 - hebrew_latin */
@font-face {
    font-family: 'Assistant';
    font-style: normal;
    font-weight: 300;
    src: local('Assistant Light'), local('Assistant-Light'),
    url('../fonts/assistant-v2-hebrew_latin-300.woff2') format('woff2'),
    url('../fonts/assistant-v2-hebrew_latin-300.woff') format('woff');
}
/* assistant-regular - hebrew_latin */
@font-face {
    font-family: 'Assistant';
    font-style: normal;
    font-weight: 400;
    src: local('Assistant'), local('Assistant-Regular'),
    url('../fonts/assistant-v2-hebrew_latin-regular.woff2') format('woff2'),
    url('../fonts/assistant-v2-hebrew_latin-regular.woff') format('woff');
}
/* assistant-600 - hebrew_latin */
@font-face {
    font-family: 'Assistant';
    font-style: normal;
    font-weight: 600;
    src: local('Assistant SemiBold'), local('Assistant-SemiBold'),
    url('../fonts/assistant-v2-hebrew_latin-600.woff2') format('woff2'),
    url('../fonts/assistant-v2-hebrew_latin-600.woff') format('woff');
}
That’s all you need to do to load Google Fonts from your server instead of using Google’s CDN. If it’s not working, check if the path is correct and adjust it accordingly.
Don’t know what font-face@ is? Check out the post Loading Custom Fonts Using font-face@…
Important Points
Note that this post is less relevant if the Expiry Date for fonts is not properly set on your server.
Whether you’re using WP-Rocket or optimizing manually, ensure that the Expiry Date for fonts is set to more than 24 hours (ideally a month).
By the way, if you’re using a CDN on your site, you can serve the fonts from your CDN instead of your server and control the Expiry Date settings for files through it.
FAQs
Summary
Self-hosting Google Fonts gives you full control over font loading, cache headers, and privacy compliance. It eliminates external DNS lookups, prevents GDPR issues, and allows you to set proper expiry dates for better Core Web Vitals scores.
Download your fonts using the Google Webfonts Helper, upload them to your server, add the CSS with @font-face rules, and combine with font-display: swap and preload for optimal results.