In one of the projects I worked on, a considerable number of videos (video) were required on specific pages. Some of those videos needed to span the entire width of the screen, while others, smaller ones, were placed in a specific container.
During my work on the site, I noticed that my laptop (which I don’t underestimate its capabilities) was struggling. The fans started spinning rapidly, the computer heated up, and everything began to respond very slowly.
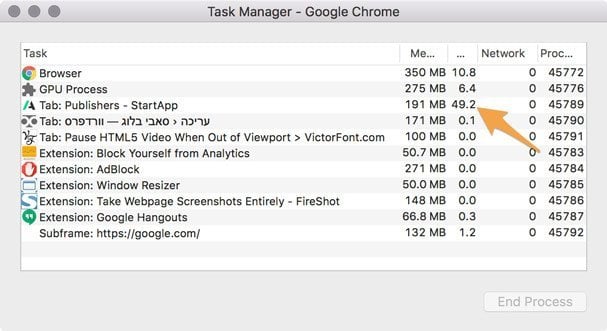
A quick check in the Task Manager showed that a specific chrome tab, which contains number of videos, was consuming about 50% of the CPU resources.

Initially, I thought there might be some issue with one of the JavaScript files I wrote, but it turned out not to be the case. Videos or HTML5 Videos consume a significant amount of resources from the processor, especially when displayed in full screen.
I am, of course, talking about videos embedded using the HTML5
<video>tag, not YouTube videos or similar.
When you think about it, it’s not correct or efficient because such a video will play when it is outside the Viewport, i.e., outside the area where the user is currently viewing at the given moment.
It would be right to stop playing all the videos unless they are within the current user’s viewport for the sake of optimization and better frontend performance.
The isInViewPort.js Library
Searching for a solution led me to the lightweight jQuery library (or plugin) that can tell us whether a specific element is currently in the viewport, called isInViewport.js.
The simplest usage looks like this:
$( 'selector:in-viewport' )Used as a selector, it returns every matching element currently visible, letting you chain any jQuery methods. You can also test a single element with .is(). Below is a practical implementation that pauses every HTML5 video when it scrolls out of view and resumes it when it comes back into view:
$('div:in-viewport').css('background-color', 'red');

// IS THE SAME AS:

var $div = $('div');
if ($div.is(':in-viewport')) {
    $div.css('background-color', 'red');
}
The pseudo-selector :in-viewport accepts two optional parameters:
$( 'selector:in-viewport( tolerance[, viewport selector] )' )- Tolerance – A pixel value that widens or narrows the “visible” area. In the example above,
400means the video starts/resumes up to 400 px before it fully enters the viewport and pauses 400 px after it leaves. - Viewport – Any DOM element can be set as the reference viewport instead of the default
window. Pass its selector as the second argument.
Using isInViewPort.js to Pause Video in WordPress
As you can see, using the isInViewPort.js library allows you to interact with any element, whether it is within the viewport of your choice or outside of it. In our case, dealing with a video, let’s see how to use the library to pause it when it’s outside the viewport.
So, download the library and add the isInViewport.js file to your JavaScript folder in your theme (or in the child theme). Then, add the following code to the functions.php file to load this file:
wp_enqueue_script(
    'isInViewport',
    get_stylesheet_directory_uri() . '/js/isInViewport.js',
    array( 'jquery' ),
    null,
    true
);
Please note that we added
array( 'jquery' )as a parameter to the function to ensure that we load the plugin only after jQuery is loaded; otherwise, we will get an error.
Now, add the following code wherever you add JavaScript on your WordPress site to initialize the plugin:
jQuery(document).ready(function ($) {
    "use strict";

    function checkVideos() {
        $('video').each(function () {
            if ($(this).is(':in-viewport(400)')) {
                this.play();
            } else {
                this.pause();
            }
        });
    }

    let timeout;
    $(window).on('scroll resize', function () {
        clearTimeout(timeout);
        timeout = setTimeout(checkVideos, 100); // throttle execution
    });

    checkVideos(); // run on page load
});
In the condition :in-viewport(400), we used a tolerance of 400 pixels, which means the video will begin playing slightly before it enters the visible viewport and pause a bit after it leaves. You can adjust this value to better match your design or performance preferences.
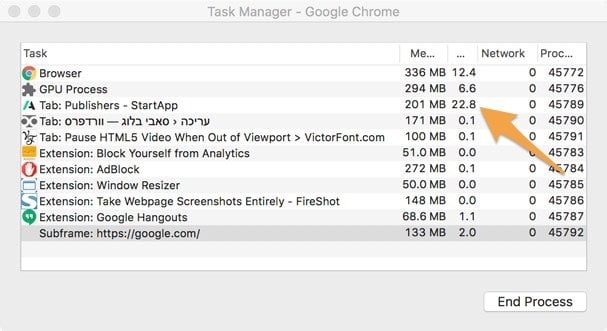
With this in place, every HTML5 <video> element on the page will automatically pause when it scrolls out of view and resume when it’s visible again, leading to a significant reduction in CPU usage. In one of my tests, resource consumption dropped by about 50%.

Summary
This is, in essence, a solution for embedded HTML5 videos on the site using the <video> tag. In a similar vein to this post, if the videos on your site are YouTube or Vimeo videos, you can improve page loading time with a bit of JavaScript.
This technique is particularly useful for long pages with many video elements, especially when not using lazy loading. If you’re using YouTube/Vimeo embeds, also consider replacing them with a thumbnail + deferred load for better performance.
Take a look at this post on deferring JavaScript for YouTube videos if you’re interested in the topic. In any case, feel free to comment on the post as always… 🙂


