When you upload an image to the WordPress media library, multiple copies are created in different sizes. WordPress does this because different parts of your site need the same image at different resolutions – a large hero image, a medium thumbnail in a grid, a small widget image, and so on.
By default, WordPress generates three image sizes: Thumbnail, Medium, and Large. But you can register your own custom sizes, remove ones you don’t need, and control which sizes are generated per content type.
“WordPress uses add_image_size() to register additional image sizes. Themes and plugins can register custom sizes for specific use cases.” – WordPress Developer Resources.
Keep in mind that more image sizes means more files in your uploads directory. Each uploaded image can generate dozens of copies if your theme and plugins register many sizes, consuming disk space and slowing down uploads.
Default Image Sizes in WordPress
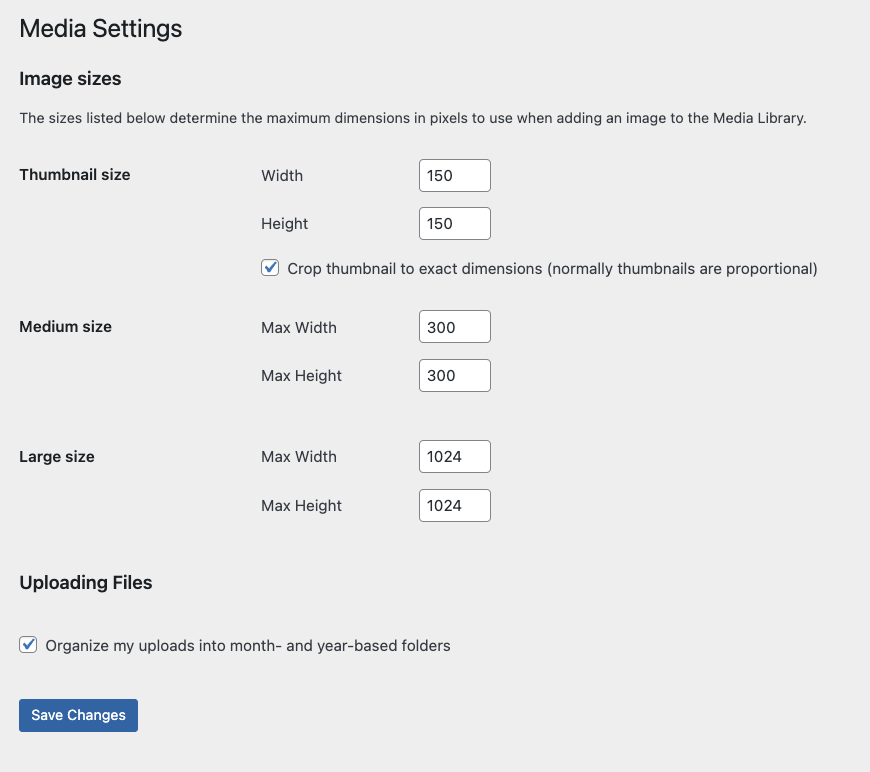
WordPress ships with four built-in image sizes. You can configure three of them under Settings > Media in the admin:
| Size Name | Default Dimensions | Configurable? |
|---|---|---|
thumbnail | 150 x 150 (cropped) | Yes (Settings > Media) |
medium | 300 x 300 (max) | Yes (Settings > Media) |
medium_large | 768 x 0 (width only) | No (added in WP 4.4 for responsive srcset) |
large | 1024 x 1024 (max) | Yes (Settings > Media) |
Since WordPress 5.3, images wider than 2560 pixels are automatically scaled down. You can change this threshold with the big_image_size_threshold filter:
add_filter( 'big_image_size_threshold', function() {
    return 1920;
} );
Removing Default Image Sizes
If you don’t need certain default sizes, remove them with the intermediate_image_sizes filter. Add this to your functions.php file:
add_filter( 'intermediate_image_sizes', function( $sizes ) {
    unset( $sizes[ array_search( 'medium', $sizes ) ] );
    unset( $sizes[ array_search( 'large', $sizes ) ] );
    return $sizes;
} );
This prevents WordPress from generating those sizes for every upload. Only remove sizes you’re sure aren’t used by your theme or plugins.
Using Image Sizes in Your Theme
There are two ways to use image sizes:
Through the Admin Interface
When inserting an image into a post, you can select which size to display from the image settings panel. Your custom sizes will appear in the dropdown if you register them with the media library (shown later in this guide).

Using Code
When building templates, use WordPress image functions and pass the size name as a parameter:
the_post_thumbnail( 'large' );

$image = wp_get_attachment_image_src( $attachment_id, 'my-custom-size' );

echo get_the_post_thumbnail( $post_id, 'thumbnail' );
The three most common functions are the_post_thumbnail(), get_the_post_thumbnail(), and wp_get_attachment_image_src().
Creating Custom Image Sizes
Adding your own image sizes is a two-step process. The second step is optional.
Step 1: Register the Size with add_image_size
Add this to your functions.php file:
add_action( 'after_setup_theme', function() {
    add_image_size( 'card-thumbnail', 400, 300, true );
    add_image_size( 'hero-banner', 1200, 600, true );
    add_image_size( 'square-medium', 500, 500, true );
} );
The add_image_size() function takes four parameters:
- Name – a unique slug for your size (e.g.,
card-thumbnail) - Width – the target width in pixels
- Height – the target height in pixels
- Crop –
truecrops to exact dimensions (center by default),falseresizes proportionally. You can also pass an array likearray( 'left', 'top' )to control the crop position.
Step 2: Add the Size to the Media Library Dropdown
This step is optional but makes your custom size available in the admin image size selector:
add_filter( 'image_size_names_choose', function( $sizes ) {
    $sizes['card-thumbnail'] = 'Card Thumbnail';
    $sizes['hero-banner']    = 'Hero Banner';
    return $sizes;
} );
After adding this, your custom sizes will appear as options when inserting images into posts.
New image sizes only apply to images uploaded after you register them. Existing images won’t have the new size until you regenerate thumbnails. Use WP-CLI (wp media regenerate) or a plugin like Regenerate Thumbnails to create the new sizes for existing images.
Regenerating Image Sizes
After changing your add_image_size() parameters, existing images still have the old dimensions. You need to regenerate them.
Using WP-CLI
The fastest method. Run from the command line:
wp media regenerate --yesTo regenerate only a specific image size:
wp media regenerate --image_size=card-thumbnail --yesUsing a Plugin
If you don’t have command-line access, use the Regenerate Thumbnails plugin. It processes images in batches from the WordPress admin.
Reducing Image Sizes Per Content Type
When your site has multiple custom post types, each with their own image sizes, you can end up generating 20-30 images per upload. You can reduce this by only generating the sizes each content type actually needs:
add_filter( 'intermediate_image_sizes', function( $sizes ) {
    $post_id = isset( $_REQUEST['post_id'] ) ? intval( $_REQUEST['post_id'] ) : 0;
    $type    = $post_id ? get_post_type( $post_id ) : '';

    if ( 'page' === $type ) {
        $allowed = array( 'thumbnail', 'medium', 'hero-banner' );
        return array_intersect( $sizes, $allowed );
    }

    if ( 'portfolio' === $type ) {
        $allowed = array( 'card-thumbnail', 'square-medium' );
        return array_intersect( $sizes, $allowed );
    }

    return $sizes;
} );
This approach can save significant disk space on sites with many post types and image sizes.
How to View Registered Image Sizes
To see all image sizes registered by your theme and plugins, you can use WP-CLI or a quick debug snippet.
With WP-CLI:
wp eval 'print_r( wp_get_registered_image_subsizes() );'Or add this temporarily to a template file:
<?php
global $_wp_additional_image_sizes;
echo '<pre>';
print_r( $_wp_additional_image_sizes );
echo '</pre>';
?>
Remove the debug code after you’ve reviewed the output. This is a development tool, not something to leave on a production site.
FAQs
Common questions about WordPress image sizes:
-scaled suffix in the filename. You can change this threshold using the big_image_size_threshold filter, or return false to disable scaling entirely.true, the image is cropped to the exact dimensions you specify (center-cropped by default). When false, the image is resized proportionally to fit within the width and height. You can also pass an array like array( 'left', 'top' ) to control the crop anchor position.wp media regenerate via WP-CLI, or use a plugin like Regenerate Thumbnails. Only the missing sizes are generated - existing ones are not re-created.wp eval 'print_r( wp_get_registered_image_subsizes() );' via WP-CLI, or temporarily add print_r( $_wp_additional_image_sizes ) to a template file. This shows all sizes registered by your theme and plugins, including their dimensions and crop settings.intermediate_image_sizes filter only prevents WordPress from generating that size for future uploads. Files that were already created remain on disk. To clean up unused image files, you can use a plugin like Image Cleanup or manually remove them from the uploads directory.Summary
WordPress generates multiple image sizes for each upload to serve the right resolution in different parts of your site. You can configure the defaults under Settings > Media, register custom sizes with add_image_size(), and remove sizes you don’t need via the intermediate_image_sizes filter.
For sites with many custom post types, generate only the sizes each type actually needs to save disk space. After changing image size parameters, regenerate thumbnails with WP-CLI or a plugin so existing images get the new dimensions.
For more on image optimization, see the guide on optimizing WordPress images for SEO.