Do you agree with me that carousels are a feature that is widely used on WordPress websites (and in general)?
A simple google search and you’ll find dozens of plugins, libraries, and guides on how to create them. However, when it comes to a carousel that the client can easily update, it’s a bit more complicated…
As WordPress website owners, you can certainly use plugins for this purpose, but in most cases, they have a negative impact on site performance. Furthermore, the learning curve of these plugins can be steep and consume a lot of learning time.
On the other hand, with the right tools, you can create carousels that look great, work excellently, and most importantly, are user-friendly and simple for the client.
Here’s an example carousel built using Slick Slider, and we gonna achieve similar results by the end of this guide:


The Initial Steps to Build the Carousel
I assume you’re using WordPress as your content management system, so before we start, here are two things you need for this guide:
- The Advanced Custom Fields Pro plugin, or ACF Pro for short.
- The Slick Slider library.
The Advanced Custom Fields plugin allows you to easily add various types of fields in the admin interface and expand the functionality of WordPress sites.
The Slick library is one of my favorites. It’s lightweight, works excellently, easy to embed, and comes with a variety of cool options.
Personally, I used this library to build carousels and slideshows on dozens of sites I built, and the process is very straightforward. Let’s see how…
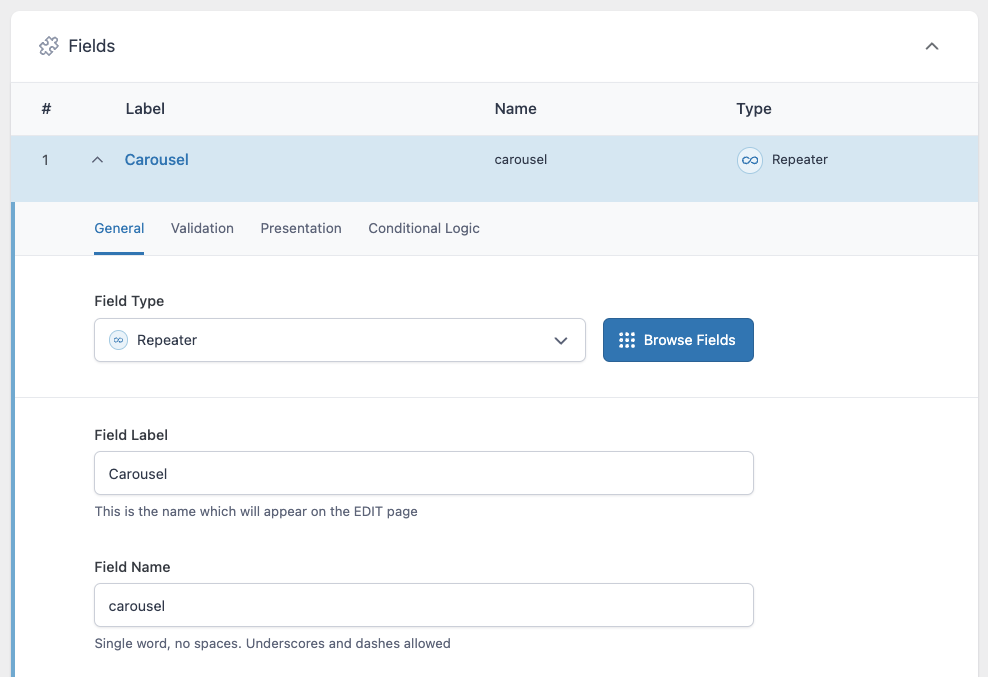
Creating the Custom Field in Advanced Custom Fields
After installing the ACF Pro plugin, you will find the “ACF” menu in the WordPress admin sidebar. Add a new field group and give it a name at the top – “Carousel” for this purpose.

If a field doesn’t appear automatically, click on “Add Field” to add a new field. Give a name to the field under Field Label, and then enter carousel under Field Name. For Field Type, choose the Repeater Field.
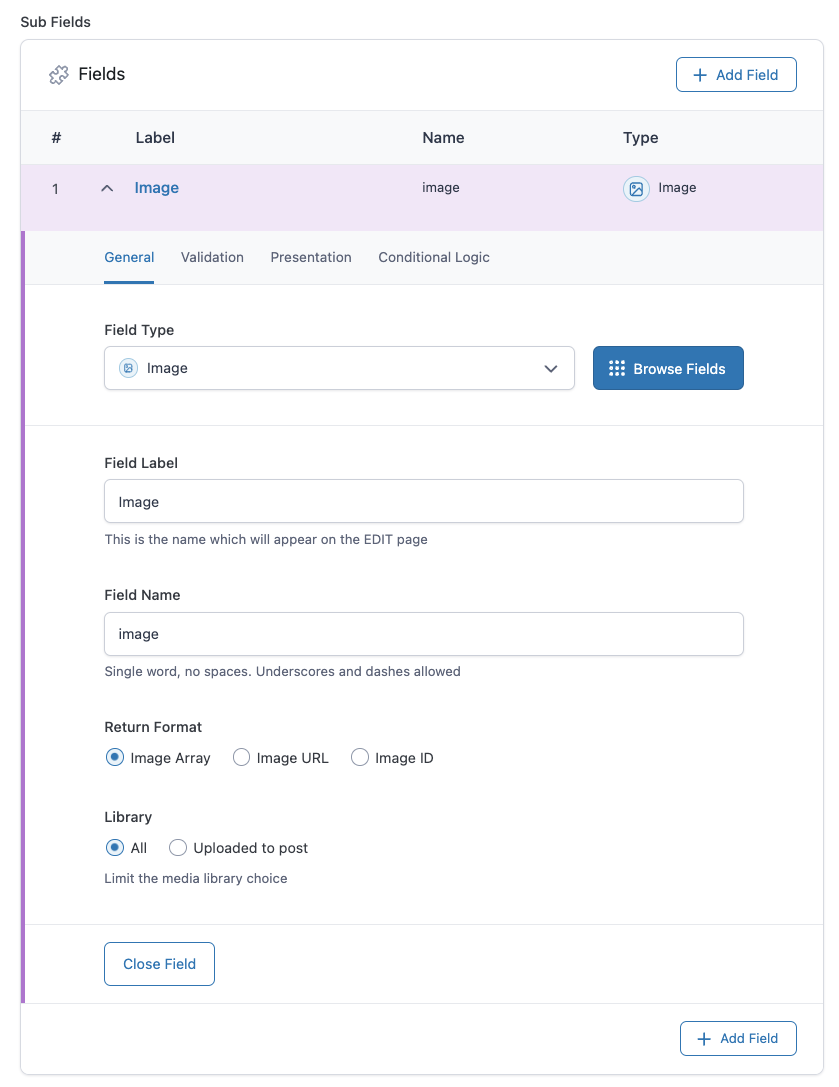
Under Sub Fields, add a field of type “Image” and name it image for the sake of this guide. Make sure the Return Format is set to Image Array.
Scroll down on the same page and, under Location Rules, select that you want this field group to appear only when you are in a post type of Page.
Of course, there are many options there, but for the purpose of this guide, simply use the post type – Page, and click Publish.
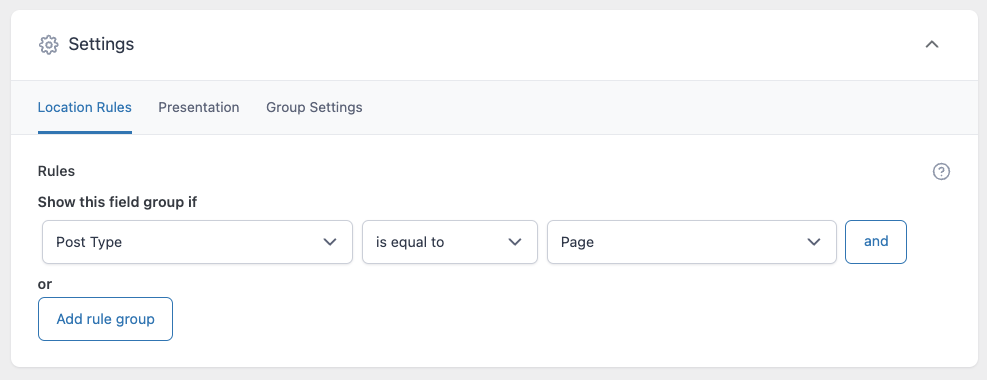
Usually, I choose the condition to be a specific Page Template because each page in my created templates has its own Page Template. However, in this case and for the purpose of this guide, I chose the field group to appear on all pages you edit.
Go to any page, and you will find the field group you created. Add all the images you want to appear in the carousel.
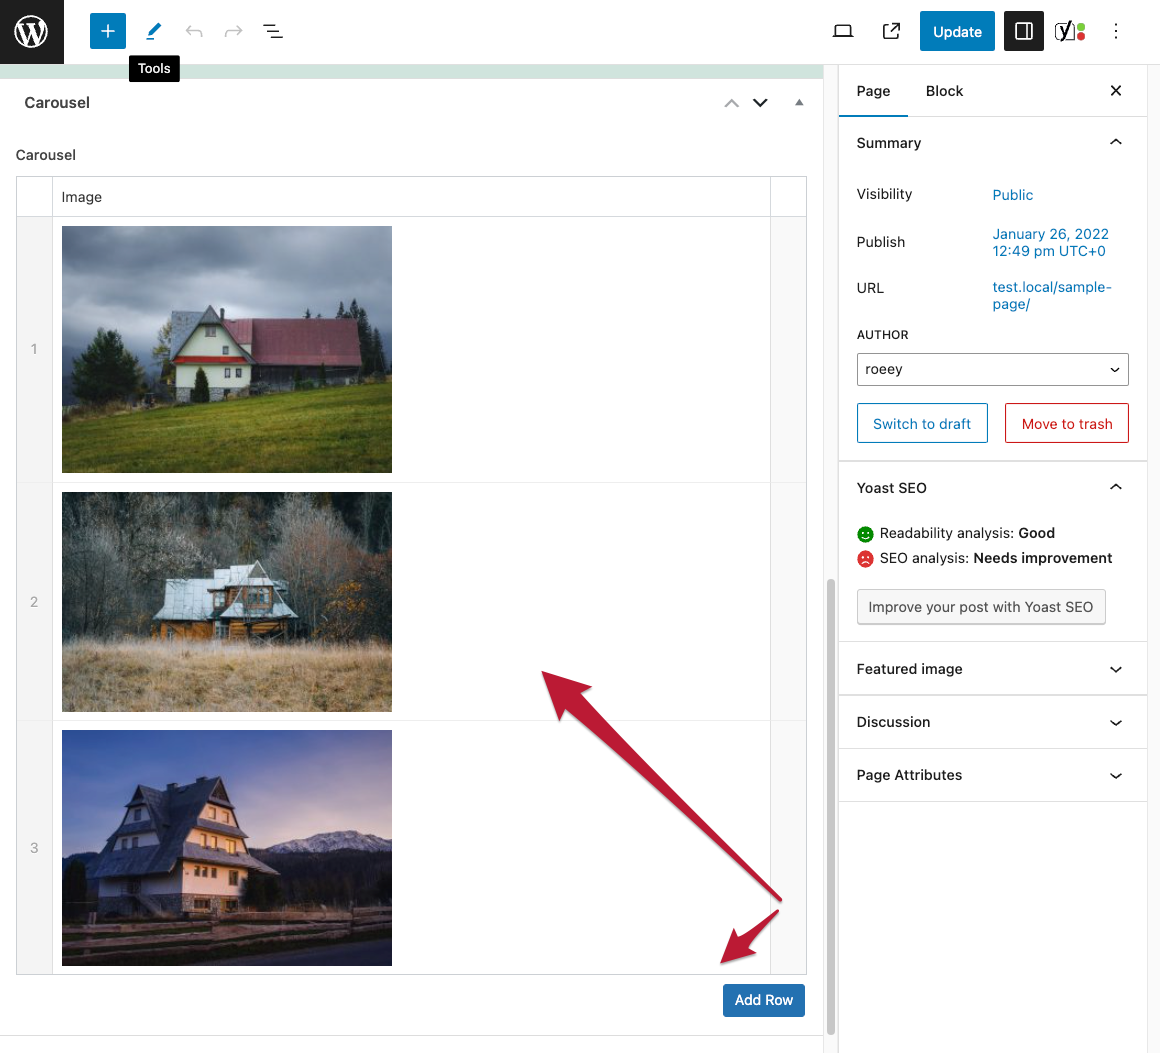
Tip – Let’s say you added several fields and clicked to add an image to the first field. You can choose multiple images, and they will automatically be attached to the fields you created.
Adding the Slick Slider Library
In order for Slick to work properly, there are three files you need to load, two CSS files and one JS file.
You can load the assets from a CDN, or more correctly, load the files directly from your server. Here’s the code that accomplishes this, add it to the functions.php file of your child theme:
function slick_assets() {
    wp_register_script( 'slick', get_stylesheet_directory_uri() . '/slick.min.js', array( 'jquery' ), '1.0.0', true );
    wp_enqueue_script( 'slick' );

    wp_register_style( 'slick', get_stylesheet_directory_uri() . '/slick.css' );
    wp_register_style( 'slick-theme', get_stylesheet_directory_uri() . '/slick-theme.css' );
    wp_enqueue_style( 'slick' );
    wp_enqueue_style( 'slick-theme' );
}
add_action( 'wp_enqueue_scripts', 'slick_assets' );
Make sure to download the Slick library and according to this code, you need to add the three files to the main library in your child theme.
Please note that we added a dependency on jQuery in line 5 so that the JS file will only load after jQuery is loaded. More on this in the article Adding Assets (JavaScript and CSS Files) in WordPress.
Additionally, you need to copy the
fontsfolder that comes with Slick and paste it into the child theme folder. Also, you might need to change the path in theslick-theme.cssfile to point to the correct location of the fonts.
Displaying the Carousel in the Page Template
In order to display the same images we added to the carousel in our site pages, you need to add the following code to the relevant file where you want to display the carousel.
In our case, we will add this to the page.php file. If this file doesn’t exist in the main directory of the child theme, copy it from the parent theme directory to the child theme directory.
<div class="slick-carousel">
    <?php
    $size = 'large';
    // check if the repeater field has rows of data
    if( have_rows('carousel') ):
        // loop through the rows use_cases_fields data
        while ( have_rows('carousel') ) : the_row();

            $image = get_sub_field('image');

            if( !empty($image) ):
                // vars
                $alt = $image['alt'];
                // thumbnail
                $thumb = $image['sizes'][ $size ];
                $width = $image['sizes'][ $size . '-width' ];
                $height = $image['sizes'][ $size . '-height' ];
                ?>
                <div class="slick-content">
                        <img src="<?php echo $thumb ?>" alt="<?php echo $alt ?>" width="<?php echo $width; ?>" height="<?php echo $height; ?>" />
                </div>
            <?php endif; ?>
            <?php
        endwhile;
    endif;
    ?>
</div>
Pay attention to a few things:
- The
sizevariable in line 7 holds the size of the image you want to load. You can define image sizes using the add_image_size function. WordPress comes with three default sizes – large, medium, and thumbnail. - In lines 7 and 9, the name inside
have_rowsshould match the name of the carousel field (in this case, “carousel”). - Pay attention to the
classin line 3. We’re using this class to activate the carousel.
Activating the Slick Carousel
The only thing left to do is to call the function that initializes Slick. Activation is very simple and is done using the following code:
$('.slick-carousel').slick();This code will activate Slick with its default options. Note that we’re using the class we mentioned earlier. You can add this file to any JS file loaded on your WordPress site. However, make sure this file is loaded after the slick library is loaded.
If you still don’t understand how to do this, add a file named custom.js to the main directory of your child theme and modify the code we wrote above to the following:
function slick_assets() {

    wp_register_script( 'slick', get_stylesheet_directory_uri() . '/slick.min.js', array( 'jquery' ), '1.0.0', true );
    wp_register_script( 'custom', get_stylesheet_directory_uri() . '/custom.js', array( 'slick' ) );

    wp_enqueue_script( 'slick' );

    wp_register_style( 'slick', get_stylesheet_directory_uri() . '/slick.css' );
    wp_register_style( 'slick-theme', get_stylesheet_directory_uri() . '/slick-theme.css' );

    wp_enqueue_style( 'slick' );
    wp_enqueue_style( 'slick-theme' );

}
add_action( 'wp_enqueue_scripts', 'slick_assets' );
Add the following code to the custom.js file you created:
jQuery(document).ready(function($) {

    $('.slick-carousel').slick();

});
You can find all the options for the carousel on the Slick website. However, if you followed this guide, you should now see something similar to this:
By playing with the parameters of Slick, along with some CSS tweaks, beautiful carousels can be achieved. Here are some examples I’ve created:
Here’s another guide that explains how to change the default animations of Slick Slider using the Animate.CSS library.
Tip – How to Make Slick Load More Smoothly?
When refreshing the page in a browser, you might notice that in many cases, the slides appear stacked on top of each other for a few seconds (feel free to refresh this page to see what I mean).
This phenomenon occurs because the JavaScript file that initializes the carousel takes some time to load (especially noticeable without caching or after a hard refresh).
There’s a neat trick I use for every carousel I create with Slick that allows the slides to load more smoothly, without affecting the user experience.
In this case, only the first slide will appear until the point where the carousel is fully loaded. We identify when the carousel has finished loading based on the added class (slick-initialized), and only then do we display the remaining slides. Here’s the code:
.your-carousel {
    visibility: hidden;
    opacity: 0;
    transition: opacity 1s;
}

.your-carousel.slick-initialized {
    visibility: visible;
    opacity: 1;
}

.your-carousel .your-item {
    display: none;
}

.your-carousel .your-item:first-child {
    display: block;
    visibility: hidden;
}

.your-carousel.slick-initialized .your-item {
    display: block;
    visibility: visible !important;
}
Of course, you need to replace the relevant classes according to the specific carousel on your site…
By the way, if you’re interested in learning how to unslick a slider at a specific breakpoint using the unslick function, take a look at the linked article.
To Sum Up
In this guide, you’ve seen how to create a dynamic carousel using the ACF plugin and the Slick Slider library.
As you can see, there are many options, the carousel is responsive (check how to achieve this on the Slick website), and it’s lightweight and versatile.
We didn’t cover all the carousel options here, but you have options like carousel synchronization, lazy loading, and more… Using this library in combination with ACF allows you to easily build and edit cool carousels. If you enjoyed this post, you may also be interested in exploring our guide on creating an infinite continuous slider using the Splide library.