WooCommerce is a powerful platform for setting up an online store, and managing taxes efficiently is one of its key features. Whether you run a local shop or sell internationally, WooCommerce offers robust tax options to help you comply with regional and global tax laws.
Before configuring any tax rules, you need to enable tax calculations. Go to WooCommerce > Settings > General and check the box labeled “Enable tax rates and calculations”, then click “Save changes”. This activates the Tax tab under WooCommerce settings.
Understanding WooCommerce Tax Settings
WooCommerce tax settings are divided into three main tabs under the WooCommerce > Settings > Tax panel in the WordPress dashboard:
- Tax Options
- Standard Rates
- Additional Tax Classes (Reduced Rate, Zero Rate, etc.)
Let’s explore each tab in detail to understand the configuration options and avoid common errors.
WooCommerce Main Tax Settings Screen
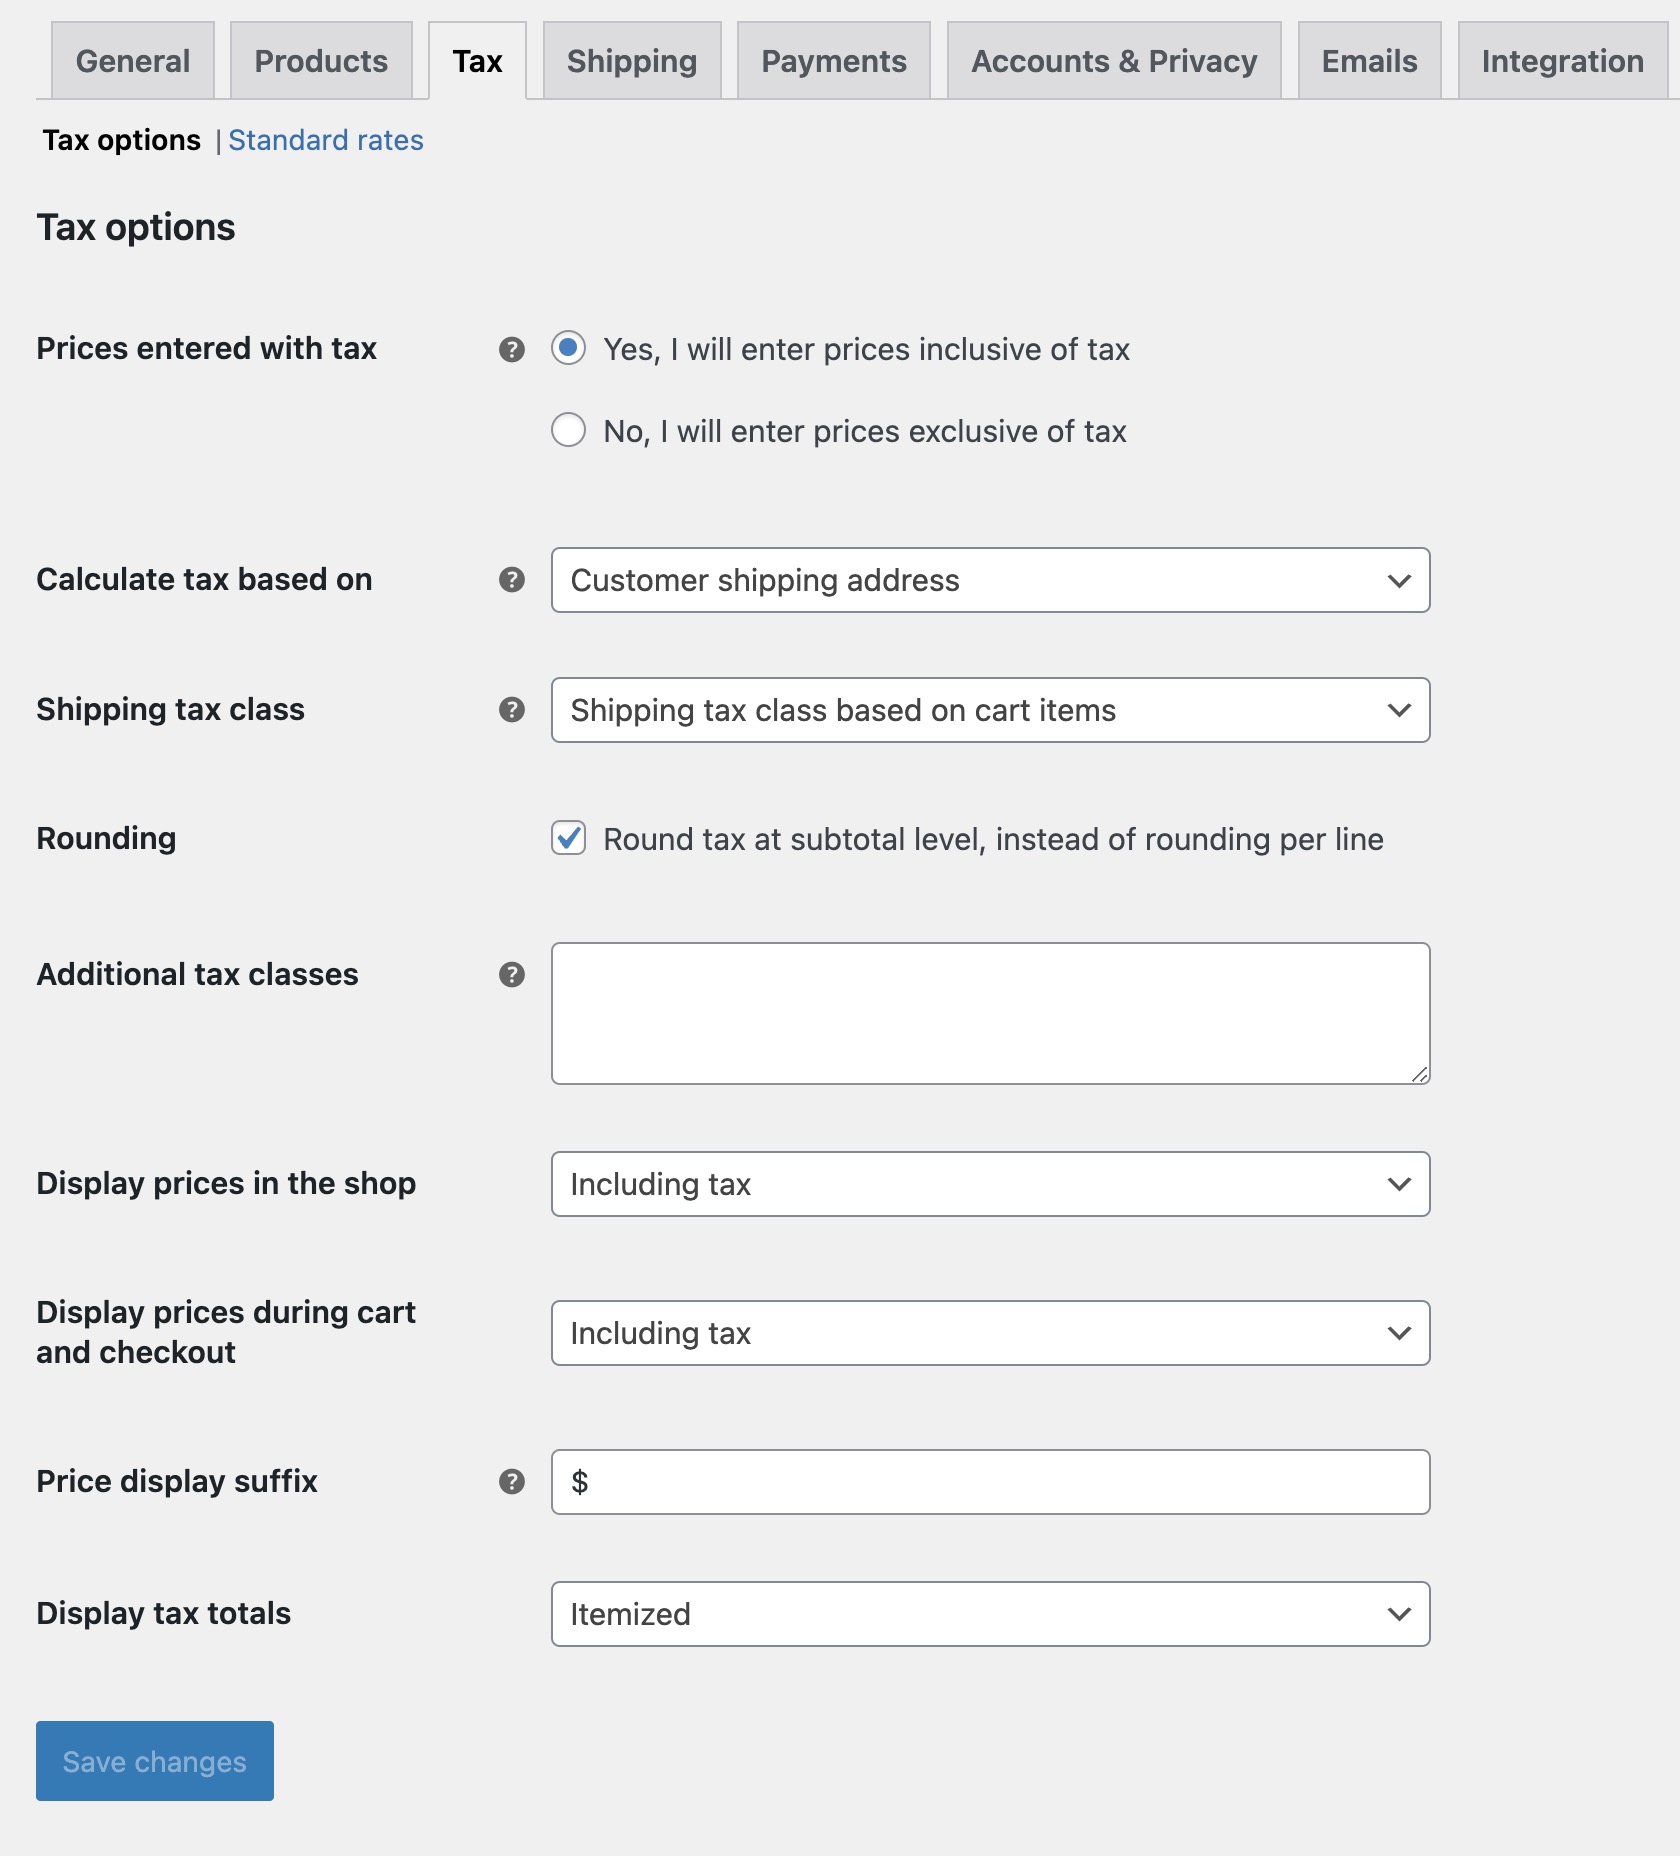
1. Tax Options
The Tax Options tab allows you to define global tax behaviors for your store. Below are the key options and their explanations:
- Prices Entered With Tax: Choose whether product prices include or exclude taxes. If you select “Yes,” taxes are deducted for customers in non-taxable locations. If you select “No,” taxes are added based on the customer’s location.
- Calculate Tax Based On: Determines how taxes are calculated. Options include:
- Customer shipping address – Uses the customer’s shipping location.
- Customer billing address – Uses the customer’s billing location.
- Store base address – Uses your store’s location regardless of the customer’s location.
- Shipping Tax Class: Defines the tax class applied to shipping. You can use a single tax class or match it with the products in the cart.
- Rounding: Choose whether taxes are rounded at the subtotal level instead of the line-item level.
- Additional Tax Classes: Allows you to define custom tax classes for your store. Examples include “Reduced Rate” and “Zero Rate.” (more on that later in the post)
- Display Prices In The Shop: Allows you to choose whether product prices in the shop display with or without taxes.
- Display Prices During Cart and Checkout: Defines whether prices during the checkout process display inclusive or exclusive of tax.
- Price Display Suffix: Adds text to clarify pricing (e.g., “Incl. VAT” or “Excl. VAT”).
- Display Tax Totals: Choose how tax totals are displayed on the cart and checkout pages:
- As a single total: Combine all taxes into one total for simplicity.
- Itemized: Break down taxes by each tax rate for greater transparency.
Tip: Always configure taxes based on your store’s primary selling region. For stores selling internationally, ensure compliance with destination-based tax laws like VAT or GST.
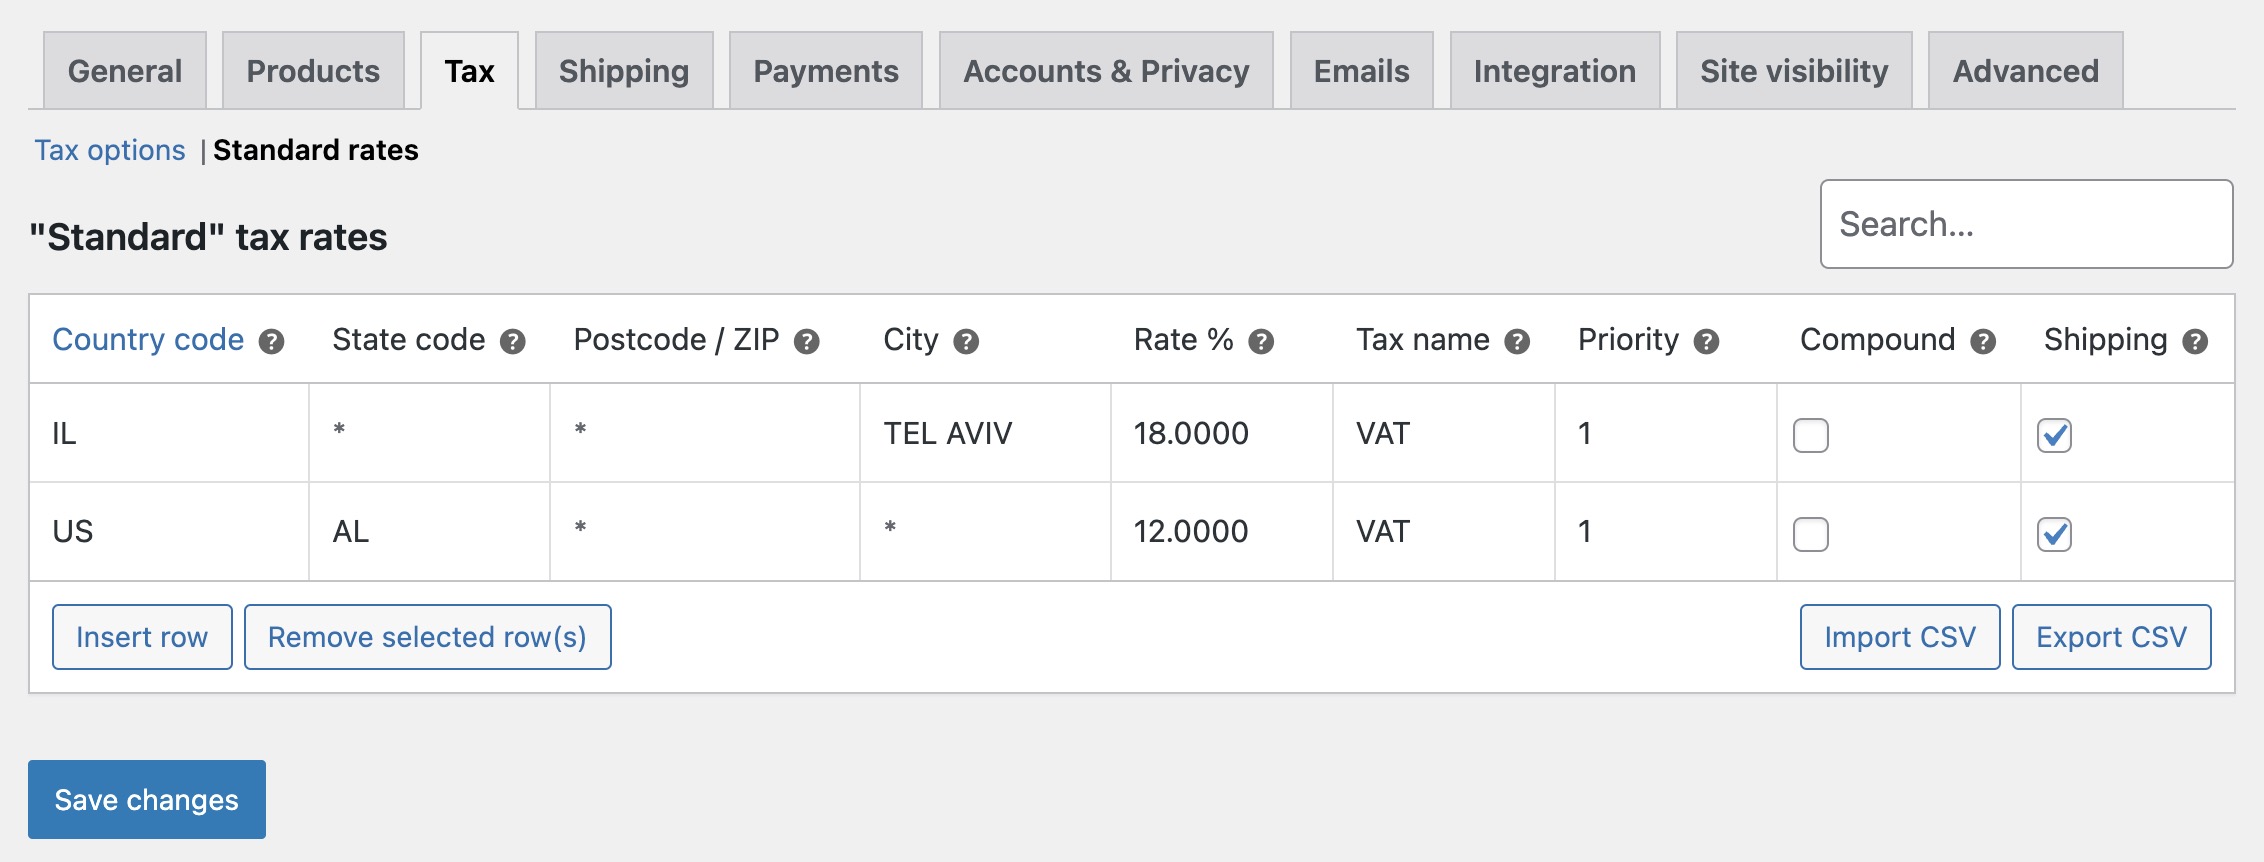
2. Standard Rates
Standard Rates – WooCommerce Tax Settings
The Standard Rates tab is where you set up tax rates for your primary tax class. This section allows you to add, edit, and manage tax rates for specific locations.
Fields include:
- Country Code: The two-letter ISO country code for the tax rate (e.g., US for the United States).
- State Code: The state or province code for the tax rate.
- ZIP/Postcode: The specific ZIP code or range of ZIP codes where the rate applies.
- City: Define specific cities for the tax rate.
- Rate %: Enter the percentage of the tax rate (e.g., 10 for 10%).
- Tax Name: The name displayed on invoices and during checkout.
- Priority: The order in which tax rules apply. Use “1” for the highest priority.
- Compound: If checked, this tax is applied on top of other taxes.
- Shipping: If checked, the tax rate applies to shipping as well.
You can import or export tax rates in bulk using the built-in CSV tools. This saves significant time when setting up taxes for multiple regions.
3. Additional Tax Classes

When you add new tax classes in the Additional Tax Classes field (e.g., “Reduced Rate” or “Zero Rate”), WooCommerce automatically generates new tabs for these classes in the tax settings.
These tabs allow you to define specific tax rates for each class, offering more flexibility to handle varying tax rules.
Additional Tax Classes like “Reduced Rate” or “Zero Rate” handle special tax situations where the standard rate doesn’t apply:
- Reduced Rate: Applied to essentials like food, books, or medicines, taxed at a lower rate.
- Zero Rate: Used for tax-exempt products like exports, medical equipment, or donations.
Each tax class has its own tab in the tax settings (e.g., “Reduced Rates” or “Zero Rates”) to define location-specific rates, offering flexibility for regional compliance.
Tip: Use additional tax classes to stay compliant with regional tax rules and avoid mischarges.
Ensure you assign the correct tax class to products on their settings page. Without this, the default Standard Rate will apply, potentially causing incorrect tax charges.
Automated Tax Calculation Solutions
Manually entering tax rates for every jurisdiction is time-consuming and error-prone, especially if you sell across multiple states or countries. WooCommerce supports several automated tax solutions that calculate rates in real time at checkout.
WooCommerce Tax is a free plugin developed by Woo. It automatically calculates sales tax by city, country, or state and requires minimal setup. It covers the United States, Canada, Australia, the United Kingdom, and many European countries. For stores with a single location, it is completely free.
For more advanced needs, third-party services like TaxCloud and TaxJar offer real-time calculations across all 50 U.S. states and thousands of tax jurisdictions. They also provide automated filing, remittance support, and audit-ready reporting. These services require a paid subscription.
Important: If you sell digital products to EU customers, VAT must be calculated based on the customer’s location (destination-based taxation). The EU One Stop Shop (OSS) system lets you register in one EU country and file a single return for all EU sales. Consider using an automated tax extension to keep rates current across all member states.
Common Tax Setting Errors
Here are some common mistakes users make when setting up taxes in WooCommerce and how to avoid them:
- Incorrect Tax Calculation Basis: Ensure the “Calculate Tax Based On” option aligns with your business logic. Using the wrong address type (e.g., billing instead of shipping) can result in incorrect tax amounts.
- Not Setting Up Tax Rates: Adding tax rates to only the Standard Rate tab but leaving out Reduced or Zero Rate tabs can cause errors for specific products.
- Overlooking Tax Class Assignments: Products without a tax class won’t have taxes calculated. Always double-check product tax class assignments.
- Neglecting to Restrict Tax Locations: If your store serves multiple regions, ensure tax rates are configured only for applicable locations.
- Mixing Inclusive and Exclusive Pricing: Setting “Prices Entered With Tax” to “Yes” but displaying prices excluding tax (or vice versa) confuses customers and can lead to checkout abandonment. Keep your pricing display consistent.
Customizing WooCommerce Taxes with Code
WooCommerce allows you to customize tax behavior using hooks and filters. Below are some useful examples:
1. Apply Custom Tax Rates Based on User Role
add_filter( 'woocommerce_product_get_tax_class', 'custom_tax_class_for_user_role', 10, 2 );
function custom_tax_class_for_user_role( $tax_class, $product ) {
    if ( current_user_can( 'wholesale_customer' ) ) {
        return 'zero-rate';
    }
    return $tax_class;
}
Explanation: This code applies the “Zero Rate” tax class for users with the “wholesale_customer” role. Wholesale buyers are often tax-exempt, and this filter ensures they are not charged tax at checkout.
2. Add a Custom Suffix to Tax-Inclusive Prices
add_filter( 'woocommerce_get_price_suffix', 'custom_tax_price_suffix', 10, 2 );
function custom_tax_price_suffix( $suffix, $product ) {
    if ( wc_prices_include_tax() ) {
        $suffix = ' (Incl. VAT)';
    }
    return $suffix;
}
Explanation: Adds a suffix to clarify that prices include VAT. This is especially useful for stores selling in regions where tax-inclusive pricing is the norm, such as the EU.
3. Disable Taxes for Specific Categories
add_filter( 'woocommerce_product_get_tax_class', 'exclude_tax_for_category', 10, 2 );
function exclude_tax_for_category( $tax_class, $product ) {
    if ( has_term( 'tax-exempt', 'product_cat', $product->get_id() ) ) {
        return 'zero-rate';
    }
    return $tax_class;
}
Explanation: Products in the “tax-exempt” category are automatically assigned the “Zero Rate” tax class. This is handy when certain product categories (e.g., donations or charity items) should never be taxed.
Staying Compliant with Regional Tax Changes
Tax regulations change frequently, and keeping your store compliant requires ongoing attention. For example, several EU countries updated their VAT rates effective January 1, 2026, including rate increases in Lithuania, the Netherlands, and Slovakia, and rate decreases in Austria, Germany, and Finland.
If you sell internationally, review your tax rates at least once a quarter. Automated tax extensions can handle rate updates for you, but you should still verify that your product tax classes and exemptions are configured correctly.
Note: Always consult a local tax professional to ensure your WooCommerce tax setup meets the specific requirements for your business, products, and selling regions. Tax laws vary widely and change often.
FAQs
Common questions about WooCommerce tax settings:
Conclusion
WooCommerce’s tax settings provide the flexibility to manage taxes for both local and international sales. By understanding and correctly configuring the options, rates, and tax classes, you can ensure accurate tax calculations and compliance with regional tax laws.
If you have specific tax needs, the filters and hooks mentioned above can help tailor WooCommerce to meet your business requirements. For stores selling across borders, automated tax solutions like WooCommerce Tax, TaxCloud, or TaxJar can save hours of manual configuration and reduce compliance risk.
Let us know in the comments if you have questions or unique tax scenarios you’d like us to address!