Have you ever looked at Google Analytics and wondered how users arrived at or landed on a specific page rather than another? If so, then UTM Parameters are the answer.
UTM Parameters are the best way to see the exact path a user took from clicking on a specific advertisement and reaching your landing page or any other page on your site.
And even though you can see who clicked on a specific link on Facebook, and even though you can track the incoming traffic to your site using Google Analytics, UTM Parameters take this a step further.
These parameters provide you with crucial context that allows you to ultimately build better and more converting campaigns for your business. In this post, I will explain what UTM Parameters are and how they can help you in online advertising.
What are UTM Parameters?
UTM Parameters are tags at the end of the URL address, and you’ve probably encountered them before. These tags provide the owner of that URL with information about which post, call to action, advertisement (and the like) led the user to a specific page on your site.
Of course, through Google Analytics, the site owner can later see how much traffic arrived at the site from a certain starting point.
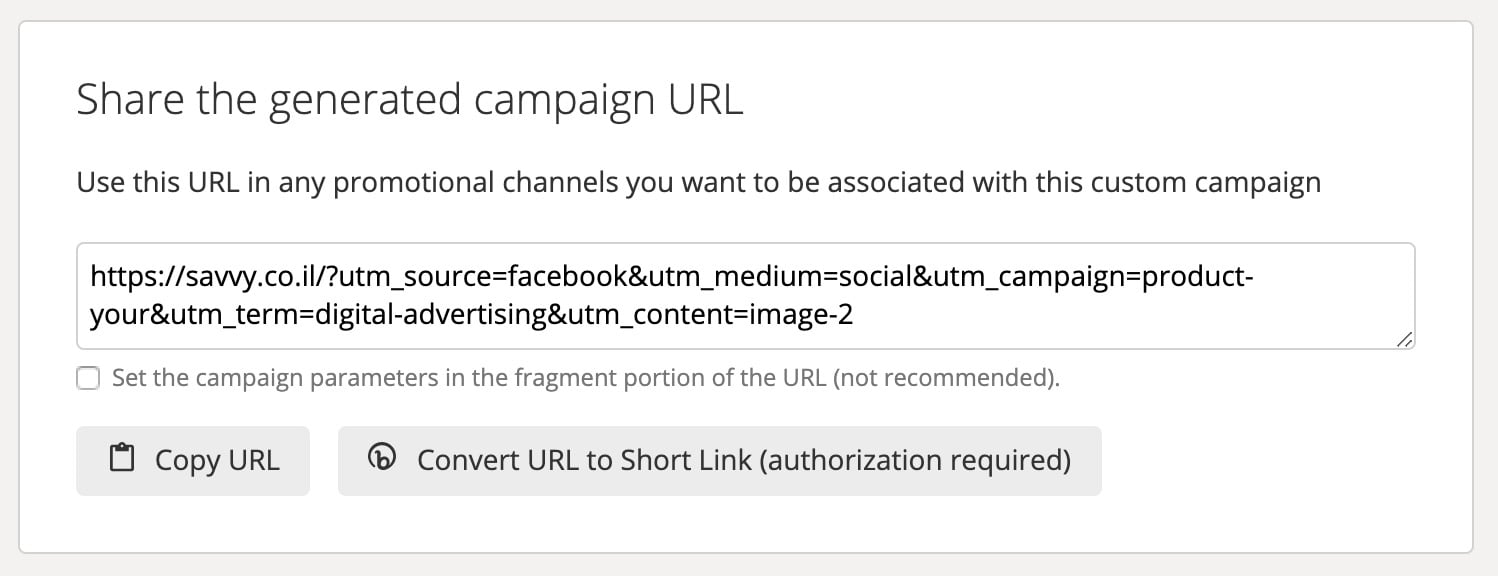
So here’s an example of a URL address with UTM Parameters created using the Google Campaign URL Builder:
Did you know? UTM stands for Urchin Tracking Module, a component acquired by Google that led to the development of Google Analytics.
Why and When to Use UTM Parameters?
If you don’t tag the URL addresses with these parameters, you won’t be able to differentiate between sources of traffic to your site. It will be very difficult to track the effectiveness of campaigns and much more difficult to understand which campaigns resonate and have a stronger impact on your audience.
Through URL Parameters, you can see that a certain advertisement on Facebook leads to much more traffic to your site than others.
Or, for example, that a specific post from your blog that you shared on Twitter is the one that led to a sharp increase in the number of site visits, not another.
You need to ensure that the URL address of each advertisement or post you publish is tagged with the same URL Parameters, as this is the ideal way to gather information about how users interact with externally published content on your site.
Using URL Parameters will allow you to assess which ads are more attractive and engaging for potential users, ultimately leading to the creation of better ads. You can use this information to optimize your advertising strategy and drive even more traffic to your site.
How to Build URL Parameters
You can create these parameters in the URL manually or by using Google’s Campaign URL Builder, which generates the complete URL with the parameters for you. There are five types of parameters, each providing additional context for the link you want to track.
Google provides an explanation of the technical specifications of each of these types on the Campaign URL Builder page mentioned in the previous paragraph.
| Campaign Source
| Required. Use Example: |
| Campaign Medium
| Required. Use Example: |
| Campaign Name
| Required. Used for keyword analysis. Use Example: |
| Campaign Term
| Used for paid search. Use utm_term to note the keywords for this ad.Example: |
| Campaign Content
| Used for A/B testing and content-targeted ads. Use utm_content to differentiate ads or links that point to the same URL.Examples: |
Five Types of UTM Parameters
Let’s see how to create a URL for a Facebook ad for a new product developed by Savvy (theoretically), in order to show you in simple terms how to use each of these parameters in your marketing efforts.
The original URL looks like this:
https://savvy.co.il/tourThere are three mandatory tags: source, medium, & name
1. Campaign Source – utm_source – Identifies the traffic source. In our case, it’s Facebook. When someone clicks on the Facebook ad, they’ll arrive at the following address with the traffic source (source) defined as Facebook:
https://savvy.co.il/tour?utm_source=facebook2. Campaign Medium – utm_medium – Identifies the marketing medium where the link was posted. In our case, it will be social media, but it could also be email, a distribution list, and the like…
https://savvy.co.il/tour?utm_source=facebook&utm_medium=social3. Campaign Name – utm_campaign – Identifies the specific campaign associated with the link. In our case, it’s a product tour, but it could also be a product launch, a gift, and the like…
https://savvy.co.il/tour?utm_source=facebook&utm_medium=social&utm_campaign=product-tourThe next two parameters are optional only:
4. Campaign Term – utm_term – Identifies the paid search keyword associated with the ad. You can omit this parameter if you’re using automated rules in Google AdWords. However, for the sake of example, let’s assume we’re targeting the keyword “digital advertising.” It will look like this:
https://savvy.co.il/tour?utm_source=facebook&utm_medium=social&utm_campaign=product-tour&utm_term=digital-advertising5. Campaign Content – utm_content – Allows you to add any additional information that can help you understand the link. You can use this for A/B tests, different calls to action, or buttons, for instance.
For example, let’s say our marketing campaign is testing the impact of a new image used in an ad. We have two different images for the same campaign, and when the second image is clicked:
https://savvy.co.il/tour?utm_source=facebook&utm_medium=social&utm_campaign=product-tour&utm_term=digital-advertising&utm_content=image-2Writing UTM Parameters
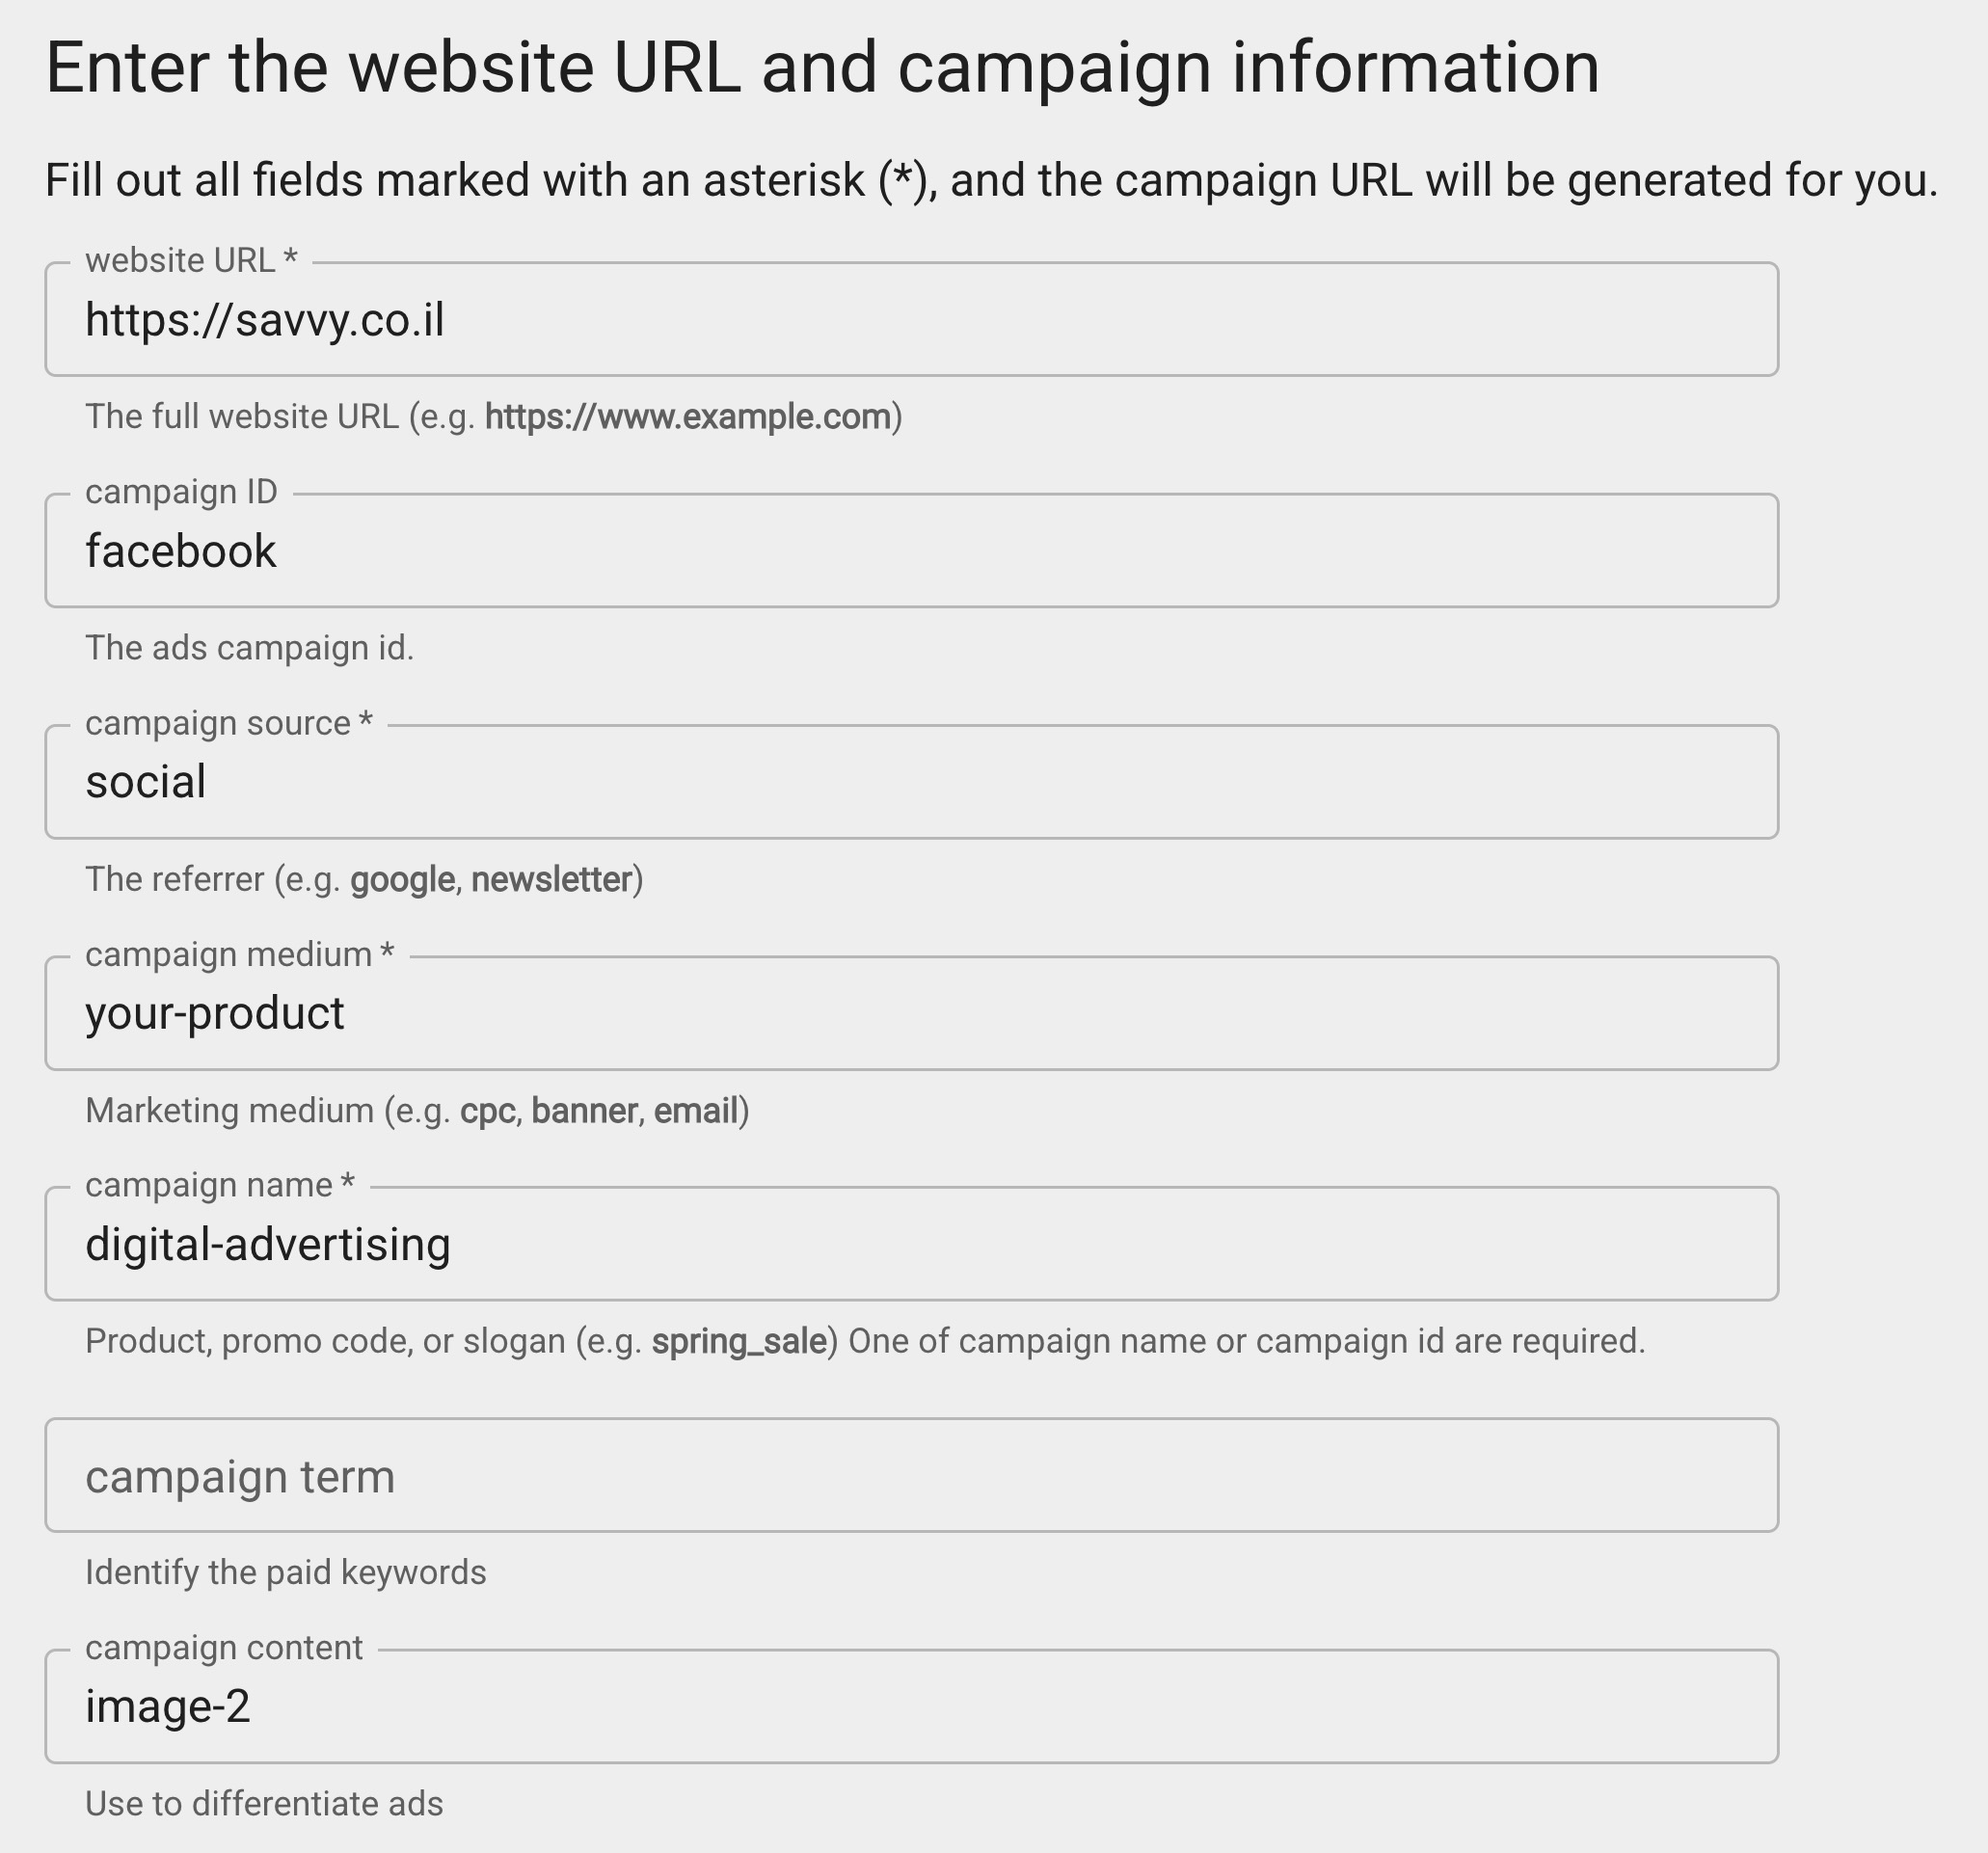
Use Google’s Campaign URL Builder to input each parameter individually:
Google will automatically generate the URL with the correct syntax:
If you’re planning to create these URLs manually, consider the following points:
- When creating these parameters, they will be added to the URL as a single long string. Each string of parameters begins with a question mark:
? - Each parameter is written in lowercase with the use of an underscore after which the equal sign follows, and then the parameter name:
utm_source=facebook? - Parameters in the string are separated by the
&sign, for example:utm_source=facebook&utm_medium=cpc - The hierarchy of the terms is: source, medium, campaign, term, content (from left to right)
Proper Use of UTM Parameters
Creating your own UTM Parameters requires a deep understanding of advertising and marketing strategy. Follow the following points to ensure you’re not creating unnecessary work for yourself or your team:
A. Use Predefined Naming Conventions
Long strings of parameters can quickly become confusing. Create a standardized format for each of these parameters and make sure your team knows how to construct these strings correctly.
This is particularly important for campaign names, for example: “product-launch-red,” “product-launch-blue,” and “product-launch-yellow,” which represent three different ads in the product launch campaign, each with a different color.
B. Use Simple Language
Remember that your audience will also see this URL. Make sure you’re using straightforward language that is easy to understand and does not provide sensitive information.
C. UTM Parameters are Case Sensitive (lowercase)
It’s recommended to always use lowercase letters to ensure you’re not displaying misleading information when searching for “Facebook” and not “facebook” – maintaining consistency will help prevent such situations.
D. Create a Tracking Sheet
It’s very easy to lose track of what specific code refers to if you’re not keeping all the information in an organized source (such as a Spreadsheet). Create a record describing how specific code relates to a particular campaign in a file or table that can be shared so that guesswork is unnecessary.
Since Google URL Builder doesn’t provide a way to track and create many URLs with UTM Parameters – here’s a comprehensive tracking and UTM Code creation template.
The template was created in Google Spreadsheet and I’m sure it will save you a lot of time in your marketing efforts.
To use this template, you need to log in to your Google account, click here to see the template, and then click on File > Save Copy to create your own version of the template.
E. Understand that the System Isn’t Perfect
People often delete those long strings when sharing content on their social networks. So even though those UTM Codes provide vital information for you, they don’t always continue when users directly share those URLs on the web.
How to View UTM Parameter Data in Google Analytics 4
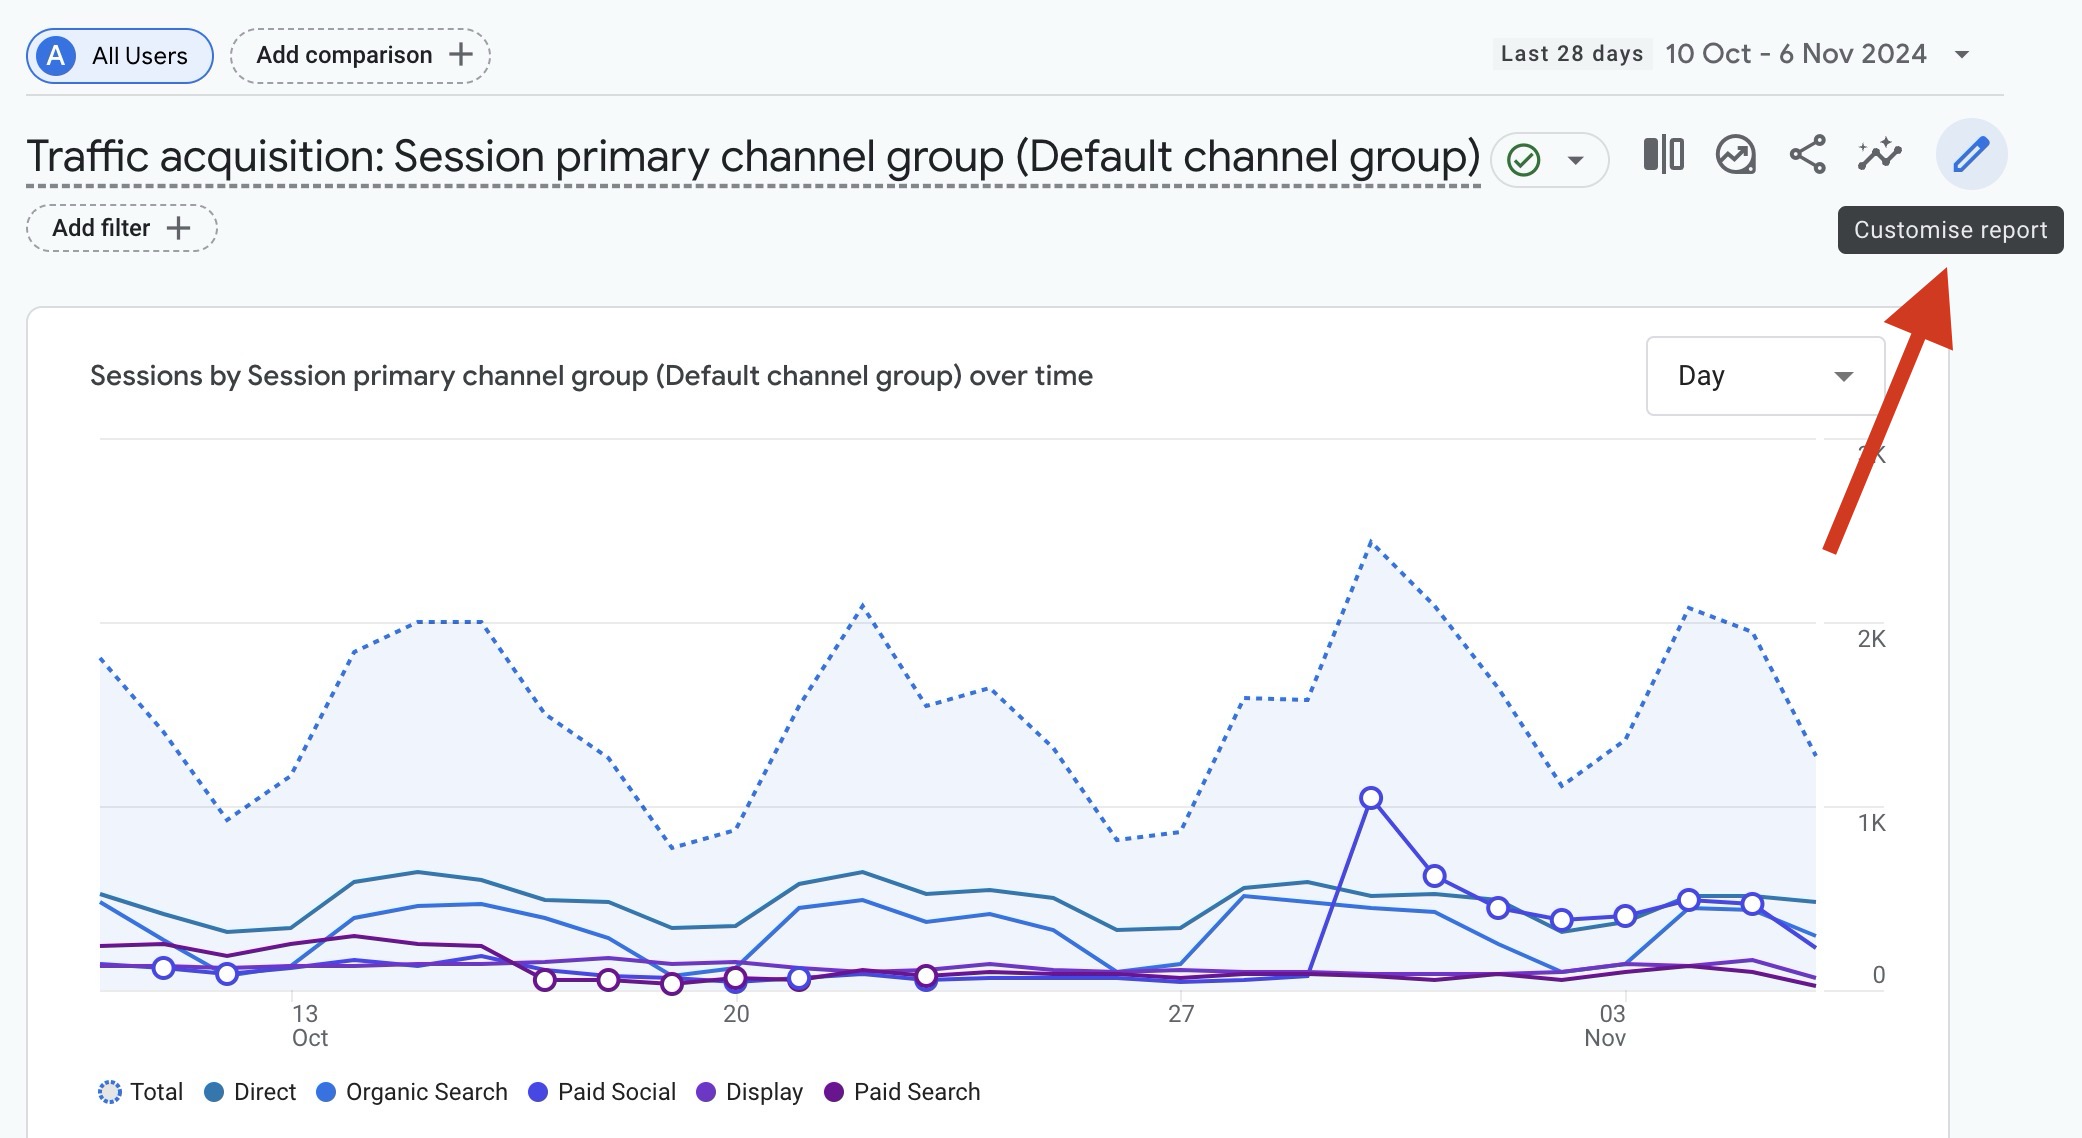
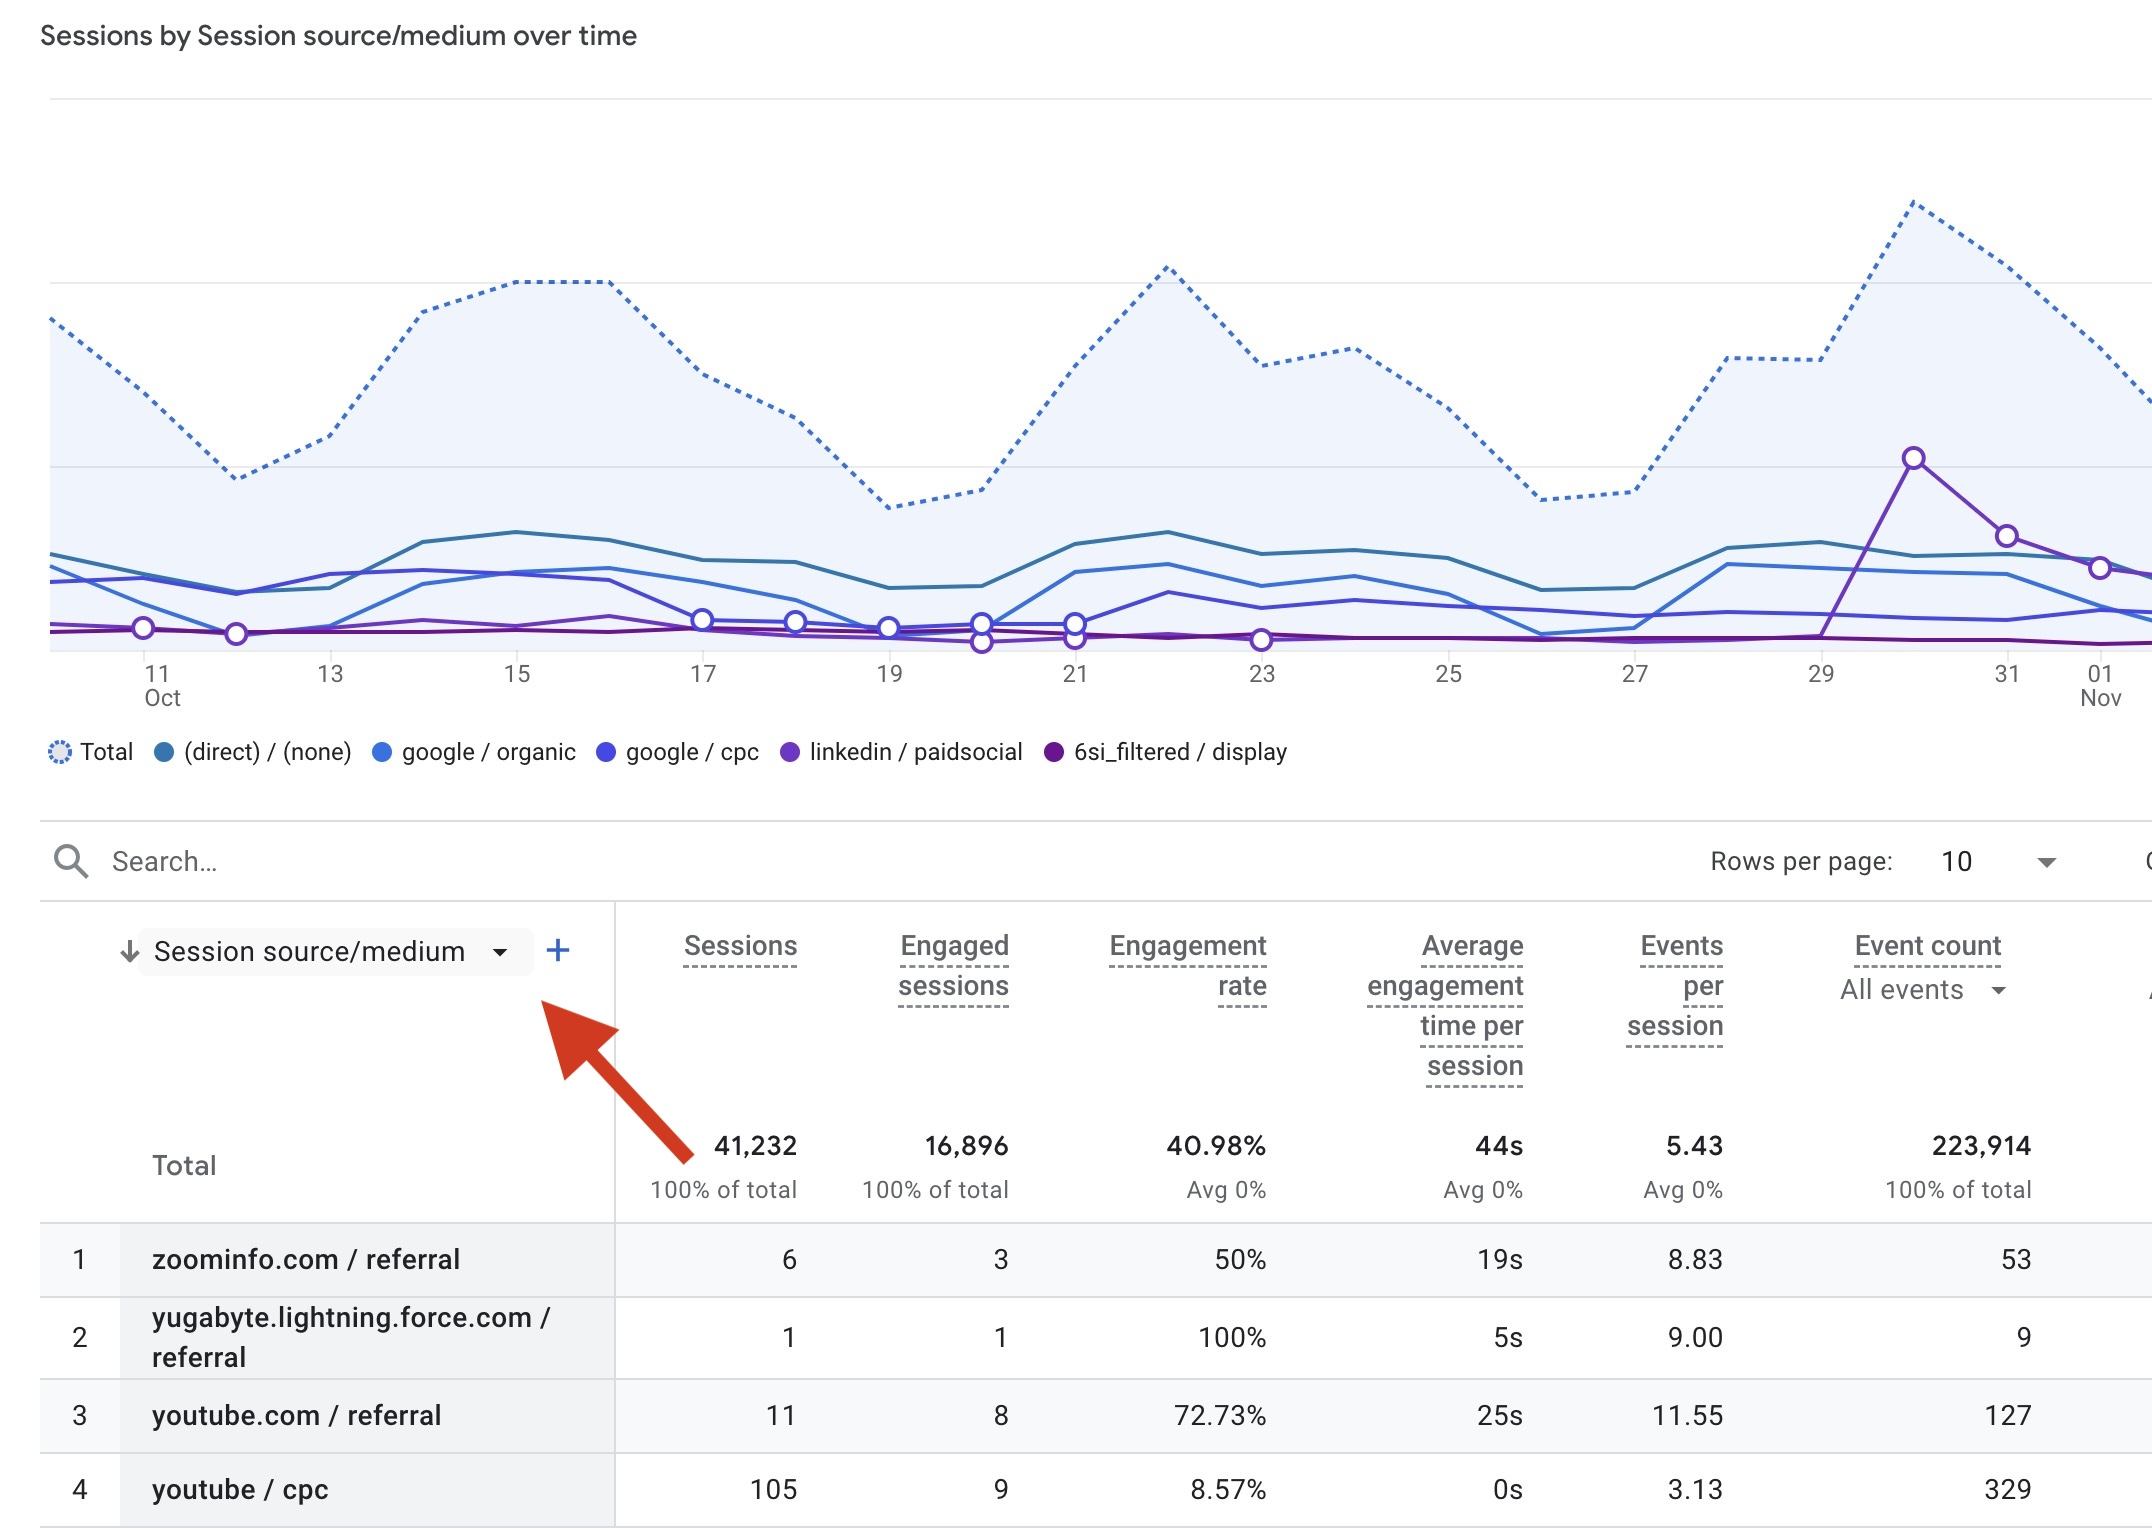
In Google Analytics 4 (GA4), you may need to customize your reports to effectively view UTM parameter data. Follow these steps:
Steps to Customize Reports for UTM Data:
- Navigate to Traffic Acquisition: Go to Reports > Acquisition > Traffic Acquisition.
- Set the Primary Dimension: By default, GA4 might show broader metrics like Session default channel group. To view UTM parameter data:
- Click on the pencil icon (Customize Report) in the top right.
- Select Customize Report.
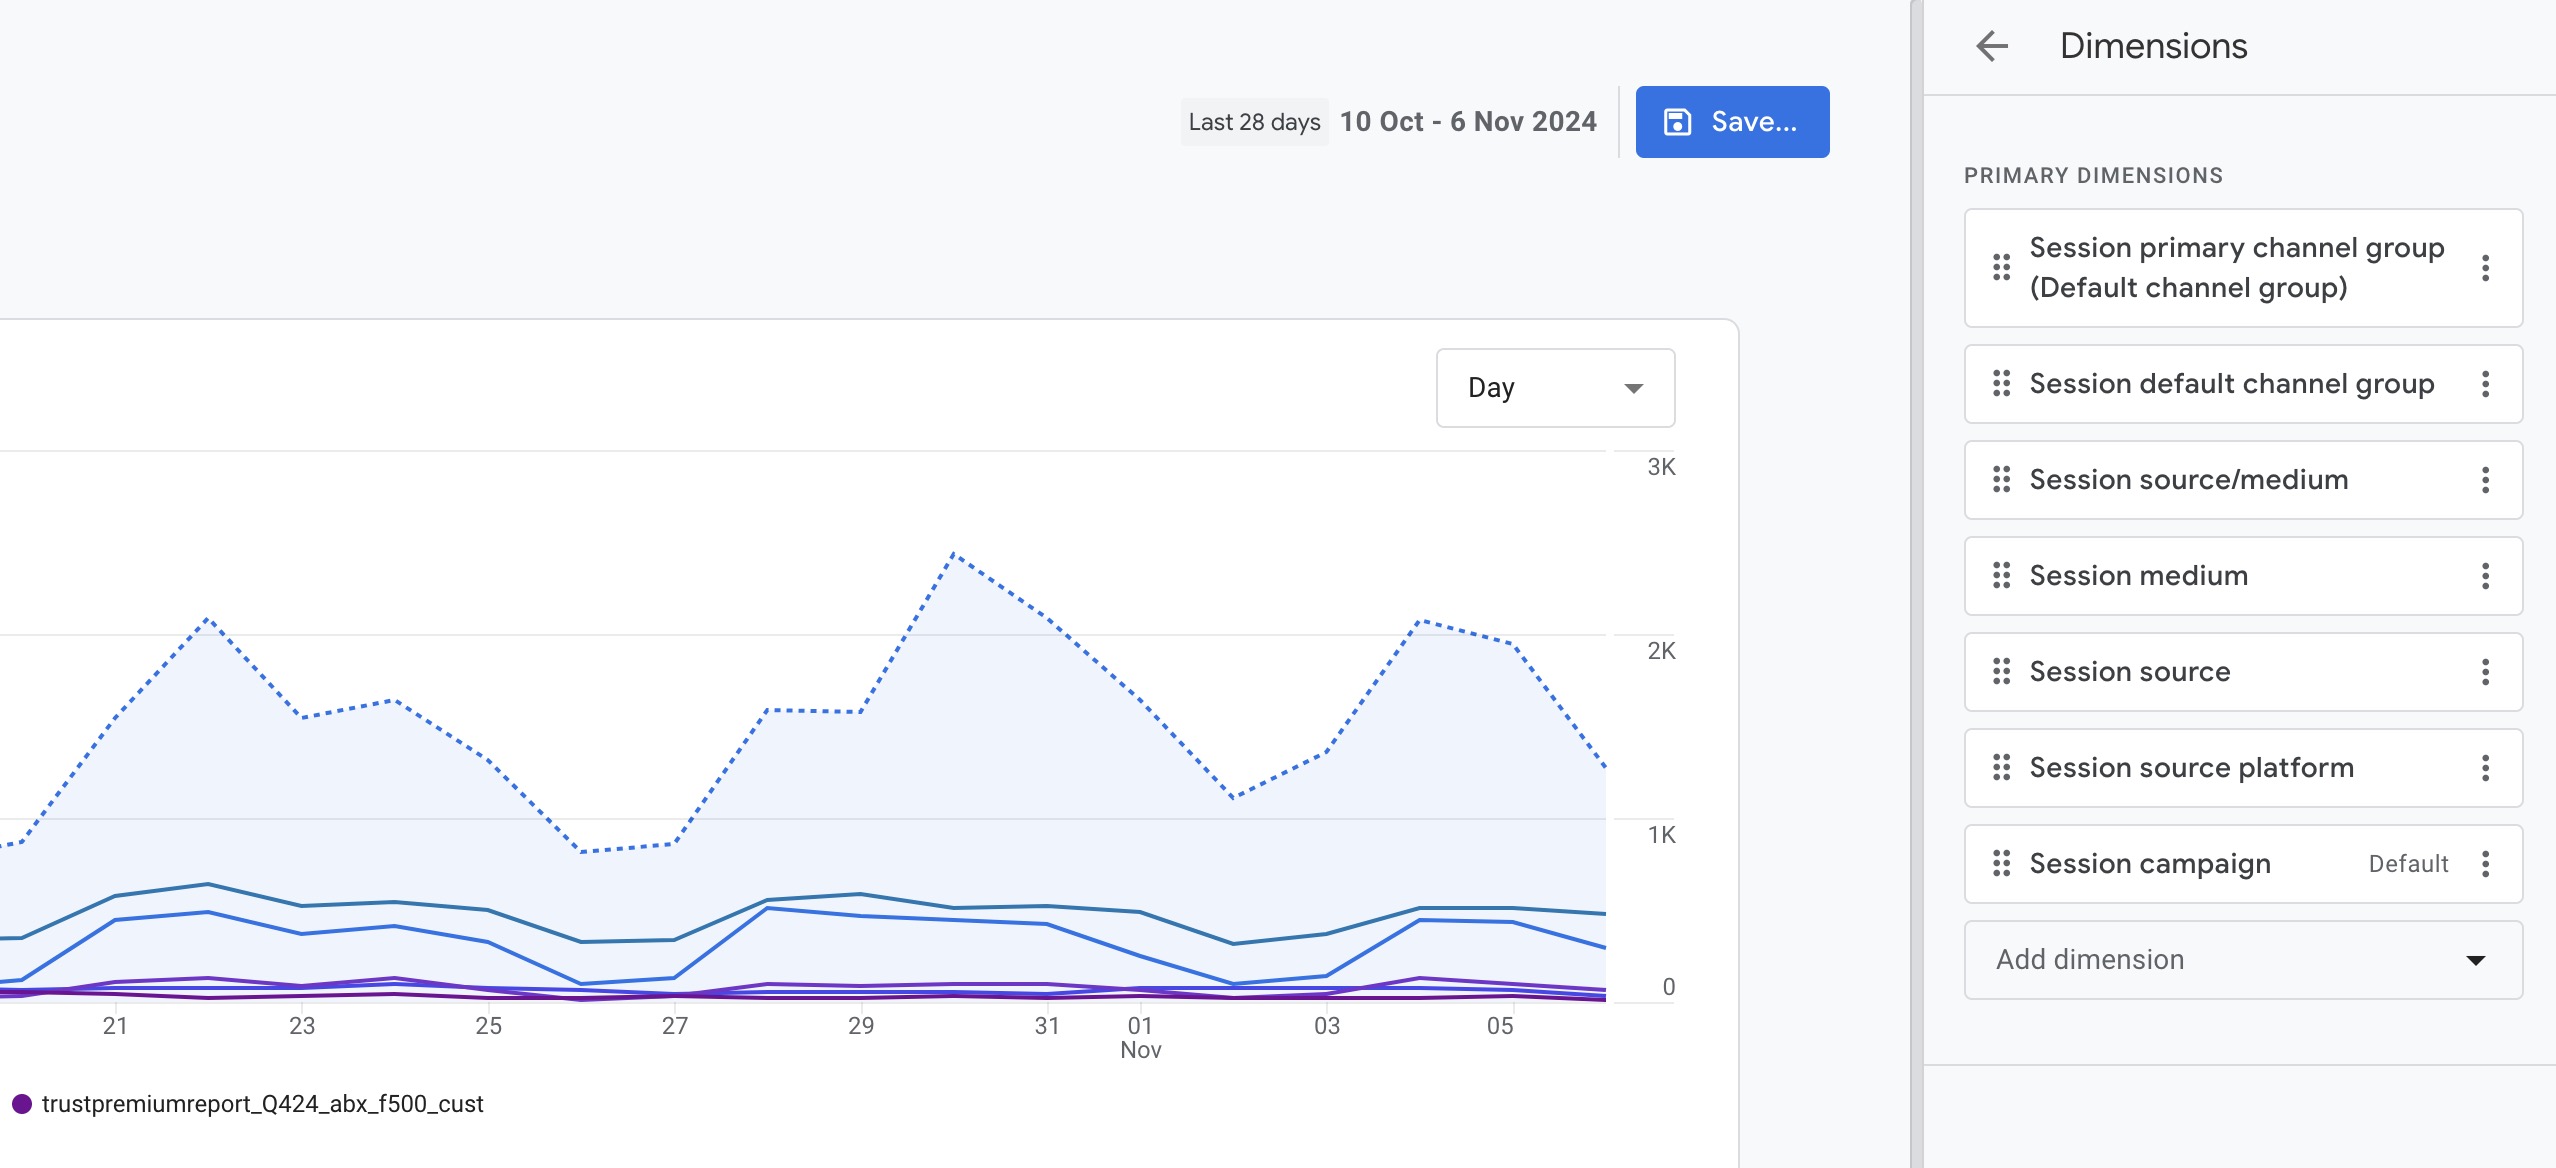
- Add Custom Dimensions: In the customization menu, under Dimensions, click Add dimension. Search for and add (if doesn’t already):
- Apply and Save: Once added, apply these dimensions and save the report. You can now filter or group your data based on UTM parameters.
%22%20transform%3D%22translate(4.2%204.2)%20scale(8.40625)%22%20fill-opacity%3D%22.5%22%3E%3Cellipse%20fill%3D%22%23c6c6c6%22%20rx%3D%221%22%20ry%3D%221%22%20transform%3D%22matrix(-40.23208%2014.12498%20-8.76275%20-24.95889%2016.9%20178.7)%22%2F%3E%3Cellipse%20fill%3D%22%23c7c7c7%22%20cx%3D%22255%22%20cy%3D%2259%22%20rx%3D%2245%22%20ry%3D%227%22%2F%3E%3Cellipse%20fill%3D%22%23cacaca%22%20cx%3D%2293%22%20cy%3D%2260%22%20rx%3D%2248%22%20ry%3D%223%22%2F%3E%3Cellipse%20fill%3D%22%23fff%22%20rx%3D%221%22%20ry%3D%221%22%20transform%3D%22rotate(30.2%20-208.9%20391.4)%20scale(131.92604%2080.5027)%22%2F%3E%3C%2Fg%3E%3C%2Fsvg%3E)
Use Explorations for Deeper Analysis:
Alternatively, you can use Explore in GA4 for a fully customizable view:
- Go to Explore.
- Start a Blank Exploration or use a template.
- Add dimensions like
Source,Medium, andCampaign. - Add metrics such as Sessions, Users, or Conversions to analyze UTM data effectively.
By customizing your reports or using Explorations, you can track and analyze UTM-tagged campaigns comprehensively in GA4.
<span>Summary</span>
UTM parameters are essential tools for tracking the effectiveness of digital marketing campaigns. By adding specific tags to your URLs, you can gather detailed insights into which sources, mediums, and campaigns drive traffic and conversions on your site.
In Google Analytics 4 (GA4), customizing your reports or using Explorations allows you to view and analyze UTM-tagged data efficiently. This enables better decision-making and optimization of your marketing strategies.
Did you like the post? Did it help you? The way to say thank you is to share with your friends and with anyone who is relevant to you.
Also, you’re always welcome to share your thoughts in the comments below, and perhaps even take a look at a post relevant to the topic that talks about forwarding UTM Parameters between pages/domains… Good luck with your marketing efforts!


