Optimizing your website’s performance involves many aspects, and one critical area is managing the Document Object Model (DOM) size. A lean, efficient DOM enhances rendering speed, reduces memory usage, and improves overall user experience.
If Google PageSpeed Insights flags your site with the warning “Avoid an excessive DOM size,” this post will help you understand why this matters and how to fix it.
What Is DOM Size?
The DOM (Document Object Model) is a hierarchical representation of your webpage’s structure. It serves as an interface between your HTML and the browser, allowing scripts to dynamically update content, style, and structure.
Every element, attribute, and text node in your HTML contributes to the DOM tree, creating a structure the browser must parse, render, and maintain.
The larger the DOM, the harder the browser works. This includes:
- Parsing: Reading and interpreting the HTML to build the DOM tree.
- Rendering: Combining the DOM with CSS to create the Render Tree, which dictates the page’s visual layout.
- Layout and Painting: Calculating element positions and painting them on the screen.
- Reflows and Repaints: Changes to the DOM or CSS trigger reflows (layout recalculations) and repaints (visual updates), which are more resource-intensive with a large DOM.
A large DOM also hinders JavaScript performance. Frameworks like React, Angular, or Vue must traverse and manipulate the DOM, slowing down as the node count increases.
For mobile users, the impact is even greater. Devices with limited memory and processing power may struggle with large DOMs, causing slow loads, laggy interactions, and potential browser crashes.
“A smaller DOM isn’t just about performance; it’s about creating a seamless and intuitive user experience.”
A smaller, well-organized DOM also improves maintainability. Simplified HTML and reduced nesting make debugging and updates easier.
It also boosts accessibility, helping screen readers interpret content more effectively.
Why Is a Large DOM Problematic?
Having an excessively large DOM can lead to several performance issues:
- Slower Rendering: A larger DOM takes more time for the browser to process and render.
- Laggy User Interactions: Heavy DOM structures can delay responses to user inputs like clicks and scrolls.
- Increased Memory Usage: More nodes require more memory, which can overwhelm devices with limited resources, especially mobile devices.
Lighthouse DOM Size Thresholds
Lighthouse uses specific thresholds to flag DOM size issues. A page triggers a warning at around 800 DOM nodes and fails the audit at approximately 1,400 nodes.
Additionally, Lighthouse flags pages where any parent element has more than 60 child nodes, or where the maximum DOM depth exceeds 32 levels.
Excessive DOM size has a direct impact on Core Web Vitals. It is one of the biggest contributors to poor INP (Interaction to Next Paint) scores, because style recalculations scale non-linearly – doubling the DOM size can quadruple the time the browser spends recalculating styles.
How to Identify DOM Size Issues
To identify whether your site has an oversized DOM, use tools like Google PageSpeed Insights or Chrome DevTools:
<!-- Using Chrome DevTools -->
1. Open DevTools (Right-click on the page and select 'Inspect' or press Ctrl+Shift+I).
2. Navigate to the 'Elements' tab to explore the DOM tree.
3. Use the 'Performance' tab to record and analyze page performance, paying attention to DOM-related metrics.
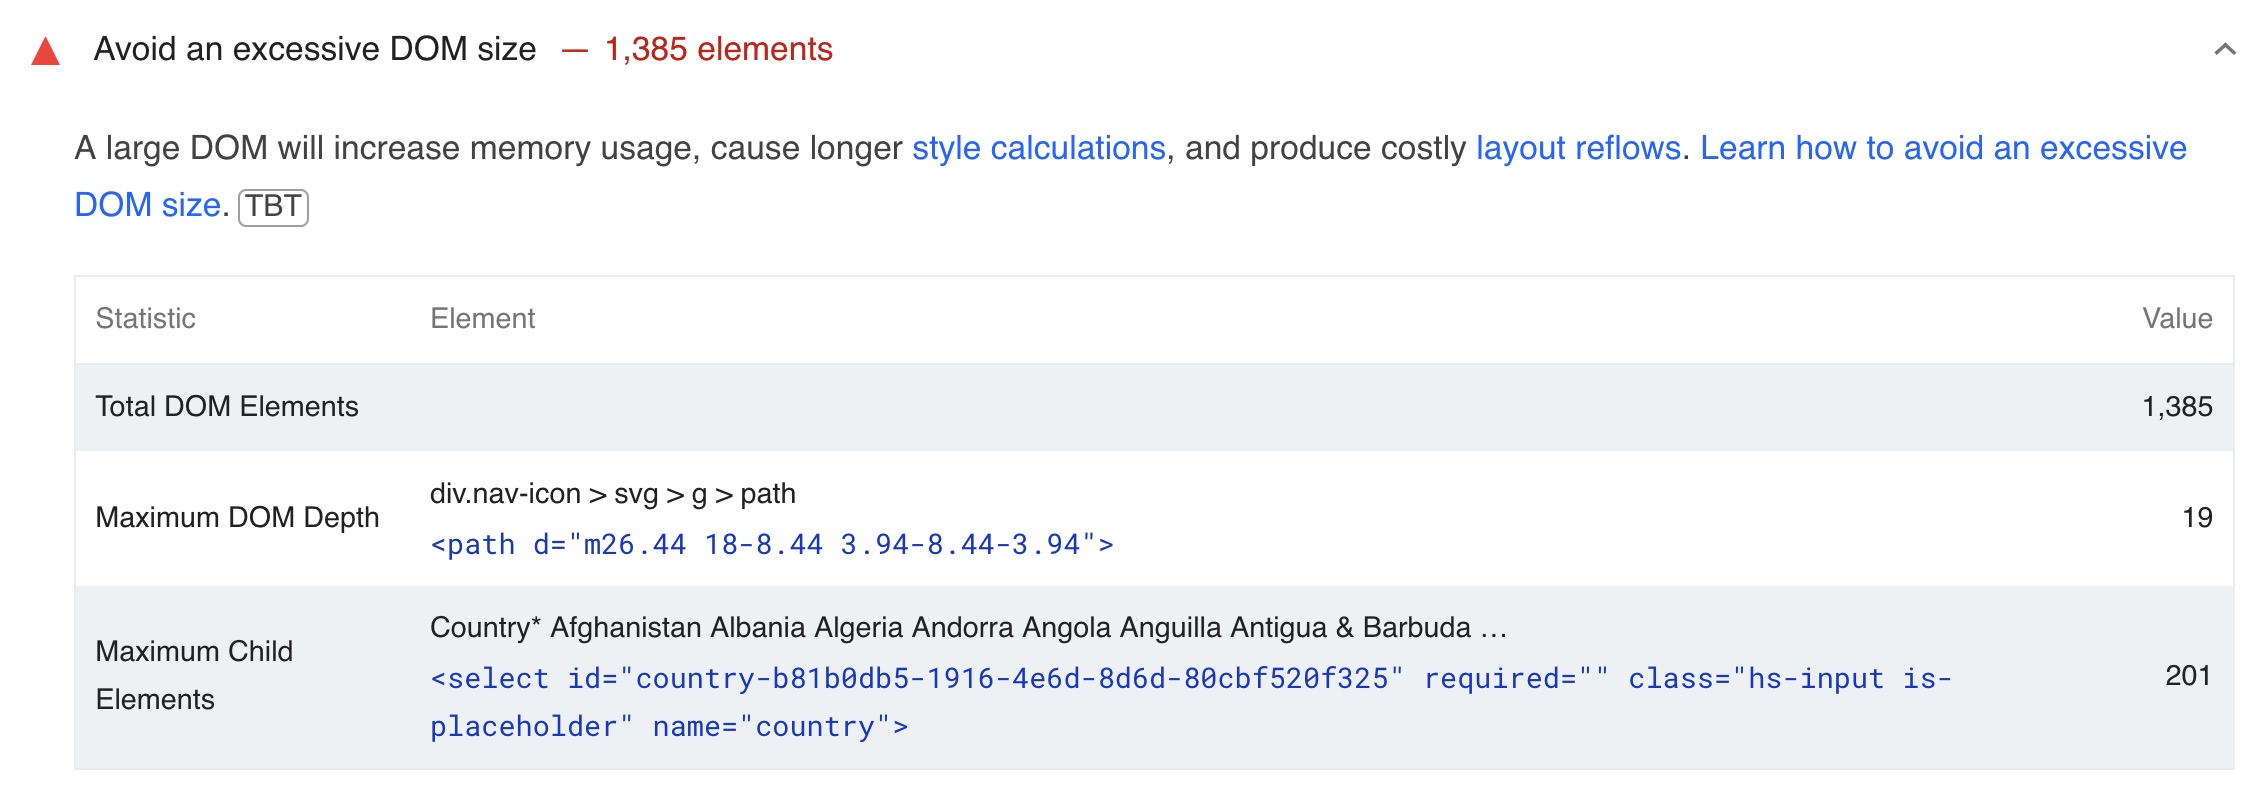
Here’s how the warning looks in Google PageSpeed Insights:
You can also check the total node count directly in the DevTools Console by running document.querySelectorAll('*').length. This gives you an instant snapshot of how many elements the browser is managing.
Since many use Elementor, be aware that using this plugin comes with a performance cost, particularly regarding the DOM & the DOM size and complexity.
Strategies for Reducing DOM Size
Here are actionable strategies to reduce your DOM size:
- Simplify Your HTML: Replace unnecessary divs and deeply nested elements with semantic HTML.
- Optimize CSS: Minimize the use of rules that require the browser to generate additional elements, like
:beforeand:after. - JavaScript Optimization: Use efficient methods to manipulate the DOM dynamically, avoiding excessive node creation.
Example 1: Simplifying HTML Structure
<!-- Unoptimized HTML -->
<div class="wrapper">
    <div class="header"><h1>Page Title</h1></div>
    <div class="content">
        <div class="text"><p>Paragraph text...</p></div>
    </div>
</div>
<div class="footer"><p>Footer content</p></div>

<!-- Optimized HTML -->
<main>
    <header><h1>Page Title</h1></header>
    <article>
        <p>Paragraph text...</p>
    </article>
    <footer><p>Footer content</p></footer>
</main>
Explanation: The optimized version uses semantic HTML tags like <main>, <article>, and <footer>, reducing the number of divs and simplifying the DOM structure.
“Switching to semantic HTML not only streamlines your DOM but also improves accessibility for users relying on assistive technologies.”
Example 2: Optimized vs. Unoptimized CSS
<!-- HTML Structure -->
<div class="container">
    <h2>Main Title</h2>
    <p>First paragraph.</p>
    <p>Second paragraph.</p>
</div>
/* Unoptimized CSS */
.container p {
    margin-top: 20px;
    margin-bottom: 20px;
}

/* Optimized CSS */
.container > * + * {
    margin-top: 20px;
}
Explanation: The unoptimized CSS applies margins to all paragraphs, leading to unnecessary spacing at the top and bottom.
The optimized version uses the adjacent sibling selector (> * + *) to apply margins only between elements, resulting in cleaner and more efficient styling.
Example 3: Dynamic Content with JavaScript
// Unoptimized JavaScript - multiple DOM operations
const container = document.getElementById('dynamic-content');
const title = document.createElement('h2');
title.textContent = 'Dynamic Title';
container.appendChild(title);

const paragraph = document.createElement('p');
paragraph.textContent = 'Dynamic text...';
container.appendChild(paragraph);

// Optimized JavaScript - batch DOM updates with DocumentFragment
const fragment = document.createDocumentFragment();
const title = document.createElement('h2');
title.textContent = 'Dynamic Title';
fragment.appendChild(title);

const paragraph = document.createElement('p');
paragraph.textContent = 'Dynamic text...';
fragment.appendChild(paragraph);

document.getElementById('dynamic-content').appendChild(fragment);
Explanation: The optimized version uses a DocumentFragment to batch DOM updates into a single operation. This avoids multiple reflows and repaints, which is especially important when adding many elements at once.
Advanced Techniques for DOM Optimization
Beyond the basics, there are several advanced strategies that can significantly reduce DOM size and improve rendering performance.
Using content-visibility for Lazy Rendering
The CSS content-visibility property tells the browser to skip rendering work for off-screen elements until they are needed. Setting content-visibility: auto on sections below the fold can deliver up to a 7x improvement in initial rendering speed.
/* Apply to sections below the fold */
.below-fold-section {
    content-visibility: auto;
    contain-intrinsic-size: auto 500px;
}
The contain-intrinsic-size property provides an estimated height so the browser can reserve space and avoid layout shifts as content renders on scroll.
This property reached Baseline support across all major browsers in September 2024, making it safe to use in production.
Virtualization for Long Lists
When your page displays hundreds or thousands of items – such as product listings, data tables, or log entries – virtualization (also called “windowing”) renders only the items visible in the viewport.
This reduces the DOM from thousands of nodes to roughly 20-30 at any given time. Libraries like react-window (6KB gzipped) and react-virtuoso handle this efficiently for React applications.
// Example using react-window for a list of 10,000 items
import { FixedSizeList } from 'react-window';

const MyList = () => (
    <FixedSizeList
        height={600}
        itemCount={10000}
        itemSize={35}
        width="100%"
    >
        {({ index, style }) => (
            <div style={style}>Item {index}</div>
        )}
    </FixedSizeList>
);
Without virtualization, rendering 10,000 items would create 10,000+ DOM nodes. With it, the browser only manages the visible items plus a small buffer.
Lazy Loading Off-Screen Content
Instead of rendering all content on page load, create DOM nodes only when they are needed. Use the IntersectionObserver API to detect when elements enter the viewport and load them on demand.
This approach works well for comment sections, image galleries, and tabbed content where users may never scroll to or interact with certain parts of the page.
Do not apply content-visibility: auto to elements in the initial viewport. Doing so can delay LCP (Largest Contentful Paint) because the browser skips rendering the very content the user sees first.
WordPress-Specific DOM Bloat
WordPress sites are particularly prone to DOM bloat, especially when using page builders like Elementor, Divi, or WPBakery. These tools wrap every widget and section in multiple nested <div> elements, inflating the DOM far beyond what hand-coded HTML would produce.
Here are practical steps to reduce DOM size in WordPress:
- Enable Optimized DOM Output: Elementor (since version 3.0) offers an “Optimized DOM Output” setting that reduces wrapper elements in the HTML output. Enable it under Elementor Settings.
- Use a lightweight theme: Themes like Hello Elementor, Astra, or GeneratePress produce minimal markup compared to bloated multipurpose themes.
- Audit your plugins: Some plugins inject hidden elements, inline styles, or extra scripts on every page. Deactivate plugins one by one and measure the DOM node count to find the worst offenders.
- Consider a custom WordPress theme: A hand-coded theme gives you full control over the markup and eliminates the wrapper bloat that page builders introduce.
FAQs
Common questions about DOM size optimization:
content-visibility: auto reduce DOM size?
content-visibility: auto CSS property does not remove elements from the DOM. Instead, it tells the browser to skip rendering work (layout, paint, and style computation) for off-screen elements until they scroll into view. The result is similar to having fewer nodes from a performance standpoint.<div> elements for styling and positioning. A single button that requires one HTML element in hand-coded markup might use five or more wrapper divs in a page builder. This adds up quickly across an entire page.react-window and react-virtuoso make implementation straightforward in React applications.Summary
Avoiding an excessive DOM size is a common performance issue that often goes unnoticed by inexperienced developers, who may struggle to address it effectively without proper guidance.
Optimizing your DOM size is essential for delivering a fast, seamless user experience. Simplify your HTML with semantic elements, use content-visibility to defer off-screen rendering, and apply virtualization for long lists.
For WordPress sites, audit your plugins, enable optimized DOM output in your page builder, and consider a custom theme for full control over your markup. By keeping your DOM lean, you ensure your site runs smoothly – even on resource-constrained devices.