WooCommerce is undoubtedly the most powerful E-Commerce plugin for WordPress. One of its main advantages is that it provides an API that allows you to do almost anything you want with your digital store.
In this post, we will explain how you can customize WooCommerce and show a way to add new fields (Custom Fields) to WooCommerce products. Here is the final result of what we will learn to do in this guide:
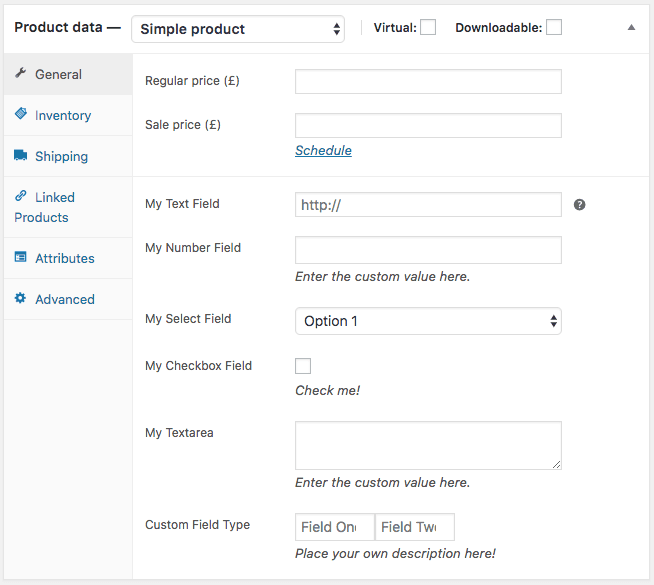
As you can see in the screenshot, we added several custom fields to the product editing page in WooCommerce. Initially, we will add new fields to the General tab on the product page, but we will also show how to add fields to other tabs and even how to add your own custom tab.
The Right Hooks
The first step is to attach an action to woocommerce_product_options_general_product_data. The function we attach will be responsible for displaying the new fields. Another hook we will use is woocommerce_process_product_meta, and its role will be to save the values we enter.
Basically, both actions will be performed by adding this code to your theme’s functions.php file (or your child theme if you have one):
// Show Fields
add_action( 'woocommerce_product_options_general_product_data', 'woo_add_custom_general_fields' );

// Save Fields
add_action( 'woocommerce_process_product_meta', 'woo_add_custom_general_fields_save' );
If you are not familiar with hooks, take a look at the WordPress Hooks guide to understand the topic better. There is also a more focused post on using WooCommerce hooks, check it out.
Adding New Fields to WooCommerce Products
The code above attaches two functions to the right hooks, and now we need to create these two functions. Let’s start with the first function, woo_add_custom_general_fields, which will create the new fields.
It looks like this:
function woo_add_custom_general_fields() {

  global $woocommerce, $post;

  echo '<div class="options_group">';

  // Custom fields will be created here...

  echo '</div>';

}
To actually create the fields, we will use built-in functions in WooCommerce that allow us to add different types of fields:
- woocommerce_wp_text_input
- woocommerce_wp_textarea_input
- woocommerce_wp_select
- woocommerce_wp_checkbox
- woocommerce_wp_hidden_input
Information about these functions can be found here.
Adding a Text Field
To create a text field, use the following code and add it after line 6 in the previous code:
// Text Field
woocommerce_wp_text_input(
	array(
		'id'          => '_text_field',
		'label'       => __( 'My Text Field', 'woocommerce' ),
		'placeholder' => 'http://',
		'desc_tip'    => 'true',
		'description' => __( 'Enter the custom value here.', 'woocommerce' )
	)
);
Note the use of desc_tip which displays a small question mark next to the field. Hovering over it will show the field’s description instead of displaying the description right next to the field.
You can use the
desc_tipattribute for each of the field types we’ll display in this post.
Adding a Number Field
To create a number field, use this code:
// Number Field
woocommerce_wp_text_input(
	array(
		'id'                => '_number_field',
		'label'             => __( 'My Number Field', 'woocommerce' ),
		'placeholder'       => '',
		'description'       => __( 'Enter the custom value here.', 'woocommerce' ),
		'type'              => 'number',
		'custom_attributes' => array(
				'step' 	=> 'any',
				'min'	=> '0'
			)
	)
);
The main change in this code compared to the previous one is that we set the type attribute to number. You can also set additional attributes like the step value and the minimum and maximum values.
In this code, we set the step value to the default (1) and the minimum value to 0. This means we expect a positive number greater than 0.
Adding a Textarea Field
To create a textarea field, use this code:
// Textarea
woocommerce_wp_textarea_input(
	array(
		'id'          => '_textarea',
		'label'       => __( 'My Textarea', 'woocommerce' ),
		'placeholder' => '',
		 'description' => __( 'Enter the custom value here.', 'woocommerce' )
	)
);
There’s nothing special to note about this field type…
Dropdown Field
To create a Dropdown field, use the following code:
// Select
woocommerce_wp_select(
array(
	'id'      => '_select',
	'label'   => __( 'My Select Field', 'woocommerce' ),
	'options' => array(
		'one'   => __( 'Option 1', 'woocommerce' ),
		'two'   => __( 'Option 2', 'woocommerce' ),
		'three' => __( 'Option 3', 'woocommerce' )
		)
	)
);
The options attribute determines the options that will be displayed in the Dropdown field.
Checkbox Field
To create a checkbox field, use the following code:
// Checkbox
woocommerce_wp_checkbox(
array(
	'id'            => '_checkbox',
	'wrapper_class' => 'show_if_simple',
	'label'         => __('My Checkbox Field', 'woocommerce' ),
	'description'   => __( 'Check me!', 'woocommerce' )
	)
);
Hidden Field
You can also add hidden fields using the following code:
// Hidden field
woocommerce_wp_hidden_input(
array(
	'id'    => '_hidden_field',
	'value' => 'hidden_value'
	)
);
Custom Field Type
You can create your custom fields. In the example below, I created a dual field, but you can modify the code to add as many fields as you want, and they will be “merged” into one array.
// Custom field Type
?>
<p class="form-field custom_field_type">
	<label for="custom_field_type"><?php echo __( 'Custom Field Type', 'woocommerce' ); ?></label>
	<span class="wrap">
		<?php $custom_field_type = get_post_meta( $post->ID, '_custom_field_type', true ); ?>
		<input placeholder="<?php _e( 'Field One', 'woocommerce' ); ?>" class="" type="number" name="_field_one" value="<?php echo $custom_field_type[0]; ?>" step="any" min="0" style="width: 80px;" />
		<input placeholder="<?php _e( 'Field Two', 'woocommerce' ); ?>" type="number" name="_field_two" value="<?php echo $custom_field_type[1]; ?>" step="any" min="0" style="width: 80px;" />
	</span>
	<span class="description"><?php _e( 'Place your own description here!', 'woocommerce' ); ?></span>
</p>
<?php
Custom fields can be almost anything, but note that you are using the form-field class to ensure they are displayed correctly.
Saving Field Values in WooCommerce Database
Now that we have created new product fields in WooCommerce, we need to create a function that saves these values when you publish or update a product in your store.
As we showed at the beginning, we will use the woo_add_custom_general_fields_save function attached to the woocommerce_process_product_meta function.
In principle, the idea behind the function is quite simple – we check if the field is empty, and if not, we create a post meta field using update_post_meta. Note that we use the esc_attr and esc_html functions to sanitize the data entered into these fields.
Here is the code that allows us to save each of the fields we created:
function woo_add_custom_general_fields_save( $post_id ){

	// Text Field
	$woocommerce_text_field = $_POST['_text_field'];
	if( !empty( $woocommerce_text_field ) )
		update_post_meta( $post_id, '_text_field', esc_attr( $woocommerce_text_field ) );

	// Number Field
	$woocommerce_number_field = $_POST['_number_field'];
	if( !empty( $woocommerce_number_field ) )
		update_post_meta( $post_id, '_number_field', esc_attr( $woocommerce_number_field ) );

	// Textarea
	$woocommerce_textarea = $_POST['_textarea'];
	if( !empty( $woocommerce_textarea ) )
		update_post_meta( $post_id, '_textarea', esc_html( $woocommerce_textarea ) );

	// Select
	$woocommerce_select = $_POST['_select'];
	if( !empty( $woocommerce_select ) )
		update_post_meta( $post_id, '_select', esc_attr( $woocommerce_select ) );

	// Checkbox
	$woocommerce_checkbox = isset( $_POST['_checkbox'] ) ? 'yes' : 'no';
	update_post_meta( $post_id, '_checkbox', $woocommerce_checkbox );

	// Custom Field
	$custom_field_type =  array( esc_attr( $_POST['_field_one'] ), esc_attr( $_POST['_field_two'] ) );
	update_post_meta( $post_id, '_custom_field_type', $custom_field_type );

	// Hidden Field
	$woocommerce_hidden_field = $_POST['_hidden_field'];
	if( !empty( $woocommerce_hidden_field ) )
		update_post_meta( $post_id, '_hidden_field', esc_attr( $woocommerce_hidden_field ) );
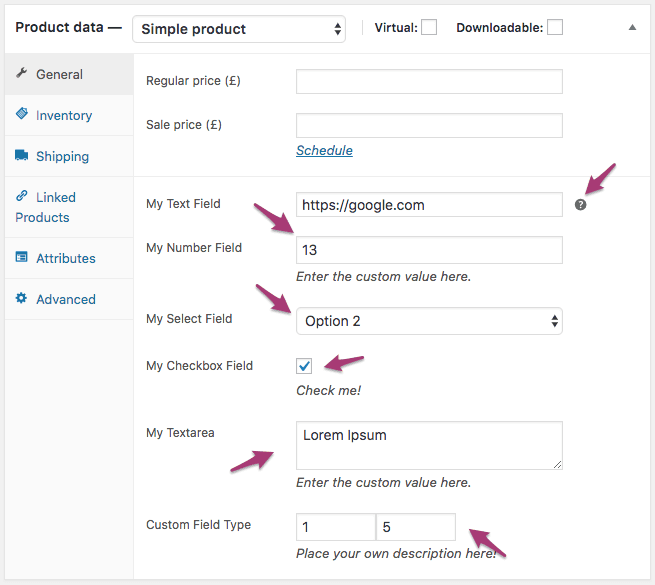
}$_POST values directly for clarity. In production, always use isset() checks and sanitize_text_field() or wc_clean() to properly validate and sanitize input data.Here is an image of the result after saving the fields:
Fetching and Printing Field Values in a Template
After successfully creating and saving our fields, I assume you want to display these fields for the customer. The best way to do this is by using custom WooCommerce templates.
In principle, these templates (similar to regular templates) allow you to override WooCommerce’s default files and use your own files. Here’s a brief guide on how to create your own custom template in WooCommerce.
Anyway, to fetch values from the fields we created, we will use the popular get_post_meta function. This is all you need:
<?php
// Display Custom Field Value
echo get_post_meta( $post->ID, 'my-field-slug', true );
// You can also use
echo get_post_meta( get_the_ID(), 'my-field-slug', true );
?>
Creating Your Own Tabs on the Product Edit Page
We won’t go into too much detail, but here’s a snippet that allows you to add a new tab on the WooCommerce product edit page:
// Add a custom tab to the product data meta box
add_filter( 'woocommerce_product_data_tabs', function( $tabs ) {
    $tabs['custom_tab'] = array(
        'label'    => __( 'My Custom Tab', 'woocommerce' ),
        'target'   => 'custom_tab_data',
        'priority' => 60,
    );
    return $tabs;
});

// Add content to the custom tab panel
add_action( 'woocommerce_product_data_panels', function() {
    echo '<div id="custom_tab_data" class="panel woocommerce_options_panel">';
    // Add your custom fields here using woocommerce_wp_text_input, etc.
    echo '</div>';
});
The old
woocommerce_product_write_panel_tabshook is deprecated. Use thewoocommerce_product_data_tabsfilter andwoocommerce_product_data_panelsaction as shown above.
You can style this tab a bit or simply add a small icon to it, and you’re done. In this context, it’s worth mentioning that if you want to add your own fields to one of the other tabs and not to the “General” tab, you just need to change the hook to which you attach the function woo_add_custom_general_fields.
For example, you can use the woocommerce_product_options_shipping hook to add your fields to the “Shipping” tab.
FAQs
Common questions about WooCommerce custom product fields:
get_post_meta( get_the_ID(), '_your_field_id', true ) in a WooCommerce template override or hook into an action like woocommerce_single_product_summary to echo the value. Check the WooCommerce hooks guide for available display hooks.woocommerce_variation_options for display and woocommerce_save_product_variation for saving. The field creation functions are the same, but the hooks and save logic differ.functions.php, make sure it is in a child theme so your changes are not lost during theme updates.sanitize_text_field() for plain text, absint() for integers, esc_url() for URLs, and wp_kses_post() for HTML content. The esc_attr() function shown in the examples is for output escaping, not input sanitization.Summary
WooCommerce provides built-in functions like woocommerce_wp_text_input, woocommerce_wp_select, and woocommerce_wp_checkbox to add custom fields to the product editor. Hook your display function to woocommerce_product_options_general_product_data and your save function to woocommerce_process_product_meta.
To display saved field values on the frontend, use get_post_meta() in a WooCommerce template override or through action hooks. You can also create entirely new tabs on the product editor using the woocommerce_product_data_tabs filter.