jQuery is a powerful tool that simplifies client-side web development by providing easy-to-use methods for manipulating HTML, handling events, and creating animations. One of the most attractive features of jQuery is its built-in animation functions.
In this tutorial, we’ll walk through how to animate elements on your website using jQuery, step by step.
Why Use jQuery for Animations?
jQuery animations offer a simple way to add dynamic interactions to your web pages without writing complex JavaScript code. You can create smooth transitions, fade effects, and sliding elements that enhance user experience, all with minimal effort.
Although CSS animations are now preferred in many cases, jQuery is still widely used due to its ease of use, compatibility with older browsers, and simplicity for quick projects.
Basic jQuery Animation Functions
jQuery comes with several built-in animation methods, such as .show(), .hide(), .fadeIn(), .fadeOut(), .slideDown(), and .slideUp(). These functions allow you to animate elements easily.
// Basic show and hide animations
$('#myElement').hide(1000);  // Hide element over 1 second
$('#myElement').show(1000);  // Show element over 1 second

// Fade in and fade out animations
$('#myElement').fadeOut(1000);  // Fade out over 1 second
$('#myElement').fadeIn(1000);   // Fade in over 1 second

// Slide up and slide down animations
$('#myElement').slideUp(1000);  // Slide up over 1 second
$('#myElement').slideDown(1000); // Slide down over 1 second
In the code above, each function takes an optional parameter that defines the duration of the animation (in milliseconds). This allows you to control how fast or slow the animation happens.
Creating Custom Animations with .animate()
If you want more control over your animations, you can use jQuery’s .animate() method. This method allows you to animate CSS properties, such as width, height, opacity, and more.
// Custom animation to increase width and opacity
$('#myElement').animate({
    width: '300px',
    opacity: 0.5
}, 1500);  // Animate over 1.5 seconds
In this example, the width of the element will expand to 300px, and the opacity will decrease to 0.5 over 1.5 seconds.
Chaining Animations
jQuery allows you to chain multiple animations together, ensuring they execute in sequence. This keeps your code clean and readable.
// Chaining animations together
$('#myElement').fadeOut(500).slideDown(1000).fadeIn(500);
Here, the element will fade out, slide down, and then fade back in, creating a smooth sequence of effects.
Handling Animation Callbacks
Animations are asynchronous, meaning they take place over time. If you want to run some code after an animation completes, you can use a callback function. This ensures that the next action happens only after the animation is done.
// Animation with a callback
$('#myElement').fadeOut(1000, function() {
    alert('Animation complete!');
});
In this example, once the fade-out animation is finished, an alert message will appear.
Adding Easing for Smoother Animations
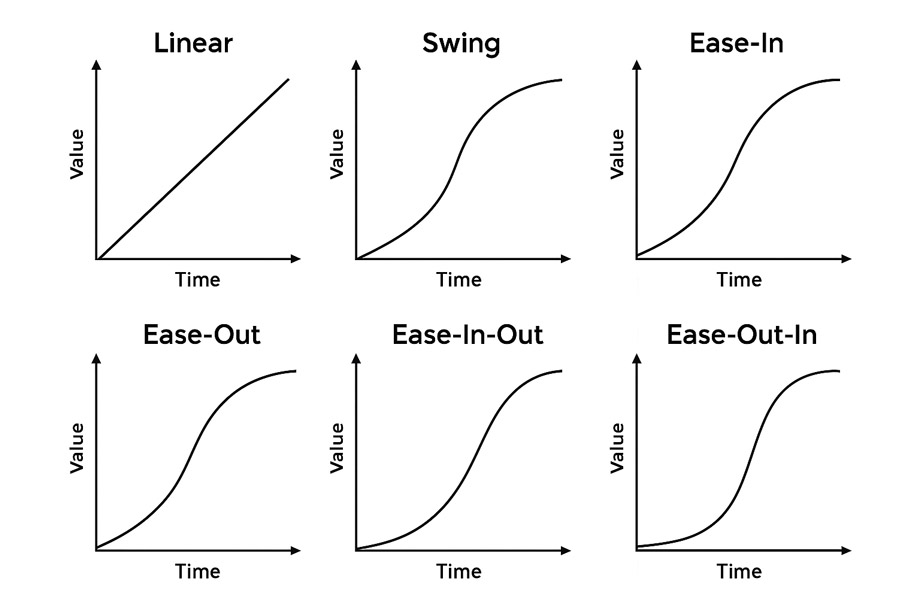
Easing functions allow you to control how the animation progresses over time. Instead of animating at a constant speed, easing defines acceleration and deceleration curves to make motion feel more natural and responsive.
jQuery includes two default easing options: linear, which moves at a constant pace, and swing (the default), which accelerates at the beginning and decelerates toward the end.
You can also integrate additional easing functions using jQuery UI or external easing libraries. The following diagram illustrates how common easing functions behave over time:

// Animate with easing
$('#myElement').animate({
    width: '300px',
    opacity: 0.5
}, 1500, 'swing');  // 'swing' creates a smooth easing effect
In this example, the animation begins slowly, accelerates, then eases into the final state. The choice of easing function significantly affects the feel of your interface, making transitions more intuitive and engaging.
Stopping and Queuing Animations
jQuery also provides methods to stop or queue animations. This is particularly useful when you want to control the flow of animations based on user interactions.
// Stopping an ongoing animation
$('#myElement').stop();  // Stops the current animation in its tracks

// Queuing animations for smoother transitions
$('#myElement').slideUp(500).delay(500).slideDown(500);
The .stop() method will immediately halt an animation, while .delay() can be used to pause between animations, adding smooth transitions to your website.
Combining jQuery and CSS for Optimal Performance
While jQuery animations are easy to use, combining them with CSS animations can improve performance, especially for complex effects like transform or opacity transitions. For example, you can use CSS for smooth transitions and jQuery for triggering the effects.
// Triggering CSS animation using jQuery
$('#myElement').on('click', function() {
    $(this).addClass('animate-class');
});
This approach helps offload heavier animations to CSS, making them faster and more efficient.
Performance Considerations
Although jQuery animations are easy to implement, they can sometimes be less efficient than CSS animations, especially on mobile devices where performance is crucial. To maintain optimal performance, follow these tips:
- Use
.stop()to avoid animation buildup if a user triggers the animation repeatedly. - Avoid animating layout-heavy properties like
widthorheightunless necessary. Instead, animate properties likeopacityortransform, which are lighter for the browser. - CSS animations are often GPU-accelerated, making them more efficient on mobile devices.
- For highly complex animations, consider using JavaScript libraries like GSAP for smoother and more efficient performance.
Conclusion
jQuery makes it easy to animate elements on your website, allowing you to create engaging, interactive experiences for your users. From simple effects like fading and sliding to more complex custom animations, jQuery gives you the tools to bring your web pages to life.
Although CSS animations are generally more efficient, especially on modern browsers and devices, jQuery remains a versatile and accessible tool for developers seeking quick and effective animation solutions.
Try out the methods covered in this tutorial to enhance your web projects with dynamic, smooth animations!


